【ESP32学习笔记】-- OTA升级(适用Arduino、PlatformIO)+ 完整代码
这段时间用esp32+PlatformIO做了一个桌面时钟,考虑到以后作为礼物送给朋友,所以考虑增加一个OTA功能,以便他们升级固件。在网上搜索了一遍相关资料,发现有很多这类教程,但是很多文章中分享的代码有bug,并不能用,于是又摸索了一段时间,找到了代码中的bug,并进行了优化,现在拿出来分享给大家。
【ESP32学习笔记】-- OTA升级(适用Arduino、PlatformIO)+ 完整代码
1、背景
这段时间用esp32+PlatformIO做了一个桌面时钟,考虑到以后作为礼物送给朋友,所以考虑增加一个OTA功能,以便他们升级固件。在网上搜索了一遍相关资料,发现有很多这类教程,但是很多文章中分享的代码有bug,并不能用,于是又摸索了一段时间,找到了代码中的bug,并进行了优化,现在拿出来分享给大家。
2、OTA功能实现
本人使用的是web页面的方式,也就是esp32作为wifi,并生成一个web页面,通过手机连接esp32的wifi,并在web页面上传固件,实现OTA升级。废话不多说,接下我们结合代码进行讲解,分析这个OTA的实现过程。
3、代码讲解
3.1 开启wifi
esp32要作为wifi,就得配置为AP模式
    WiFi.mode(WIFI_AP);
    WiFi.softAP("esp32");
    Serial.println(WiFi.softAPIP());		//打印IP地址
3.2 设计html页面
我们需要设计一个html页面,实现对固件的上传。对于只接触过C语言的小伙伴来说,html会显得比较陌生,不过没关系,这里附上一个学习教程:菜鸟html教程和菜鸟html在线编辑器,多看看,多练习练习就能上手了。
<!DOCTYPE html>
<html lang="en">
<head>
    <meta charset="UTF-8">
    <meta name="viewport" content="width=device-width, initial-scale=1.0">
    <title>ESP32 Firmware Update</title>
    <style>
        body {
            font-family: Arial, sans-serif;
            margin: 50px;
        }
        .upload-container {
            max-width: 400px;
            margin: 0 auto;
            text-align: center;
        }
        .upload-btn {
            margin-top: 20px;
            padding: 10px 20px;
            background-color: #007bff;
            color: white;
            border: none;
            border-radius: 5px;
            cursor: pointer;
        }
        .upload-btn:hover {
            background-color: #0056b3;
        }
    </style>
</head>
<body>
    <div class="upload-container">
        <h1>ESP32 固件更新</h1>
        <input type="file" id="firmwareFile" accept=".bin">
        <button class="upload-btn" onclick="uploadFirmware()">上传固件</button>
        <p id="status"></p>
    </div>

    <script>
        function uploadFirmware() {
            const fileInput = document.getElementById('firmwareFile');
            const status = document.getElementById('status');

            if (fileInput.files.length === 0) {
                status.textContent = "Please select a firmware file.";
                return;
            }

            const file = fileInput.files[0];
            const formData = new FormData();
            formData.append("firmware", file);

            status.textContent = "上传中...";

            fetch("/upload-firmware", {
                method: "POST",
                body: formData
            })
            .then(response => {
                if (response.ok) {
                    status.textContent = "上传成功!";
                } else {
                    status.textContent = "上传失败.";
                }
            })
            .catch(error => {
                status.textContent = "Error: " + error.message;
            });
        }
    </script>
</body>
</html>
3.3 开启web服务
有了wifi,有了html页面,接下来就需要开启web服务,也就是esp32作为一个服务器,手机才能去访问它。再举个例子,新买的路由器,需要配置wifi密码时,是不是要登录192.168.0.1进入一个页面进行配置,这一步就是让esp32实现这样的一个功能。
3.3.1 声明一个web服务器类
AsyncWebServer serverOta(80);
3.3.2 将html挂载到web服务器上
    serverOta.on("/", HTTP_GET, [](AsyncWebServerRequest *request) {//web服务接收
        request->send(200, "text/html", update_html);
    });
    serverOta.on("/upload-firmware", HTTP_POST, [](AsyncWebServerRequest *request){        //OTA升级
        request->send(200, "text/plain", (Update.hasError()) ? "FAIL" : "OK");
        ESP.restart();
    },[](AsyncWebServerRequest *request, String filename, size_t index, uint8_t *data, size_t len, bool final){
        if(!index){
        Serial.printf("Update Start: %s\n", filename.c_str());
        Update.begin(UPDATE_SIZE_UNKNOWN);
        }
        if(Update.write(data, len) != len){
        Update.printError(Serial);
        }
        if(final){
        if(Update.end(true)){
            Serial.printf("Update Success: %uB\n", index+len);
        } else {
            Update.printError(Serial);
        }
        }
    });

    serverOta.begin();
到此,我们就实现了一个完整的OTA功能。
4、运行
代码写好了,接下来我们来看看运行效果。
4.1 串口打印
烧录进esp32后,打开esp32的串口,会打印出esp32的IP地址。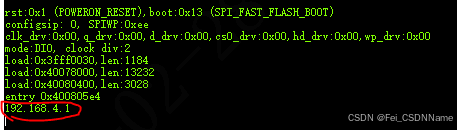
4.2 连接esp32
手机打开wifi,会搜索到一个名为esp32的wifi,连接上去,注意,手机连上后会检测wifi是否有网络,无网络手机会弹出是否保持连接,这时一定要选择保持连接,否则会无法访问esp32的页面
4.3 登录esp32
连上esp32 wifi后,手机打开任意一个浏览器,输入4.1步的IP地址进行访问。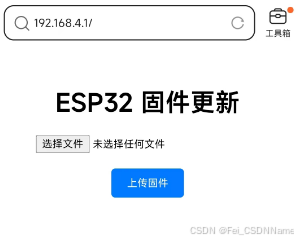
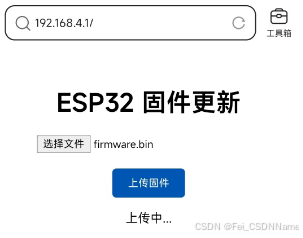
4.4 上传固件
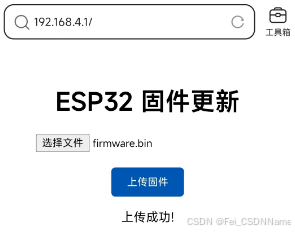
4.5 上传成功
5、完整代码
#include <WiFi.h>
#include <WiFiClient.h>
#include <ESPAsyncWebServer.h>
#include <ESPmDNS.h>
#include <Update.h>

//variabls for blinking an LED with Millis
const int led = 2; // ESP32 Pin to which onboard LED is connected
unsigned long previousMillis = 0;  // will store last time LED was updated
const long interval = 1000;  // interval at which to blink (milliseconds)
int ledState = LOW;  // ledState used to set the LED

AsyncWebServer serverOta(80);

const char update_html[] PROGMEM = R"rawliteral(
<!DOCTYPE html>
<html lang="en">
<head>
    <meta charset="UTF-8">
    <meta name="viewport" content="width=device-width, initial-scale=1.0">
    <title>ESP32 Firmware Update</title>
    <style>
        body {
            font-family: Arial, sans-serif;
            margin: 50px;
        }
        .upload-container {
            max-width: 400px;
            margin: 0 auto;
            text-align: center;
        }
        .upload-btn {
            margin-top: 20px;
            padding: 10px 20px;
            background-color: #007bff;
            color: white;
            border: none;
            border-radius: 5px;
            cursor: pointer;
        }
        .upload-btn:hover {
            background-color: #0056b3;
        }
    </style>
</head>
<body>
    <div class="upload-container">
        <h1>ESP32 固件更新</h1>
        <input type="file" id="firmwareFile" accept=".bin">
        <button class="upload-btn" onclick="uploadFirmware()">上传固件</button>
        <p id="status"></p>
    </div>

    <script>
        function uploadFirmware() {
            const fileInput = document.getElementById('firmwareFile');
            const status = document.getElementById('status');

            if (fileInput.files.length === 0) {
                status.textContent = "Please select a firmware file.";
                return;
            }

            const file = fileInput.files[0];
            const formData = new FormData();
            formData.append("firmware", file);

            status.textContent = "上传中...";

            fetch("/upload-firmware", {
                method: "POST",
                body: formData
            })
            .then(response => {
                if (response.ok) {
                    status.textContent = "上传成功!";
                } else {
                    status.textContent = "上传失败.";
                }
            })
            .catch(error => {
                status.textContent = "Error: " + error.message;
            });
        }
    </script>
</body>
</html>
)rawliteral";

/* setup function */
void setup(void)
{
    pinMode(led,  OUTPUT);
    Serial.begin(115200);
    WiFi.mode(WIFI_AP);
    WiFi.softAP("esp32");
    Serial.println(WiFi.softAPIP());

    serverOta.on("/", HTTP_GET, [](AsyncWebServerRequest *request) {//web服务接收
        request->send(200, "text/html", update_html);
    });
    serverOta.on("/upload-firmware", HTTP_POST, [](AsyncWebServerRequest *request){        //OTA升级
        request->send(200, "text/plain", (Update.hasError()) ? "FAIL" : "OK");
        ESP.restart();
    },[](AsyncWebServerRequest *request, String filename, size_t index, uint8_t *data, size_t len, bool final){
        if(!index){
        Serial.printf("Update Start: %s\n", filename.c_str());
        Update.begin(UPDATE_SIZE_UNKNOWN);
        }
        if(Update.write(data, len) != len){
        Update.printError(Serial);
        }
        if(final){
        if(Update.end(true)){
            Serial.printf("Update Success: %uB\n", index+len);
        } else {
            Update.printError(Serial);
        }
        }
    });

    serverOta.begin();
}

void loop(void)
{
    // serverOta.handleClient();
    delay(1);

    //loop to blink without delay
    unsigned long currentMillis = millis();
    if (currentMillis - previousMillis >= interval) {
        // save the last time you blinked the LED
        previousMillis = currentMillis;
        // if the LED is off turn it on and vice-versa:
        ledState = not(ledState);
        // set the LED with the ledState of the variable:
        digitalWrite(led,  ledState);
    }

}
6、结尾
本章内容到此结束啦,若本文对你有帮助或是你觉得不错的话,能否点个赞呢!
咱们下期再见!

智能硬件社区聚焦AI智能硬件技术生态,汇聚嵌入式AI、物联网硬件开发者,打造交流分享平台,同步全国赛事资讯、开展 OPC 核心人才招募,助力技术落地与开发者成长。
更多推荐


 29
29 0
0- 0


 已为社区贡献3条内容

所有评论(0)