[Example][Basic] - TC3XX 启动流程
TC397 启动流程
关键词:
TC397 启动流程;TC397 系统初始化
简介:
本篇研究 TriCore 上电后,系统执行的一系列初始化流程,关注 CPU 相关寄存器的初始值如何设置,中断向量表的加载地址,系统内存的划分,以及如何运行至用户函数 core0_main()
目录
3.__StartUpSoftware_Phase3PowerOnResetPath()
7.1.使能程序缓存 - Program Cache Enable
7.2.使能数据缓存 - Data Cache Enable
TriCore 裸机驱动在执行 main() 函数前需要对硬件系统进行初始化,在该阶段配置时钟、电源、内核寄存器等基本模块,并配置 C 运行环境
启动流程中的部分工作依靠汇编完成,这些汇编指令通过宏进行包装,使其看起来更像是函数调用(增加可读性)
本篇将该阶段的工作称为预初始化阶段,每个阶段的大致工作如下:
-
__StartUpSoftware():初始化全局地址寄存器 A1、初始化程序状态寄存器 PSW(允许对一些内核寄存器进行读写);
-
__StartUpSoftware_Phase2():初始化电源管理系统 PMS、电源自检;
-
__StartUpSoftware_Phase3PowerOnResetPath():初始化上下文,将用户栈的地址保存至 A10 栈指针寄存器、将上下文区域的起始地址保存至空闲上下文链表寄存器 FCX;
-
__StartUpSoftware_Phase4():初始化时钟系统(时钟控制单元 Clock Control Unit,CCU);
-
__StartUpSoftware_Phase5():检查安全管理单元 SMU;
-
__StartUpSoftware_Phase6():启动 CPU 内核;
-
__Core0_start():多核启动、初始化 C 运行环境、跳转至 CPU0 的 core0_main() 函数开始执行用户程序;
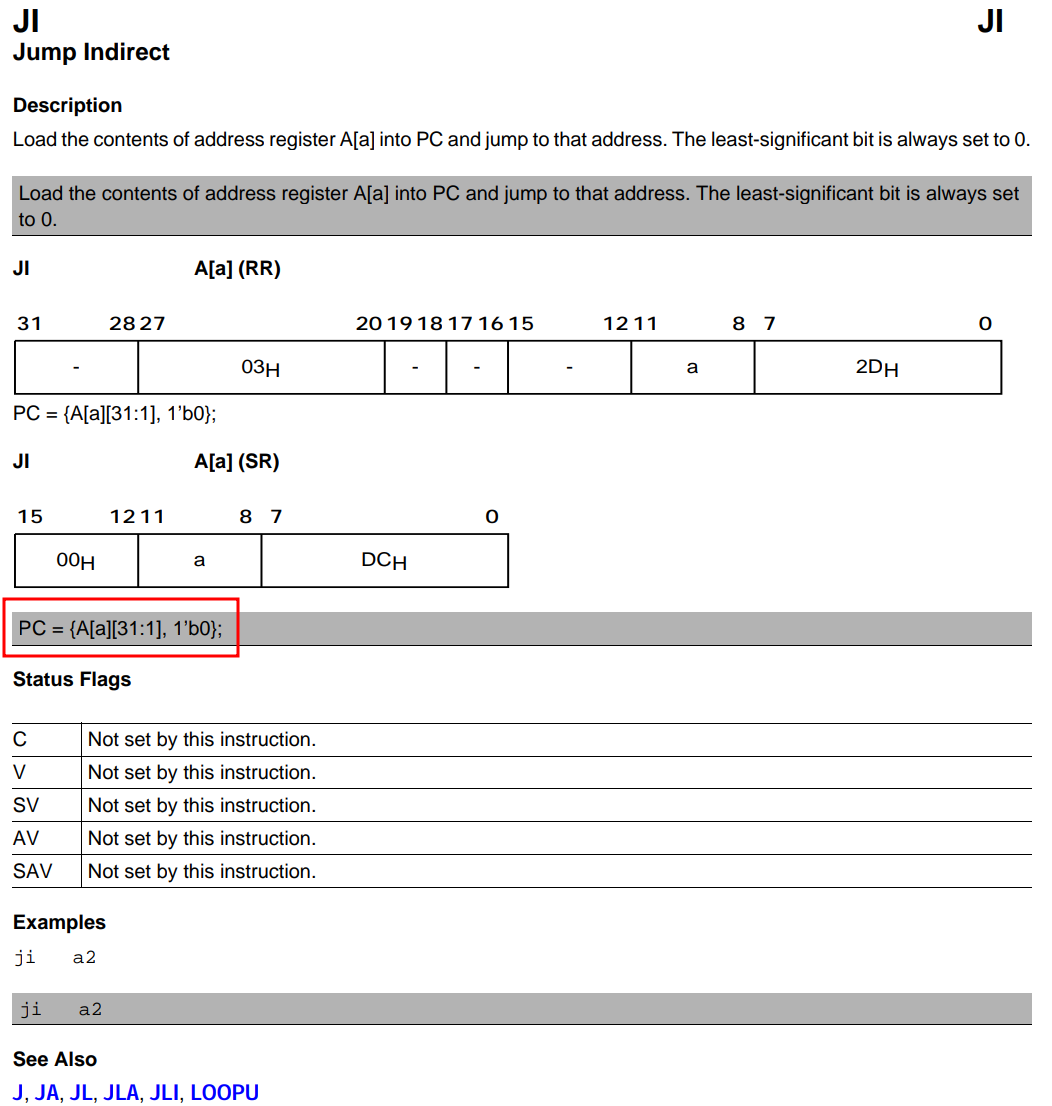
预初始化流程中,通过 Ifx_Ssw_jumpToFunction() 实现函数跳转,其本质是一条 JI 直接跳转指令:
// Libraries/Infra/Ssw/TC39B/Tricore/Ifx_Ssw_Tc0.c
static void __StartUpSoftware(void)
{
...
Ifx_Ssw_jumpToFunction(__StartUpSoftware_Phase2);
----------------------------------------------------------
// Libraries/Infra/Ssw/TC39B/Tricore/Ifx_Ssw_CompilersGcc.h
IFX_SSW_INLINE void Ifx_Ssw_jumpToFunction(void (*fun)(void))
{
__asm__ volatile ("ji %0" ::"a" (fun));
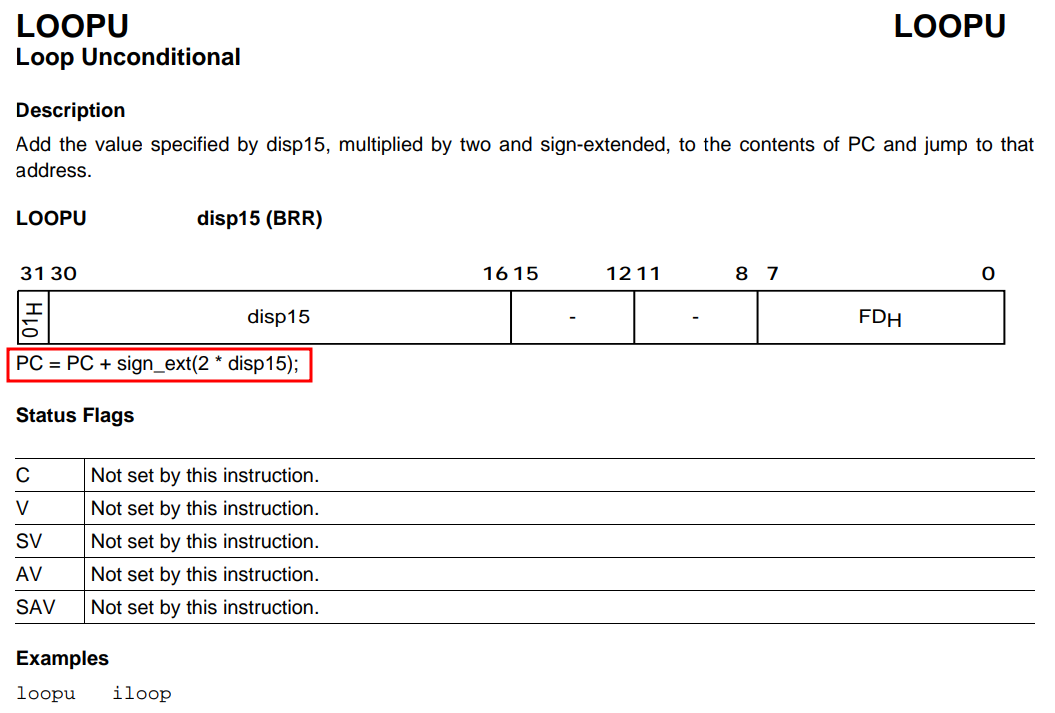
}Ifx_Ssw_jumpToFunction() 通过 JI 指令直接跳转至 fun 所在的地址,即将 PC 指针指向 fun,JI 指令的描述如下:
启动位置
TriCore 的链接文件中,指定启动位置为 _START:
// Lcf_Gnuc_Tricore_Tc.lsl
OUTPUT_FORMAT("elf32-tricore")
OUTPUT_ARCH(tricore)
ENTRY(_START) // 启动位置
_START 的地址为 0xa0000000,对应 CPU0 的起始指令地址,即 CPU0 的 PC 指针从该地址开始取指令执行:
// Lcf_Gnuc_Tricore_Tc.lsl
LCF_STARTPTR_NC_CPU0 = 0xA0000000;
...
RESET = LCF_STARTPTR_NC_CPU0;
...
    /*Fixed memory Allocations for _START*/
    CORE_ID = GLOBAL ;
    SECTIONS
    {
        .start_tc0 (LCF_STARTPTR_NC_CPU0) : FLAGS(rxl) { KEEP (*(.start)); } > pfls0_nc
        ...
        PROVIDE(__START0 = LCF_STARTPTR_NC_CPU0);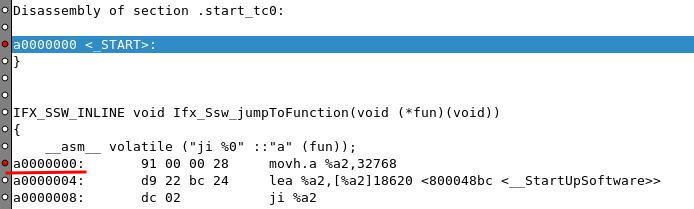
0xa0000000 为 Program Flash Non-Cached 的起始地址:

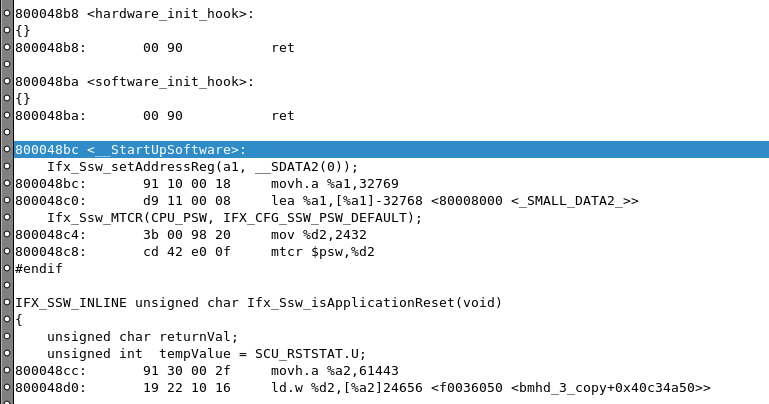
_START 仅进行一次跳转,预初始化流程实际从 __StartUpSoftware() 开始:
// Libraries/Infra/Ssw/TC39B/Tricore/Ifx_Ssw_Tc0.c
void _START(void)
{
    Ifx_Ssw_jumpToFunction(__StartUpSoftware);
}
1.__StartUpSoftware()
该阶段初始化 A1 全局地址寄存器和 PSW 程序状态寄存器:
// Libraries/Infra/Ssw/TC39B/Tricore/Ifx_Ssw_Tc0.c
static void __StartUpSoftware(void)
{
--------------------------------------------------------------------------------------
    // 初始化 A1 全局地址寄存器
    /* Initialize A1 pointer to use the global constants with small data addressing */
    Ifx_Ssw_setAddressReg(a1, __SDATA2(0));
--------------------------------------------------------------------------------------

--------------------------------------------------------------------------------------
    // 初始化程序状态寄存器 PSW
    /* Set the PSW to its reset value in case of a warm start,clear PSW.IS */
    Ifx_Ssw_MTCR(CPU_PSW, IFX_CFG_SSW_PSW_DEFAULT);
--------------------------------------------------------------------------------------

--------------------------------------------------------------------------------------
    // 检查软件重启 or 电源重启
    /* This phase is executed only if last reset is not of type application reset */
    if (Ifx_Ssw_isApplicationReset() != 1)
    {
        Ifx_Ssw_jumpToFunction(__StartUpSoftware_Phase2);
    }
    else
    {
        Ifx_Ssw_jumpToFunction(__StartUpSoftware_Phase3ApplicationResetPath);
    }
}
1.1.全局地址寄存器 A1
// Libraries/Infra/Ssw/TC39B/Tricore/Ifx_Ssw_Tc0.c
static void __StartUpSoftware(void)
{
// 初始化 A1 全局地址寄存器
/* Initialize A1 pointer to use the global constants with small data addressing */
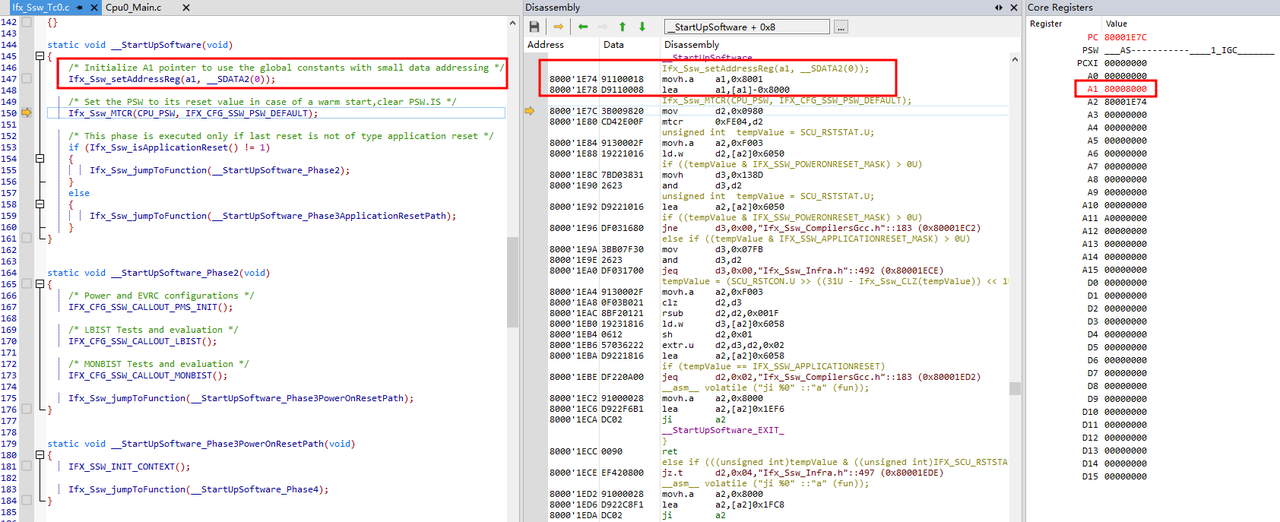
Ifx_Ssw_setAddressReg(a1, __SDATA2(0));Ifx_Ssw_setAddressReg() 封装了 MOVH.A 和 LEA 两条指令,通过这两条指令分别设置 A1 寄存器的高 16 位和低 16 位:
// Libraries/Infra/Ssw/TC39B/Tricore/Ifx_Ssw_CompilersGcc.h
#define Ifx_Ssw___setAddressReg(aReg, val) \
{__asm__ volatile ("movh.a\t %"#aReg ", hi:("#val ")\n\tlea\t %"#aReg ",[%"#aReg "] lo:("#val ")"); }
---------------------------------------------------------------------------
// Libraries/Infra/Ssw/TC39B/Tricore/Ifx_Ssw_CompilersGcc.h
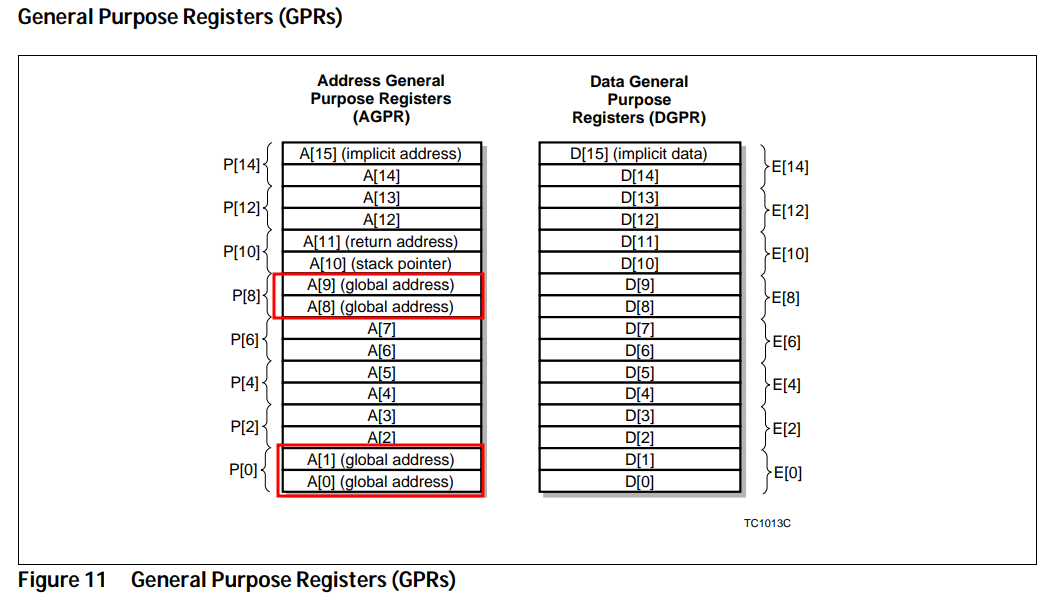
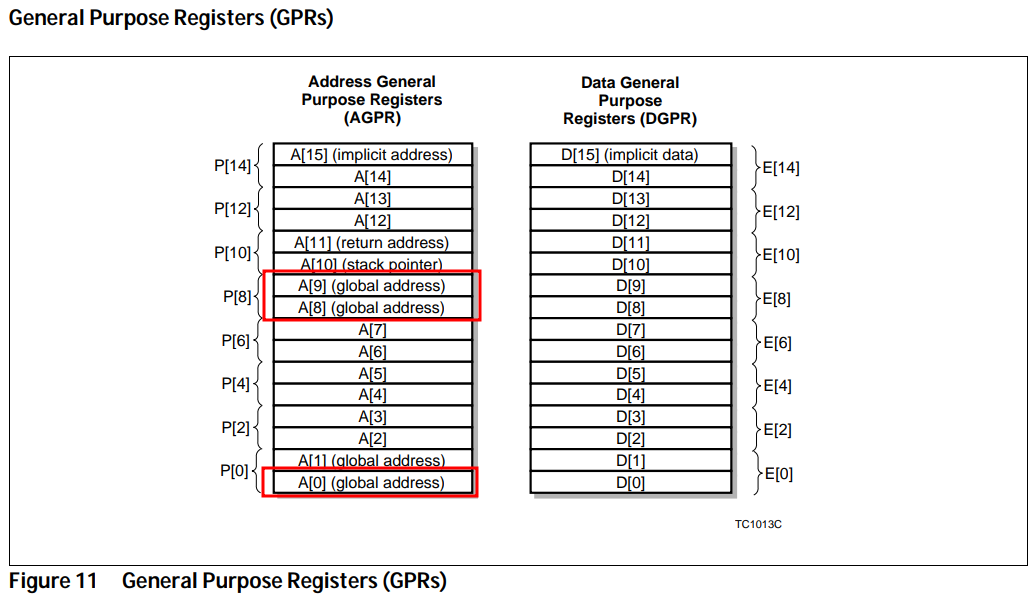
#define Ifx_Ssw_setAddressReg(regNum, val) Ifx_Ssw___setAddressReg(regNum, val)TriCore 架构中,A1 为全局地址寄存器,同样的还有 A0、A8、A9,这几个全局地址寄存器中的内容不受函数调用、Trap 或中断的影响:
__SDATA2() 中存储的是 A1 寄存器的初始值 __A1_MEM:
// Libraries/Infra/Platform/Tricore/Compilers/CompilerGcc.h
#define __SDATA2(cpu)      __A1_MEM
__A1_MEM 在链接文件中的定义如下:
// Lcf_Gnuc_Tricore_Tc.lsl
SECTIONS
{
    /*Relative A1 Addressable Const, selectable with patterns and user defined sections*/
    /*Note: A1 addressable area is common, to make the functions callable in any CPU*/
    /*Relative A1 Addressable Const, selectable by toolchain*/
    CORE_SEC(.sdata2) : FLAGS(arsl)
    {
        *(.srodata)
        *(.srodata.*)
    } > default_rom
    _SMALL_DATA2_ = SIZEOF(CORE_SEC(.sdata2)) ? ADDR(CORE_SEC(.sdata2)) : (ADDR(CORE_SEC(.sdata2)) & 0xF0000000) + 32k ;
    __A1_MEM = _SMALL_DATA2_;
}
其中,.sdata2 用于存放 A1 地址寄存器的初始值,判断该地址中是否存在数据,如果有则使用其中的值初始化 A1 寄存器
如果没有则获取 .sdata2 的地址(代码段的起始地址 0x80000000)并加上 32K 大小(0x8000),将该值(0x80008000)写入 A1 寄存器
default_rom 的起始地址为 0x80000000,对应 PFlash(Program Flash Cached),大小为 3M 字节:
// Lcf_Gnuc_Tricore_Tc.lsl
MEMORY
{
    ...
    pfls0 (rx!p): org = 0x80000000, len = 3M
-----------------------------------------------

// Lcf_Gnuc_Tricore_Tc.lsl
REGION_ALIAS( default_ram , dsram0)
REGION_ALIAS( default_rom , pfls0)
综上,将 A1 地址寄存器的值设置为 0x80008000:
1.2.程序状态寄存器 PSW
// Libraries/Infra/Ssw/TC39B/Tricore/Ifx_Ssw_Tc0.c
static void __StartUpSoftware(void)
{
    ...
    /* Set the PSW to its reset value in case of a warm start,clear PSW.IS */
    Ifx_Ssw_MTCR(CPU_PSW, IFX_CFG_SSW_PSW_DEFAULT);
Ifx_Ssw_MTCR() 调用 MTCR 指令,将值写入核心寄存器:
// Libraries/Infra/Ssw/TC39B/Tricore/Ifx_Ssw_CompilersGcc.h
#define Ifx_Ssw_MTCR(reg, val) __mtcr(reg, val);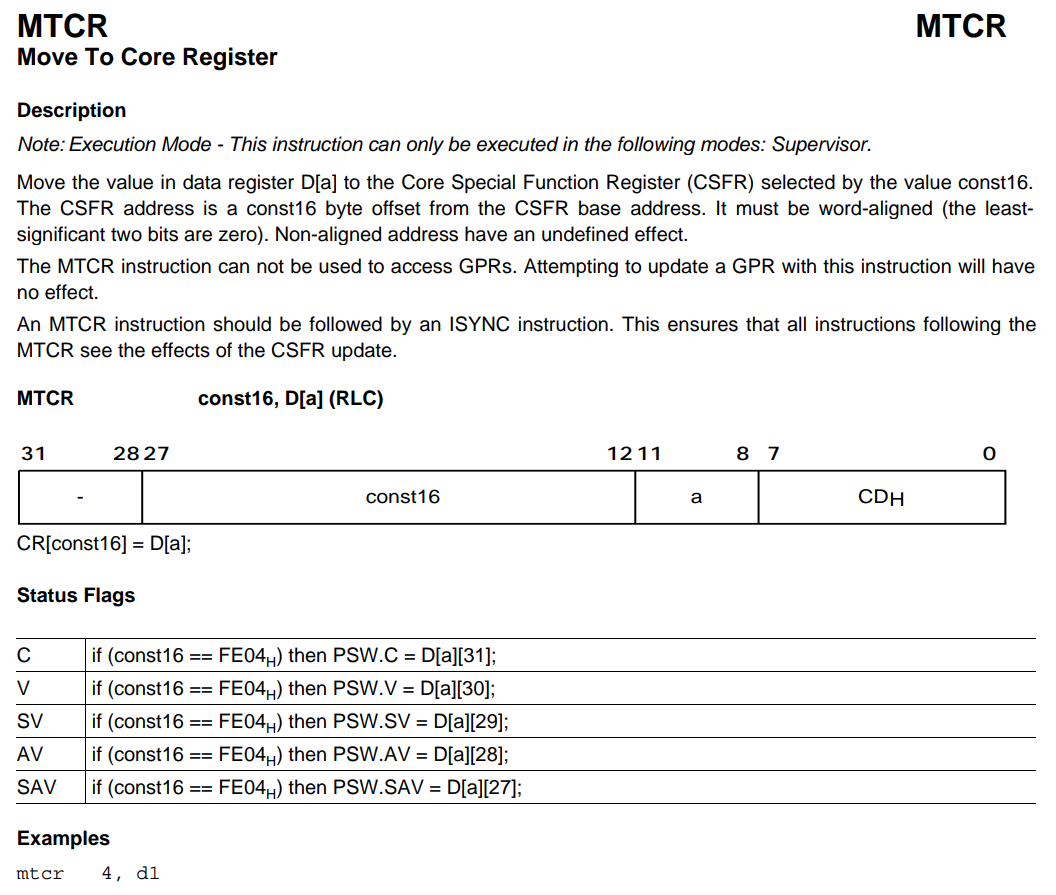
这里需要注意的是,TriCore 的部分核心寄存器不能使用 MOV/LD 等普通指令读写,只能通过 MTCR/MFCR 指令读写
写入 PSW 的初始值 IFX_CFG_SSW_PSW_DEFAULT = 0x00000980:
// Libraries/Infra/Ssw/TC39B/Tricore/Ifx_Ssw.h
#define IFX_CFG_SSW_PSW_DEFAULT     (0x00000980u)
该初始值的含义如下:
-
PSW.IO [11:10] 设置为 1 0,切换至 Supervisor 模式,该模式下允许修改所有核心寄存器和受保护的外设寄存器;
-
PSW.CDE [7:7] 设置为 1,使能调用深度计数;
综上,初始化 PSW 寄存器的目的在于使能所有寄存器的读写,并使能调用深度计数(为后续的上下文初始化做准备)
1.3.判断软件/电源重启
// Libraries/Infra/Ssw/TC39B/Tricore/Ifx_Ssw_Tc0.c
static void __StartUpSoftware(void)
{
    ...
    /* This phase is executed only if last reset is not of type application reset */
    if (Ifx_Ssw_isApplicationReset() != 1)
    {
        Ifx_Ssw_jumpToFunction(__StartUpSoftware_Phase2);
    }
    else
    {
        Ifx_Ssw_jumpToFunction(__StartUpSoftware_Phase3ApplicationResetPath);
    }
}
Ifx_Ssw_isApplicationReset() 读取系统控制单元 SCU 的 RSTCON 寄存器,判断是电源重启还是软件重启:
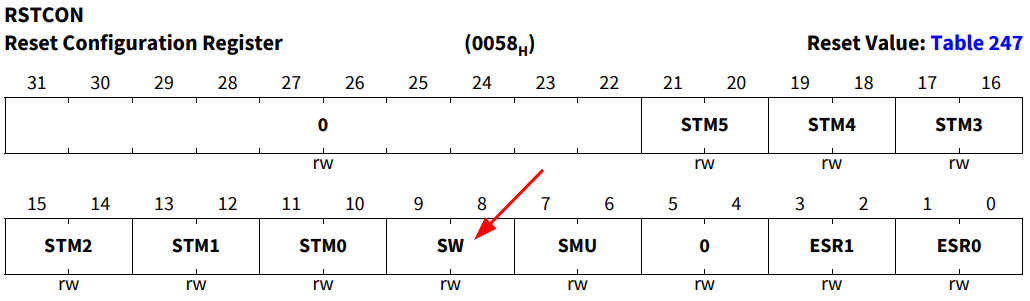
两者的区别在于,如果是软件重启则无需再初始化电源和时钟系统,本篇分析完整的电源重启流程,因此程序跳转至 __StartUpSoftware_Phase2() 执行
2.__StartUpSoftware_Phase2()
由于 LBIST 和 MONBIST 均未定义,因此阶段二实际只初始化电源管理系统 PMS:
// Libraries/Infra/Ssw/TC39B/Tricore/Ifx_Ssw_Tc0.c
static void __StartUpSoftware_Phase2(void)
{
    /* Power and EVRC configurations */
    IFX_CFG_SSW_CALLOUT_PMS_INIT();

    /* LBIST Tests and evaluation */
    IFX_CFG_SSW_CALLOUT_LBIST(); // 软件定义 IFX_CFG_SSW_ENABLE_LBIST 默认为空,不会执行这步

    /* MONBIST Tests and evaluation */
    IFX_CFG_SSW_CALLOUT_MONBIST(); // 软件定义 IFX_CFG_SSW_ENABLE_MONBIST 默认为空,不会执行这步

    Ifx_Ssw_jumpToFunction(__StartUpSoftware_Phase3PowerOnResetPath);
}
备注:LBIST 和 MONBIST 均为电路内部的自检系统
PMS 的初始化流程分为两部分:
-
Ifx_Ssw_Pms_Init():PMS 初始化;
-
Ifx_Ssw_Pms_InitCheck():检查 PMS 初始化是否成功;
// Configurations/Ifx_Cfg_Ssw.h
#define IFX_CFG_SSW_CALLOUT_PMS_INIT() \
{ \
Ifx_Ssw_jumpToFunctionWithLink(&Ifx_Ssw_Pms_Init); \
IFX_CFG_SSW_CALLOUT_PMS_CHECK(); \
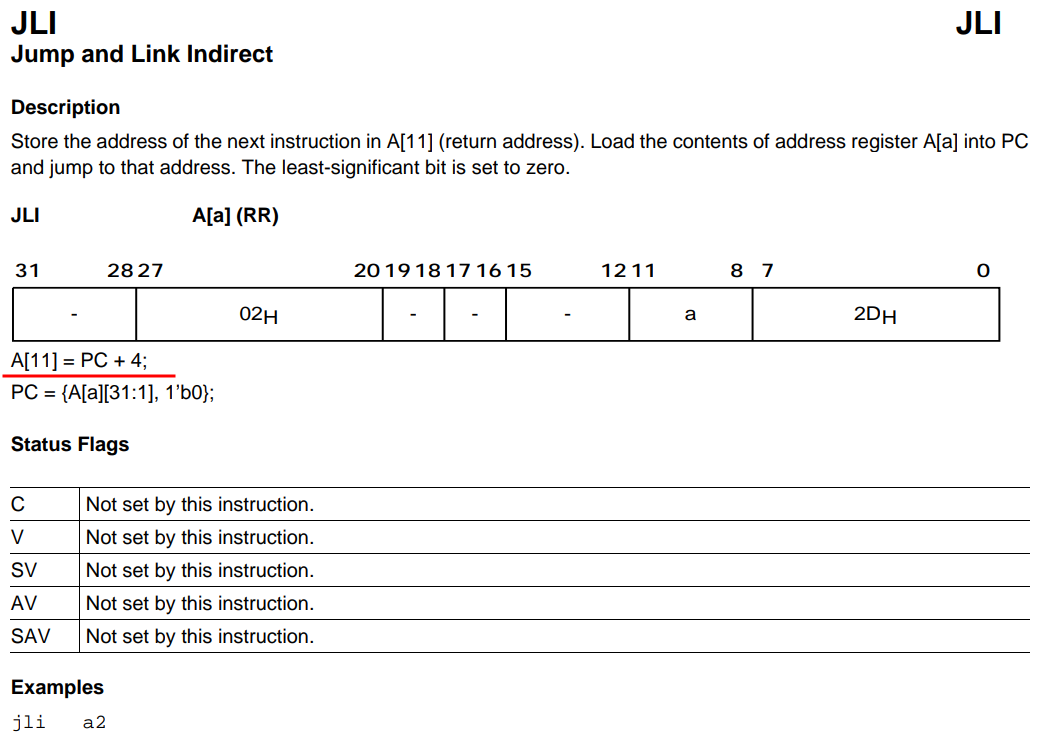
}注意,PMS 初始化函数由 Ifx_Ssw_jumpToFunctionWithLink() 调用,该调用实质为 JLI 指令,JLI 指令先记录当前下一条指令的地址(将下一条指令的地址存储至 A11 返回地址寄存器中),然后再跳转至目标地址处执行,当目标地址的指令执行结束后,会返回 A11 中存储的地址处执行:
2.1.初始化电源管理系统 PMS
// Configurations/Ifx_Cfg_Ssw.c
void Ifx_Ssw_Pms_Init(void)
{
    if (IfxPmsEvr_runInitSequence(&IfxPmsEvr_cfgSequenceDefault) == 0)
    {
        __debug();
        /* Application may have call to error handling here */
    }

    Ifx_Ssw_jumpBackToLink();
}
PMS 的初始化流程分为 3 个阶段,每个阶段初始化 1 组寄存器,这些寄存器组如下所示:
// Libraries/iLLD/TC39B/Tricore/Pms/Std/IfxPmsEvr.c
IFX_CONST IfxPmsEvr_StepDownRegulatorRegConfig IfxPmsEvr_cfgPhase1Default[] = {
    {&PMS_EVRSDCOEFF6.U, (0x00873802U), (0xFFFFFFFFU)},
    {&PMS_EVRSDCOEFF7.U, (0x0000D066U), (0xFFFFFFFFU)},
    {&PMS_EVRSDCOEFF8.U, (0x00073802U), (0xFFFFFFFFU)},
    {&PMS_EVRSDCOEFF9.U, (0x00009826U), (0xFFFFFFFFU)},
    {&PMS_EVRSDCTRL7.U,  (0x000000C9U), (0xFFFFFFFFU)},
    {&PMS_EVRSDCTRL0.U,  (0x30360001U), (0xFFFFFFFFU)},
    {&PMS_EVRSDCTRL1.U,  (0x0B690708U), (0xFFFFFFFFU)},
    {&PMS_EVRSDCTRL8.U,  (0x0121048EU), (0xFFFFFFFFU)},
};
----------------------------------------------------------------------------------

// Libraries/iLLD/TC39B/Tricore/Pms/Std/IfxPmsEvr.c
IFX_CONST IfxPmsEvr_StepDownRegulatorRegConfig IfxPmsEvr_cfgPhase2Default[] = {
    {&PMS_EVRSDCOEFF0.U, (0x350873B6U), (0xFFFFFFFFU)},
    {&PMS_EVRSDCOEFF1.U, (0x02946C46U), (0xFFFFFFFFU)},
};
----------------------------------------------------------------------------------

// Libraries/iLLD/TC39B/Tricore/Pms/Std/IfxPmsEvr.c
IFX_CONST IfxPmsEvr_StepDownRegulatorRegConfig IfxPmsEvr_cfgPhase3Default[] = {
    {&PMS_EVRSDCTRL0.U,  (0x30360002U), (0xFFFFFFFFU)},
    {&PMS_EVRSDCTRL2.U,  (0x0036033BU), (0xFFFFFFFFU)},
    {&PMS_EVRSDCTRL3.U,  (0x0B690810U), (0xFFFFFFFFU)},
    {&PMS_EVRSDCOEFF2.U, (0x3408710EU), (0xFFFFFFFFU)},
    {&PMS_EVRSDCOEFF3.U, (0x02946C44U), (0xFFFFFFFFU)},
    {&PMS_EVRSDCTRL4.U,  (0x00360009U), (0xFFFFFFFFU)},
    {&PMS_EVRSDCTRL5.U,  (0x0B690808U), (0xFFFFFFFFU)},
    {&PMS_EVRSDCTRL6.U,  (0x00231C94U), (0xFFFFFFFFU)},
    {&PMS_EVRSDCOEFF4.U, (0x1B0822B6U), (0xFFFFFFFFU)},
    {&PMS_EVRSDCOEFF5.U, (0x02946C46U), (0xFFFFFFFFU)},
    {&PMS_EVRSDCTRL9.U,  (0x00000434U), (0xFFFFFFFFU)},
    {&PMS_EVRSDCTRL10.U, (0x00005A82U), (0xFFFFFFFFU)},
    {&PMS_EVRSDCTRL11.U, (0x12070909U), (0xFFFFFFFFU)},
};
----------------------------------------------------------------------------------

// Libraries/iLLD/TC39B/Tricore/Pms/Std/IfxPmsEvr.c
IFX_CONST IfxPmsEvr_initSequencePhase          IfxPmsEvr_cfgPhasesDefault[] = {
    {
        sizeof(IfxPmsEvr_cfgPhase1Default) / sizeof(IfxPmsEvr_StepDownRegulatorRegConfig),
        IfxPmsEvr_cfgPhase1Default,
        (0.00002F)
    },
    {
        sizeof(IfxPmsEvr_cfgPhase2Default) / sizeof(IfxPmsEvr_StepDownRegulatorRegConfig),
        IfxPmsEvr_cfgPhase2Default,
        (0.00002F)
    },
    {
        sizeof(IfxPmsEvr_cfgPhase3Default) / sizeof(IfxPmsEvr_StepDownRegulatorRegConfig),
        IfxPmsEvr_cfgPhase3Default,
        (0.00002F)
    }
};
----------------------------------------------------------------------------------

// Libraries/iLLD/TC39B/Tricore/Pms/Std/IfxPmsEvr.c
IFX_CONST IfxPmsEvr_initSequence               IfxPmsEvr_cfgSequenceDefault = {
    sizeof(IfxPmsEvr_cfgPhasesDefault) / sizeof(IfxPmsEvr_initSequencePhase),
    IfxPmsEvr_cfgPhasesDefault
};
IfxPmsEvr_runInitSequence() 依次将初始值写入对应的 PMS 寄存器:
// Libraries/iLLD/TC39B/Tricore/Pms/Std/IfxPmsEvr.h
IFX_INLINE boolean IfxPmsEvr_runInitSequence(const IfxPmsEvr_initSequence *const sequence)
{
    ...
---------------------------------------------------------------------------------------
    // 检查内部稳压器是否已激活
    if (PMS_EVRSTAT.B.EVRC == 1U)
    {
---------------------------------------------------------------------------------------
        // 共 3 个阶段,每个阶段写入 1 组寄存器
        /*Loop through each configured phase*/
        for (phaseConfig = &sequence->phaseConfig[0];
             phaseConfig < &sequence->phaseConfig[sequence->numOfPhases];
             phaseConfig++)
        {
            IfxScuWdt_clearGlobalSafetyEndinitInline(endinitSfty_pw);
---------------------------------------------------------------------------------------
            // 依次将初始值写入寄存器
            /*Loop through each register which is configured in the phase configuration*/
            for (regConfig = &phaseConfig->regConfig[0];
                 regConfig < &phaseConfig->regConfig[phaseConfig->numOfRegisters];
                 regConfig++)
            {
                regVal  = (*((volatile uint32 *)regConfig->regAddr));
                regVal &= ~regConfig->mask;
                regVal |= regConfig->value;

                /** During normal running one must wait for the LCK bit.
                 * However, for this function, as this is used only with CPU0 startup no wait required
                 */
                (*((volatile uint32 *)regConfig->regAddr)) = regVal; /*Write to the physical register*/
            }
---------------------------------------------------------------------------------------
            // 向硬件发送寄存器更新请求(触发硬件更新寄存器)
            PMS_EVRSDCTRL0.B.UP = 1;
            IfxScuWdt_setGlobalSafetyEndinitInline(endinitSfty_pw);

            /* wait for the UP bit*/
            sint32 timeoutCount = IFXPMSEVR_CTRL_UP_WAIT_TIMEOUTCOUNT;
---------------------------------------------------------------------------------------
            // 等待硬件寄存器更新完成
            /*Now, wait for the UP bit at EVRSDCTRL0 is reset, which is to indicate the configurations are done*/
            do
            {
                if (--timeoutCount <= 0)
                {
                    pmsInitDone = FALSE;
                    break;
                }
            } while (PMS_EVRSDCTRL0.B.UP == 1); // 更新完成后,硬件自动将 UP 位置 0
---------------------------------------------------------------------------------------
            IfxPmsEvr_wait(phaseConfig->waitInSecs); // wait for configured time
        }
    }

    /*return the status*/
    return pmsInitDone;
}
如果初始化执行失败,会调用 DEBUG 指令触发一次 Debug Event:
// Configurations/Ifx_Cfg_Ssw.c
void Ifx_Ssw_Pms_Init(void)
{
    if (IfxPmsEvr_runInitSequence(&IfxPmsEvr_cfgSequenceDefault) == 0)
    {   // 如果初始化失败,则会调用 DEBUG 指令触发一次 Debug 事件
        __debug();
        /* Application may have call to error handling here */
    }
初始化结束后,通过 Ifx_Ssw_jumpBackToLink() 跳转回 A11 中保存的地址处执行:
// Configurations/Ifx_Cfg_Ssw.c
void Ifx_Ssw_Pms_Init(void)
{
    ...
    Ifx_Ssw_jumpBackToLink();
}
---------------------------------------------------------------------------------------

// Libraries/Infra/Ssw/TC39B/Tricore/Ifx_Ssw_CompilersGcc.h
IFX_SSW_INLINE void Ifx_Ssw_jumpBackToLink(void)
{
    __asm__ volatile ("ji %a11");
}
2.2.检查 PMS 初始化是否完成
PMS 初始化完成后,将寄存器中的值与 CheckValue 进行对比,检查是否正确写入,CheckValue 的定义如下:
// Libraries/iLLD/TC39B/Tricore/Pms/Std/IfxPmsEvr.c
IFX_CONST IfxPmsEvr_StepDownRegulatorRegConfig IfxPmsEvr_checkRegValuesDefault[] = {
    {&PMS_EVRSDCOEFF6.U, (0x00873802U), (0xFFFFFFFFU)},
    {&PMS_EVRSDCOEFF7.U, (0x0000D066U), (0xFFFFFFFFU)},
    {&PMS_EVRSDCOEFF8.U, (0x00073802U), (0xFFFFFFFFU)},
    {&PMS_EVRSDCOEFF9.U, (0x00009826U), (0xFFFFFFFFU)},
    {&PMS_EVRSDCTRL7.U,  (0x000000C9U), (0xFFFFFFFFU)},
    {&PMS_EVRSDCTRL1.U,  (0x0B690708U), (0xFFFFFFFFU)},
    {&PMS_EVRSDCTRL8.U,  (0x0121048EU), (0xFFFFFFFFU)},
    {&PMS_EVRSDCOEFF0.U, (0x350873B6U), (0xFFFFFFFFU)},
    {&PMS_EVRSDCOEFF1.U, (0x02946C46U), (0xFFFFFFFFU)},
    {&PMS_EVRSDCTRL0.U,  (0x30360002U), (0xFFFFFFFFU)},
    {&PMS_EVRSDCTRL2.U,  (0x0036033BU), (0xFFFFFFFFU)},
    {&PMS_EVRSDCTRL3.U,  (0x0B690810U), (0xFFFFFFFFU)},
    {&PMS_EVRSDCOEFF2.U, (0x3408710EU), (0xFFFFFFFFU)},
    {&PMS_EVRSDCOEFF3.U, (0x02946C44U), (0xFFFFFFFFU)},
    {&PMS_EVRSDCTRL4.U,  (0x00360009U), (0xFFFFFFFFU)},
    {&PMS_EVRSDCTRL5.U,  (0x0B690808U), (0xFFFFFFFFU)},
    {&PMS_EVRSDCTRL6.U,  (0x00231C94U), (0xFFFFFFFFU)},
    {&PMS_EVRSDCOEFF4.U, (0x1B0822B6U), (0xFFFFFFFFU)},
    {&PMS_EVRSDCOEFF5.U, (0x02946C46U), (0xFFFFFFFFU)},
    {&PMS_EVRSDCTRL9.U,  (0x00000434U), (0xFFFFFFFFU)},
    {&PMS_EVRSDCTRL10.U, (0x00005A82U), (0xFFFFFFFFU)},
    {&PMS_EVRSDCTRL11.U, (0x12070909U), (0xFFFFFFFFU)},
};
------------------------------------------------------------------------------------------

// Libraries/iLLD/TC39B/Tricore/Pms/Std/IfxPmsEvr.c
IFX_CONST IfxPmsEvr_checkRegConfig             IfxPmsEvr_checkRegCfgDefault = {
    sizeof(IfxPmsEvr_checkRegValuesDefault) / sizeof(IfxPmsEvr_StepDownRegulatorRegConfig),
    IfxPmsEvr_checkRegValuesDefault
};
通过 IFX_CFG_SSW_CALLOUT_PMS_CHECK() 调用 Ifx_Ssw_Pms_InitCheck() 进行检查:
// Configurations/Ifx_Cfg_Ssw.h
#define IFX_CFG_SSW_CALLOUT_PMS_INIT()                     \
    {                                                      \
        ...                                                \
        IFX_CFG_SSW_CALLOUT_PMS_CHECK();                   \
    }
-------------------------------------------------------------

// Configurations/Ifx_Cfg_Ssw.h
#define IFX_CFG_SSW_CALLOUT_PMS_CHECK()                         \
    {                                                           \
        Ifx_Ssw_jumpToFunctionWithLink(&Ifx_Ssw_Pms_InitCheck); \
    }
-------------------------------------------------------------

// Configurations/Ifx_Cfg_Ssw.c
void Ifx_Ssw_Pms_InitCheck(void)
{

    if (IfxPmsEvr_areInitValuesRight(&IfxPmsEvr_checkRegCfgDefault) == 0)
    {
        __debug();
        /* Application may have call to error handling here */
    }
    Ifx_Ssw_jumpBackToLink();
}
实际通过 IfxPmsEvr_areInitValuesRight() 检查寄存器中的值是否正确:
// Libraries/iLLD/TC39B/Tricore/Pms/Std/IfxPmsEvr.h
IFX_INLINE boolean IfxPmsEvr_areInitValuesRight(const IfxPmsEvr_checkRegConfig *const checkConfig)
{
    boolean allRight = TRUE;
    sint32  regCfgCount;

    if (PMS_EVRSTAT.B.EVRC == 1U)
    {
        for (regCfgCount = 0; regCfgCount < checkConfig->numOfRegisters; regCfgCount++)
        {
            uint32                                      regVal;
            const IfxPmsEvr_StepDownRegulatorRegConfig *regConfig = &checkConfig->regConfig[regCfgCount];
------------------------------------------------------------------------
            // 读取硬件寄存器
            regVal  = (*((volatile uint32 *)regConfig->regAddr));
            regVal &= regConfig->mask;

            // 与 CheckValue 进行对比
            if (regVal != regConfig->value)
            {
                allRight = FALSE;
            }
------------------------------------------------------------------------
        }
------------------------------------------------------------------------
        // 确认 PMS 输出是否正常
        /*Check if EVRSTAT.SDVOK is set*/
        if (allRight == TRUE)
        {
            if (PMS_EVRSTAT.B.SDVOK != 1)
            {
                allRight = FALSE;
            }
        }
------------------------------------------------------------------------
    }

    return allRight;
}
PMS 初始化与自检完成后,跳转至 __StartUpSoftware_Phase3PowerOnResetPath() 执行,初始化上下文:
// Libraries/Infra/Ssw/TC39B/Tricore/Ifx_Ssw_Tc0.c
static void __StartUpSoftware_Phase2(void)
{
    /* Power and EVRC configurations */
    IFX_CFG_SSW_CALLOUT_PMS_INIT();
    ...
    Ifx_Ssw_jumpToFunction(__StartUpSoftware_Phase3PowerOnResetPath);
}
3.__StartUpSoftware_Phase3PowerOnResetPath()
阶段三初始化任务切换所需的上下文:
// Libraries/Infra/Ssw/TC39B/Tricore/Ifx_Ssw_Tc0.c
static void __StartUpSoftware_Phase3PowerOnResetPath(void)
{
    IFX_SSW_INIT_CONTEXT();

    Ifx_Ssw_jumpToFunction(__StartUpSoftware_Phase4);
}
执行中断、函数调用等称为任务切换,在切换至另一任务执行前,需要保存当前任务的上下文信息,比如地址寄存器中的值、程序状态标志位、当前 CPU 的优先级等信息,这样,才能在回到原任务时恢复现场并继续执行,这些信息统称为上下文信息,其保存在系统指定的内存中,这块内存称为上下文节点(区域),每次任务切换时都会新建或释放一个上下文节点,所有上下文节点以链表的形式保存,详见架构手册的第 4 章 Tasks and Functions
备注:上下文节点是有限的,当节点耗尽时会触发 Trap
3.1.加载用户栈指针
系统存在中断栈和用户栈,正常程序执行时,使用的是用户栈,初始化上下文前先加载用户栈:
// Libraries/Infra/Ssw/TC39B/Tricore/Ifx_Ssw_Tc0.c
#define IFX_SSW_INIT_CONTEXT()                                                   \
    {                                                                            \
        /* Load user stack pointer */                                            \
        Ifx_Ssw_setAddressReg(a10, __USTACK(0));                                 \
与设置 A1 寄存器的方式类似,通过 Ifx_Ssw_setAddressReg() 宏调用 MOVH.A 和 LEA 指令设置栈地址寄存器 A10,用户栈地址由 __USTACK(0) 定义:
// Libraries/Infra/Platform/Tricore/Compilers/CompilerGcc.h
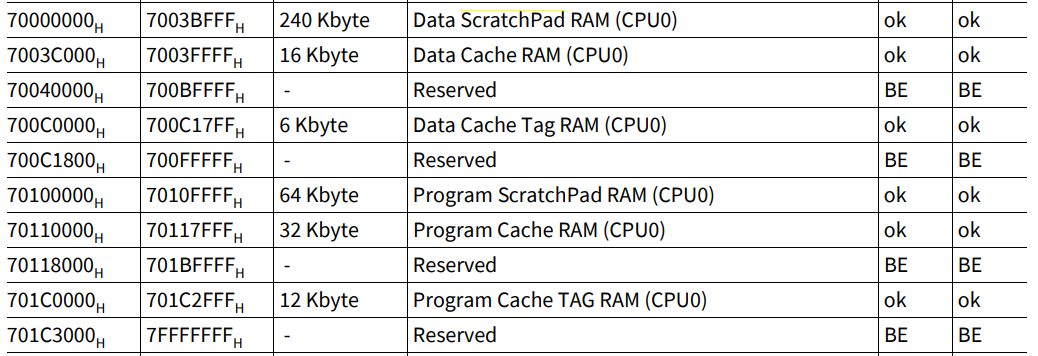
#define __USTACK(cpu) __USTACK##cpu // 展开:__USTACK0TriCore 的用户栈保存在 Data Scratchpad RAM(DSPR)中,每个 CPU 均有自己独立的堆栈区域,CPU0 的内存布局如下所示:
其在链接文件中的描述如下所示:
// Lcf_Gnuc_Tricore_Tc.lsl
LCF_CSA0_SIZE = 8k;
LCF_USTACK0_SIZE = 2k;
LCF_ISTACK0_SIZE = 1k;
-------------------------------------------

// Lcf_Gnuc_Tricore_Tc.lsl
LCF_DSPR0_START = 0x70000000;
LCF_DSPR0_SIZE = 240k;
-------------------------------------------

// Lcf_Gnuc_Tricore_Tc.lsl
LCF_CSA0_OFFSET =    (LCF_DSPR0_SIZE - 1k - LCF_CSA0_SIZE);
LCF_ISTACK0_OFFSET = (LCF_CSA0_OFFSET - 256 - LCF_ISTACK0_SIZE);
LCF_USTACK0_OFFSET = (LCF_ISTACK0_OFFSET - 256 - LCF_USTACK0_SIZE);
-------------------------------------------

// Lcf_Gnuc_Tricore_Tc.lsl
    CORE_ID = CPU0;
    SECTIONS
    {
        CORE_SEC(.ustack) (LCF_DSPR0_START + LCF_USTACK0_OFFSET):
        { PROVIDE(__USTACK0_END = .);    . = . + LCF_USTACK0_SIZE;    PROVIDE(__USTACK0 = .); }

        CORE_SEC(.istack) (LCF_DSPR0_START + LCF_ISTACK0_OFFSET):
        { PROVIDE(__ISTACK0_END = .);    . = . + LCF_ISTACK0_SIZE;    PROVIDE(__ISTACK0 = .); }

        CORE_SEC(.csa) (LCF_DSPR0_START + LCF_CSA0_OFFSET):
        { PROVIDE(__CSA0 = .);    . = . + LCF_CSA0_SIZE;    PROVIDE(__CSA0_END = .); }
    }
从中可以看到,DSPR0 的起始地址为 0x70000000,大小为 240K 字节,用户栈的大小为 2K 字节,中断栈的大小为 1 K 字节,上下文区域的大小为 8K 字节,实际硬件的用户栈的起始地址为 0x70039600:
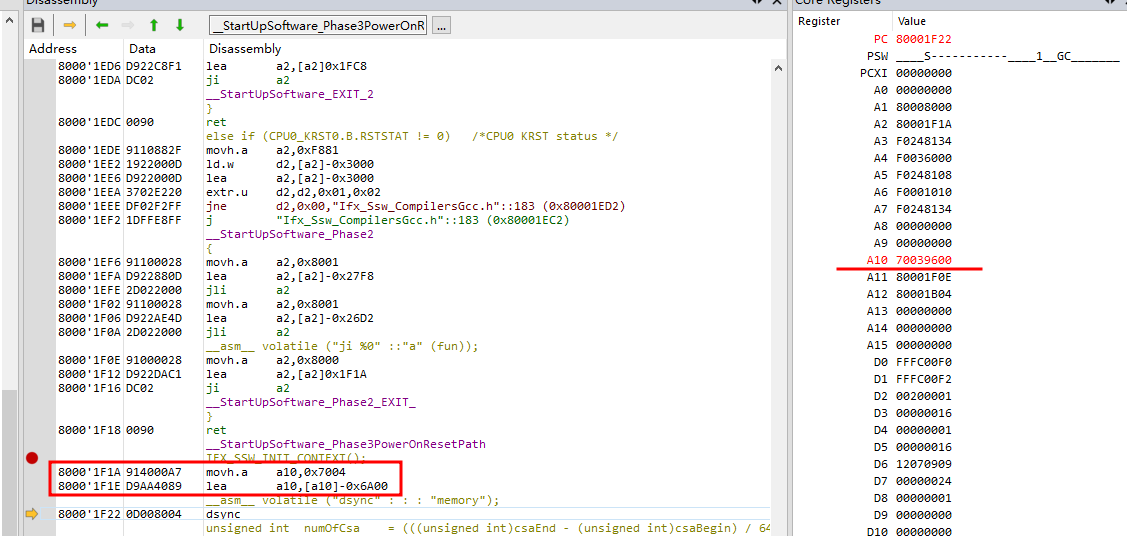
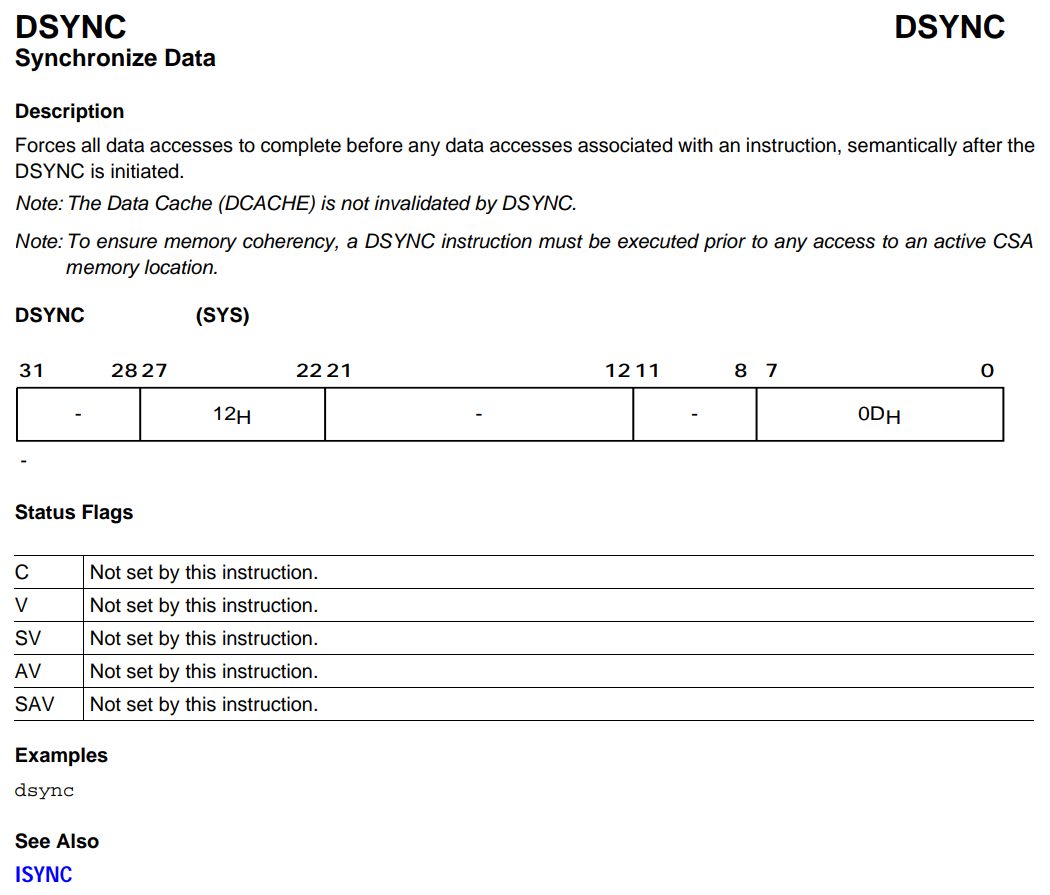
3.2.DSYNC/ISYNC 同步操作
为了保持内存数据的一致性,访问上下文区域 CSA(Context Save Area)前必须执行 DSYNC 指令:
// Libraries/Infra/Ssw/TC39B/Tricore/Ifx_Ssw_Tc0.c
#define IFX_SSW_INIT_CONTEXT()                                                   \
    {                                                                            \
        ...                                                                      \
        Ifx_Ssw_DSYNC();                                                         \
                                                                                 \
        /*Initialize the context save area for CPU0. Function Calls Possible */  \
        /* Setup the context save area linked list */                            \
        Ifx_Ssw_initCSA((unsigned int *)__CSA(0), (unsigned int *)__CSA_END(0)); \
DSYNC 指令使 CPU 执行下一条指令前,强制结束对内存或数据寄存器的访问,确保操作 CSA 前没有任何数据被更改:
同时,当 CSA 访问结束后,需要调用 ISYNC 指令,确保操作 CSA 相关的指令全部执行完毕:
// Libraries/Infra/Ssw/TC39B/Tricore/Ifx_Ssw_Tc0.c
#define IFX_SSW_INIT_CONTEXT()                                                   \
    {                                                                            \
        ...                                                                      \
                                                                                 \
        /*Initialize the context save area for CPU0. Function Calls Possible */  \
        /* Setup the context save area linked list */                            \
        Ifx_Ssw_initCSA((unsigned int *)__CSA(0), (unsigned int *)__CSA_END(0)); \
        /* Clears any instruction buffer */                                      \
        Ifx_Ssw_ISYNC();                                                         \
    }
ISYNC 指令会强制结束之前的指令流,并使得之前指令流中未执行完的指令失效,从而立即开始执行新的指令:
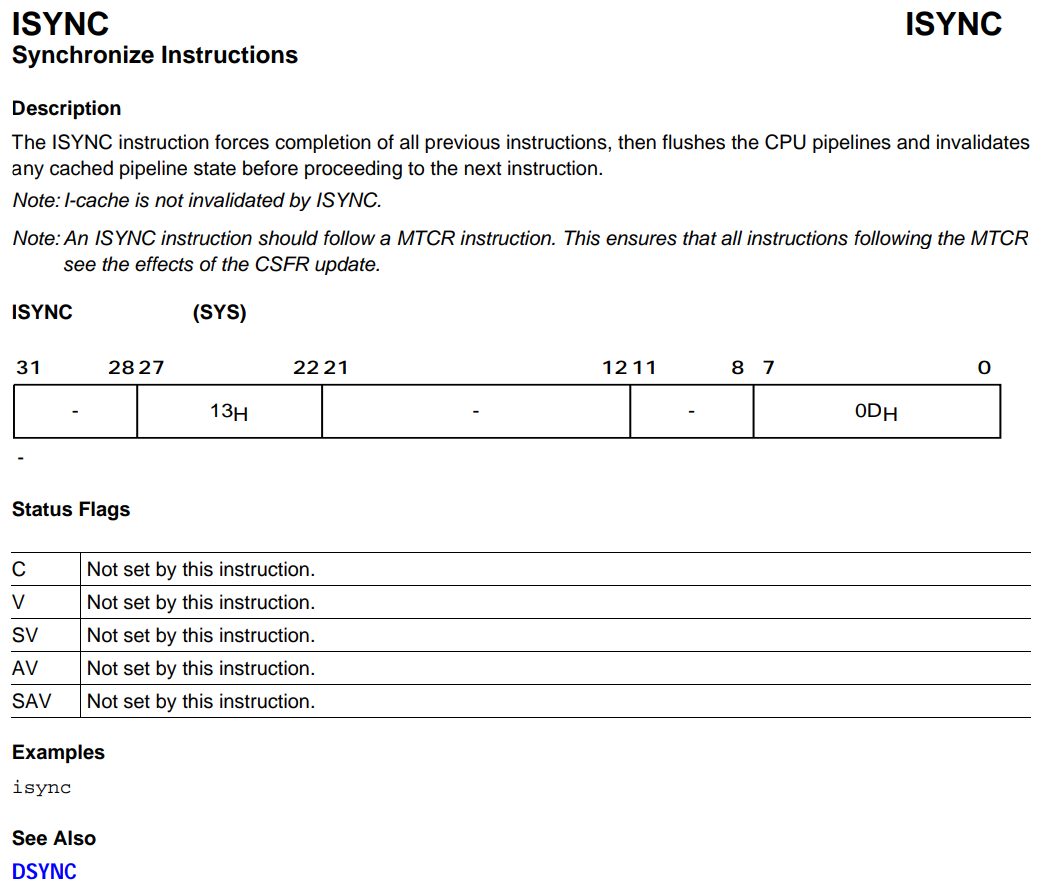
综上,使用 DSYNC 和 ISYNC 指令的目的在于保持 CPU 状态和内存数据的一致性
3.3.初始化上下文区域 CSA
// Libraries/Infra/Ssw/TC39B/Tricore/Ifx_Ssw_Tc0.c
#define IFX_SSW_INIT_CONTEXT()                                                   \
    {                                                                            \
        ...                                                                      \
        /*Initialize the context save area for CPU0. Function Calls Possible */  \
        /* Setup the context save area linked list */                            \
        Ifx_Ssw_initCSA((unsigned int *)__CSA(0), (unsigned int *)__CSA_END(0)); \
        ...                                                                      \
    }
CSA 的起始位置为 __CSA(0),结束位置为 __CSA_END(0),其定义如下:
// Libraries/Infra/Platform/Tricore/Compilers/CompilerGcc.h
#define __CSA(cpu)         __CSA##cpu       // __CSA(0) 展开为 __CSA0
#define __CSA_END(cpu)     __CSA##cpu##_END // __CSA_END(0) 展开为 __CSA0_END
从 4.1 小节的分析中可知,CSA 的总大小为 8K 字节,CSA 的起始地址为 0x70039C00:
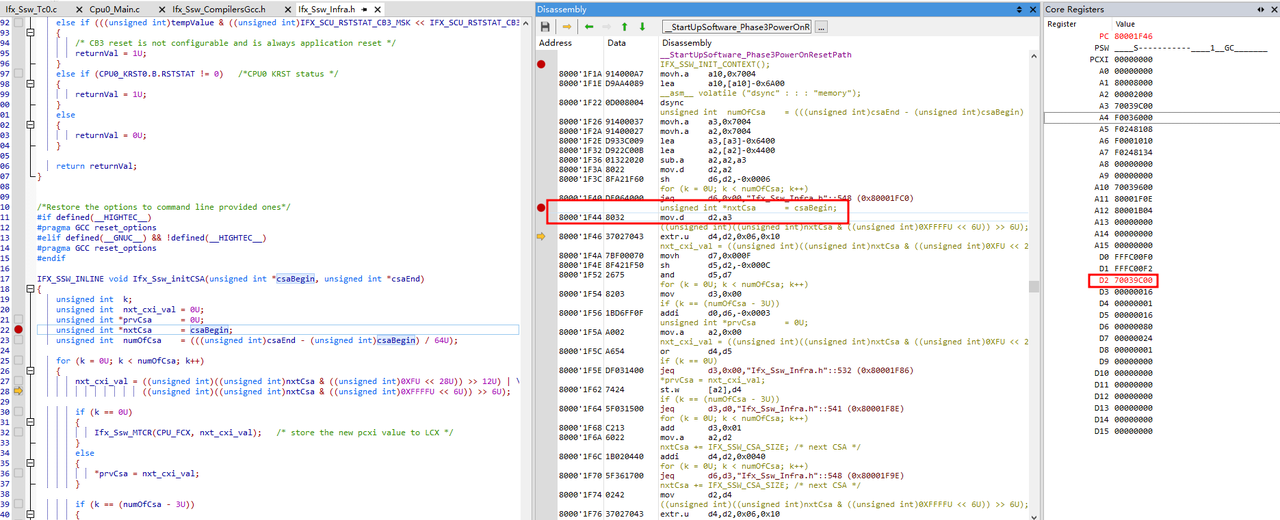
每个 CSA 区域的大小为 16 个 Word,对于 32 位系统而言,就是 16 * 4 = 64 Bytes,因此,每个 CSA 节点的地址偏移量为 0x40:
// Libraries/Infra/Ssw/TC39B/Tricore/Ifx_Ssw_Infra.h
/* CSA size */
#define IFX_SSW_CSA_SIZE    16U
Ifx_Ssw_initCSA() 初始化上下文区域 CSA 的流程如下:
// Libraries/Infra/Ssw/TC39B/Tricore/Ifx_Ssw_Infra.h
IFX_SSW_INLINE void Ifx_Ssw_initCSA(unsigned int *csaBegin, unsigned int *csaEnd)
{
    unsigned int  k;
    unsigned int  nxt_cxi_val = 0U;
    unsigned int *prvCsa      = 0U;
    unsigned int *nxtCsa      = csaBegin;
    unsigned int  numOfCsa    = (((unsigned int)csaEnd - (unsigned int)csaBegin) / 64U);

    for (k = 0U; k < numOfCsa; k++)
    {
        nxt_cxi_val = ((unsigned int)((unsigned int)nxtCsa & ((unsigned int)0XFU << 28U)) >> 12U) | \
                      ((unsigned int)((unsigned int)nxtCsa & ((unsigned int)0XFFFFU << 6U)) >> 6U);
-------------------------------------------------------------------------------------
        // FCX 保存 CSA 链表的头结点
        /* store the new pcxi value to LCX */
        if (k == 0U)
        {
            Ifx_Ssw_MTCR(CPU_FCX, nxt_cxi_val);
        }
-------------------------------------------------------------------------------------
        else
        {
            *prvCsa = nxt_cxi_val;
        }
-------------------------------------------------------------------------------------
        // LCX 保存 CSA 链表的倒数第 3 个节点
        /* Last but 2 context save area is pointed in LCX to know if there is CSA depletion */
        if (k == (numOfCsa - 3U))
        {
            Ifx_Ssw_MTCR(CPU_LCX, nxt_cxi_val);
        }
-------------------------------------------------------------------------------------
        prvCsa  = (unsigned int *)nxtCsa;
        nxtCsa += IFX_SSW_CSA_SIZE; /* next CSA */
    }

    *prvCsa = 0U; /* Store null pointer in last CSA (= very first time!) */

    Ifx_Ssw_DSYNC();
}
在该流程中,计算每个 CSA 的地址,将 CSA 链表头节点的地址保存在 CPU 的 FCX(Free CSA List Head Pointer Register)寄存器中,将 CSA 链表倒数第 3 个节点的地址保存在 CPU 的 LCX(Free CSA List Limit Pointer Register)寄存器中,最后执行一条 DSYNC 指令
完成上下文区域初始化后,跳转至 __StartUpSoftware_Phase4() 初始化时钟系统:
// Libraries/Infra/Ssw/TC39B/Tricore/Ifx_Ssw_Tc0.c
static void __StartUpSoftware_Phase3PowerOnResetPath(void)
{
    IFX_SSW_INIT_CONTEXT();

    Ifx_Ssw_jumpToFunction(__StartUpSoftware_Phase4);
}
4.__StartUpSoftware_Phase4()
平台并未定义 MMIC 和 MBIST,不会进行这两部分的自检工作,因此,阶段四实际上只进行时钟系统的初始化:
// Libraries/Infra/Ssw/TC39B/Tricore/Ifx_Ssw_Tc0.c
static void __StartUpSoftware_Phase4(void)
{
    /* This is for ADAS chip, where clock is provided by MMIC chip. This has to be
     * implemented according the board.
     */
    IFX_CFG_SSW_CALLOUT_MMIC_CHECK(); // 无定义,不执行任何操作
--------------------------------------------------------------------------------
    // 喂狗
    {
        /* Update safety and cpu watchdog reload value*/
        unsigned short cpuWdtPassword    = Ifx_Ssw_getCpuWatchdogPasswordInline(&MODULE_SCU.WDTCPU[0]);
        unsigned short safetyWdtPassword = Ifx_Ssw_getSafetyWatchdogPasswordInline();

        /* servicing watchdog timers */
        Ifx_Ssw_serviceCpuWatchdog(&MODULE_SCU.WDTCPU[0], cpuWdtPassword);
        Ifx_Ssw_serviceSafetyWatchdog(safetyWdtPassword);
    }
--------------------------------------------------------------------------------

--------------------------------------------------------------------------------
    // 初始化时钟系统
    /* Initialize the clock system */
    IFX_CFG_SSW_CALLOUT_PLL_INIT();
--------------------------------------------------------------------------------

    /* MBIST Tests and evaluation */
    IFX_CFG_SSW_CALLOUT_MBIST(); // 无定义,不执行任何操作

    Ifx_Ssw_jumpToFunction(__StartUpSoftware_Phase5);
}
4.1.看门狗定时器复位
初始化时钟系统前,先喂看门狗定时器,防止超时:
// Libraries/Infra/Ssw/TC39B/Tricore/Ifx_Ssw_Tc0.c
static void __StartUpSoftware_Phase4(void)
{
    ...
    // 喂狗
    {
        /* Update safety and cpu watchdog reload value*/
        unsigned short cpuWdtPassword    = Ifx_Ssw_getCpuWatchdogPasswordInline(&MODULE_SCU.WDTCPU[0]);
        unsigned short safetyWdtPassword = Ifx_Ssw_getSafetyWatchdogPasswordInline();

        /* servicing watchdog timers */
        Ifx_Ssw_serviceCpuWatchdog(&MODULE_SCU.WDTCPU[0], cpuWdtPassword);
        Ifx_Ssw_serviceSafetyWatchdog(safetyWdtPassword);
    }
4.2.时钟频率配置
时钟系统初始化时会设置晶振和 PLL 的默认频率,以及 PLL 的输入源:
// Libraries/iLLD/TC39B/Tricore/Scu/Std/IfxScuCcu.c
IFX_CONST IfxScuCcu_Config     IfxScuCcu_defaultClockConfig = {
    /* IfxScuCcu_InitialStepConfig: Configuration of first step which is same as internal osc frequency. */
    IFXSCU_CFG_PLL_INITIAL_STEP,
    ...
};
-----------------------------------------------------

// Libraries/iLLD/TC39B/Tricore/_Impl/IfxScu_cfg.h
/* macro for sys pll initial step configuration */
#define IFXSCU_CFG_PLL_INITIAL_STEP \
{\
    {\
        IFX_CFG_SCU_XTAL_FREQUENCY,\
        IfxScuCcu_PllInputClockSelection_fOsc0,\
        IFXSCU_CFG_SYS_PLL_INITIAL_STEP, \
        IFXSCU_CFG_PER_PLL_INITIAL_STEP, \
    },\
    IFXSCU_CFG_WAIT_INITIAL_STEP \
}
IFX_CFG_SCU_XTAL_FREQUENCY 默认晶振频率为 20MHz,PLL 相关频率配置如下所示:
// Configurations/Ifx_Cfg.h
/* External oscillator frequency in Hz */
#define IFX_CFG_SCU_XTAL_FREQUENCY (20000000)  /* Allowed values are: 40000000, 25000000, 20000000, 16000000 */
/* System PLL frequency in Hz */
#define IFX_CFG_SCU_PLL_FREQUENCY  (300000000) /* Allowed values are: 300000000, 200000000, 160000000, 133000000
                                                * or 80000000 */
/* Peripheral PLL1 frequency in Hz */
#define IFX_CFG_SCU_PLL1_FREQUENCY (320000000) /* Allowed values are: 320000000, 160000000 */
/* Peripheral PLL2 frequency in Hz */
#define IFX_CFG_SCU_PLL2_FREQUENCY (200000000) /* Allowed values are: 200000000 */
PLL 输入源选择晶振输入 IfxScuCcu_PllInputClockSelection_fOsc0:
// Libraries/iLLD/TC39B/Tricore/Scu/Std/IfxScuCcu.h
/* SysPll & Per Pll input clock selection.
 * SYSPLLCON0.B.INSEL
 */
typedef enum
{
    IfxScuCcu_PllInputClockSelection_fOsc1   = 0, /* Backup clock select */
    IfxScuCcu_PllInputClockSelection_fOsc0   = 1, /* fOsc0 or XTAL clock select */
    IfxScuCcu_PllInputClockSelection_fSysclk = 2  /* fOsc1 */
} IfxScuCcu_PllInputClockSelection;
IFXSCU_CFG_SYS_PLL_INITIAL_STEP 配置 System PLL,其中,晶振频率 IFXSCU_CFG_XTAL_FREQ 为 20MHz,PLL 频率 IFXSCU_CFG_PLL_FREQ 为 300MHz:
// Libraries/iLLD/TC39B/Tricore/_Impl/IfxScu_cfg.h
#if (IFX_CFG_SCU_XTAL_FREQUENCY == (20000000))
#define IFXSCU_CFG_XTAL_FREQ        20MHZ
---------------------------------------------------------

// Libraries/iLLD/TC39B/Tricore/_Impl/IfxScu_cfg.h
#elif (IFX_CFG_SCU_PLL_FREQUENCY == (300000000))
#define IFXSCU_CFG_PLL_FREQ 300MHZ
---------------------------------------------------------

// Libraries/iLLD/TC39B/Tricore/_Impl/IfxScu_cfg.h
/* macro for sys pll initial step configuration */
#define IFXSCU_CFG_SYS_PLL_INITIAL_STEP_BASIC_(xtalFreq, pll0Freq) IFXSCU_CFG_SYS_PLL_##xtalFreq##_##pll0Freq
#define IFXSCU_CFG_SYS_PLL_INITIAL_STEP_BASIC(xtalFreq, pll0Freq)  IFXSCU_CFG_SYS_PLL_INITIAL_STEP_BASIC_(xtalFreq, pll0Freq)
#define IFXSCU_CFG_SYS_PLL_INITIAL_STEP IFXSCU_CFG_SYS_PLL_INITIAL_STEP_BASIC(IFXSCU_CFG_XTAL_FREQ, IFXSCU_CFG_PLL_FREQ)
IFXSCU_CFG_PER_PLL_INITIAL_STEP 配置 Peripheral PLL,其中,晶振频率 IFXSCU_CFG_XTAL_FREQ 为 20MHz,PLL1 频率 IFXSCU_CFG_PLL1_FREQ 为 320MHz,PLL2 频率 IFXSCU_CFG_PLL2_FREQ 为 200MHz
// Libraries/iLLD/TC39B/Tricore/_Impl/IfxScu_cfg.h
#if (IFX_CFG_SCU_XTAL_FREQUENCY == (20000000))
#define IFXSCU_CFG_XTAL_FREQ        20MHZ
---------------------------------------------------------

// Libraries/iLLD/TC39B/Tricore/_Impl/IfxScu_cfg.h
#if (IFX_CFG_SCU_PLL1_FREQUENCY == (320000000))
#define IFXSCU_CFG_PLL1_FREQ     320MHZ
...
#if (IFX_CFG_SCU_PLL2_FREQUENCY == (200000000))
#define IFXSCU_CFG_PLL2_FREQ 200MHZ
---------------------------------------------------------

// Libraries/iLLD/TC39B/Tricore/_Impl/IfxScu_cfg.h
/* macro for per pll initial step configuration */
#define IFXSCU_CFG_PER_PLL_INITIAL_STEP_BASIC_(xtalFreq, pll1Freq, pll2Freq) IFXSCU_CFG_PER_PLL_##xtalFreq##_##pll1Freq##_##pll2Freq
#define IFXSCU_CFG_PER_PLL_INITIAL_STEP_BASIC(xtalFreq, pll1Freq, pll2Freq)  IFXSCU_CFG_PER_PLL_INITIAL_STEP_BASIC_(xtalFreq, pll1Freq, pll2Freq)
#define IFXSCU_CFG_PER_PLL_INITIAL_STEP IFXSCU_CFG_PER_PLL_INITIAL_STEP_BASIC(IFXSCU_CFG_XTAL_FREQ, IFXSCU_CFG_PLL1_FREQ, IFXSCU_CFG_PLL2_FREQ)
系统最终会将晶振频率设置为 20MHz,PLL 频率设置为 300MHz:
// Libraries/iLLD/TC39B/Tricore/Scu/Std/IfxScuCcu.c
IFX_CONST IfxScuCcu_Config IfxScuCcu_defaultClockConfig = {
    ...
    /*IfxScuCcu_PllThrottleConfig: Configuration of PLL throttling. */
    {
        ...
        IfxScuCcu_defaultPllConfigSteps
------------------------------------------------------

// Libraries/iLLD/TC39B/Tricore/Scu/Std/IfxScuCcu.c
IFX_STATIC IFX_CONST IfxScuCcu_PllStepConfig  IfxScuCcu_defaultPllConfigSteps[] = {
    IFXSCU_CFG_PLL_STEPS
};
------------------------------------------------------

// Libraries/iLLD/TC39B/Tricore/_Impl/IfxScu_cfg.h
/***************************** Final Macro Setting for PLL ****************************************/
#define IFXSCU_CFG_PLL_STEPS_BASIC_(xtalFreq, pll0Freq)        IFXSCU_CFG_PLL_STEPS_##xtalFreq##_##pll0Freq
#define IFXSCU_CFG_PLL_STEPS_BASIC(xtalFreq, pll0Freq)         IFXSCU_CFG_PLL_STEPS_BASIC_(xtalFreq, pll0Freq)
#define IFXSCU_CFG_PLL_STEPS        IFXSCU_CFG_PLL_STEPS_BASIC(IFXSCU_CFG_XTAL_FREQ, IFXSCU_CFG_PLL_FREQ)
4.3.时钟系统初始化
IFX_CFG_SSW_CALLOUT_PLL_INIT() 宏调用 IfxScuCcu_init() 初始化时钟系统:
// Configurations/Ifx_Cfg_Ssw.h
#define IFX_CFG_SSW_CALLOUT_PLL_INIT() \
{ \
if (IfxScuCcu_init(&IfxScuCcu_defaultClockConfig) == 1) \
{ \
__debug(); \
} \
}
-----------------------------------------------------------------
// Libraries/iLLD/TC39B/Tricore/Scu/Std/IfxScuCcu.c
boolean IfxScuCcu_init(const IfxScuCcu_Config *config)
{
boolean status = 0;
----------------------------------------------------------------------------------
// 写入相关频率、分频倍数等基本信息
status = IfxScuCcu_configureCcuInitialStep(&config->pllInitialStepConfig);
----------------------------------------------------------------------------------
// 使能 PLL 锁相环:配置 SYSPLLCON2 和 SYSPLLCON0
if (!status)
{
IfxScuCcu_modulation_init(config->modulationConfig); /* initialize modulation */
}
----------------------------------------------------------------------------------
// 时钟分发:通过 CCUCON 寄存器配置各个模块所需的时钟频率
if (!status)
{
status = IfxScuCcu_distributeClockInline(&config->clockDistribution);
}
----------------------------------------------------------------------------------
...
----------------------------------------------------------------------------------
// 分频系数限制
if (!status)
{
status = IfxScuCcu_throttleSysPllClockInline(&config->sysPllThrottleConfig);
}
----------------------------------------------------------------------------------
return status;
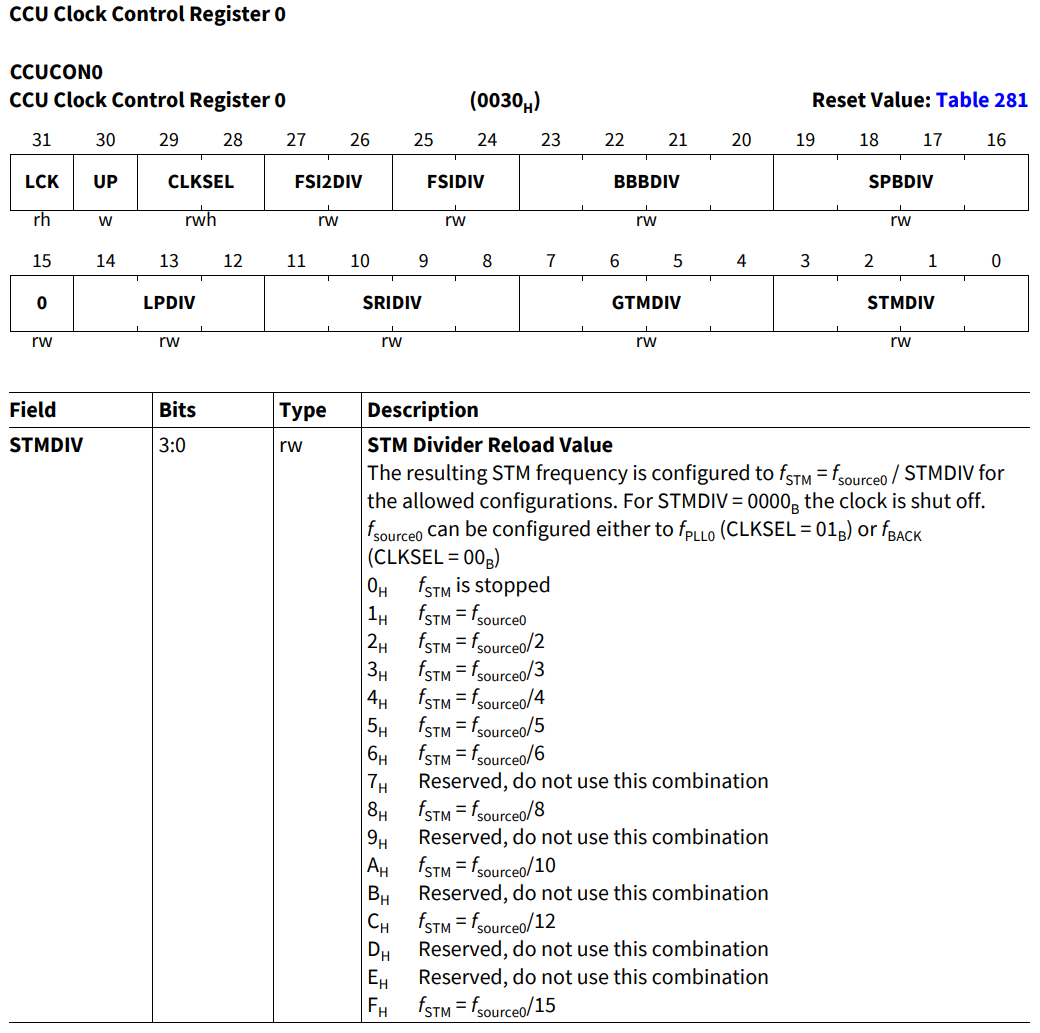
}其中需要关注的是,外设时钟频率通过 PLL 分频获得,外设和 CPU 的分频系数由 CCUCON0~CCUCON12 寄存器控制,具体可参考手册中这些寄存器的具体位定义,例如:
时钟系统初始化完成后,跳转至 __StartUpSoftware_Phase5() 初始化安全管理模块 SMU:
// Libraries/Infra/Ssw/TC39B/Tricore/Ifx_Ssw_Tc0.c
static void __StartUpSoftware_Phase4(void)
{
    ...
    Ifx_Ssw_jumpToFunction(__StartUpSoftware_Phase5);
}
5.__StartUpSoftware_Phase5()
程序中并未配置 SMU 的初始化步骤,因此直接跳转至阶段六执行:
// Libraries/Infra/Ssw/TC39B/Tricore/Ifx_Ssw_Tc0.c
#ifndef IFX_CFG_SSW_CALLOUT_SMU
#define IFX_CFG_SSW_CALLOUT_SMU()
#endif
-----------------------------------------------------

// Libraries/Infra/Ssw/TC39B/Tricore/Ifx_Ssw_Tc0.c
static void __StartUpSoftware_Phase5(void)
{
    /* SMU alarm handling */
    IFX_CFG_SSW_CALLOUT_SMU(); // 未配置初始化步骤,不执行任何操作

    Ifx_Ssw_jumpToFunction(__StartUpSoftware_Phase6);
}
6.__StartUpSoftware_Phase6
阶段六执行多核启动流程,系统初始启动 CPU0,在该阶段中由 CPU0 拉起 CPU1,这样依次启动各个 CPU 核心:
// Libraries/Infra/Ssw/TC39B/Tricore/Ifx_Ssw_Tc0.c
static void __StartUpSoftware_Phase6(void)
{
--------------------------------------------------------
    // 启动 CPU1
    /* Start remaining cores as a daisy-chain */
#if (IFX_CFG_SSW_ENABLE_TRICORE1 != 0)
    Ifx_Ssw_startCore(&MODULE_CPU1, (unsigned int)__START(1)); /*The status returned by function call is ignored */
#endif /* #if (IFX_CFG_CPU_CSTART_ENABLE_TRICORE1 != 0)*/
--------------------------------------------------------

--------------------------------------------------------
// 不会一次性启动多个 CPU 核心,而是采用逐个启动的方式
#if (IFX_CFG_SSW_ENABLE_TRICORE1 == 0)
...
#endif /* #if (IFX_CFG_SSW_ENABLE_TRICORE1 == 0) */
--------------------------------------------------------

    Ifx_Ssw_jumpToFunction(__Core0_start);
}
启动 CPU 需要做两件事:
-
将 CPU 的 PC 指针指向第一条待执行的指令;
-
将 CPU 的状态由 HALT 设置为 RUN;
// Libraries/Infra/Ssw/TC39B/Tricore/Ifx_Ssw_Infra.c
void Ifx_Ssw_startCore(Ifx_CPU *cpu, unsigned int programCounter)
{
-------------------------------------------------------
    // 设置 PC 指针
    cpu->PC.B.PC = (unsigned int)programCounter >> 1U;
-------------------------------------------------------

    /* release boot halt mode if required */
    Ifx_CPU_SYSCON syscon;
    syscon = cpu->SYSCON;

    if (syscon.B.BHALT)
    {
-------------------------------------------------------
        // 取消 CPU 的 HALT 状态
        syscon.B.BHALT = 0U;
-------------------------------------------------------
        cpu->SYSCON    = syscon;
    }
}
CPU 初始 PC 位置定义如下,以 CPU0 为例:
// Lcf_Gnuc_Tricore_Tc.lsl
LCF_STARTPTR_CPU0 = 0x80000000;
LCF_STARTPTR_CPU1 = 0x80300100;
...
LCF_STARTPTR_CPU5 = 0x80F00100;

LCF_STARTPTR_NC_CPU0 = 0xA0000000;
LCF_STARTPTR_NC_CPU1 = 0xA0300100;
...
LCF_STARTPTR_NC_CPU5 = 0xA0F00100;
-------------------------------------------------------------------

// Lcf_Gnuc_Tricore_Tc.lsl
    /*Fixed memory Allocations for _START*/
    CORE_ID = GLOBAL ;
    SECTIONS
    {
        .start_tc0 (LCF_STARTPTR_NC_CPU0) : FLAGS(rxl) { KEEP (*(.start)); } > pfls0_nc
        ...
        PROVIDE(__START0 = LCF_STARTPTR_NC_CPU0);
        ...
    }
CPU0 的 PC 起始位置为 LCF_STARTPTR_NC_CPU0 = 0xA0000000,可以看出程序使用的是 Non-Cached Program Flash:
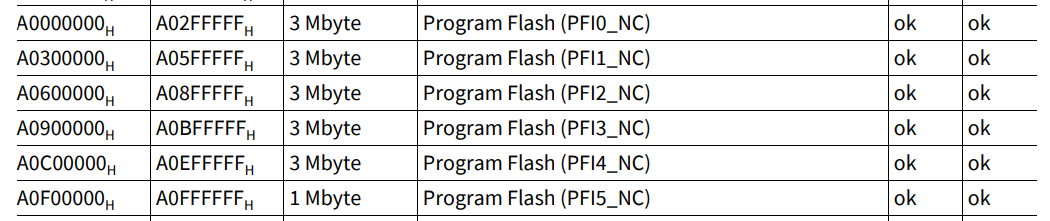
上面比较特殊的是 CPU5,其 PFI5_NC 的空间大小为 1M 字节,其余的均为 3M 字节空间
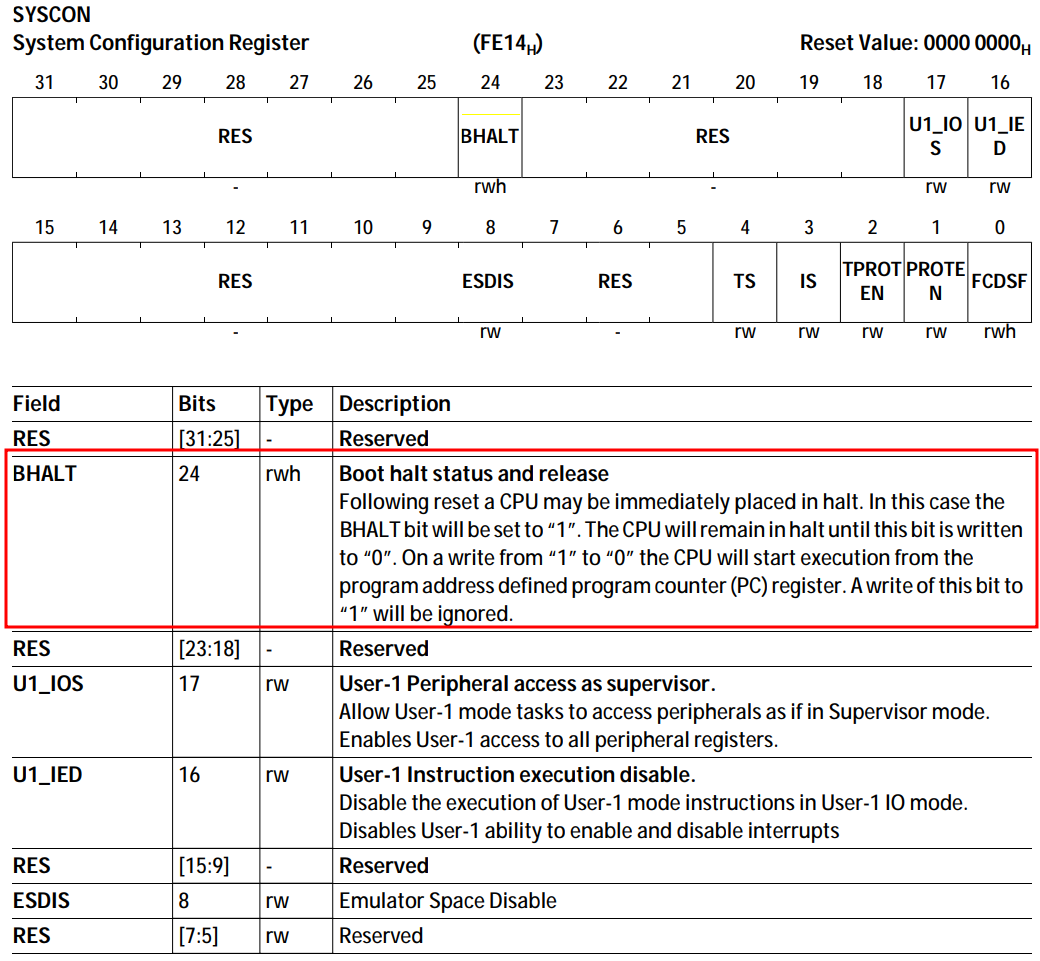
PC 指针设置后,将 CPU 寄存器 SYSCON.BHALT 置 0 以取消 CPU 的 HALT 状态:
CPU1 启动后,会开始执行 _START1() 中的代码(PC = 0xA0300100),后续逐一启动各个 CPU:
// Libraries/Infra/Ssw/TC39B/Tricore/Ifx_Ssw_Tc1.c
void _START1(void)
{
    Ifx_Ssw_jumpToFunction(__Core1_start);
}
--------------------------------------------------

// Libraries/Infra/Ssw/TC39B/Tricore/Ifx_Ssw_Tc1.c
void __Core1_start(void)
{
    ...
    // 启动 CPU2
    /*Start remaining cores down the line in a daisy-chain fashion*/
#if (IFX_CFG_SSW_ENABLE_TRICORE2 != 0)
    (void)Ifx_Ssw_startCore(&MODULE_CPU2, (unsigned int)__START(2));       /*The status returned by function call is ignored */
#endif
在阶段六中完成 CPU1 的启动后,跳转至 __Core0_start() 执行 CPU0 初始化、准备 C 运行环境等工作:
// Libraries/Infra/Ssw/TC39B/Tricore/Ifx_Ssw_Tc0.c
static void __StartUpSoftware_Phase6(void)
{
    ...
    Ifx_Ssw_jumpToFunction(__Core0_start);
}
7. __Core0_start()
下面的代码片段略去了包括操作看门狗定时器、未定义的 EMEM 内存初始化等在内不重要的部分,剩余部分是我们需要重点关注的,包括:
-
使能程序缓存 Program Cache;
-
使能数据缓存 Data Cache;
-
初始化地址寄存器;
-
加载中断向量表、Trap 向量表、中断栈;
-
初始化 C 运行环境;
-
跳转至 core0_main() 开始执行用户程序;
// Libraries/Infra/Ssw/TC39B/Tricore/Ifx_Ssw_Tc0.c
static void __Core0_start(void)
{
...
---------------------------------------------------------------------------------------
// 使能程序缓存 Program Cache
/* Enable/ Disable the caches depending on the configuration. At this point cache are invalidated */
{
Ifx_CPU_PCON0 pcon0;
pcon0.U = 0;
pcon0.B.PCBYP = IFX_CFG_SSW_ENABLE_TRICORE0_PCACHE ? 0 : 1; /* depending on the enable bypass bit is reset/set */
Ifx_Ssw_MTCR(CPU_PCON0, pcon0.U);
Ifx_Ssw_ISYNC();
}
---------------------------------------------------------------------------------------
---------------------------------------------------------------------------------------
// 使能数据缓存 Data Cache
{
Ifx_CPU_DCON0 dcon0;
dcon0.U = 0;
dcon0.B.DCBYP = IFX_CFG_SSW_ENABLE_TRICORE0_DCACHE ? 0 : 1; /* depending on the enable bypass bit is reset/set */
Ifx_Ssw_MTCR(CPU_DCON0, dcon0.U);
Ifx_Ssw_ISYNC();
}
---------------------------------------------------------------------------------------
---------------------------------------------------------------------------------------
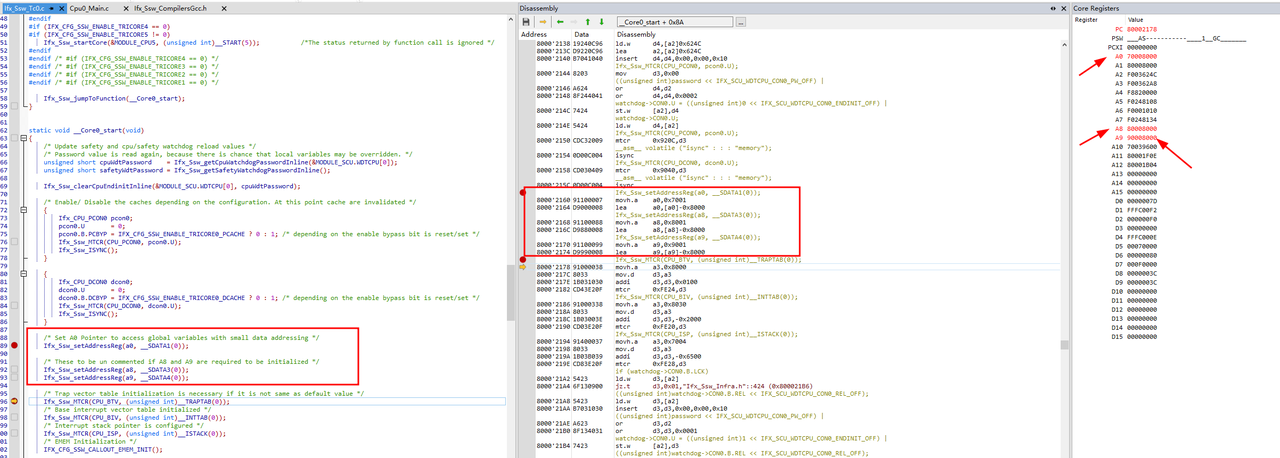
// 初始化地址寄存器
/* Set A0 Pointer to access global variables with small data addressing */
Ifx_Ssw_setAddressReg(a0, __SDATA1(0));
/* These to be un commented if A8 and A9 are required to be initialized */
Ifx_Ssw_setAddressReg(a8, __SDATA3(0));
Ifx_Ssw_setAddressReg(a9, __SDATA4(0));
---------------------------------------------------------------------------------------
---------------------------------------------------------------------------------------
// 加载 Trap 向量表、中断向量表、中断栈
/* Trap vector table initialization is necessary if it is not same as default value */
Ifx_Ssw_MTCR(CPU_BTV, (unsigned int)__TRAPTAB(0));
/* Base interrupt vector table initialized */
Ifx_Ssw_MTCR(CPU_BIV, (unsigned int)__INTTAB(0));
/* Interrupt stack pointer is configured */
Ifx_Ssw_MTCR(CPU_ISP, (unsigned int)__ISTACK(0));
---------------------------------------------------------------------------------------
...
---------------------------------------------------------------------------------------
// 初始化 C 运行环境
/* Initialization of C runtime variables and CPP constructors and destructors */
(void)Ifx_Ssw_doCppInit();
---------------------------------------------------------------------------------------
...
---------------------------------------------------------------------------------------
// 跳转至 core0_main() 开始执行用户程序
extern void core0_main(void);
Ifx_Ssw_jumpToFunction(core0_main); /* Jump to main function of CPU0 */
---------------------------------------------------------------------------------------
...
/* Go into infinite loop, normally the code shall not reach here */
Ifx_Ssw_infiniteLoop();
}7.1.使能程序缓存 - Program Cache Enable
// Libraries/Infra/Ssw/TC39B/Tricore/Ifx_Ssw_Tc0.c
static void __Core0_start(void)
{
    ...
    // 使能程序缓存 Program Cache
    /* Enable/ Disable the caches depending on the configuration. At this point cache are invalidated */
    {
        Ifx_CPU_PCON0 pcon0;
        pcon0.U       = 0;
        pcon0.B.PCBYP = IFX_CFG_SSW_ENABLE_TRICORE0_PCACHE ? 0 : 1; /* depending on the enable bypass bit is reset/set */
        Ifx_Ssw_MTCR(CPU_PCON0, pcon0.U);
        Ifx_Ssw_ISYNC();
    }
CPU 的 PCON0~PCON2 寄存器控制是否使能程序缓存,这些寄存器依平台实现:
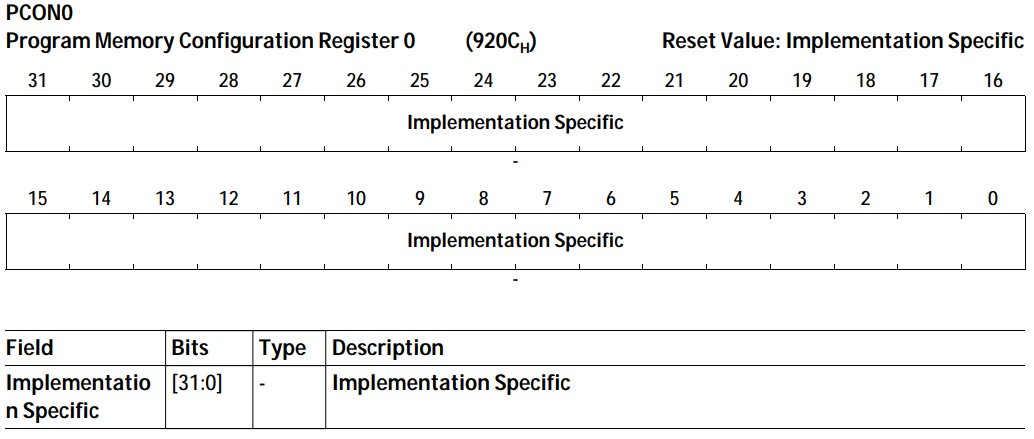
TC397 的 PCON0 实现如下,其仅包含 PCBYP 一个有效位:
// Libraries/Infra/Sfr/TC39B/_Reg/IfxCpu_regdef.h
/* CPUx Program Control 0   */
typedef union
{
    Ifx_UReg_32Bit U;     /* Unsigned access */
    Ifx_SReg_32Bit I;     /* Signed access */
    Ifx_CPU_PCON0_Bits B; /* Bitfield access */
} Ifx_CPU_PCON0;
-----------------------------------------------------------

// Libraries/Infra/Sfr/TC39B/_Reg/IfxCpu_regdef.h
/* CPUx Program Control 0 */
typedef struct _Ifx_CPU_PCON0_Bits
{
    Ifx_Strict_32Bit reserved_0:1;  /* [0:0] Reserved */
    Ifx_Strict_32Bit PCBYP:1;       /* [1:1] Program Cache Bypass - PCBYP (rw) */
    Ifx_Strict_32Bit reserved_2:30; /* [31:2] Reserved */
} Ifx_CPU_PCON0_Bits;
将 PCON0.PCBYP 置 0 使能程序缓存,即将程序缓存至 Cached Program Flash,减少 Memory IO 以提升 CPU 运行速度:

因此,可以看到用户程序的地址为 0x80......:

这里可以看到用户程序 core0_main() 的起始地址为 0x80004c50,而非 0x80000000,这是因为前面的部分地址用于存放 Trap 向量表,以及部分预初始化代码:
7.2.使能数据缓存 - Data Cache Enable
// Libraries/Infra/Ssw/TC39B/Tricore/Ifx_Ssw_Tc0.c
static void __Core0_start(void)
{
    ...
    // 使能数据缓存 Data Cache
    {
        Ifx_CPU_DCON0 dcon0;
        dcon0.U       = 0;
        dcon0.B.DCBYP = IFX_CFG_SSW_ENABLE_TRICORE0_DCACHE ? 0 : 1; /* depending on the enable bypass bit is reset/set */
        Ifx_Ssw_MTCR(CPU_DCON0, dcon0.U);
        Ifx_Ssw_ISYNC();
    }
CPU 的 DCON0~DCON2 寄存器控制是否启用数据缓存,这些寄存器依平台实现:
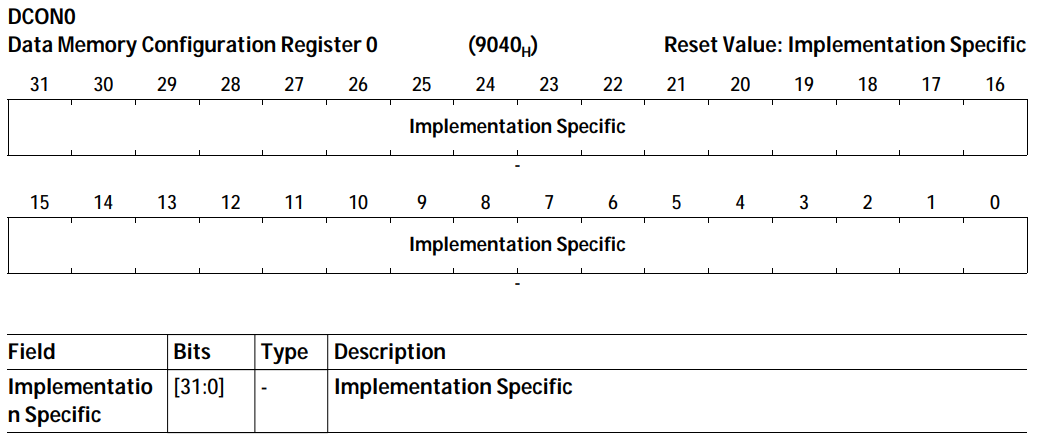
TC397 的 DCON 实现方式如下,其仅包含 DCBYP 一个有效位:
// Libraries/Infra/Sfr/TC39B/_Reg/IfxCpu_regdef.h
/* CPUx Data Memory Control Register */
typedef union
{
Ifx_UReg_32Bit U; /* Unsigned access */
Ifx_SReg_32Bit I; /* Signed access */
Ifx_CPU_DCON0_Bits B; /* Bitfield access */
} Ifx_CPU_DCON0;
--------------------------------------------------------------
// Libraries/Infra/Sfr/TC39B/_Reg/IfxCpu_regdef.h
/* CPUx Data Memory Control Register */
typedef struct _Ifx_CPU_DCON0_Bits
{
Ifx_Strict_32Bit reserved_0:1; /* [0:0] Reserved */
Ifx_Strict_32Bit DCBYP:1; /* [1:1] Data Cache Bypass - DCBYP (rw) */
Ifx_Strict_32Bit reserved_2:30; /* [31:2] Reserved */
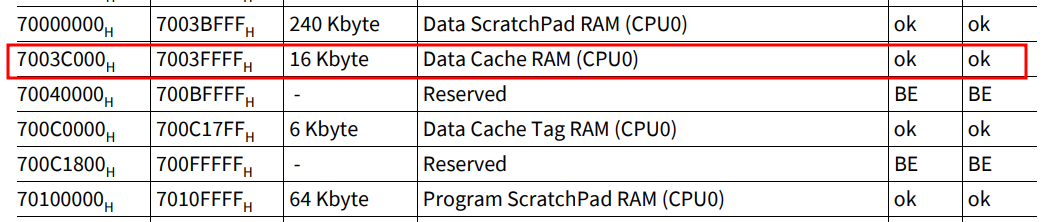
} Ifx_CPU_DCON0_Bits;将 DCON0.DCBYP 置 0 使能数据缓存,即指令执行时所需的部分数据保存在 16K 字节大小的 Data Cache RAM 中:
7.3.初始化地址寄存器
// Libraries/Infra/Ssw/TC39B/Tricore/Ifx_Ssw_Tc0.c
static void __Core0_start(void)
{
    ...
    // 初始化地址寄存器
    /* Set A0 Pointer to access global variables with small data addressing */
    Ifx_Ssw_setAddressReg(a0, __SDATA1(0));
    /* These to be un commented if A8 and A9 are required to be initialized */
    Ifx_Ssw_setAddressReg(a8, __SDATA3(0));
    Ifx_Ssw_setAddressReg(a9, __SDATA4(0));
这里设置 A0、A8、A9 三个全局地址寄存器:
注意:全局地址寄存器 A1 在最开始的 __StartUpSoftware() 阶段已经设置
这几个全局地址寄存器的初始值如下:
// Libraries/Infra/Platform/Tricore/Compilers/CompilerGcc.h
#define __SDATA1(cpu)      __A0_MEM
#define __SDATA2(cpu)      __A1_MEM
#define __SDATA3(cpu)      __A8_MEM
#define __SDATA4(cpu)      __A9_MEM
------------------------------------------------------------------

// Lcf_Gnuc_Tricore_Tc.lsl
/*Relative A0/A1/A8/A9 Addressable Sections*/
CORE_ID = GLOBAL;
SECTIONS
{
    /*Relative A0 Addressable Data, selectable with patterns and user defined sections*/
    /*Note: A0 addressable area is common, to make the functions callable in any CPU*/
    /*Relative A0 Addressable Data, selectable by toolchain*/
    CORE_SEC(.sdata) : FLAGS(awsl)
    {
        *(.sdata)
        *(.sdata.*)
        . = ALIGN(2);
    } > default_ram AT> pfls0
    CORE_SEC(.sbss) (NOLOAD): FLAGS(aws)
    {
        *(.sbss)
        *(.sbss.*)
    } > default_ram
    _SMALL_DATA_ = SIZEOF(CORE_SEC(.sdata)) ? ADDR(CORE_SEC(.sdata)) : (ADDR(CORE_SEC(.sdata)) & 0xF0000000) + 32k ;
    __A0_MEM = _SMALL_DATA_;
}
------------------------------------------------------------------

// Lcf_Gnuc_Tricore_Tc.lsl
CORE_ID = GLOBAL;
SECTIONS
{
    /*Relative A1 Addressable Const, selectable with patterns and user defined sections*/
        /*Note: A1 addressable area is common, to make the functions callable in any CPU*/
    /*Relative A1 Addressable Const, selectable by toolchain*/
    CORE_SEC(.sdata2) : FLAGS(arsl)
    {
        *(.srodata)
        *(.srodata.*)
    } > default_rom
    _SMALL_DATA2_ = SIZEOF(CORE_SEC(.sdata2)) ? ADDR(CORE_SEC(.sdata2)) : (ADDR(CORE_SEC(.sdata2)) & 0xF0000000) + 32k ;
    __A1_MEM = _SMALL_DATA2_;
}
------------------------------------------------------------------

// Lcf_Gnuc_Tricore_Tc.lsl
CORE_ID = GLOBAL;
SECTIONS
{
    /*Relative A9 Addressable Data, selectable with patterns and user defined sections*/
    CORE_SEC(.sdata4) :
    {
        *(.a9sdata)
        *(.a9sdata.*)
        . = ALIGN(2);
    } > lmuram AT> pfls0

    CORE_SEC(.sbss4) :
    {
        *(.a9sbss)
        *(.a9sbss.*)
    } > lmuram

    _SMALL_DATA4_ = SIZEOF(CORE_SEC(.sdata4)) ? ADDR(CORE_SEC(.sdata4)) : (ADDR(CORE_SEC(.sdata4)) & 0xF0000000) + 32k ;
    __A9_MEM = _SMALL_DATA4_;

    /*Relative A8 Addressable Const, selectable with patterns and user defined sections*/
    CORE_SEC(.sdata3) : FLAGS(arsl)
    {
        *(.rodata_a8)
        *(.rodata_a8.*)
    } > default_rom

    _SMALL_DATA3_ = SIZEOF(CORE_SEC(.sdata3)) ? ADDR(CORE_SEC(.sdata3)) : (ADDR(CORE_SEC(.sdata3)) & 0xF0000000) + 32k ;
    __A8_MEM = _SMALL_DATA3_;
}
最终,将 A0 设置为 0x70008000,A8 设置为 0x80008000,A9 设置为 0x90008000:
7.4.加载中断向量表、Trap 向量表、中断栈
通过调用 MTCR 指令,将:
-
Trap 向量表保存在 CPU 的 BTV 寄存器中;
-
中断向量表保存在 CPU 的 BIV 寄存器中;
-
中断栈地址保存在 CPU 的 ISP 寄存器中;
// Libraries/Infra/Ssw/TC39B/Tricore/Ifx_Ssw_Tc0.c
static void __Core0_start(void)
{
...
// 加载中断向量表、Trap 向量表、中断栈
/* Trap vector table initialization is necessary if it is not same as default value */
Ifx_Ssw_MTCR(CPU_BTV, (unsigned int)__TRAPTAB(0));
/* Base interrupt vector table initialized */
Ifx_Ssw_MTCR(CPU_BIV, (unsigned int)__INTTAB(0));
/* Interrupt stack pointer is configured */
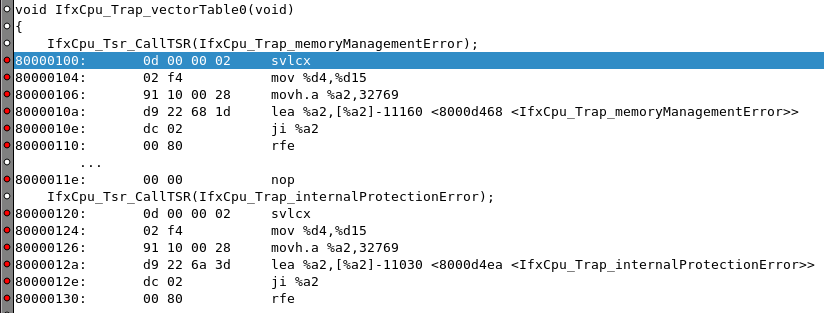
Ifx_Ssw_MTCR(CPU_ISP, (unsigned int)__ISTACK(0));7.4.1.Trap 向量表
// Libraries/Infra/Ssw/TC39B/Tricore/Ifx_Ssw_Tc0.c
static void __Core0_start(void)
{
    ...
    /* Trap vector table initialization is necessary if it is not same as default value */
    Ifx_Ssw_MTCR(CPU_BTV, (unsigned int)__TRAPTAB(0));
对于 CPU0,载入的 Trap 向量表为 __TRAPTAB_CPU0,使用的是 Cached Program Flash(plfs):
// Libraries/Infra/Platform/Tricore/Compilers/CompilerGcc.h
#define __TRAPTAB(cpu)     __TRAPTAB_CPU##cpu
-------------------------------------------------------------

// Libraries/Infra/Platform/Tricore/Compilers/CompilerGcc.h
    pfls0 (rx!p): org = 0x80000000, len = 3M
    pfls0_nc (rx!p): org = 0xa0000000, len = 3M
-------------------------------------------------------------

// Lcf_Gnuc_Tricore_Tc.lsl
    /*Fixed memory Allocations for Trap Vector Table*/
    CORE_ID = GLOBAL;
    SECTIONS
    {
        .traptab_tc0 (LCF_TRAPVEC0_START) : { PROVIDE(__TRAPTAB_CPU0 = .); KEEP (*(.traptab_cpu0)); } > pfls0
        ...
        .traptab_tc5 (LCF_TRAPVEC5_START) : { PROVIDE(__TRAPTAB_CPU5 = .); KEEP (*(.traptab_cpu5)); } > pfls5
    }
Trap 向量表各个向量的地址如下:
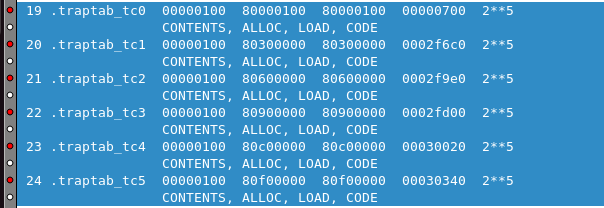
// Lcf_Gnuc_Tricore_Tc.lsl
LCF_TRAPVEC0_START = 0x80000100;
LCF_TRAPVEC1_START = 0x80300000;
LCF_TRAPVEC2_START = 0x80600000;
LCF_TRAPVEC3_START = 0x80900000;
LCF_TRAPVEC4_START = 0x80C00000;
LCF_TRAPVEC5_START = 0x80F00000;
通过 MTCR 指令将 Trap 向量表的起始地址 0x800000100 保存在 CPU 寄存器 BTV(Base Trap Vector Table Pointer) 中:
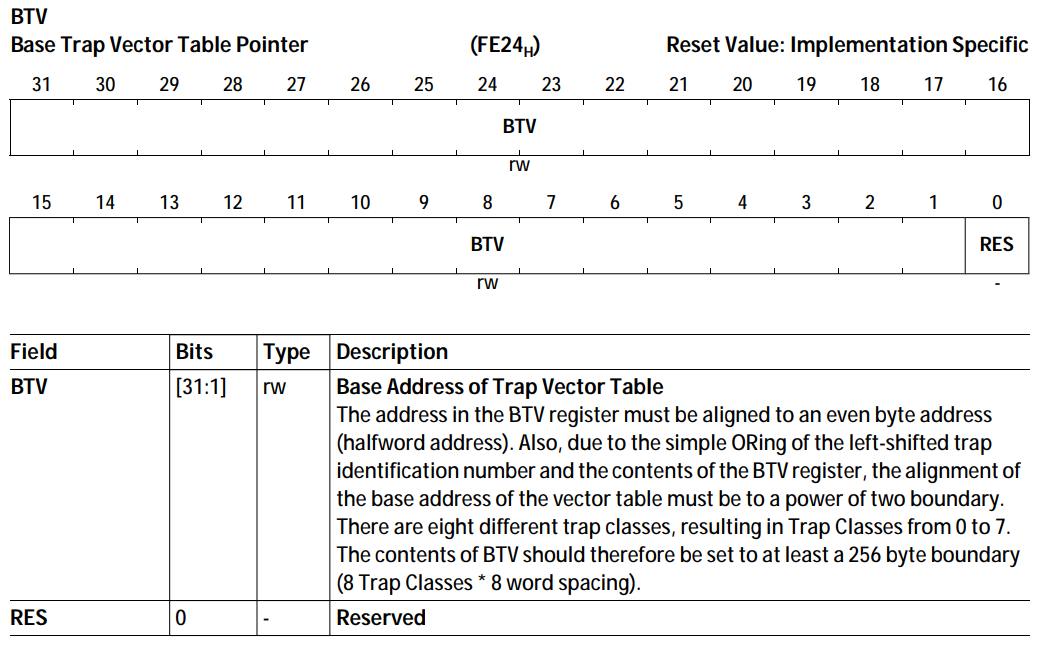

这里需要注意的是,获取 Trap 向量表的地址时,需要将 RES 位视为有效位,即 Trap 向量表的起始地址为 BTV.BTV 左移一位
7.4.2.中断向量表
// Libraries/Infra/Ssw/TC39B/Tricore/Ifx_Ssw_Tc0.c
static void __Core0_start(void)
{
...
/* Base interrupt vector table initialized */
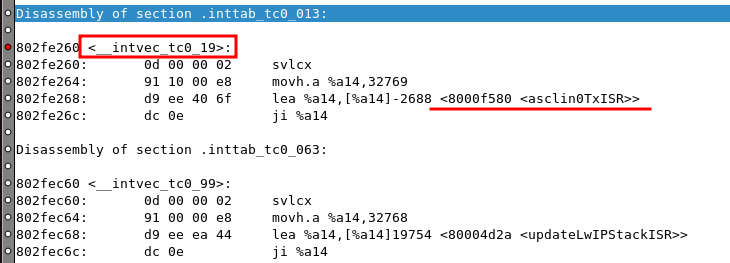
Ifx_Ssw_MTCR(CPU_BIV, (unsigned int)__INTTAB(0)); 对于 CPU0,载入的中断向量表为 __INTTAB_CPU0,共 256 个中断向量,按照 8 字节对齐,向量名称为 intvec_tc0_XXX:
// Libraries/Infra/Platform/Tricore/Compilers/CompilerGcc.h
#define __INTTAB_CPU(cpu)  __INTTAB_CPU##cpu
--------------------------------------------------------------

// Lcf_Gnuc_Tricore_Tc.lsl
    /*Fixed memory Allocations for Interrupt Vector Table*/
    SECTIONS
    {
        /*CPU0 Interrupt Vector Table*/
        .inttab_tc0_000 (__INTTAB_CPU0 + 0x0000) : { . = ALIGN(8) ;  KEEP (*(.intvec_tc0_0  )); }
        .inttab_tc0_001 (__INTTAB_CPU0 + 0x0020) : { . = ALIGN(8) ;  KEEP (*(.intvec_tc0_1  )); }
        ...
        .inttab_tc0_0FF (__INTTAB_CPU0 + 0x1FE0) : { . = ALIGN(8) ;  KEEP (*(.intvec_tc0_255)); }
    }
通过 MTCR 指令将中断向量表的起始地址 0x802FE000 保存在 CPU 的 BIV 寄存器中:
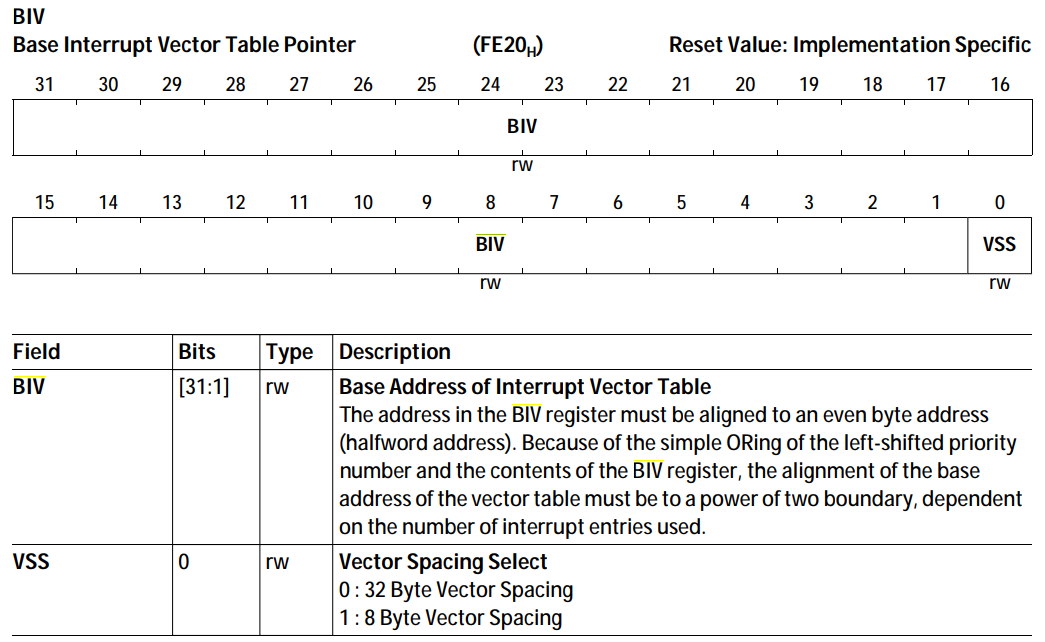
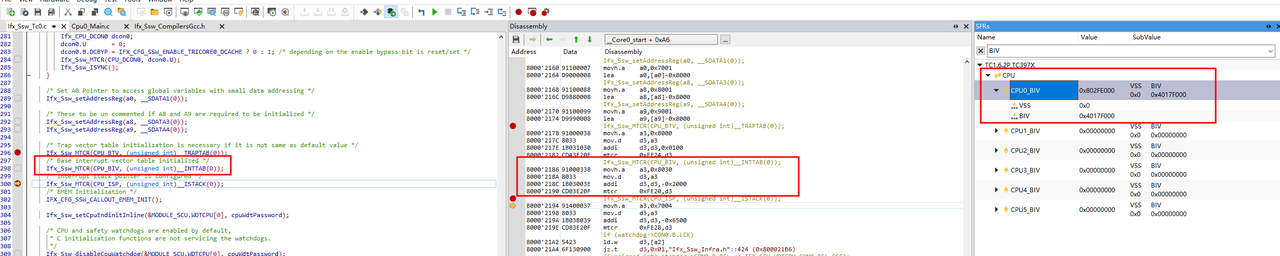
同样的,在计算中断向量表的起始地址时,也需要将 BIV.VSS 位视为有效位,即中断向量表的起始地址为 BIV.BIV 左移一位
TriCore 的中断向量表可以按照 8 字节对齐,也可以按照 32 字节对齐,由 BIV.VSS 位控制,当中断产生后,PC 指针跳转至对应的中断向量时,需要读取 VSS 位,并根据其状态计算实际的中断向量地址:
if (BIV.VSS == 0)
    ISR_Entry_PC = {BIV[31:1],1’b0} | {PIPN<<5};
else
    ISR_Entry_PC = {BIV[31:1],1’b0} | {PIPN<<3};
这里需要注意的是,TriCore 的中断向量并不是中断服务程序,中断向量仅用于跳转,这样每个中断向量的大小固定,不会因为中断服务程序过长,而导致每个中断向量的大小不一致:
// Libraries/Infra/Platform/Tricore/Compilers/CompilerGcc.h
#define IFX_INTERRUPT(isr, vectabNum, prio) IFX_INTERRUPT_INTERNAL(isr, vectabNum, prio)
----------------------------------------------------------------------------------------

// Libraries/Infra/Platform/Tricore/Compilers/CompilerGcc.h
#define IFX_INTERRUPT_INTERNAL(isr, vectabNum, prio) \
__asm__ (".ifndef .intr.entry.include                        \n"\
        ".altmacro                                           \n"\
        ".macro .int_entry.2 intEntryLabel, name # define the section and inttab entry code \n"\
        "   .pushsection .\\intEntryLabel,\"ax\",@progbits   \n"\
        "   __\\intEntryLabel :                              \n"\
--------------------------------------------------------------------\
        "       svlcx                                        \n"\
        "       movh.a  %a14, hi:\\name                      \n"\
        "       lea     %a14, [%a14]lo:\\name                \n"\
        "       ji      %a14                                 \n"\
--------------------------------------------------------------------\
        "   .popsection                                      \n"\
        ".endm                                               \n"\
--------------------------------------------------------------------\
        ".macro .int_entry.1 prio,vectabNum,u,name           \n"\
            ".int_entry.2 intvec_tc\\vectabNum\\u\\prio,(name) # build the unique name \n"\
        ".endm                                               \n"\
--------------------------------------------------------------------\
        "                                                    \n"\
        ".macro .intr.entry name,vectabNum,prio              \n"\
            ".int_entry.1 %(prio),%(vectabNum),_,name # evaluate the priority and the cpu number \n"\
        ".endm                                               \n"\
        ".intr.entry.include:                                \n"\
        ".endif                                              \n"\
        ".intr.entry "#isr","#vectabNum","#prio               );\
IFX_EXTERN void __attribute__ ((interrupt_handler)) isr(); \
void isr (void)
7.4.3.中断栈
// Libraries/Infra/Ssw/TC39B/Tricore/Ifx_Ssw_Tc0.c
static void __Core0_start(void)
{
    ...
    /* Interrupt stack pointer is configured */
    Ifx_Ssw_MTCR(CPU_ISP, (unsigned int)__ISTACK(0));
对于 CPU0,载入的中断栈为 __ISTACK0:
// Libraries/Infra/Platform/Tricore/Compilers/CompilerGcc.h
#define __ISTACK(cpu)      __ISTACK##cpu
----------------------------------------------------------------------------

// Lcf_Gnuc_Tricore_Tc.lsl
LCF_CSA0_SIZE = 8k;
LCF_USTACK0_SIZE = 2k;
LCF_ISTACK0_SIZE = 1k;
----------------------------------------------------------------------------

// Lcf_Gnuc_Tricore_Tc.lsl
LCF_DSPR0_START = 0x70000000;
LCF_DSPR0_SIZE = 240k;
----------------------------------------------------------------------------

// Lcf_Gnuc_Tricore_Tc.lsl
// LCF_CSA0_OFFSET = 0x3C000 - 0x400 - 0x2000 = 0x39C00
LCF_CSA0_OFFSET =    (LCF_DSPR0_SIZE - 1k - LCF_CSA0_SIZE);
// offset start = LCF_CSA0_OFFSET - 0x100 = 39B00
LCF_ISTACK0_OFFSET = (LCF_CSA0_OFFSET - 256 - LCF_ISTACK0_SIZE);
LCF_USTACK0_OFFSET = (LCF_ISTACK0_OFFSET - 256 - LCF_USTACK0_SIZE);
----------------------------------------------------------------------------

// Lcf_Gnuc_Tricore_Tc.lsl
    CORE_ID = CPU0;
    SECTIONS
    {
        CORE_SEC(.ustack) (LCF_DSPR0_START + LCF_USTACK0_OFFSET):
        { PROVIDE(__USTACK0_END = .);    . = . + LCF_USTACK0_SIZE;    PROVIDE(__USTACK0 = .); }

        CORE_SEC(.istack) (LCF_DSPR0_START + LCF_ISTACK0_OFFSET):
        { PROVIDE(__ISTACK0_END = .);    . = . + LCF_ISTACK0_SIZE;    PROVIDE(__ISTACK0 = .); }

        CORE_SEC(.csa) (LCF_DSPR0_START + LCF_CSA0_OFFSET):
        { PROVIDE(__CSA0 = .);    . = . + LCF_CSA0_SIZE;    PROVIDE(__CSA0_END = .); }
    }
通过 MTCR 指令,将中断栈的起始地址 0x70039B00 保存在 CPU 的 ISP 寄存器中:
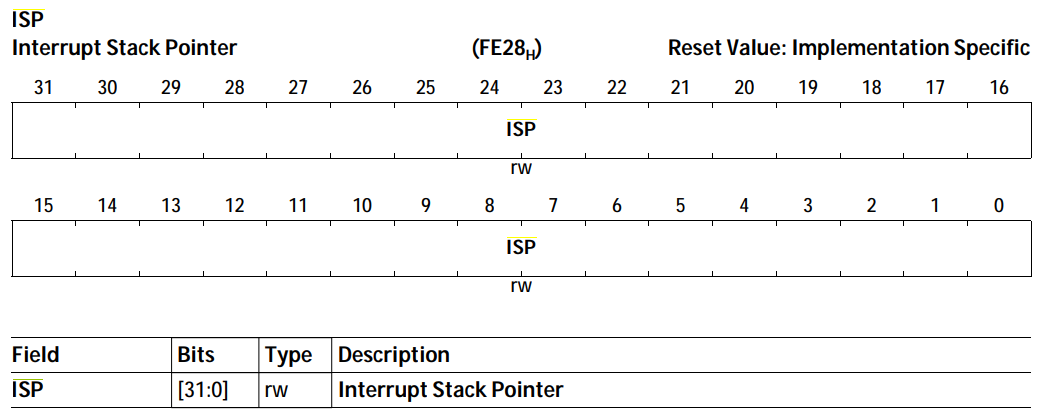

这里可以看出,中断栈默认保存在 Non-Cached Data RAM 中:

7.5.初始化 C 运行环境
// Libraries/Infra/Ssw/TC39B/Tricore/Ifx_Ssw_Tc0.c
static void __Core0_start(void)
{
    ...
    // 初始化 C 运行环境
    /* Initialization of C runtime variables and CPP constructors and destructors */
    (void)Ifx_Ssw_doCppInit();
Ifx_Ssw_doCppInit() 执行 C 运行环境的初始化,这里 _init() 并未定义,因此不执行任何操作:
// Libraries/Infra/Ssw/TC39B/Tricore/Ifx_Ssw_Infra.c
void Ifx_Ssw_doCppInit(void)
{
    Ifx_Ssw_C_InitInline();

    #ifdef __TASKING__
        extern void _main(void); /* cpp initialization */
        _main();
    #elif defined(__HIGHTEC__) && !defined(__clang__)
        extern void _init(void); /* cpp initialization */
        _init();
---------------------------------------------------------------
    // GCC
    #elif defined(__GNUC__) && !defined(__HIGHTEC__)
        extern void _init(void); /* cpp initialization */
        _init();
---------------------------------------------------------------
    #elif defined(__ghs__)
        extern void _main(void); /* cpp initialization */
        _main();
    #endif
}
因此 C 运行环境的初始化实际只执行了 Ifx_Ssw_C_InitInline(),其先清空相关数据/代码要使用的内存,然后将实际需要执行的代码/数据等复制到该内存中:
// Libraries/Infra/Ssw/TC39B/Tricore/Ifx_Ssw_CompilersGcc.h
typedef volatile union
{
    unsigned char      *ucPtr;
    unsigned short     *usPtr;
    unsigned int       *uiPtr;
    unsigned long long *ullPtr;
} Ifx_Ssw_CTablePtr;
------------------------------------------------------------

// Libraries/Infra/Ssw/TC39B/Tricore/Ifx_Ssw_CompilersGcc.h
IFX_SSW_INLINE void Ifx_Ssw_C_InitInline(void)
{
    Ifx_Ssw_CTablePtr pBlockDest, pBlockSrc;
    unsigned int      uiLength, uiCnt;
    unsigned int     *pTable;

-----------------------------------------------------
    // 清空内存区域:.bss、.data 等
    /* clear table */
    pTable = (unsigned int *)&__clear_table;

    while (pTable)
    {
        pBlockDest.uiPtr = (unsigned int *)*pTable++;
        uiLength         = *pTable++;

        /* we are finished when length == -1 */
        if (uiLength == 0xFFFFFFFF)
        {
            break;
        }

        uiCnt = uiLength / 8;

        while (uiCnt--)
        {
            *pBlockDest.ullPtr++ = 0;
        }

        if (uiLength & 0x4)
        {
            *pBlockDest.uiPtr++ = 0;
        }

        if (uiLength & 0x2)
        {
            *pBlockDest.usPtr++ = 0;
        }

        if (uiLength & 0x1)
        {
            *pBlockDest.ucPtr = 0;
        }
    }
-----------------------------------------------------

-----------------------------------------------------
    // 将 .bss、.data 等数据复制到内存区域
    /* copy table */
    pTable = (unsigned int *)&__copy_table;

    while (pTable)
    {
        pBlockSrc.uiPtr  = (unsigned int *)*pTable++;
        pBlockDest.uiPtr = (unsigned int *)*pTable++;
        uiLength         = *pTable++;

        /* we are finished when length == -1 */
        if (uiLength == 0xFFFFFFFF)
        {
            break;
        }

        uiCnt = uiLength / 8;

        while (uiCnt--)
        {
            *pBlockDest.ullPtr++ = *pBlockSrc.ullPtr++;
        }

        if (uiLength & 0x4)
        {
            *pBlockDest.uiPtr++ = *pBlockSrc.uiPtr++;
        }

        if (uiLength & 0x2)
        {
            *pBlockDest.usPtr++ = *pBlockSrc.usPtr++;
        }

        if (uiLength & 0x1)
        {
            *pBlockDest.ucPtr = *pBlockSrc.ucPtr;
        }
    }
}
需要清空的内存区域以及需要复制的数据定义如下:
// Lcf_Gnuc_Tricore_Tc.lsl
/*Far Const Sections, selectable by toolchain*/
CORE_ID = GLOBAL;
SECTIONS
{
    CORE_SEC(.rodata) : FLAGS(arl)
    {
        *(.rodata.farConst.cpu0.32bit)
        *(.rodata.farConst.cpu0.16bit)
        *(.rodata.farConst.cpu0.8bit)
        *(.rodata)
        *(.rodata.*)
    *(.gnu.linkonce.r.*)
    /*
     * Create the clear and copy tables that tell the startup code
     * which memory areas to clear and to copy, respectively.
     */
    . = ALIGN(4) ;
------------------------------------------------------------------------------------------------
    PROVIDE(__clear_table = .);
    LONG(0 + ADDR(.CPU5.zbss));       LONG(SIZEOF(.CPU5.zbss));
    LONG(0 + ADDR(.CPU5.bss));        LONG(SIZEOF(.CPU5.bss));
    LONG(0 + ADDR(.CPU5.lmubss));     LONG(SIZEOF(.CPU5.lmubss));
    LONG(0 + ADDR(.CPU4.zbss));       LONG(SIZEOF(.CPU4.zbss));
    LONG(0 + ADDR(.CPU4.bss));        LONG(SIZEOF(.CPU4.bss));
    LONG(0 + ADDR(.CPU4.lmubss));     LONG(SIZEOF(.CPU4.lmubss));
    LONG(0 + ADDR(.CPU3.zbss));       LONG(SIZEOF(.CPU3.zbss));
    LONG(0 + ADDR(.CPU3.bss));        LONG(SIZEOF(.CPU3.bss));
    LONG(0 + ADDR(.CPU3.lmubss));     LONG(SIZEOF(.CPU3.lmubss));
    LONG(0 + ADDR(.CPU2.zbss));       LONG(SIZEOF(.CPU2.zbss));
    LONG(0 + ADDR(.CPU2.bss));        LONG(SIZEOF(.CPU2.bss));
    LONG(0 + ADDR(.CPU2.lmubss));     LONG(SIZEOF(.CPU2.lmubss));
    LONG(0 + ADDR(.CPU1.zbss));       LONG(SIZEOF(.CPU1.zbss));
    LONG(0 + ADDR(.CPU1.bss));        LONG(SIZEOF(.CPU1.bss));
    LONG(0 + ADDR(.CPU1.lmubss));     LONG(SIZEOF(.CPU1.lmubss));
    LONG(0 + ADDR(.CPU0.zbss));       LONG(SIZEOF(.CPU0.zbss));
    LONG(0 + ADDR(.CPU0.bss));        LONG(SIZEOF(.CPU0.bss));
    LONG(0 + ADDR(.CPU0.lmubss));     LONG(SIZEOF(.CPU0.lmubss));
    LONG(0 + ADDR(.zbss));            LONG(SIZEOF(.zbss));
    LONG(0 + ADDR(.sbss));            LONG(SIZEOF(.sbss));
    LONG(0 + ADDR(.bss));             LONG(SIZEOF(.bss));
    LONG(0 + ADDR(.lmubss));          LONG(SIZEOF(.lmubss));
    LONG(0 + ADDR(.sbss4));           LONG(SIZEOF(.sbss4));
------------------------------------------------------------------------------------------------
    LONG(-1);                         LONG(-1);
    PROVIDE(__clear_table_powerOn = .);
    LONG(0 + ADDR(.zbss_powerOn));    LONG(SIZEOF(.zbss_powerOn));
    LONG(-1);                         LONG(-1);
------------------------------------------------------------------------------------------------
    PROVIDE(__copy_table = .);
    LONG(LOADADDR(.CPU5.zdata));      LONG(0 + ADDR(.CPU5.zdata));      LONG(SIZEOF(.CPU5.zdata));
    LONG(LOADADDR(.CPU5.data));       LONG(0 + ADDR(.CPU5.data));       LONG(SIZEOF(.CPU5.data));
    LONG(LOADADDR(.CPU5.lmudata));    LONG(0 + ADDR(.CPU5.lmudata));    LONG(SIZEOF(.CPU5.lmudata));
    LONG(LOADADDR(.CPU4.zdata));      LONG(0 + ADDR(.CPU4.zdata));      LONG(SIZEOF(.CPU4.zdata));
    LONG(LOADADDR(.CPU4.data));       LONG(0 + ADDR(.CPU4.data));       LONG(SIZEOF(.CPU4.data));
    LONG(LOADADDR(.CPU4.lmudata));    LONG(0 + ADDR(.CPU4.lmudata));    LONG(SIZEOF(.CPU4.lmudata));
    LONG(LOADADDR(.CPU3.zdata));      LONG(0 + ADDR(.CPU3.zdata));      LONG(SIZEOF(.CPU3.zdata));
    LONG(LOADADDR(.CPU3.data));       LONG(0 + ADDR(.CPU3.data));       LONG(SIZEOF(.CPU3.data));
    LONG(LOADADDR(.CPU3.lmudata));    LONG(0 + ADDR(.CPU3.lmudata));    LONG(SIZEOF(.CPU3.lmudata));
    LONG(LOADADDR(.CPU2.zdata));      LONG(0 + ADDR(.CPU2.zdata));      LONG(SIZEOF(.CPU2.zdata));
    LONG(LOADADDR(.CPU2.data));       LONG(0 + ADDR(.CPU2.data));       LONG(SIZEOF(.CPU2.data));
    LONG(LOADADDR(.CPU2.lmudata));    LONG(0 + ADDR(.CPU2.lmudata));    LONG(SIZEOF(.CPU2.lmudata));
    LONG(LOADADDR(.CPU1.zdata));      LONG(0 + ADDR(.CPU1.zdata));      LONG(SIZEOF(.CPU1.zdata));
    LONG(LOADADDR(.CPU1.data));       LONG(0 + ADDR(.CPU1.data));       LONG(SIZEOF(.CPU1.data));
    LONG(LOADADDR(.CPU1.lmudata));    LONG(0 + ADDR(.CPU1.lmudata));    LONG(SIZEOF(.CPU1.lmudata));
    LONG(LOADADDR(.CPU0.zdata));      LONG(0 + ADDR(.CPU0.zdata));      LONG(SIZEOF(.CPU0.zdata));
    LONG(LOADADDR(.CPU0.data));       LONG(0 + ADDR(.CPU0.data));       LONG(SIZEOF(.CPU0.data));
    LONG(LOADADDR(.CPU0.lmudata));    LONG(0 + ADDR(.CPU0.lmudata));    LONG(SIZEOF(.CPU0.lmudata));
    LONG(LOADADDR(.zdata));           LONG(0 + ADDR(.zdata));           LONG(SIZEOF(.zdata));
    LONG(LOADADDR(.sdata));           LONG(0 + ADDR(.sdata));           LONG(SIZEOF(.sdata));
    LONG(LOADADDR(.data));            LONG(0 + ADDR(.data));            LONG(SIZEOF(.data));
    LONG(LOADADDR(.lmudata));         LONG(0 + ADDR(.lmudata));         LONG(SIZEOF(.lmudata));
    LONG(LOADADDR(.sdata4));          LONG(0 + ADDR(.sdata4));          LONG(SIZEOF(.sdata4));
    LONG(LOADADDR(.CPU0.psram_text)); LONG(0 + ADDR(.CPU0.psram_text)); LONG(SIZEOF(.CPU0.psram_text));
    LONG(LOADADDR(.CPU1.psram_text)); LONG(0 + ADDR(.CPU1.psram_text)); LONG(SIZEOF(.CPU1.psram_text));
    LONG(LOADADDR(.CPU2.psram_text)); LONG(0 + ADDR(.CPU2.psram_text)); LONG(SIZEOF(.CPU2.psram_text));
    LONG(LOADADDR(.CPU3.psram_text)); LONG(0 + ADDR(.CPU3.psram_text)); LONG(SIZEOF(.CPU3.psram_text));
    LONG(LOADADDR(.CPU4.psram_text)); LONG(0 + ADDR(.CPU4.psram_text)); LONG(SIZEOF(.CPU4.psram_text));
    LONG(LOADADDR(.CPU5.psram_text)); LONG(0 + ADDR(.CPU5.psram_text)); LONG(SIZEOF(.CPU5.psram_text));
------------------------------------------------------------------------------------------------
    LONG(-1);                         LONG(-1);                         LONG(-1);
    PROVIDE(__copy_table_powerOn = .) ;
    LONG(LOADADDR(.zdata_powerOn));   LONG(0 + ADDR(.zdata_powerOn));   LONG(SIZEOF(.zdata_powerOn));
    LONG(-1);                         LONG(-1);                         LONG(-1);
    . = ALIGN(8);
    } > default_rom
}
其中包括:
-
.data:需要初始化的数据;
-
.lmudata:Local Memory Unit(LMU)中的数据;
-
.bss:不需要初始化的数据;
-
.text:需要执行的代码(代码 Section);
-
等等(前面带 s 标记的如 .sdata,则表示该数据使用的是小地址,其地址长度为 16-bit 而非 32-bit,带有 z 标记的如 .zdata 表示使用的是绝对地址);
C 运行环境配置完成后,跳转至实际的用户程序 core0_main() 处开始执行:
// Libraries/Infra/Ssw/TC39B/Tricore/Ifx_Ssw_Tc0.c
static void __Core0_start(void)
{
    ...
    // 执行用户程序:core0_main()
    extern void core0_main(void);
    Ifx_Ssw_jumpToFunction(core0_main);    /* Jump to main function of CPU0 */
8.运行用户程序 - core0_main()
// Cpu0_Main.c
IFX_ALIGN(4) IfxCpu_syncEvent g_cpuSyncEvent = 0;

void core0_main(void)
{
    IfxCpu_enableInterrupts();

    /* !!WATCHDOG0 AND SAFETY WATCHDOG ARE DISABLED HERE!!
     * Enable the watchdogs and service them periodically if it is required
     */
    IfxScuWdt_disableCpuWatchdog(IfxScuWdt_getCpuWatchdogPassword());
    IfxScuWdt_disableSafetyWatchdog(IfxScuWdt_getSafetyWatchdogPassword());

    /* Wait for CPU sync event */
    IfxCpu_emitEvent(&g_cpuSyncEvent);
    IfxCpu_waitEvent(&g_cpuSyncEvent, 1);

    /* Enable the global interrupts of this CPU */
    IfxCpu_enableInterrupts();

    ... // 用户自己定义的代码,如调用串口等等

    while(1)
    {
    }
}
这里需要注意的是,在执行实际的用户程序前,需要对各个 CPU 进行同步,依靠 IfxCpu_emitEvent() 和 IfxCpu_waitEvent() 完成,这一步的目的是确保在执行实际的用户程序前,各个 CPU 核心均已启动完成:
// Libraries/iLLD/TC39B/Tricore/Cpu/Std/IfxCpu.c
void IfxCpu_emitEvent(IfxCpu_syncEvent *event)
{
Ifx__imaskldmst(event, 1, __mfcr(CPU_CORE_ID), 1);
}
------------------------------------------------------
// Libraries/iLLD/TC39B/Tricore/Cpu/Std/IfxCpu.c
boolean IfxCpu_waitEvent(IfxCpu_syncEvent *event, uint32 timeoutMilliSec)
{
volatile uint32 *sync = (volatile uint32 *)IFXCPU_GLB_ADDR_DSPR(__mfcr(CPU_CORE_ID), event);
boolean errorcnt = 0U;
/* Divide with 1000, gives the count value equivalent to milliseconds */
uint32 stmCount = (uint32)((IfxScuCcu_getStmFrequency() / 1000) * timeoutMilliSec);
uint32 stmCountBegin = STM0_TIM0.U;
while ((*sync & IFXCPU_CFG_ALLCORE_DONE) != IFXCPU_CFG_ALLCORE_DONE)
{
__nop();
if ((uint32)(STM0_TIM0.U - stmCountBegin) >= stmCount)
{
errorcnt = 1;
break;
}
/* There is no need to check overflow of the STM timer.
* When counter after overflow subtracted with counter before overflow,
* the subtraction result will be as expected, as long as both are unsigned 32 bits
* eg: stmCountBegin= 0xFFFFFFFE (before overflow)
* stmCountNow = 0x00000002 (before overflow)
* diff= stmCountNow - stmCountBegin = 4 as expected.*/
}
return errorcnt;
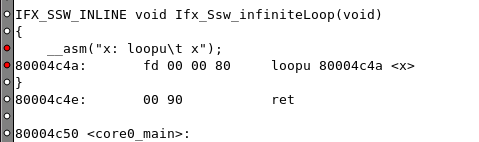
}至此,TriCore 系统的启动完成,可以开始执行用户程序,core0_main() 函数中的 while() 循环是为了防止程序跳出正常的用户逻辑,如果没有这一步,则用户程序在执行完后,会回到 __Core0_start() 处执行 LOOPU 指令:
// Libraries/Infra/Ssw/TC39B/Tricore/Ifx_Ssw_CompilersGcc.h
IFX_SSW_INLINE void Ifx_Ssw_infiniteLoop(void)
{
    __asm("x: loopu\t x");
}
------------------------------------------------------

// Libraries/Infra/Ssw/TC39B/Tricore/Ifx_Ssw_Tc0.c
static void __Core0_start(void)
{
    ...
    extern void core0_main(void);
    Ifx_Ssw_jumpToFunction(core0_main);    /* Jump to main function of CPU0 */
...

    /* Go into infinite loop, normally the code shall not reach here */
    Ifx_Ssw_infiniteLoop();
}

智能硬件社区聚焦AI智能硬件技术生态,汇聚嵌入式AI、物联网硬件开发者,打造交流分享平台,同步全国赛事资讯、开展 OPC 核心人才招募,助力技术落地与开发者成长。
更多推荐


 33
33 0
0- 0


 已为社区贡献21条内容

所有评论(0)