硬件设计_基于STM32单片机的自动浇花系统
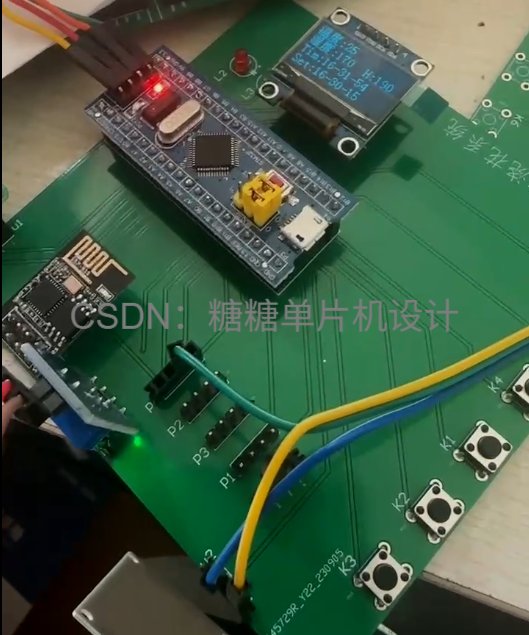
系统通过温度传感器和土壤湿度传感器实时监测环境参数,当温度过高或土壤过干时自动触发浇水。系统配备OLED显示屏展示实时数据,内置时钟模块支持定时浇水功能,并通过ESP8266模块实现远程监控,用户可通过手机APP查看数据并远程控制。硬件设计采用微控制器连接各类传感器和继电器,软件部分包含Keil端的下位机程序和基于MQTT协议的上位机界面程序,实现了温度、湿度数据的采集显示与智能灌溉控制。系统具有
一.系统概述
自动浇花系统功能概述
环境温度监测:
利用温度传感器实时获取环境温度,并在OLED显示屏上显示当前温度数据。
当温度超过用户设定的阈值时,系统会自动启动浇水功能。
土壤湿度监测:
采用电阻式水滴模块检测土壤的湿度,检测结果同样通过OLED显示屏进行展示。
一旦检测到土壤湿度低于设定值,系统将自动进行浇水。
定时浇水功能:
配备DS1302实时时钟模块,用于记录和显示当前时间在OLED显示屏上。
当达到用户预设的浇水时间时,系统将自动启动浇水。
远程监控与控制:
通过ESP8266模块实现无线网络连接,将实时温度和土壤湿度数据上传至手机APP。
用户可通过APP远程控制浇水系统的开关。
阈值设定与手动控制:
用户可以通过按键输入设定温度和土壤湿度的阈值。
按键还可用于手动控制浇水系统的启动与停止。
二.电路设计
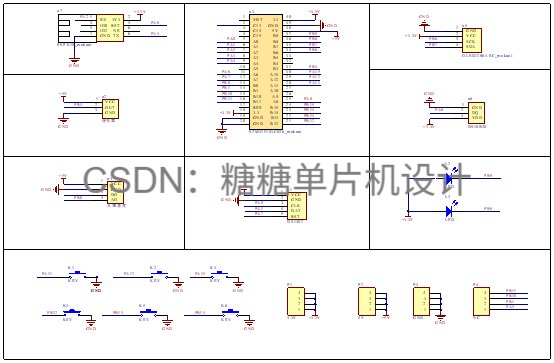
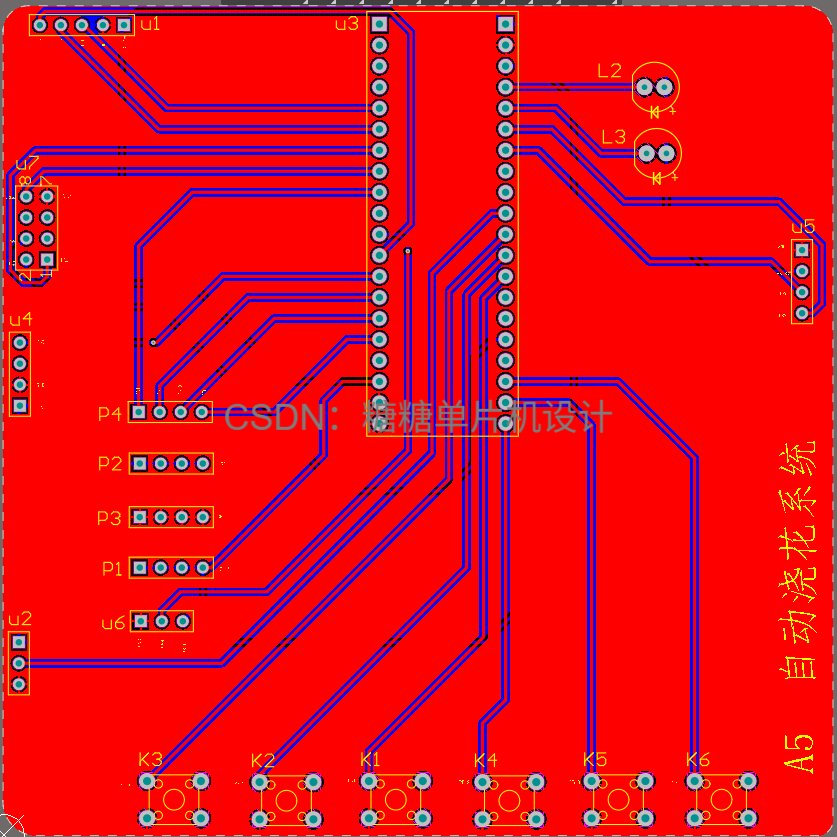
电电路图设计概述(使用Altium Designer)
温度传感器连接:
使用DS18B20温度传感器进行环境温度检测,该传感器通过单总线接口与微控制器进行数据通信。
数据显示模块:
采用0.96寸OLED显示屏(型号12864),通过IIC总线与微控制器进行连接,实现数据的实时显示。
时钟定时功能:
利用DS1302实时时钟模块进行时间管理,模块通过SDA、SCK和DAT三个引脚与微控制器相连。
阈值设定与浇水控制:
设计独立的按键用于用户设定阈值和控制浇水功能,按键的一个端口接地,另一个端口连接至微控制器的GPIO引脚。
浇水控制机制:
通过继电器实现浇水的模拟操作,将继电器的控制输出脚连接至微控制器的GPIO口,以便进行控制。
数据上传功能:
采用ESP8266-01S模块将采集到的温度和湿度数据上传至服务器,该模块通过UART串口与微控制器进行数据通信。
三.程序设计
keil端程序
#include "sys.h"
#include "delay.h"
#include "adc2.h"
#include "math.h"
#include "key.h"
#include "OLED_I2C.h"
#include "Control_Report_To_Police.h"


int main(void)
 {


	NVIC_PriorityGroupConfig(NVIC_PriorityGroup_2);//设置中断优先级分组为组2:2位抢占优先级,2位响应优先级
	delay_init();	    	 //延时函数初始化
  Usart1_Init(115200);
	TIM4_Init(300,7200);

	KEY_Init();
	Adc2_Init();	   //湿度

	while(DS18B20_Init());      //温度传感器初始化
	Relay_init();            //继电器初始化

	DS1302_GPIO_Init_Write_Time();
	OLED_Init();            //OLED初始化
	OLED_CLS();             //OLED清屏
	OLED_ShowCN(32,2,0);			//小常硬件
	OLED_ShowCN(32+16,2,1);
	OLED_ShowCN(32+32,2,2);
	OLED_ShowCN(32+32+16,2,3);
	delay_ms(100);
	OLED_CLS();

	ALi_ESP8266_GPIO_Init();
	MQTT_Buff_Init();
  AliIoT_Parameter_Init();

//	 /*******显示汉字**********/
	OLED_ShowCN(0,0,10);
	OLED_ShowCN(0+16,0,11);
	OLED_ShowCN(0,2,12);
	OLED_ShowCN(0+16,2,13);


  Relay_0=0;  //停止浇花
//  Beep=1;//蜂鸣器初始化   系统上电后先让蜂鸣器停止叫
  while(1)
	{
    OLED_Display_Cotrol(); //显示控制函数
	}
}
上位机端程序
<template>
<view class="wrapper">
<view class="device-area">
<view class="device-cart">
<view class="device-info">
<view class="device-name">温度</view>
<image class="device-logo" src="/static/Temp.png"></image>
</view>
<view class="device-data">{<!-- -->{Temp}}℃</view>
</view>
<view class="device-cart">
<view class="device-info">
<view class="device-name">湿度</view>
<image class="device-logo" src="/static/Humi.png"></image>
</view>
<view class="device-data">{<!-- -->{Humi}}%</view>
</view>
</view>
<button @click="clickon" type="primary">开启连接</button>
<button @click="tem_add" type="primary">浇花控制</button>
<!-- <button @click="tem_samll" type="primary">温度阈值-</button>
<button @click="him_add" type="primary">湿度阈值+</button>
<button @click="him_small" type="primary">湿度阈值-</button> -->
</view>
</template>
<script src="https://unpkg.com/mqtt/dist/mqtt.min.js"></script>
<script>
// const mqtt = require('mqtt')
const mqtt = require('node_modules/mqtt/dist/mqtt.min.js')
const url = 'ws://iot-06z00g5pu6fx3oj.mqtt.iothub.aliyuncs.com:443'
const options = {
clean: true,
connectTimeout: 4000,
username: 'uniapp_device&k054r6Bpm3e',
password: 'b5200c65e727e56cd66675f8068ba3a2c1bd5ac9367ebd99cfac68166ff18960',
clientId: 'k054r6Bpm3e.uniapp_device|securemode=2,signmethod=hmacsha256,timestamp=1693390768432|'}
const sub_topic = "/sys/k054r6Bpm3e/uniapp_device/thing/service/property/set" //需要订阅的主题
const P_TOPIC_NAME = "/sys/k054r6Bpm3e/uniapp_device/thing/event/property/post" //需要发布的主题
// const client = mqtt.connect(url, options)
// #ifdef H5
console.log('h5')
const client = mqtt.connect(url, options)
//#endif
// #ifdef APP-PLUS
console.log('app')
const client = mqtt.connect(`wx://iot-06z00g5pu6fx3oj.mqtt.iothub.aliyuncs.com:443`, options)
//#endif
// #ifdef MP
const client = mqtt.connect(`wxs://iot-06z00g5pu6fx3oj.mqtt.iothub.aliyuncs.com:443`, options)
console.log('微信小程序连接');
//#endif
export default {
data() {
return {
Temp:0,
Humi:0,
};
},
methods:{
clickon(){
let that = this
console.log(333);
client.on('connect', function () {
console.log(333);
console.log('Connected')
client.subscribe(sub_topic, { qos: 0 }, function (err) {
console.log("11111");
})
})
// 接收消息
client.on('message', function (topic, message) {
console.log(JSON.parse(message))
if (JSON.parse(message).items) {
that.Temp = JSON.parse(message).items.temperature.value
that.Humi = JSON.parse(message).items.humidity.value
}})
},
tem_add(){
client.publish(P_TOPIC_NAME, '{"method":"thing.event.property.post","id":"203302322","params":{"temp_max":999},"version":"1.0.0"}', { qos: 0, retain: false }, function (error) {
console.log('Published aa')
})
}
上位机开发界面

四.资料内容
24-32-09

智能硬件社区聚焦AI智能硬件技术生态,汇聚嵌入式AI、物联网硬件开发者,打造交流分享平台,同步全国赛事资讯、开展 OPC 核心人才招募,助力技术落地与开发者成长。
更多推荐


 9
9 0
0- 0


 已为社区贡献10条内容

所有评论(0)