W5500io-M 模块通过Web网页控制LED
1 前言
HTTP(超文本传输协议,HyperText Transfer Protocol)是一种用于分布式、协作式、超媒体信息系统的应用层协议, 基于 TCP/IP 通信协议来传递数据,是万维网(WWW)的数据通信的基础。设计 HTTP 最初的目的是为了提供一种发布和接收 HTML 页面的方法,通过 HTTP 或者 HTTPS 协议请求的资源由统一资源标识符(Uniform Resource Identifiers,URI)来标识。 以上是HTTP协议的简介,如想深入了解该协议,请参考mozilla网站上的介绍:HTTP 概述 - HTTP | MDN
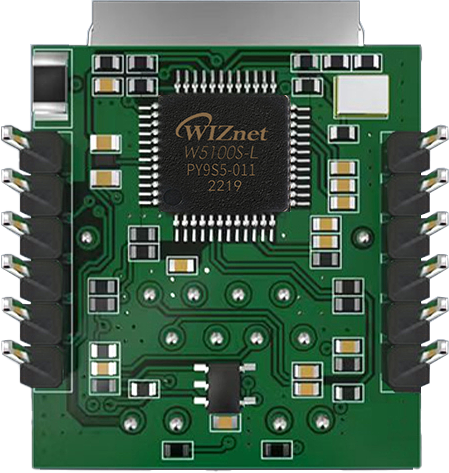
W5500io-M 是炜世推出的高性能SPI转以太网模块,具有以下特点:
- 极简设计:集成MAC、PHY、16KB缓存及RJ45网口,通过4线SPI接口直连主控,3.3V供电,紧凑尺寸适配嵌入式场景 。
- 简单易用:用户无需再移植复杂的TCP/IP协议栈到MCU中,可直接基于应用层数据做开发。
- 资料丰富:提供丰富的MCU应用例程和硬件参考设计,可直接参考使用,大大缩短研发时间,硬件兼容W5500io-M模组,方便方案开发与迭代。
- 应用广泛:在工业控制、智能电网、充电桩、安防消防、新能源、储能等领域都有广泛应用。
产品链接:商品详情
2 项目环境
2.1 硬件环境
- W5500io-M
- STM32F103VCT6 EVB
- 网络连接线
- 杜邦线若干
- 交换机或路由器
2.2 软件环境
- 开发环境:keil uvision 5
- 飞思创串口助手
- 例程连接:w5500.com/w5500.html
- 浏览器
3 硬件连接和方案
3.1 W5500硬件连接
1. //W5500_SCS	--->	STM32_GPIOD7	/*W5500的片选引脚*/
2. //W5500_SCLK	--->	STM32_GPIOB13	/*W5500的时钟引脚*/
3. //W5500_MISO	--->	STM32_GPIOB14	/*W5500的MISO引脚*/
4. //W5500_MOSI	--->	STM32_GPIOB15	/*W5500的MOSI引脚*/
5. //W5500_RESET	--->	STM32_GPIOD8	/*W5500的RESET引脚*/
6. //W5500_INT	--->	STM32_GPIOD9	/*W5500的INT引脚*/
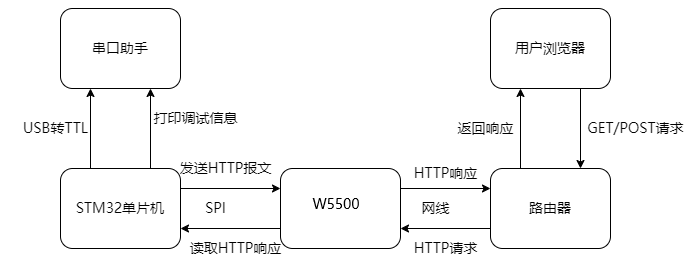
3.2 方案图示
4 例程修改
1.我们创建一个web_server.c和web_server.h,并在web_server.c添加头文件以及全局变量和初始化
#include "user_main.h"
#include "web_server.h"
#include <stdio.h>
#include <string.h>
// 全局变量
uint8_t txBuff[2048] = {0};  // 发送缓冲区
uint8_t rxBuff[2048] = {0};  // 接收缓冲区
uint8_t socketCount = 8;      // 支持的Socket数量
uint8_t socketList[] = {0,1,2,3,4,5,6,7}; // Socket列表

// LED状态管理
uint8_t led_status = 0;       // 0:关灯 1:开灯
uint8_t status_content[2] = "0"; // 状态页内容2.创建HTML用户界面,主要包含开/关控制按钮(JavaScript事件),实时调试信息面板,状态轮询机制(每2秒更新),时间戳日志功能
uint8_t *contentName = "index.html";
// 修改后的HTML内容 - 添加了更详细的调试信息
uint8_t content[] =
"<!doctype html>\n"
"<html lang=\"en\">\n"
"<head>\n"
"    <meta charset=\"GBK\">\n"
"    <meta name=\"viewport\" content=\"width=device-width, initial-scale=1.0\">\n"
"    <title>LED Control</title>\n"
"    <style>\n"
"        #light {\n"
"            width: 100px; height: 100px; border-radius: 50%;\n"
"            margin: 20px auto; border: 2px solid #333;\n"
"            transition: background-color 0.5s;\n"
"        }\n"
"        .light-on { background-color: yellow; box-shadow: 0 0 20px yellow; }\n"
"        .light-off { background-color: #ccc; }\n"
"        .btn { padding: 10px 20px; margin: 5px; }\n"
"        #debug { margin-top: 20px; padding: 10px; border: 1px solid #ccc; font-family: monospace; max-height: 200px; overflow-y: auto; }\n"
"    </style>\n"
"</head>\n"
"<body>\n"
"    <h1>LED Control Panel</h1>\n"
"    <button class=\"btn\" onclick=\"controlLED(1)\">开灯</button>\n"
"    <button class=\"btn\" onclick=\"controlLED(0)\">关灯</button>\n"
"    <div id=\"debug\">Debug information will appear here...</div>\n"
"    <script>\n"
"        const light = document.getElementById('light');\n"
"        const debugDiv = document.getElementById('debug');\n"
"        \n"
"        // 调试函数 - 在页面上显示调试信息\n"
"        function log(message) {\n"
"            console.log(message);\n"
"            debugDiv.innerHTML += '<p>' + new Date().toLocaleTimeString() + ': ' + message + '</p>';\n"
"            debugDiv.scrollTop = debugDiv.scrollHeight; // 自动滚动到底部\n"
"        }\n"
"        \n"
"        // 初始加载时获取状态\n"
"        fetchStatus();\n"
"        \n"
"        function controlLED(state) {\n"
"            log('Sending control: ' + state);\n"
"            fetch(`/control?action=${state ? '1' : '0'}&t=${Date.now()}`)\n"
"                .then(response => {\n"
"                    log(`Control response: ${response.status}`);\n"
"                    if (response.ok) {\n"
"                        log('Control command successful');\n"
"                        fetchStatus();\n"
"                    } else {\n"
"                        log('Control command failed');\n"
"                    }\n"
"                })\n"
"                .catch(error => {\n"
"                    log('Control error: ' + error);\n"
"                });\n"
"        }\n"
"        \n"
"        function fetchStatus() {\n"
"            const url = '/status?t=' + Date.now();\n"
"            log('Fetching status: ' + url);\n"
"            \n"
"            fetch(url)\n"
"                .then(response => {\n"
"                    log(`Status response: ${response.status}`);\n"
"                    if (!response.ok) {\n"
"                        throw new Error('Bad status: ' + response.status);\n"
"                    }\n"
"                    return response.text();\n"
"                })\n"
"                .then(status => {\n"
"                    log('Received status: ' + status);\n"
"                    updateLight(status.trim()); // 确保去除空白字符\n"
"                })\n"
"                .catch(error => {\n"
"                    log('Status error: ' + error);\n"
"                });\n"
"        }\n"
"        \n"
"        function updateLight(status) {\n"
"            if (status === '1') {\n"
"                light.className = 'light-on';\n"
"                log('Light ON - UI updated');\n"
"            } else if (status === '0') {\n"
"                light.className = 'light-off';\n"
"                log('Light OFF - UI updated');\n"
"            } else {\n"
"                log('Invalid status: ' + status);\n"
"            }\n"
"        }\n"
"        \n"
"        // 每2秒轮询一次状态\n"
"        setInterval(fetchStatus, 2000);\n"
"        \n"
"        // 初始日志\n"
"        log('Control panel initialized');\n"
"        log('Waiting for status updates...');\n"
"    </script>\n"
"</body>\n"
"</html>";3.添加URL解析与控制逻辑
static uint8_t parse_url_action(uint8_t *url) {
    // 从URL中提取action参数
    uint8_t *pAction = (uint8_t *)strstr((char *)url, "action=");
    return *(pAction + 7); // 返回action值
}
// 根据action执行LED操作
static void do_led_action(uint8_t action)
{
    if (action == '1')  // 开灯
    {
       printf("[LED] Turning ON\n");
       led_status = 1;
       status_content[0] = '1';
           }
    else if (action == '0')  // 关灯
    {
        printf("[LED] Turning OFF\n");
        led_status = 0;
        status_content[0] = '0';
           }
    else
    {
        printf("[LED] Unknown action: %c\n", action);
    }
    // 打印当前状态
    printf("[STATUS] Current LED status: %d\n", led_status);
}4.添加初始化WEB服务器函数
// 初始化Web服务器
void WebServer_Init(void)
{
    // 初始化http服务器
    httpServer_init(txBuff, rxBuff, socketCount, socketList);
    // 注册html页面
    reg_httpServer_webContent(contentName, content);
    // 注册状态页面 - 关键修复:确保状态页正确注册
    reg_httpServer_webContent("status", status_content);
    // 注册控制端点
    reg_httpServer_webContent("control", (uint8_t *)"OK");
    printf("[WEB] Server initialized\n");
    printf("[STATUS] Initial LED status: %d\n", led_status);
}
5.添加web服务器
// 启动Web服务器
void WebServer_Start(void)
{
    for (uint8_t i = 0; i < sizeof(socketList); i++)
    {
        httpServer_run(i);
    }
}
6.添加处理核心函数
void handler_user_function(uint8_t *url)
{
    printf("[HTTP] Request received: %s\n", url);
    // 检查是否为控制请求
    if (strstr((char *)url, "control") != NULL)
    {
        // 1. 从URL里提取出action的值
        uint8_t action = parse_url_action(url);
        // 2. 根据action的值,执行相应的LED操作
        do_led_action(action);
        // 调试输出
        printf("[CONTROL] Processed action: %c\n", action);
    }
    // 检查是否为状态请求
    else if (strstr((char *)url, "status") != NULL)
    {
        // 确保返回最新的状态值
        printf("[STATUS] Request received. Returning: %s\n", status_content);

        // 更新状态页内容 - 确保返回最新值
        reg_httpServer_webContent("status", status_content);
    }
}
// 状态获取函数
uint8_t* get_led_status(void)
{
    return status_content;
}

// 状态更新通知
void update_led_status(void)
{
    // 当LED状态改变时调用此函数
    reg_httpServer_webContent("status", status_content);
    printf("[STATUS] Updated status page to: %s\n", status_content);
}
7.添加web_server.函数
#ifndef __WEB_SERVER_H
#define __WEB_SERVER_H
#include "httpServer.h"
#include <string.h>
// 初始化Web服务器
void WebServer_Init(void);
// 启动Web服务器
void WebServer_Start(void);
extern uint8_t led_status; // 0:关灯 1:开灯
extern uint8_t status_content[2]; // 状态页内容
#endif8.在user_main.c中添加外部中断来表示LED状态变化,从而可以在浏览器页面上显示本地LED状态
  __HAL_RCC_GPIOC_CLK_ENABLE();
GPIO_InitStruct.Pin = GPIO_PIN_2;
GPIO_InitStruct.Mode = GPIO_MODE_IT_RISING;
GPIO_InitStruct.Pull = GPIO_NOPULL;
HAL_GPIO_Init(GPIOC, &GPIO_InitStruct);
HAL_NVIC_SetPriority(EXTI2_IRQn, 0, 0);
HAL_NVIC_EnableIRQ(EXTI2_IRQn);
void HAL_GPIO_EXTI_Callback(uint16_t GPIO_Pin)
{
    if(GPIO_Pin == GPIO_PIN_2) {
        led_status = ~led_status;
        status_content[0] = (status_content[0] == '0') ? '1' : '0';
    }
}
void EXTI2_IRQHandler(void)
{
   __HAL_GPIO_EXTI_CLEAR_IT(GPIO_PIN_2);
  HAL_GPIO_EXTI_IRQHandler(GPIO_PIN_2);
}
5 功能验证
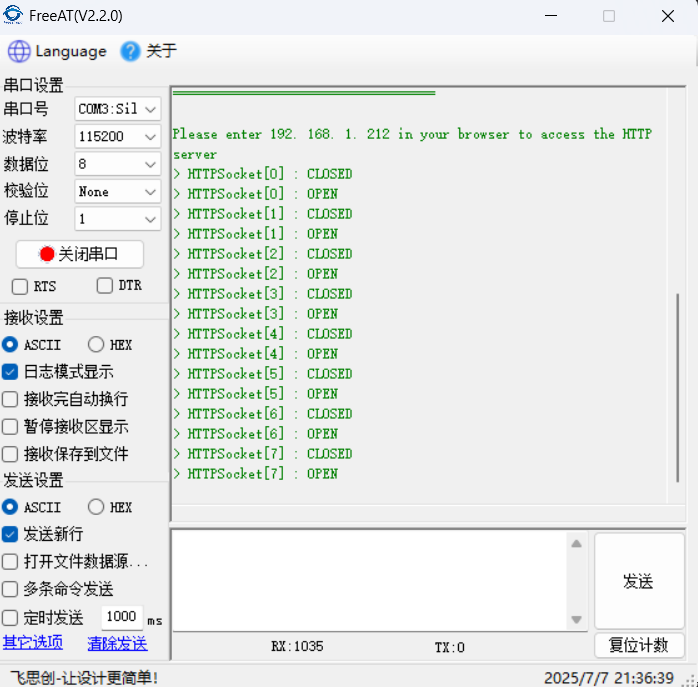
1.硬件连接完毕,烧录程序上电打印如下信息:在浏览器输入192.168.1.212来进入html页面
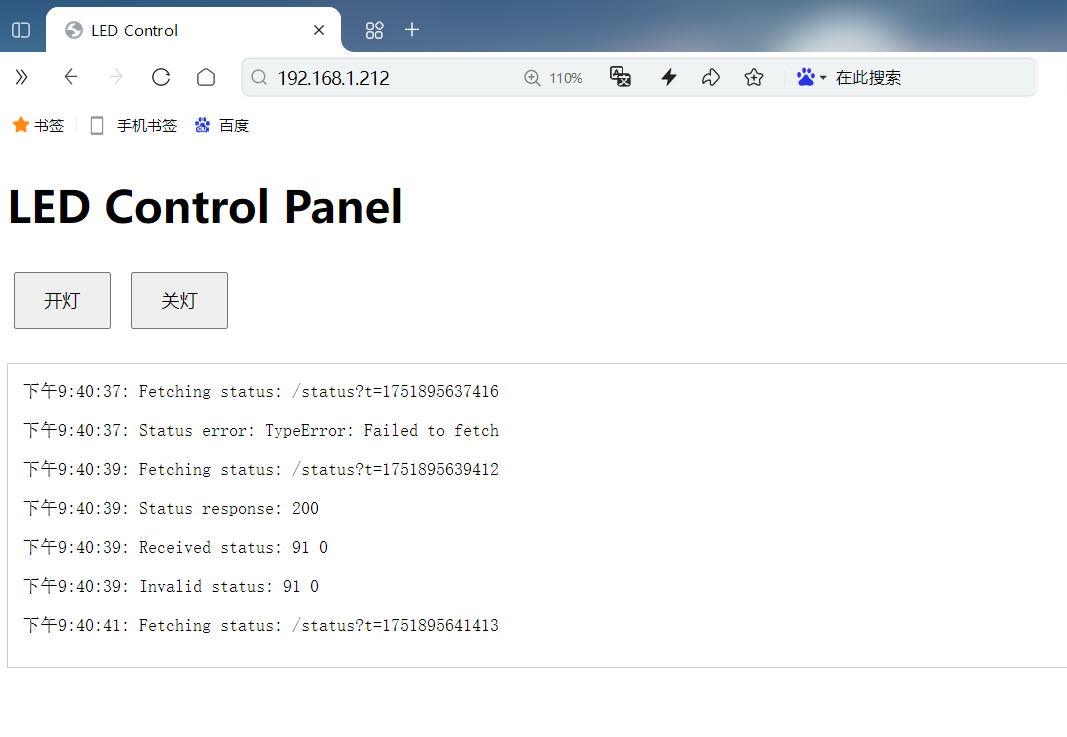
2.在浏览器输入提示的ip地址进入控制页面
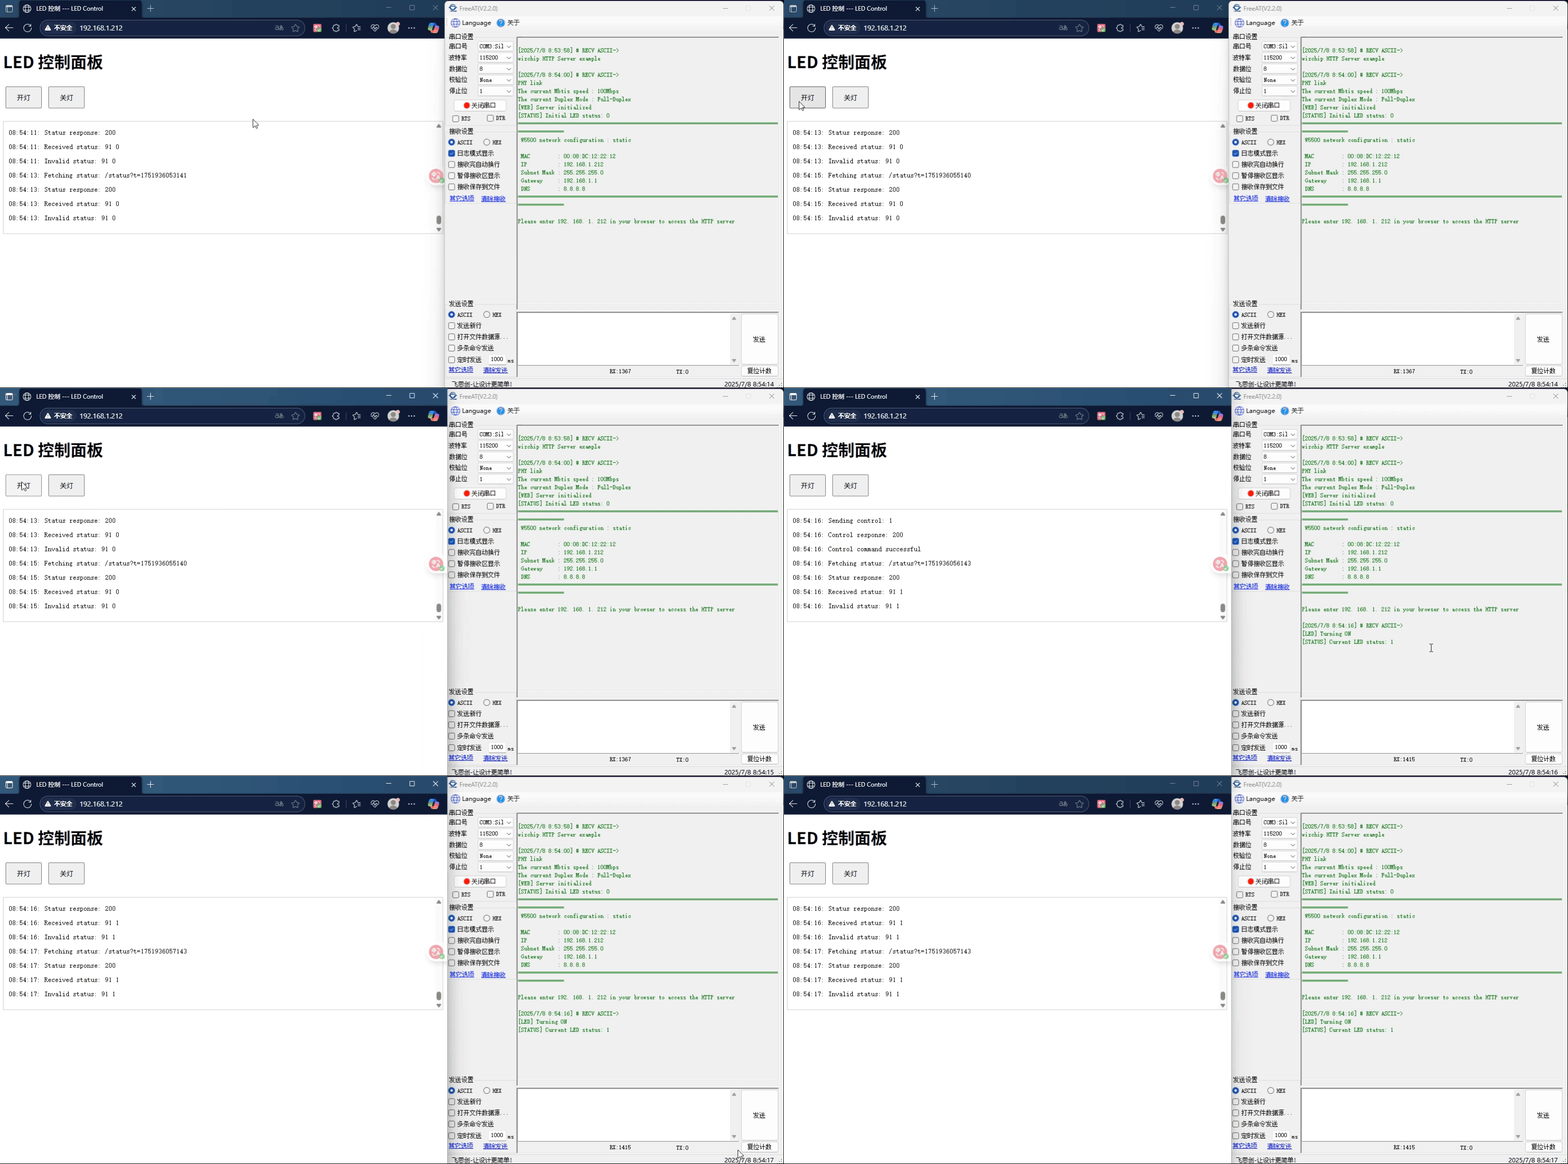
3.点击开灯
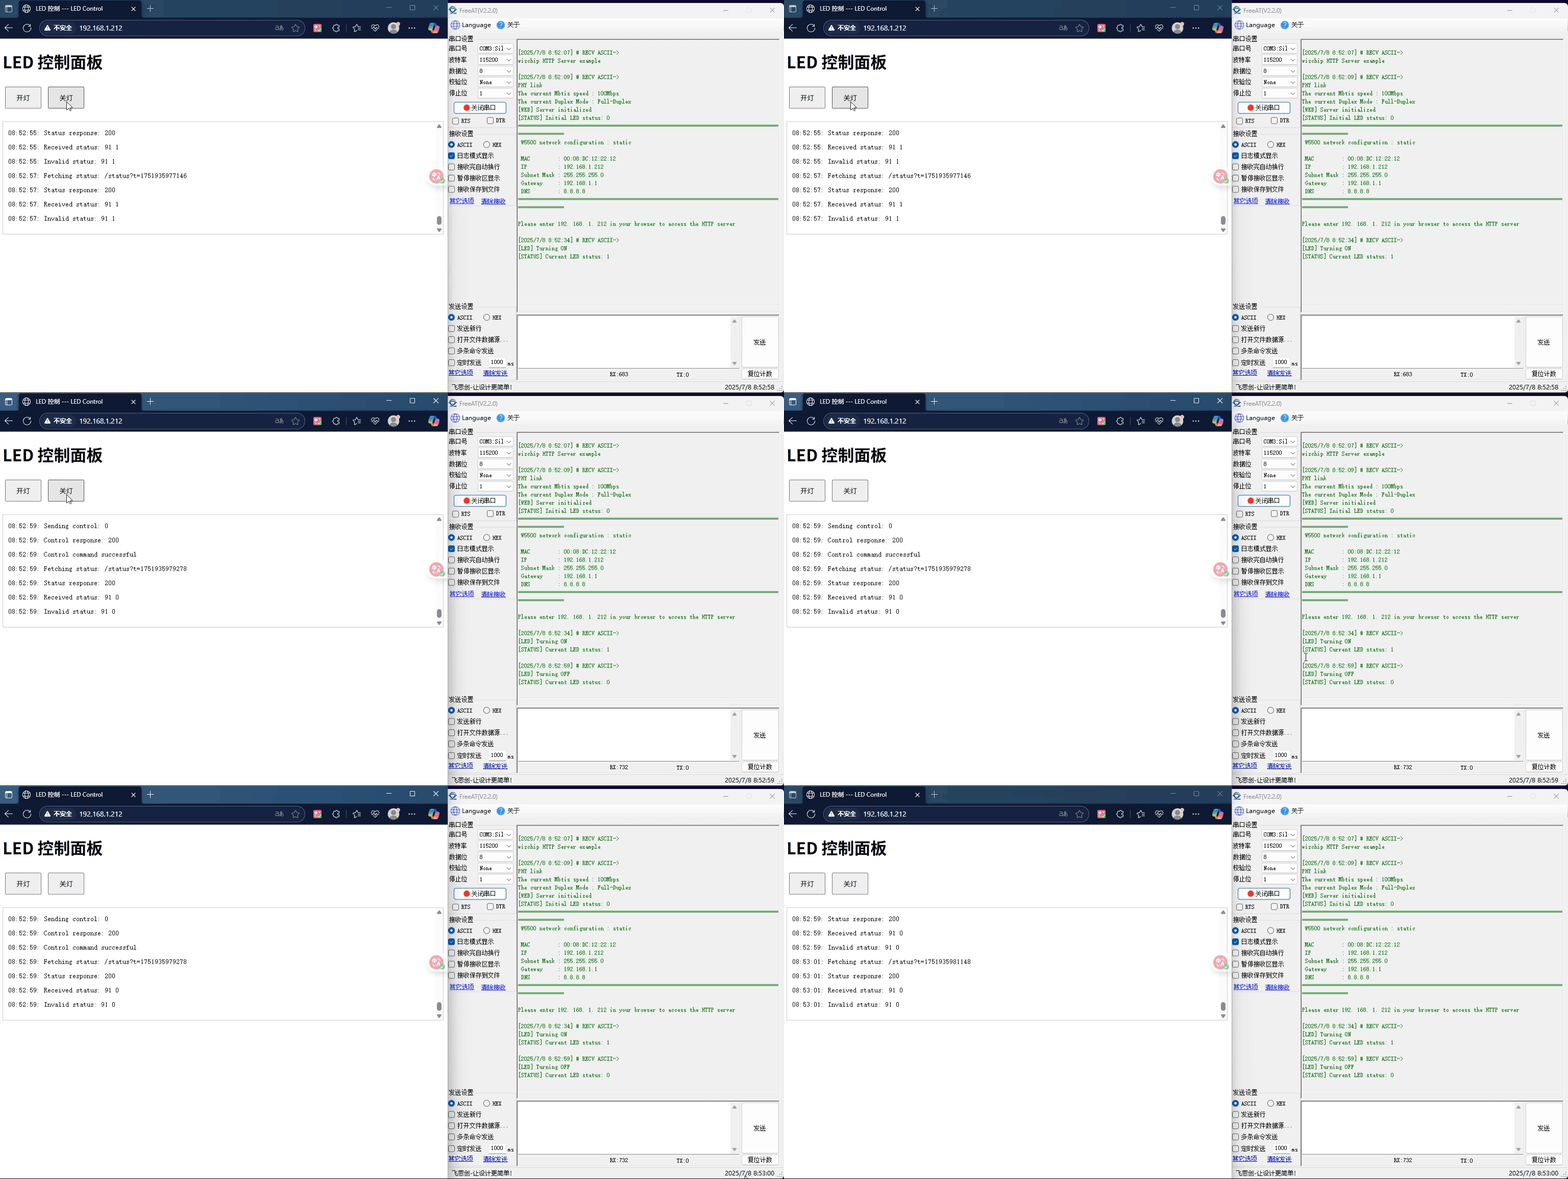
4.点击关灯
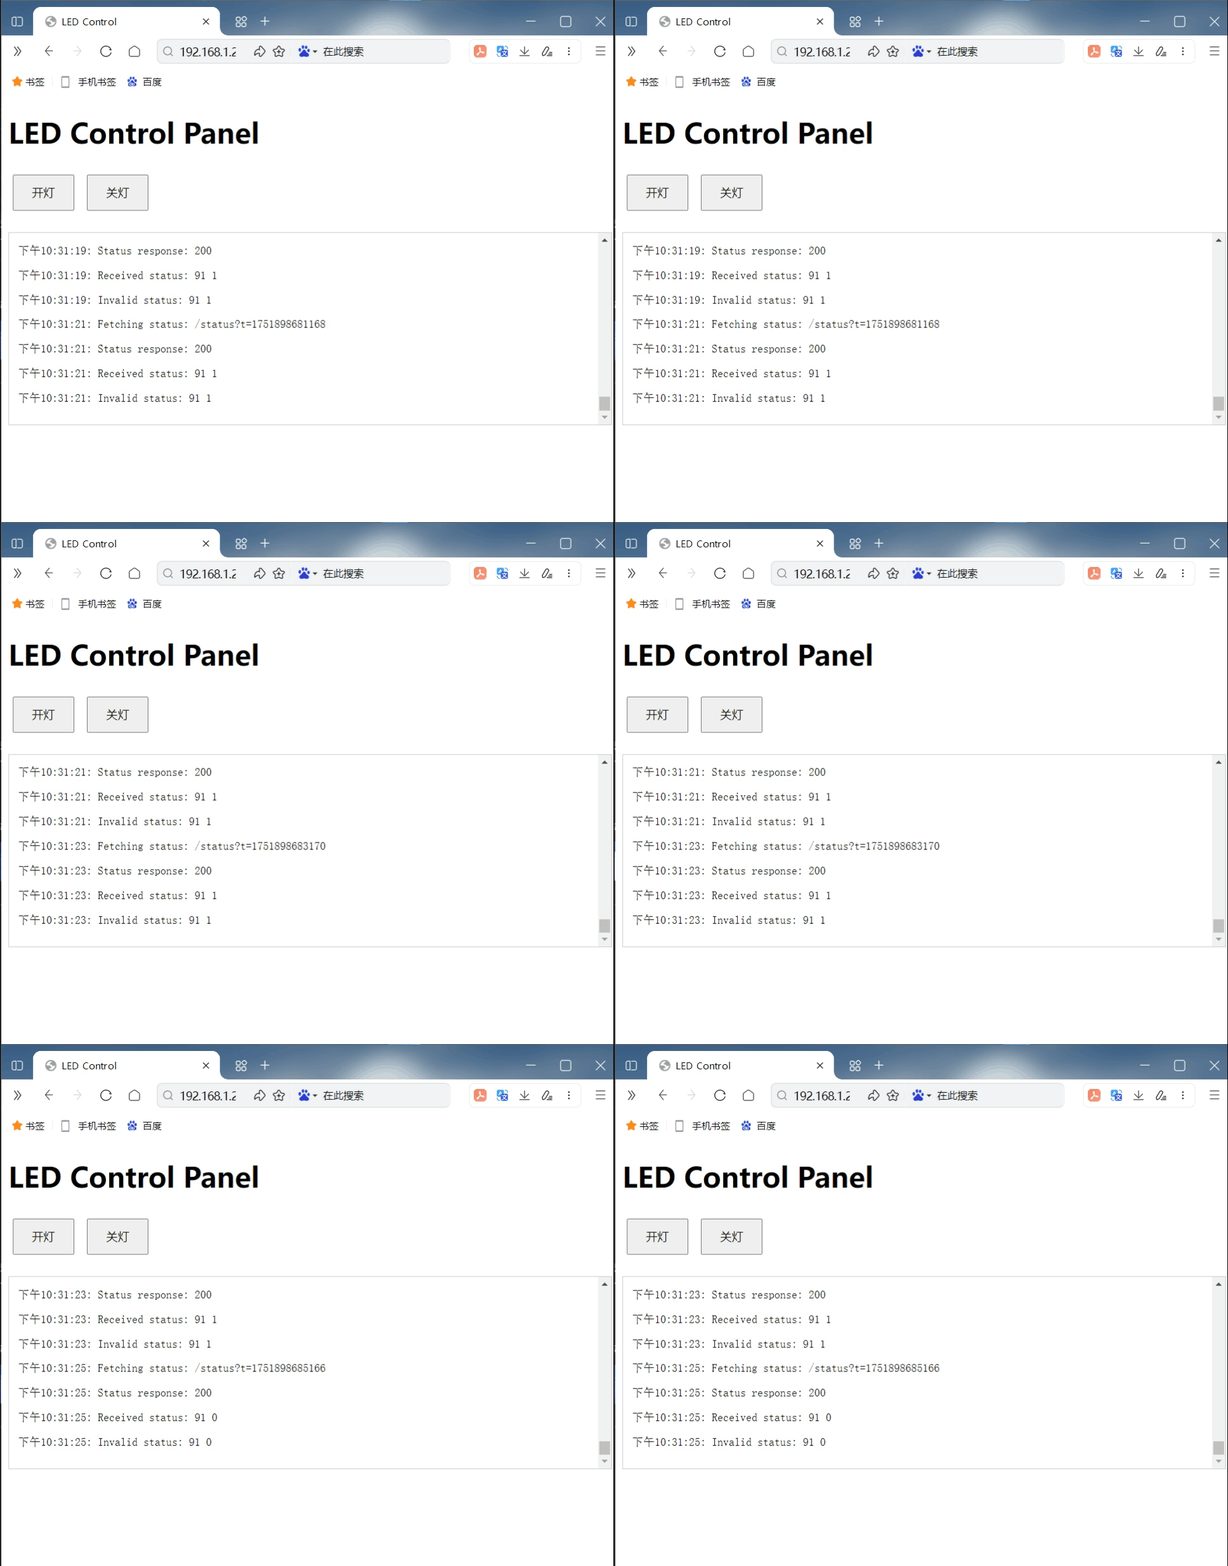
5.我们在代码里规定了PC2作为LED的控制端口,进入中断会翻转LED的状态,并且获取到浏览器上.我们外部使PC2进入中断,可见LED由关到开.
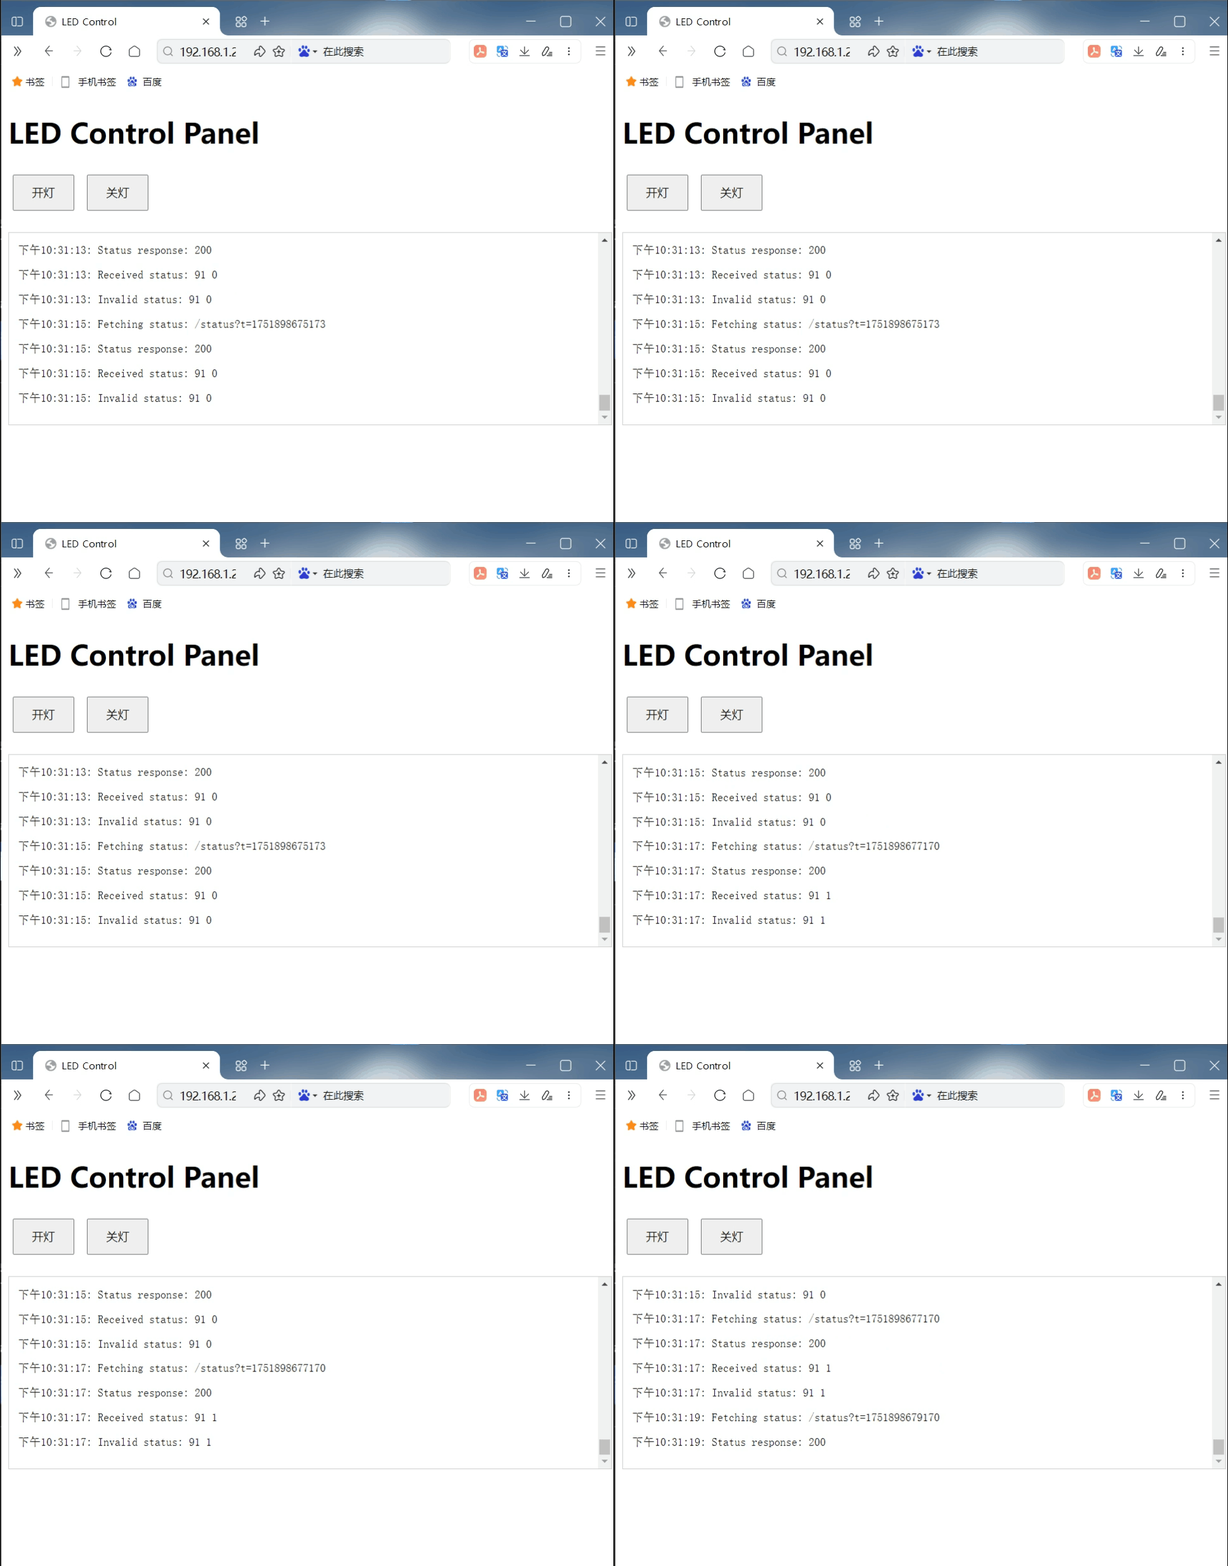
6.当我们再次使PC2引脚外部进入中断,可见LED由开变到关
6 总结
本项目通过 W5500io-M 模块与 STM32 的结合,成功实现了 Web 网页对继电器的远程控制,验证了基于以太网的嵌入式 Web 服务器方案的可行性。感谢大家的耐心阅读!如果您在阅读过程中有任何疑问,或者希望进一步了解这款产品及其应用,欢迎随时通过私信或评论区留言。我们会尽快回复您的消息,为您提供更详细的解答和帮助!

智能硬件社区聚焦AI智能硬件技术生态,汇聚嵌入式AI、物联网硬件开发者,打造交流分享平台,同步全国赛事资讯、开展 OPC 核心人才招募,助力技术落地与开发者成长。
更多推荐
 29
29 0
0- 0


 已为社区贡献3条内容

所有评论(0)