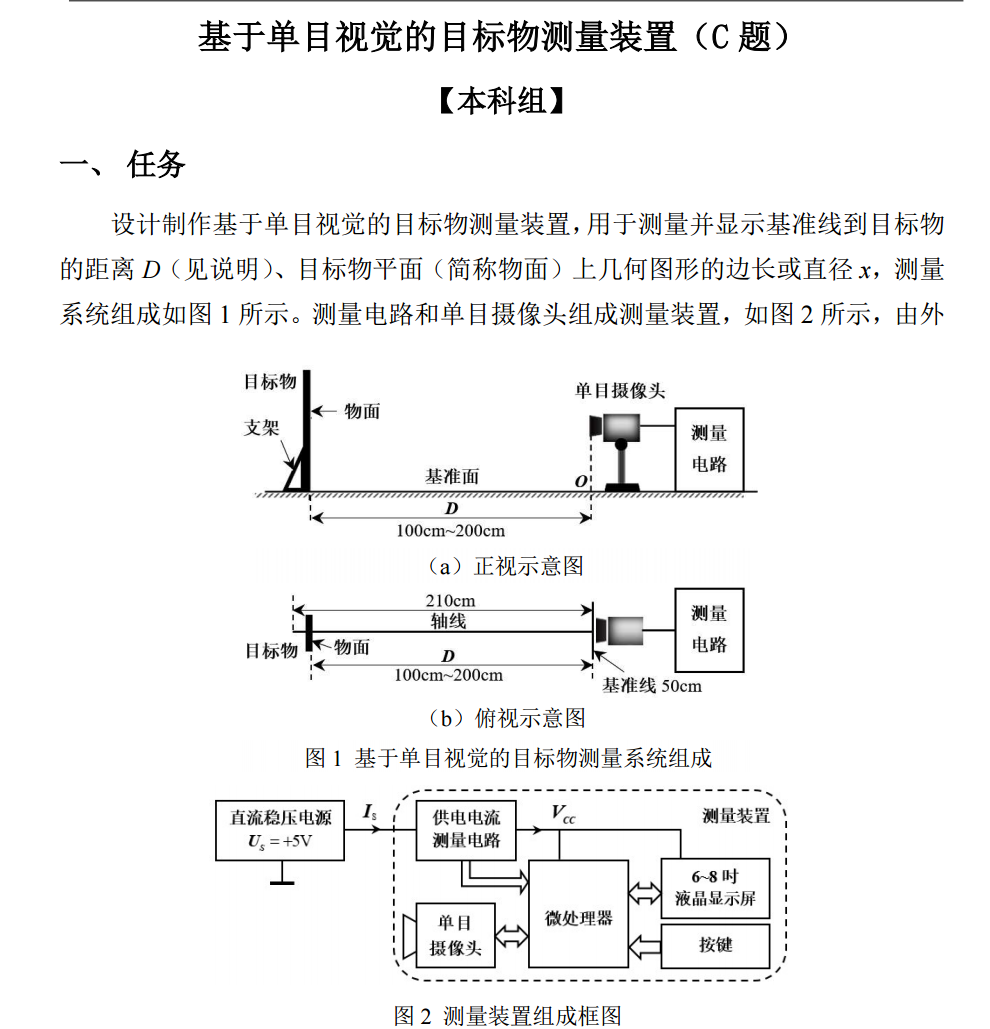
2025 TI 杯全国大学生电子设计竞赛 上海赛区 C题参考代码
2025TI杯全国大学生电子设计竞赛上海赛区C题参考代码基于K230开发板实现,包含五个主要Python文件:main.py作为入口文件连接五个按钮控制程序执行,分别对应不同图形检测模式(model1检测正方形、model2检测圆形、model3检测三角形、model4为拓展题代码、model5整合三种图形检测)。代码采用自适应阈值处理和距离计算算法,通过图像处理识别A4纸外框并计算目标距离(D值
·
1.正文
2025 TI 杯全国大学生电子设计竞赛 上海赛区 C题参考代码
题目:
2.代码
主体代码均为博主手搓,基于K230开发板,CanMV python代码:
分为五个主要文件 和一个入口文件
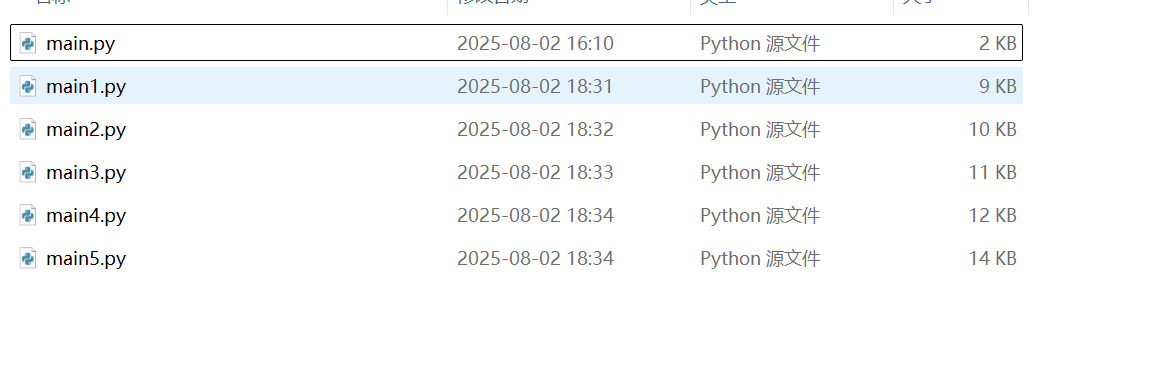
介绍: 其中main.py为入口文件 需要连接5个按钮,控制程序执行,按钮连接串口如下:
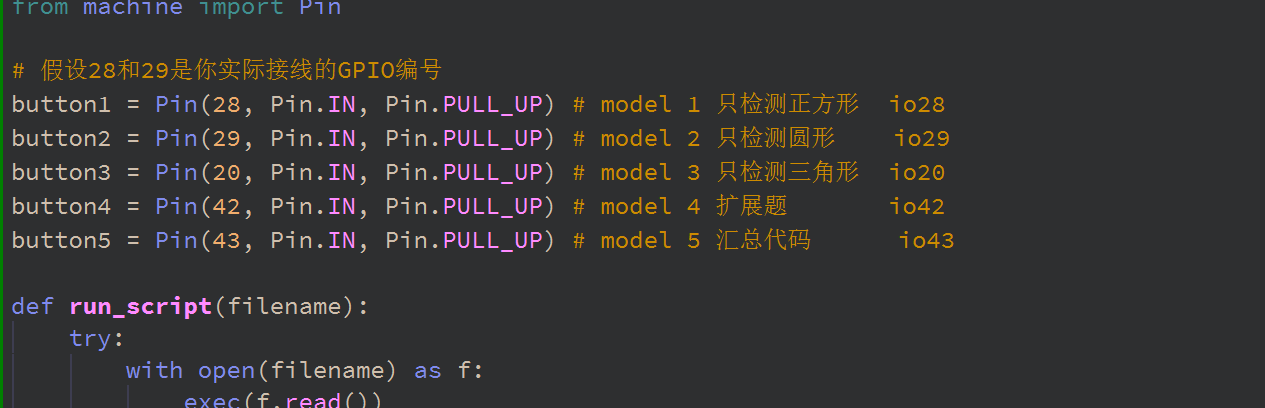 共有五个model 分别为基础题的model1、2、3、5 拓展题代码 model4 ,其中model5是将基础题三个图形的检测放到一起运行,也就是说可以单独进行检测圆形、正方形、三角形。但是运行效率和精度均会下降。
代码部分:
已经放到了仓库里:url:
https://gitee.com/ldlnii/ti-cup_25-ct.git具体代码:
Main.py:
import time
from machine import Pin

# 假设28和29是你实际接线的GPIO编号
button1 = Pin(28, Pin.IN, Pin.PULL_UP) # model 1 只检测正方形  io28
button2 = Pin(29, Pin.IN, Pin.PULL_UP) # model 2 只检测圆形    io29
button3 = Pin(20, Pin.IN, Pin.PULL_UP) # model 3 只检测三角形  io20
button4 = Pin(42, Pin.IN, Pin.PULL_UP) # model 4 扩展题       io42
button5 = Pin(43, Pin.IN, Pin.PULL_UP) # model 5 汇总代码      io43

def run_script(filename):
    try:
        with open(filename) as f:
            exec(f.read())
    except Exception as e:
        print("Error running {}: {}".format(filename, e))

# 等待电路稳定
time.sleep(0.5)

while True:
    if button1.value() == 0:  # 按钮1被按下
        #print("Button 1 pressed, running main1.py")
        run_script('/sdcard/main1.py')
        # 等待按钮释放,防止重复触发
        while button1.value() == 0:
            time.sleep(0.05)
    elif button2.value() == 0:  # 按钮2被按下
        #print("Button 2 pressed, running main2.py")
        run_script('/sdcard/main2.py')
        while button2.value() == 0:
            time.sleep(0.05)
    elif button3.value() == 0:  # 按钮3被按下
        #print("Button 3 pressed, running main3.py")
        run_script('/sdcard/main3.py')
        while button3.value() == 0:
            time.sleep(0.05)
    elif button4.value() == 0:  # 按钮4被按下
        #print("Button 4 pressed, running main4.py")
        run_script('/sdcard/main4.py')
        while button4.value() == 0:
            time.sleep(0.05)
    elif button5.value() == 0:  # 按钮5被按下
        #print("Button 5 pressed, running main5.py")
        run_script('/sdcard/main5.py')
        while button5.value() == 0:
            time.sleep(0.05)
    else:
        # 没有按钮被按下,可以选择运行默认脚本或什么都不做
        # print("No button pressed")
        pass
    time.sleep(0.1)  # 主循环延时,减少CPU占用
Main1.py
import time, math, os, gc, sys

from media.sensor import *
from media.display import *
from media.media import *
import random


def calInnerxValue(boundary,D):
    k = 202.5693
    #还是根据公式计算出偏差多少像素 D = k*(W)/w  D为D_true 求小w,W为期望裁剪距离
    W1 = boundary[0] * D / k
    W2 = boundary[1] * D / k

    x_inner = (W1 + W2) / 2

    return x_inner

def getDestince(boundry_d):
    D = 0.0
    try:
        #k值 实验求得的值
        k = 202.5693
        #计算公式   D = k*(W)/w   w即为boundry_d   A4纸的尺寸 210mm * 297 mm 由于比赛用纸要贴边 所以各要减去20mm
        #比赛代码
        a4_size = [170,257]
        #padding_size = 5.6
        a4_w = a4_size[0]
        a4_h = a4_size[1]
        #自己实验所用
#        a4_w = 157
#        a4_h = 250

        #第一种计算方法 根据宽高各自求一个D值 然后取平均
        #D_w = a4_w * k / boundry_d[0]
        D_h = a4_h * k / boundry_d[1]
        #D_w = D_h
        #print("D_w is %s" % D_w)
        #print("D_h is %s" % D_h)
        #D = (D_w+D_h) / 2
        D = D_h
    except Exception as e:
        print("error, set D to 0:", e)
        D = 0.0
    #第二遍过滤 如果计算出来的D值太离谱 直接跳过 比如范围在97~203之外
    b_D = [97,203]
    if D > b_D[1] or D < b_D[0]:
        D = 0.0

    return D


#主函数
if __name__ == "__main__":

    WIDTH = 1440
    HEIGHT = 900
    x = (1920 - WIDTH) // 2
    y = (1080 - HEIGHT) // 2

    # 初始化传感器变量为空
    sensor = None
    try:
        # 使用默认配置构造传感器对象,设置指定宽度和高度
        sensor = Sensor(width = WIDTH, height = HEIGHT, fps=30)
        # 传感器复位
        sensor.reset()
        #sensor.set_vflip(True)
        sensor.set_framesize(width = WIDTH, height = HEIGHT)
        # 设置通道0的输出格式为RGB565
        sensor.set_pixformat(Sensor.RGB565)
        # 使用IDE作为输出目标初始化显示
        Display.init(Display.LT9611, to_ide=True)
        # 初始化媒体管理器
        MediaManager.init()
        # 启动传感器运行
        sensor.run()
        # 创建时钟对象用于计算帧率
        fps = time.clock()

        # 主循环
        D_true = 0
        interested_box = None
        x_inner_end = 0


        while True:
            fps.tick()
            # 检查是否应该退出程序
            os.exitpoint()
            # 从传感器获取一帧图像
            img = sensor.snapshot()
            #img2 = img.copy()
            #黑色阈值    值越大会导致场景更白,噪声排除效率高 但容易把黑边框当作噪声
            #当目标距离较远时候 这个阈值应该 高一点排除过多的噪声
            #当目标距离较近时候 这个阈值应该 低一点保留更多的黑边框特征
            #thr_list = [35,38,40,42,45]
            #b_thr = thr_list[0]
            b_thr = 35
            if 95.0 <= D_true <= 125.0 :
                b_thr = 45
            elif D_true > 125.0 and D_true <= 150.0:
                b_thr = 40
            elif D_true > 150.0 and D_true <= 175.0:
                b_thr = 35
            else:
                b_thr = 35
            print("阈值为:",b_thr)
            img = img.binary([(0, b_thr)])
            #img = img.binary([(0, 60)], adaptive=True)
            #find所有的矩形  阈值是置信度得分 即是矩形的可信度
            rects = img.find_rects(threshold = 10000)
            #筛选矩形面积需要调整
            for r in rects:
                #先通过面积限制一下检测的矩形框 现在我暂时只需要检测外边框 A4纸
                #在100cm-200cm处 对应的像素面积在:
                #实验值:
                #boundary_a4s = [35250,150602] #这个值放宽+- 2500
                boundary_a4s = [32750,153102]

                area = r.w() * r.h()
                wh_rate = r.w() / r.h()
                a = 0.05 # 91% 检测正方形严苛程度,越小越严苛 越要求这个正方形方

                #自适应调整a
                if D_true <= 125.0 or D_true >175.0 :
                    a = 0.15
                elif D_true > 125.0 and D_true < 150.0:
                    a = 0.15
                else:
                    a = 0.05

#                print("宽高比为",wh_rate)
                if D_true != 0 and interested_box is not None:
                    if wh_rate <= 1+a and wh_rate >= 1-a:
                        #检测到正方形了
                        #print("检测到的正方形的宽高:",r.w(),r.h())
                        #计算x
                        x_inner = calInnerxValue([r.w(),r.h()],D_true)
                        x_box = [r.x(),r.y(),r.w(),r.h()]
                        #print("正方形边长为:",x_inner)
                        if x_inner >=9.5 and x_inner <=16.5:
                            x_inner_end = x_inner
                            img.draw_rectangle(x_box, color = (255, 0, 0),thickness=8)
                if area > boundary_a4s[0] and area < boundary_a4s[1]:
                    print("入选矩形框面积大小:",area)
                    #这里由于中间夹一个正方形的情况会导致出现两个矩形框 所以我暂时先排除这个正方形边框
                    #排除就 利用长宽比接近1:1的性质
                    if wh_rate <= 1+a and wh_rate >= 1-a:
                        #能通过表示目前检测到的就是正方形 则跳过此次循环
                        continue
                    #下边为才为A4矩形
                    #绘制矩形
                    # 计算中心点
                    center_x = r.x() + r.w() // 2
                    center_y = r.y() + r.h() // 2
                    img.draw_cross(center_x, center_y, color = (0, 255, 0),size=10,thickness=5)

                    #外围的只能是个矩形 r.rect x,y,w,h
                    boundry_det = []
                    if r.w() > r.h():
                        boundry_det = [r.h(),r.w()]
                    else:
                        boundry_det = [r.w(),r.h()]
                    #print("Boundry_det is :",boundry_det)
                    #计算D真实值
                    D_true = getDestince(boundry_det)
                    #print("D is : %s" % str(round(D_true,2)))

                    if D_true == 0.0:
                        #没有测出来,则这次循环无效
                        continue
                    else:
                        #已经测出就先绘制 在屏幕上显示结果图像
                        interested_box = (r[0],r[1],r[2],r[3])
                        img.draw_rectangle(interested_box, color = (255, 0, 0),thickness=8)

            img.draw_string(0, 0,
                            "D:%scm" % str(round(D_true,2)),
                            (255, 0, 0),  # color
                            scale = 15)

            img.draw_string(0, 100,
                            "x:%scm" % str(round(x_inner_end,2)),
                            (255, 0, 0),  # color
                            scale = 15)
            #在屏幕上显示电流值  A  基准是:
            base_A = 1.18
            rate = 0.05
            min_A = base_A * (1 - rate)
            max_A = base_A * (1 + rate)

            result_A = round(random.uniform(min_A, max_A), 2)


            img.draw_string(0, 700,
                            "I:%sA" % str(result_A),
                            (255, 0, 0),  # color
                            scale = 15)


            Display.show_image(img,x,y)

#            if x_true!=None and x_true!=0 :
#                time.sleep(0.1)
            # 执行垃圾回收
            gc.collect()
            # 打印当前帧率

    except KeyboardInterrupt as e:
        # 捕获键盘中断异常(用户手动停止)
        # (Catch keyboard interrupt exception - user manually stops)
        print(f"user stop")
    except BaseException as e:
        # 捕获所有其他异常
        # (Catch all other exceptions)
        print(f"Exception '{e}'")
    finally:
        # 无论如何都执行清理工作
        # (Perform cleanup regardless of how the program exits)

        # 停止传感器运行(如果传感器对象存在)
        # (Stop the sensor if the sensor object exists)
        if isinstance(sensor, Sensor):
            sensor.stop()

        # 反初始化显示
        # (Deinitialize the display)
        Display.deinit()

        # 设置退出点,允许进入睡眠模式
        # (Set exit point to enable sleep mode)
        os.exitpoint(os.EXITPOINT_ENABLE_SLEEP)

        # 短暂延时100毫秒
        # (Brief delay of 100 milliseconds)
        time.sleep_ms(100)

        # 释放媒体缓冲区
        # (Release media buffer)
        MediaManager.deinit()
Main2.py
import time, math, os, gc, sys,random

from media.sensor import *
from media.display import *
from media.media import *


def calInnerxValue(boundary,D):
    k = 202.5693
    #还是根据公式计算出偏差多少像素 D = k*(W)/w  D为D_true 求小w,W为期望裁剪距离
    W1 = boundary[0] * D / k
    W2 = boundary[1] * D / k

    x_inner = (W1 + W2) / 2

    return x_inner

def getDestince(boundry_d):
    D = 0.0
    try:
        #k值 实验求得的值
        k = 202.5693
        #计算公式   D = k*(W)/w   w即为boundry_d   A4纸的尺寸 210mm * 297 mm 由于比赛用纸要贴边 所以各要减去20mm
        #比赛代码
        a4_size = [170,257]
        #padding_size = 5.6
        a4_w = a4_size[0]
        a4_h = a4_size[1]
        #自己实验所用
#        a4_w = 157
#        a4_h = 250

        #第一种计算方法 根据宽高各自求一个D值 然后取平均
        #D_w = a4_w * k / boundry_d[0]
        D_h = a4_h * k / boundry_d[1]
        #D_w = D_h
        #print("D_w is %s" % D_w)
        #print("D_h is %s" % D_h)
        #D = (D_w+D_h) / 2
        D = D_h
    except Exception as e:
        print("error, set D to 0:", e)
        D = 0.0
    #第二遍过滤 如果计算出来的D值太离谱 直接跳过 比如范围在97~203之外
    b_D = [97,203]
    if D > b_D[1] or D < b_D[0]:
        D = 0.0

    return D


#主函数
if __name__ == "__main__":

    WIDTH = 1440
    HEIGHT = 900
    x = (1920 - WIDTH) // 2
    y = (1080 - HEIGHT) // 2

    # 初始化传感器变量为空
    sensor = None

    try:
        # 使用默认配置构造传感器对象,设置指定宽度和高度
        sensor = Sensor(width = WIDTH, height = HEIGHT, fps=30)
        # 传感器复位
        sensor.reset()
        #sensor.set_vflip(True)
        sensor.set_framesize(width = WIDTH, height = HEIGHT)
        # 设置通道0的输出格式为RGB565
        sensor.set_pixformat(Sensor.RGB565)
        # 使用IDE作为输出目标初始化显示
        Display.init(Display.LT9611, to_ide=True)
        # 初始化媒体管理器
        MediaManager.init()
        # 启动传感器运行
        sensor.run()
        # 创建时钟对象用于计算帧率
        fps = time.clock()

        # 主循环
        D_true = 0
        interested_box = None
        r_inner_end = 0

        while True:
            fps.tick()
            # 检查是否应该退出程序
            os.exitpoint()
            # 从传感器获取一帧图像
            img = sensor.snapshot()
            #img2 = img.copy()
            #黑色阈值    值越大会导致场景更白,噪声排除效率高 但容易把黑边框当作噪声
            #当目标距离较远时候 这个阈值应该 高一点排除过多的噪声
            #当目标距离较近时候 这个阈值应该 低一点保留更多的黑边框特征

            b_thr = 35
            if 95.0 <= D_true <= 125.0 :
                b_thr = 50
            elif D_true > 125.0 and D_true <= 150.0:
                b_thr = 45
            elif D_true > 150.0 and D_true <= 175.0:
                b_thr = 40
            else:
                b_thr = 40
            print("阈值为:",b_thr)

            img = img.binary([(0, b_thr)])
            #img = img.binary([(0, 60)], adaptive=True)
            #find所有的矩形  阈值是置信度得分 即是矩形的可信度
            rects = img.find_rects(threshold = 10000)
            #筛选矩形面积需要调整

            for r in rects:
                #先通过面积限制一下检测的矩形框 现在我暂时只需要检测外边框 A4纸
                #在100cm-200cm处 对应的像素面积在:
                #实验值:
                #boundary_a4s = [35250,150602] #这个值放宽+- 2500
                boundary_a4s = [32750,153102]
                #比赛值
                #boundary_a4s = [32750,153102] #这个值放宽+- 2500

                area = r.w() * r.h()
                wh_rate = r.w() / r.h()
                a = 0.09 # 91% 检测正方形严苛程度,越小越严苛 越要求这个正方形方
#                print("宽高比为",wh_rate)
                if D_true != 0 and interested_box is not None:
                    #检测圆形
                    if interested_box[0] > 0 and interested_box[1] > 0:
                        #r_min,r_max = getBoundary(D_true)
                        #print("圆半径范围:",r_min,r_max)
                        #print(interested_box)
                        center_x_r = interested_box[0] + interested_box[2] // 2
                        center_y_r = interested_box[1] + interested_box[3] // 2
                        tolerance = 10  # 3个像素
                        r_max = interested_box[2] // 2
                        r_min = r_max // 2
                        pad_s = interested_box[2] // 17

                        circles = img.find_circles(roi=interested_box,
                                                   threshold=100,
                                                   r_min=r_min,
                                                   r_max=r_max-pad_s
                                                   )
                        print("检测到的圆:",circles)
                        if len(circles) != 0:
                            #如果检测到了圆
                            for c in circles:
                                if abs(c.x() - center_x_r) <= tolerance and abs(c.y() - center_y_r) <= tolerance:
                                    #print("圆心在ROI中心附近3像素内:", c.x(), c.y(),c.r())

                                    r_inner = calInnerxValue([c.r(),c.r()],D_true)
                                    r_inner = r_inner / 5
                                    print("计算出来的圆半径为:",r_inner)
                                    if r_inner >=9.5 and r_inner <=16.5:
                                        r_inner_end = r_inner
                                        img.draw_circle(c.x(), c.y(), c.r(), color=(255, 0, 0), thickness=4)


                if area > boundary_a4s[0] and area < boundary_a4s[1]:

                    print("入选矩形框面积大小:",area)

                    #这里由于中间夹一个正方形的情况会导致出现两个矩形框 所以我暂时先排除这个正方形边框
                    #排除就 利用长宽比接近1:1的性质
                    if wh_rate <= 1+a and wh_rate >= 1-a:
                        #能通过表示目前检测到的就是正方形 则跳过此次循环
                        continue
                    #下边为才为A4矩形
                    #绘制矩形)
                    # 计算中心点
                    center_x = r.x() + r.w() // 2
                    center_y = r.y() + r.h() // 2
                    img.draw_cross(center_x, center_y, color = (0, 255, 0),size=10,thickness=5)

                    #外围的只能是个矩形 r.rect x,y,w,h
                    boundry_det = []
                    if r.w() > r.h():
                        boundry_det = [r.h(),r.w()]
                    else:
                        boundry_det = [r.w(),r.h()]
                    #print("Boundry_det is :",boundry_det)
                    #计算D真实值
                    D_true = getDestince(boundry_det)
                    #print("D is : %s" % str(round(D_true,2)))

                    if D_true == 0.0:
                        #没有测出来,则这次循环无效
                        continue
                    else:
                        #已经测出就先绘制 在屏幕上显示结果图像
                        interested_box = (r[0],r[1],r[2],r[3])
                        img.draw_rectangle(interested_box,  color = (255, 0, 0),thickness=8)

            img.draw_string(0, 0,
                            "D:%scm" % str(round(D_true,2)),
                            (255, 0, 0),  # color
                            scale = 15)
            img.draw_string(0, 100,
                            "x:%scm" % str(round(r_inner_end,2)),
                            (255, 0, 0),  # color
                            scale = 15)
            #在屏幕上显示电流值  A  基准是:
            base_A = 1.18
            rate = 0.05
            min_A = base_A * (1 - rate)
            max_A = base_A * (1 + rate)

            result_A = round(random.uniform(min_A, max_A), 2)


            img.draw_string(0, 700,
                            "I:%sA" % str(result_A),
                            (255, 0, 0),  # color
                            scale = 15)
            Display.show_image(img,x,y)

            # 执行垃圾回收
            gc.collect()
            # 打印当前帧率


    except KeyboardInterrupt as e:
        # 捕获键盘中断异常(用户手动停止)
        # (Catch keyboard interrupt exception - user manually stops)
        print(f"user stop")
    except BaseException as e:
        # 捕获所有其他异常
        # (Catch all other exceptions)
        print(f"Exception '{e}'")
    finally:
        # 无论如何都执行清理工作
        # (Perform cleanup regardless of how the program exits)

        # 停止传感器运行(如果传感器对象存在)
        # (Stop the sensor if the sensor object exists)
        if isinstance(sensor, Sensor):
            sensor.stop()

        # 反初始化显示
        # (Deinitialize the display)
        Display.deinit()

        # 设置退出点,允许进入睡眠模式
        # (Set exit point to enable sleep mode)
        os.exitpoint(os.EXITPOINT_ENABLE_SLEEP)

        # 短暂延时100毫秒
        # (Brief delay of 100 milliseconds)
        time.sleep_ms(100)

        # 释放媒体缓冲区
        # (Release media buffer)
        MediaManager.deinit()
Main3.py
import time, math, os, gc, sys,random

from media.sensor import *
from media.display import *
from media.media import *


def calInnerxValue(boundary,D):
    k = 202.5693
    #还是根据公式计算出偏差多少像素 D = k*(W)/w  D为D_true 求小w,W为期望裁剪距离
    W1 = boundary[0] * D / k
    W2 = boundary[1] * D / k

    x_inner = (W1 + W2) / 2

    return x_inner

def getDestince(boundry_d):
    D = 0.0
    try:
        #k值 实验求得的值
        k = 202.5693
        #计算公式   D = k*(W)/w   w即为boundry_d   A4纸的尺寸 210mm * 297 mm 由于比赛用纸要贴边 所以各要减去20mm
        #比赛代码
        a4_size = [170,257]
        #padding_size = 5.6
        a4_w = a4_size[0]
        a4_h = a4_size[1]
        #自己实验所用
#        a4_w = 157
#        a4_h = 250

        #第一种计算方法 根据宽高各自求一个D值 然后取平均
        #D_w = a4_w * k / boundry_d[0]
        D_h = a4_h * k / boundry_d[1]
        #D_w = D_h
        #print("D_w is %s" % D_w)
        #print("D_h is %s" % D_h)
        #D = (D_w+D_h) / 2
        D = D_h
    except Exception as e:
        print("error, set D to 0:", e)
        D = 0.0
    #第二遍过滤 如果计算出来的D值太离谱 直接跳过 比如范围在97~203之外
    b_D = [97,203]
    if D > b_D[1] or D < b_D[0]:
        D = 0.0

    return D


#主函数
if __name__ == "__main__":

    WIDTH = 1440
    HEIGHT = 900
    x = (1920 - WIDTH) // 2
    y = (1080 - HEIGHT) // 2

    # 初始化传感器变量为空
    sensor = None

    try:
        # 使用默认配置构造传感器对象,设置指定宽度和高度
        sensor = Sensor(width = WIDTH, height = HEIGHT, fps=30)
        # 传感器复位
        sensor.reset()
        #sensor.set_vflip(True)
        sensor.set_framesize(width = WIDTH, height = HEIGHT)
        # 设置通道0的输出格式为RGB565
        sensor.set_pixformat(Sensor.RGB565)
        # 使用IDE作为输出目标初始化显示
        Display.init(Display.LT9611, to_ide=True)
        # 初始化媒体管理器
        MediaManager.init()
        # 启动传感器运行
        sensor.run()
        # 创建时钟对象用于计算帧率
        fps = time.clock()

        # 主循环
        D_true = 0
        interested_box = None
        s_inner_end = 0

        while True:
            fps.tick()
            # 检查是否应该退出程序
            os.exitpoint()
            # 从传感器获取一帧图像
            img = sensor.snapshot()
            img2 = img.copy()
            #黑色阈值    值越大会导致场景更白,噪声排除效率高 但容易把黑边框当作噪声
            #当目标距离较远时候 这个阈值应该 高一点排除过多的噪声
            #当目标距离较近时候 这个阈值应该 低一点保留更多的黑边框特征

            b_thr = 35
            if 95.0 <=D_true <= 125.0 :
                b_thr = 45
            elif D_true > 125.0 and D_true <= 150.0:
                b_thr = 40
            elif D_true > 150.0 and D_true <= 175.0:
                b_thr = 35
            else:
                b_thr = 35
            print("阈值为:",b_thr)
            img = img.binary([(0, b_thr)])
            #img = img.binary([(0, 60)], adaptive=True)
            #find所有的矩形  阈值是置信度得分 即是矩形的可信度
            rects = img.find_rects(threshold = 10000)
            #筛选矩形面积需要调整

            for r in rects:
                #先通过面积限制一下检测的矩形框 现在我暂时只需要检测外边框 A4纸
                #在100cm-200cm处 对应的像素面积在:
                #实验值:
                #boundary_a4s = [35250,150602] #这个值放宽+- 2500
                boundary_a4s = [32750,153102]
                #比赛值
                #boundary_a4s = [32750,153102] #这个值放宽+- 2500

                area = r.w() * r.h()
                wh_rate = r.w() / r.h()
                a = 0.09 # 91% 检测正方形严苛程度,越小越严苛 越要求这个正方形方
#                print("宽高比为",wh_rate)
                if D_true != 0 and interested_box is not None:

                    #检测三角形
                    if interested_box[0] > 0 and interested_box[1] > 0:
                        img2 = img2.to_grayscale()
                        img2 = img2.binary([(0, 80)])
                        #寻找连通域
                        blobs = img2.find_blobs([(225, 255)],
                                                area_threshold=10,
                                                pixels_threshold=10,
                                                roi=interested_box)
                        #print("找到的连通区域:",blobs)
                        temp_all_s_inner = 0.0
                        count = 0
                        for blob in blobs:
                            img.draw_cross(blob.cx(), blob.cy(), color=(0,255,0), size=10, thickness=2)
                            #img.draw_rectangle(blob.rect(), color=(255,0,0))

                            #用面积求边长
                            S = blob.pixels()
                            #面积公式   a^2 = 4*S / g3
                            a = math.sqrt(4 * S / math.sqrt(3))
                            s_inner = calInnerxValue([a,a],D_true)
                            s_inner = s_inner / 10
                            if s_inner >=9.5 and s_inner <=16.5:
                                temp_all_s_inner = temp_all_s_inner + s_inner
                                count = count+1

                                # 画实际轮廓
                                corners = blob.corners()
                                n = len(corners)
                                for i in range(n):
                                    x1, y1 = corners[i]
                                    x2, y2 = corners[(i+1)%n]  # 最后一个点和第一个点相连,闭合
                                    img.draw_line(x1, y1, x2, y2, color=(0,255,0), thickness=2)

                        if count != 0:
                            s_inner_end = temp_all_s_inner / count
                            #print("测得等边三角形的边长为:",round(s_inner_end,2))


                if area > boundary_a4s[0] and area < boundary_a4s[1]:

                    print("入选矩形框面积大小:",area)

                    #这里由于中间夹一个正方形的情况会导致出现两个矩形框 所以我暂时先排除这个正方形边框
                    #排除就 利用长宽比接近1:1的性质
                    if wh_rate <= 1+a and wh_rate >= 1-a:
                        #能通过表示目前检测到的就是正方形 则跳过此次循环
                        continue
                    #下边为才为A4矩形
                    #绘制矩形)
                    # 计算中心点
                    center_x = r.x() + r.w() // 2
                    center_y = r.y() + r.h() // 2
                    img.draw_cross(center_x, center_y, color = (0, 255, 0),size=10,thickness=5)

                    #外围的只能是个矩形 r.rect x,y,w,h
                    boundry_det = []
                    if r.w() > r.h():
                        boundry_det = [r.h(),r.w()]
                    else:
                        boundry_det = [r.w(),r.h()]
                    #print("Boundry_det is :",boundry_det)
                    #计算D真实值
                    D_true = getDestince(boundry_det)
                    #print("D is : %s" % str(round(D_true,2)))

                    if D_true == 0.0:
                        #没有测出来,则这次循环无效
                        continue
                    else:
                        #已经测出就先绘制 在屏幕上显示结果图像
                        interested_box = (r[0],r[1],r[2],r[3])
                        img.draw_rectangle(interested_box,  color = (255, 0, 0),thickness=8)


            img.draw_string(0, 0,
                            "D:%scm" % str(round(D_true,2)),
                            (255, 0, 0),  # color
                            scale = 15)
            img.draw_string(0, 100,
                            "x:%scm" % str(round(s_inner_end,2)),
                            (255, 0, 0),  # color
                            scale = 15)
            #在屏幕上显示电流值  A  基准是:
            base_A = 1.18
            rate = 0.05
            min_A = base_A * (1 - rate)
            max_A = base_A * (1 + rate)

            result_A = round(random.uniform(min_A, max_A), 2)


            img.draw_string(0, 700,
                            "I:%sA" % str(result_A),
                            (255, 0, 0),  # color
                            scale = 15)
            Display.show_image(img,x,y)

            # 执行垃圾回收
            gc.collect()
            # 打印当前帧率


    except KeyboardInterrupt as e:
        # 捕获键盘中断异常(用户手动停止)
        # (Catch keyboard interrupt exception - user manually stops)
        print(f"user stop")
    except BaseException as e:
        # 捕获所有其他异常
        # (Catch all other exceptions)
        print(f"Exception '{e}'")
    finally:
        # 无论如何都执行清理工作
        # (Perform cleanup regardless of how the program exits)

        # 停止传感器运行(如果传感器对象存在)
        # (Stop the sensor if the sensor object exists)
        if isinstance(sensor, Sensor):
            sensor.stop()

        # 反初始化显示
        # (Deinitialize the display)
        Display.deinit()

        # 设置退出点,允许进入睡眠模式
        # (Set exit point to enable sleep mode)
        os.exitpoint(os.EXITPOINT_ENABLE_SLEEP)

        # 短暂延时100毫秒
        # (Brief delay of 100 milliseconds)
        time.sleep_ms(100)

        # 释放媒体缓冲区
        # (Release media buffer)
        MediaManager.deinit()
Main4.py
import time, math, os, gc, sys,random

from media.sensor import *
from media.display import *
from media.media import *
from machine import Pin
#拓展题代码

#函数位置
#检测外部矩形框然先定位 定位以后截取图像 去除噪声 专注于检测定位框内部图行
#定位框的检测
#求距离算法D 输入是外围黑边框的像素值大小 比如84px
def getDestince(boundry_d):
    D = 0.0
    try:
        #k值 实验求得的值
        k = 202.5693
        #计算公式   D = k*(W)/w   w即为boundry_d   A4纸的尺寸 210mm * 297 mm 由于比赛用纸要贴边 所以各要减去20mm
        #比赛代码
        a4_size = [170,257]
        #padding_size = 5.6
        a4_w = a4_size[0]
        a4_h = a4_size[1]
        #自己实验所用
#        a4_w = 157
#        a4_h = 250

        #第一种计算方法 根据宽高各自求一个D值 然后取平均
        #D_w = a4_w * k / boundry_d[0]
        D_h = a4_h * k / boundry_d[1]
        #D_w = D_h
        #print("D_w is %s" % D_w)
        #print("D_h is %s" % D_h)
        #D = (D_w+D_h) / 2
        D = D_h
    except Exception as e:
        print("error, set D to 0:", e)
        D = 0.0
    #第二遍过滤 如果计算出来的D值太离谱 直接跳过 比如范围在97~203之外
    b_D = [97,203]
    if D > b_D[1] or D < b_D[0]:
        D = 0.0

    return D

#裁剪padding,后续考虑是否需要
def calPaddingsize(roi,D,W):
    k = 202.5693
    #还是根据公式计算出偏差多少像素 D = k*(W)/w  D为D_true 求小w,W为期望裁剪距离
    w = k * W / D
    roi_n = [0,0,0,0]

    for i,m in enumerate(roi):
        if i == 2 or i == 3:
            roi_n[i] = round(m - 2 * w)
        else:
            roi_n[i] = round(m - w)

    return roi_n


def calInnerxValue(boundary,D):
    k = 202.5693
    #还是根据公式计算出偏差多少像素 D = k*(W)/w  D为D_true 求小w,W为期望裁剪距离
    W1 = boundary[0] * D / k
    W2 = boundary[1] * D / k

    x_inner = (W1 + W2) / 2

    return x_inner

def calInnerCircleRadius(c_r,D):
    k = 202.5693

    c_inner = 0.0

    W = c_r * D / k

    #从这里就排除 如果太不符合需要的值就返回0
    b_s = [8.5,17.5]
    if W < b_s[1] and W > b_s[0]:
        c_inner = W

    return c_inner


#主函数
if __name__ == "__main__":
    #屏幕凝结按钮
    button1 = Pin(53, Pin.IN, Pin.PULL_UP) # model 1 只检测正方形  io28

    WIDTH = 1440
    HEIGHT = 900
    x = (1920 - WIDTH) // 2
    y = (1080 - HEIGHT) // 2

    # 初始化传感器变量为空
    sensor = None
#    x_true = 0
#    inner_box = None
    try:
        # 使用默认配置构造传感器对象,设置指定宽度和高度
        sensor = Sensor(width = WIDTH, height = HEIGHT, fps=30)
        # 传感器复位
        sensor.reset()
        #sensor.set_vflip(True)
        sensor.set_framesize(width = WIDTH, height = HEIGHT)
        # 设置通道0的输出格式为RGB565
        sensor.set_pixformat(Sensor.RGB565)
        # 使用IDE作为输出目标初始化显示
        Display.init(Display.LT9611, to_ide=True)
        # 初始化媒体管理器
        MediaManager.init()
        # 启动传感器运行
        sensor.run()
        # 创建时钟对象用于计算帧率
        fps = time.clock()

        # 主循环
        D_true = 0
        interested_box = None
        x_inner_end = 0
        freeze = False  # 是否冻结画面
        last_button_state = 1  # 上一次按钮状态,初始为未按下
        while True:

        # 检查按钮状态,做边沿检测(防止长按多次切换)
            button_state = button1.value()
            if last_button_state == 1 and button_state == 0:  # 检测到按下
                freeze = not freeze  # 切换冻结状态
                #print("Freeze state changed:", freeze)
                time.sleep_ms(200)  # 简单防抖
            last_button_state = button_state

            if freeze:
                # 冻结状态下,只显示当前画面,不做新检测
                Display.show_image(img, x, y)
                time.sleep_ms(100)
                continue

            fps.tick()
            # 检查是否应该退出程序
            os.exitpoint()
            # 从传感器获取一帧图像
            img = sensor.snapshot()
            img2 = img.copy()
            #黑色阈值    值越大会导致场景更白,噪声排除效率高 但容易把黑边框当作噪声
            #当目标距离较远时候 这个阈值应该 高一点排除过多的噪声
            #当目标距离较近时候 这个阈值应该 低一点保留更多的黑边框特征
            b_thr = 35
            if 95.0 <=D_true <= 125.0 :
                b_thr = 45
            elif D_true > 125.0 and D_true <= 150.0:
                b_thr = 40
            elif D_true > 150.0 and D_true <= 175.0:
                b_thr = 35
            else:
                b_thr = 35

            print("阈值为:",b_thr)
            img = img.binary([(0, b_thr)])
            #img = img.binary([(0, 60)], adaptive=True)
            #find所有的矩形  阈值是置信度得分 即是矩形的可信度
            rects = img.find_rects(threshold = 10000)
            #筛选矩形面积需要调整
            for r in rects:
                #先通过面积限制一下检测的矩形框 现在我暂时只需要检测外边框 A4纸
                #在100cm-200cm处 对应的像素面积在:
                #实验值:
                #boundary_a4s = [35250,150602] #这个值放宽+- 2500
                boundary_a4s = [32750,153102]
                #比赛值
                #boundary_a4s = [32750,153102] #这个值放宽+- 2500
                area = r.w() * r.h()
                wh_rate = r.w() / r.h()
                a = 0.09 # 91% 检测正方形严苛程度,越小越严苛 越要求这个正方形方
                if D_true != 0 and interested_box is not None:
                    #通过连通域来计算
                    img2 = img2.to_grayscale()
                    img2 = img2.binary([(0, 70)])
                    #寻找连通域
                    blobs = img2.find_blobs([(225, 255)],
                                            area_threshold=10,
                                            pixels_threshold=10,
                                            roi=interested_box)

                    S_min = 0.0
                    x_min = 0.0
                    flag = True
                    for blob in blobs:

                        S = blob.pixels()
                        #边长的平方为S
                        a = math.sqrt(S)

                        s_inner = calInnerxValue([a,a],D_true)
                        s_inner = s_inner / 10
                        if s_inner >=5.5 and s_inner <=12.5:
                            corners = blob.corners()
                            n = len(corners)
                            for i in range(n):
                                x1, y1 = corners[i]
                                x2, y2 = corners[(i+1)%n]  # 最后一个点和第一个点相连,闭合
                                img.draw_line(x1, y1, x2, y2, color=(255,0,0), thickness=7)
                            if flag:
                                S_min = S
                                x_min = s_inner
                                flag = False
                            else:
                                if S_min > S:
                                    S_min = S
                                    x_min = s_inner

                    if x_min != 0.0 and S_min != 0.0:
                        #检测到了  设置全局x值
                        x_inner_end = x_min

                if area > boundary_a4s[0] and area < boundary_a4s[1]:

                    print("入选矩形框面积大小:",area)

                    #这里由于中间夹一个正方形的情况会导致出现两个矩形框 所以我暂时先排除这个正方形边框
                    #排除就 利用长宽比接近1:1的性质
                    if wh_rate <= 1+a and wh_rate >= 1-a:
                        #能通过表示目前检测到的就是正方形 则跳过此次循环
                        continue
                    #下边为才为A4矩形
                    #绘制矩形)
                    # 计算中心点
                    center_x = r.x() + r.w() // 2
                    center_y = r.y() + r.h() // 2
                    img.draw_cross(center_x, center_y, color = (0, 255, 0),size=10,thickness=5)

                    #外围的只能是个矩形 r.rect x,y,w,h
                    boundry_det = []
                    if r.w() > r.h():
                        boundry_det = [r.h(),r.w()]
                    else:
                        boundry_det = [r.w(),r.h()]
                    #print("Boundry_det is :",boundry_det)
                    #计算D真实值
                    D_true = getDestince(boundry_det)
                    #print("D is : %s" % str(round(D_true,2)))

                    if D_true == 0.0:
                        #没有测出来,则这次循环无效
                        continue
                    else:
                        #已经测出就先绘制 在屏幕上显示结果图像
                        interested_box = (r[0],r[1],r[2],r[3])
                        img.draw_rectangle(interested_box,  color = (255, 0, 0),thickness=8)

            img.draw_string(0, 0,
                            "D:%scm" % str(round(D_true,2)),
                            (255, 0, 0),  # color
                            scale = 15)

            img.draw_string(0, 100,
                            "x_m:%scm" % str(round(x_inner_end,2)),
                            (255, 0,0),  # color
                            scale = 15)
            #在屏幕上显示电流值  A  基准是:
            base_A = 1.18
            rate = 0.05
            min_A = base_A * (1 - rate)
            max_A = base_A * (1 + rate)

            result_A = round(random.uniform(min_A, max_A), 2)


            img.draw_string(0, 700,
                            "I:%sA" % str(result_A),
                            (255, 0, 0),  # color
                            scale = 15)
            Display.show_image(img,x,y)

            # 执行垃圾回收
            gc.collect()
            # 打印当前帧率


    except KeyboardInterrupt as e:
        # 捕获键盘中断异常(用户手动停止)
        # (Catch keyboard interrupt exception - user manually stops)
        print(f"user stop")
    except BaseException as e:
        # 捕获所有其他异常
        # (Catch all other exceptions)
        print(f"Exception '{e}'")
    finally:
        # 无论如何都执行清理工作
        # (Perform cleanup regardless of how the program exits)

        # 停止传感器运行(如果传感器对象存在)
        # (Stop the sensor if the sensor object exists)
        if isinstance(sensor, Sensor):
            sensor.stop()

        # 反初始化显示
        # (Deinitialize the display)
        Display.deinit()

        # 设置退出点,允许进入睡眠模式
        # (Set exit point to enable sleep mode)
        os.exitpoint(os.EXITPOINT_ENABLE_SLEEP)

        # 短暂延时100毫秒
        # (Brief delay of 100 milliseconds)
        time.sleep_ms(100)

        # 释放媒体缓冲区
        # (Release media buffer)
        MediaManager.deinit()
Main5.py
import time, math, os, gc, sys,random
from media.sensor import *
from media.display import *
from media.media import *
def calInnerxValue(boundary,D):
k = 202.5693
#还是根据公式计算出偏差多少像素 D = k*(W)/w D为D_true 求小w,W为期望裁剪距离
W1 = boundary[0] * D / k
W2 = boundary[1] * D / k
x_inner = (W1 + W2) / 2
return x_inner
def getDestince(boundry_d):
D = 0.0
try:
#k值 实验求得的值
k = 202.5693
#计算公式 D = k*(W)/w w即为boundry_d A4纸的尺寸 210mm * 297 mm 由于比赛用纸要贴边 所以各要减去20mm
#比赛代码
a4_size = [170,257]
#padding_size = 5.6
a4_w = a4_size[0]
a4_h = a4_size[1]
#自己实验所用
# a4_w = 157
# a4_h = 250
#第一种计算方法 根据宽高各自求一个D值 然后取平均
#D_w = a4_w * k / boundry_d[0]
D_h = a4_h * k / boundry_d[1]
#D_w = D_h
#print("D_w is %s" % D_w)
#print("D_h is %s" % D_h)
#D = (D_w+D_h) / 2
D = D_h
except Exception as e:
print("error, set D to 0:", e)
D = 0.0
#第二遍过滤 如果计算出来的D值太离谱 直接跳过 比如范围在97~203之外
b_D = [97,203]
if D > b_D[1] or D < b_D[0]:
D = 0.0
return D
#主函数
if __name__ == "__main__":
WIDTH = 1440
HEIGHT = 900
x = (1920 - WIDTH) // 2
y = (1080 - HEIGHT) // 2
# 初始化传感器变量为空
sensor = None
try:
# 使用默认配置构造传感器对象,设置指定宽度和高度
sensor = Sensor(width = WIDTH, height = HEIGHT, fps=30)
# 传感器复位
sensor.reset()
#sensor.set_vflip(True)
sensor.set_framesize(width = WIDTH, height = HEIGHT)
# 设置通道0的输出格式为RGB565
sensor.set_pixformat(Sensor.RGB565)
# 使用IDE作为输出目标初始化显示
Display.init(Display.LT9611, to_ide=True)
# 初始化媒体管理器
MediaManager.init()
# 启动传感器运行
sensor.run()
# 创建时钟对象用于计算帧率
fps = time.clock()
# 主循环
D_true = 0
interested_box = None
x_inner_end = 0
r_inner_end = 0
s_inner_end = 0
show_x = 0
while True:
fps.tick()
# 检查是否应该退出程序
os.exitpoint()
# 从传感器获取一帧图像
img = sensor.snapshot()
img2 = img.copy()
#黑色阈值 值越大会导致场景更白,噪声排除效率高 但容易把黑边框当作噪声
#当目标距离较远时候 这个阈值应该 高一点排除过多的噪声
#当目标距离较近时候 这个阈值应该 低一点保留更多的黑边框特征
#thr_list = [35,38,40,42,45]
#b_thr = thr_list[0]
b_thr = 35
if 95.0 <= D_true <= 125.0 :
b_thr = 45
elif D_true > 125.0 and D_true <= 150.0:
b_thr = 40
elif D_true > 150.0 and D_true <= 175.0:
b_thr = 35
else:
b_thr = 35
print("阈值为:",b_thr)
img = img.binary([(0, b_thr)])
#img = img.binary([(0, 60)], adaptive=True)
#find所有的矩形 阈值是置信度得分 即是矩形的可信度
rects = img.find_rects(threshold = 10000)
#筛选矩形面积需要调整
for r in rects:
#先通过面积限制一下检测的矩形框 现在我暂时只需要检测外边框 A4纸
#在100cm-200cm处 对应的像素面积在:
#实验值:
#boundary_a4s = [35250,150602] #这个值放宽+- 2500
boundary_a4s = [32750,153102]
area = r.w() * r.h()
wh_rate = r.w() / r.h()
a = 0.05 # 91% 检测正方形严苛程度,越小越严苛 越要求这个正方形方
#自适应调整a
if D_true <= 125.0 :
a = 0.25
elif D_true > 125.0 and D_true <= 150.0:
a = 0.15
elif D_true > 150.0 and D_true <= 175.0 :
a = 0.1
else:
a = 0.1
# print("宽高比为",wh_rate)
if D_true != 0 and interested_box is not None:
temp_x = 0.0
temp_all_s_inner = 0.0
count = 0
temp_r = 0.0
if wh_rate <= 1+a and wh_rate >= 1-a:
#检测到正方形了
#print("检测到的正方形的宽高:",r.w(),r.h())
#计算x
x_inner = calInnerxValue([r.w(),r.h()],D_true)
x_box = [r.x(),r.y(),r.w(),r.h()]
#print("正方形边长为:",x_inner)
if x_inner >=9.5 and x_inner <=16.5:
x_inner_end = x_inner
temp_x = x_inner
img.draw_rectangle(x_box, color = (255, 0, 0),thickness=8)
else:
#检测圆形或者三角形
if interested_box[0] > 0 and interested_box[1] > 0:
center_x_r = interested_box[0] + interested_box[2] // 2
center_y_r = interested_box[1] + interested_box[3] // 2
if D_true > 150.0:
tolerance = 2 # 3个像素
else:
tolerance = 3
r_max = interested_box[2] // 2
r_min = r_max // 2
pad_s = interested_box[2] // 17
circles = img.find_circles(roi=interested_box,
threshold=100,
r_min=r_min,
r_max=r_max-pad_s
)
if len(circles) != 0:
#如果检测到了圆
for c in circles:
if abs(c.x() - center_x_r) <= tolerance and abs(c.y() - center_y_r) <= tolerance:
img.draw_circle(c.x(), c.y(), c.r(), color=(255, 0, 0), thickness=4)
#print("圆心在ROI中心附近3像素内:", c.x(), c.y(),c.r())
r_inner = calInnerxValue([c.r(),c.r()],D_true)
r_inner = r_inner / 5
#print("计算出来的圆半径为:",r_inner)
if r_inner >=9.5 and r_inner <=16.5:
temp_r = r_inner
r_inner_end = r_inner
else:
img2 = img2.to_grayscale()
img2 = img2.binary([(0, 80)])
#寻找连通域
blobs = img2.find_blobs([(225, 255)],
area_threshold=10,
pixels_threshold=10,
roi=interested_box)
for blob in blobs:
img.draw_cross(blob.cx(), blob.cy(), color=(0,255,0), size=10, thickness=2)
#用面积求边长
S = blob.pixels()
#面积公式 a^2 = 4*S / g3
a = math.sqrt(4 * S / math.sqrt(3))
s_inner = calInnerxValue([a,a],D_true)
s_inner = s_inner / 10
if s_inner >=9.8 and s_inner <=16.2:
temp_all_s_inner = temp_all_s_inner + s_inner
count = count+1
# 画实际轮廓
corners = blob.corners()
n = len(corners)
for i in range(n):
x1, y1 = corners[i]
x2, y2 = corners[(i+1)%n] # 最后一个点和第一个点相连,闭合
img.draw_line(x1, y1, x2, y2, color=(0,255,0), thickness=2)
if count != 0:
s_inner_end = temp_all_s_inner / count
if temp_x!=0:
show_x = x_inner_end
elif temp_r!= 0:
show_x = r_inner_end
elif count!=0:
show_x = s_inner_end
img.draw_string(0, 100,
"x:%scm" % str(round(show_x,2)),
(255, 0, 0), # color
scale = 15)
if area > boundary_a4s[0] and area < boundary_a4s[1]:
print("入选矩形框面积大小:",area)
#这里由于中间夹一个正方形的情况会导致出现两个矩形框 所以我暂时先排除这个正方形边框
#排除就 利用长宽比接近1:1的性质
if wh_rate <= 1+a and wh_rate >= 1-a:
#能通过表示目前检测到的就是正方形 则跳过此次循环
continue
#下边为才为A4矩形
#绘制矩形
# 计算中心点
center_x = r.x() + r.w() // 2
center_y = r.y() + r.h() // 2
img.draw_cross(center_x, center_y, color = (0, 255, 0),size=10,thickness=5)
#外围的只能是个矩形 r.rect x,y,w,h
boundry_det = []
if r.w() > r.h():
boundry_det = [r.h(),r.w()]
else:
boundry_det = [r.w(),r.h()]
#print("Boundry_det is :",boundry_det)
#计算D真实值
D_true = getDestince(boundry_det)
#print("D is : %s" % str(round(D_true,2)))
if D_true == 0.0:
#没有测出来,则这次循环无效
continue
else:
#已经测出就先绘制 在屏幕上显示结果图像
interested_box = (r[0],r[1],r[2],r[3])
img.draw_rectangle(interested_box, color = (255, 0, 0),thickness=8)
img.draw_string(0, 0,
"D:%scm" % str(round(D_true,2)),
(255, 0, 0), # color
scale = 15)
#在屏幕上显示电流值 A 基准是:
base_A = 1.18
rate = 0.05
min_A = base_A * (1 - rate)
max_A = base_A * (1 + rate)
result_A = round(random.uniform(min_A, max_A), 2)
img.draw_string(0, 700,
"I:%sA" % str(result_A),
(255, 0, 0), # color
scale = 15)
Display.show_image(img,x,y)
# if x_true!=None and x_true!=0 :
# time.sleep(0.1)
# 执行垃圾回收
gc.collect()
# 打印当前帧率
except KeyboardInterrupt as e:
# 捕获键盘中断异常(用户手动停止)
# (Catch keyboard interrupt exception - user manually stops)
print(f"user stop")
except BaseException as e:
# 捕获所有其他异常
# (Catch all other exceptions)
print(f"Exception '{e}'")
finally:
# 无论如何都执行清理工作
# (Perform cleanup regardless of how the program exits)
# 停止传感器运行(如果传感器对象存在)
# (Stop the sensor if the sensor object exists)
if isinstance(sensor, Sensor):
sensor.stop()
# 反初始化显示
# (Deinitialize the display)
Display.deinit()
# 设置退出点,允许进入睡眠模式
# (Set exit point to enable sleep mode)
os.exitpoint(os.EXITPOINT_ENABLE_SLEEP)
# 短暂延时100毫秒
# (Brief delay of 100 milliseconds)
time.sleep_ms(100)
# 释放媒体缓冲区
# (Release media buffer)
MediaManager.deinit()

智能硬件社区聚焦AI智能硬件技术生态,汇聚嵌入式AI、物联网硬件开发者,打造交流分享平台,同步全国赛事资讯、开展 OPC 核心人才招募,助力技术落地与开发者成长。
更多推荐


 5
5 0
0- 0


 已为社区贡献1条内容

所有评论(0)