DSP(TI-C2000)---基于CAN通信同邮箱多帧ID接收发送中断(标准帧格式)
首先,叠加环节:
1.才入门dsp,我的理解和代码可能会有错误,主要供作者本人参考!!!
2.如果您发现我的文章错误请联系我,谢谢。
3.基本所有资料都是从网上查找的,如有侵权,请联系我。
4.我是用的芯片TMS320F280039
5.参考了C2000Ware文件中的can的参考例程
一.CAN介绍
1Mb波特率、32个邮箱(可自由配置为接收和发送)、0 – 8 字节的数据、可编程中断(可嵌套)
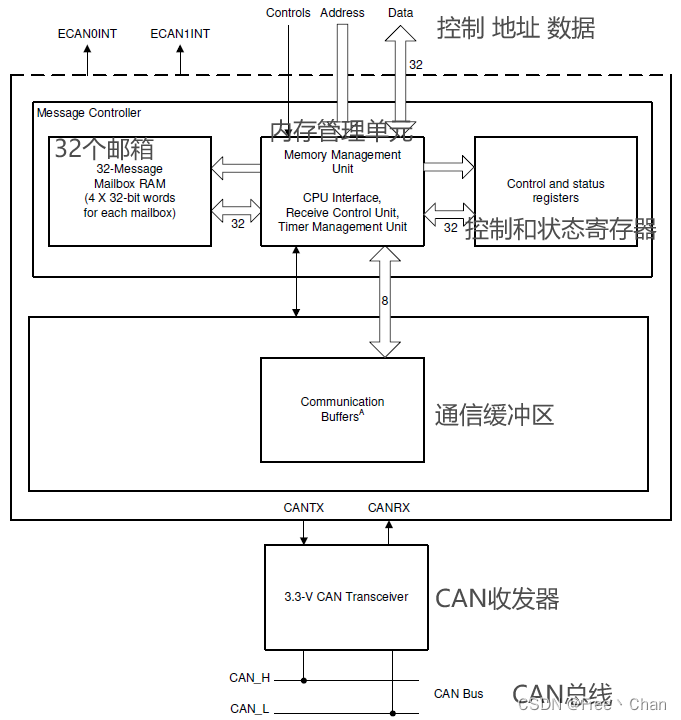
帧类型
1.数据帧:数据帧将数据从发送器传输到接收器(本文章只讨论数据帧)
2.远程帧:总线节点发出远程帧,请求发送具有同一识别符的数据帧。
3.错误帧:报文发送过程中,检测到任一节点出错,即于下一位发送出错帧,通知发送端停止发 送。
4.过载帧:接收端用于要求发送端延缓发送下一个数据帧或者远程帧。
数据帧结构
总数据帧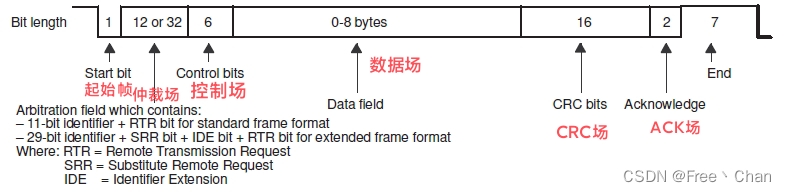
仲裁场
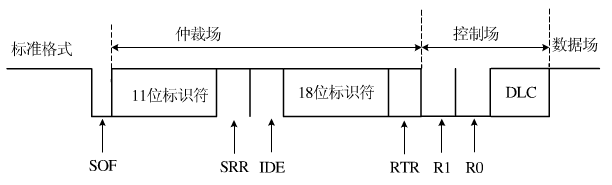
要注意的就3个:
1.有32个邮箱可以自行配置为接收或者发送
2.分为标准帧格式、拓展帧格式
3.注意区分邮箱ID(对象ID Object ID)和帧ID(标识符 Message ID)
二.CAN配置
1.CAN时钟配置
首先使能CAN的外设时钟,选择自己需要的时钟使能,一般在官方InitPeripheralClocks函数里有。
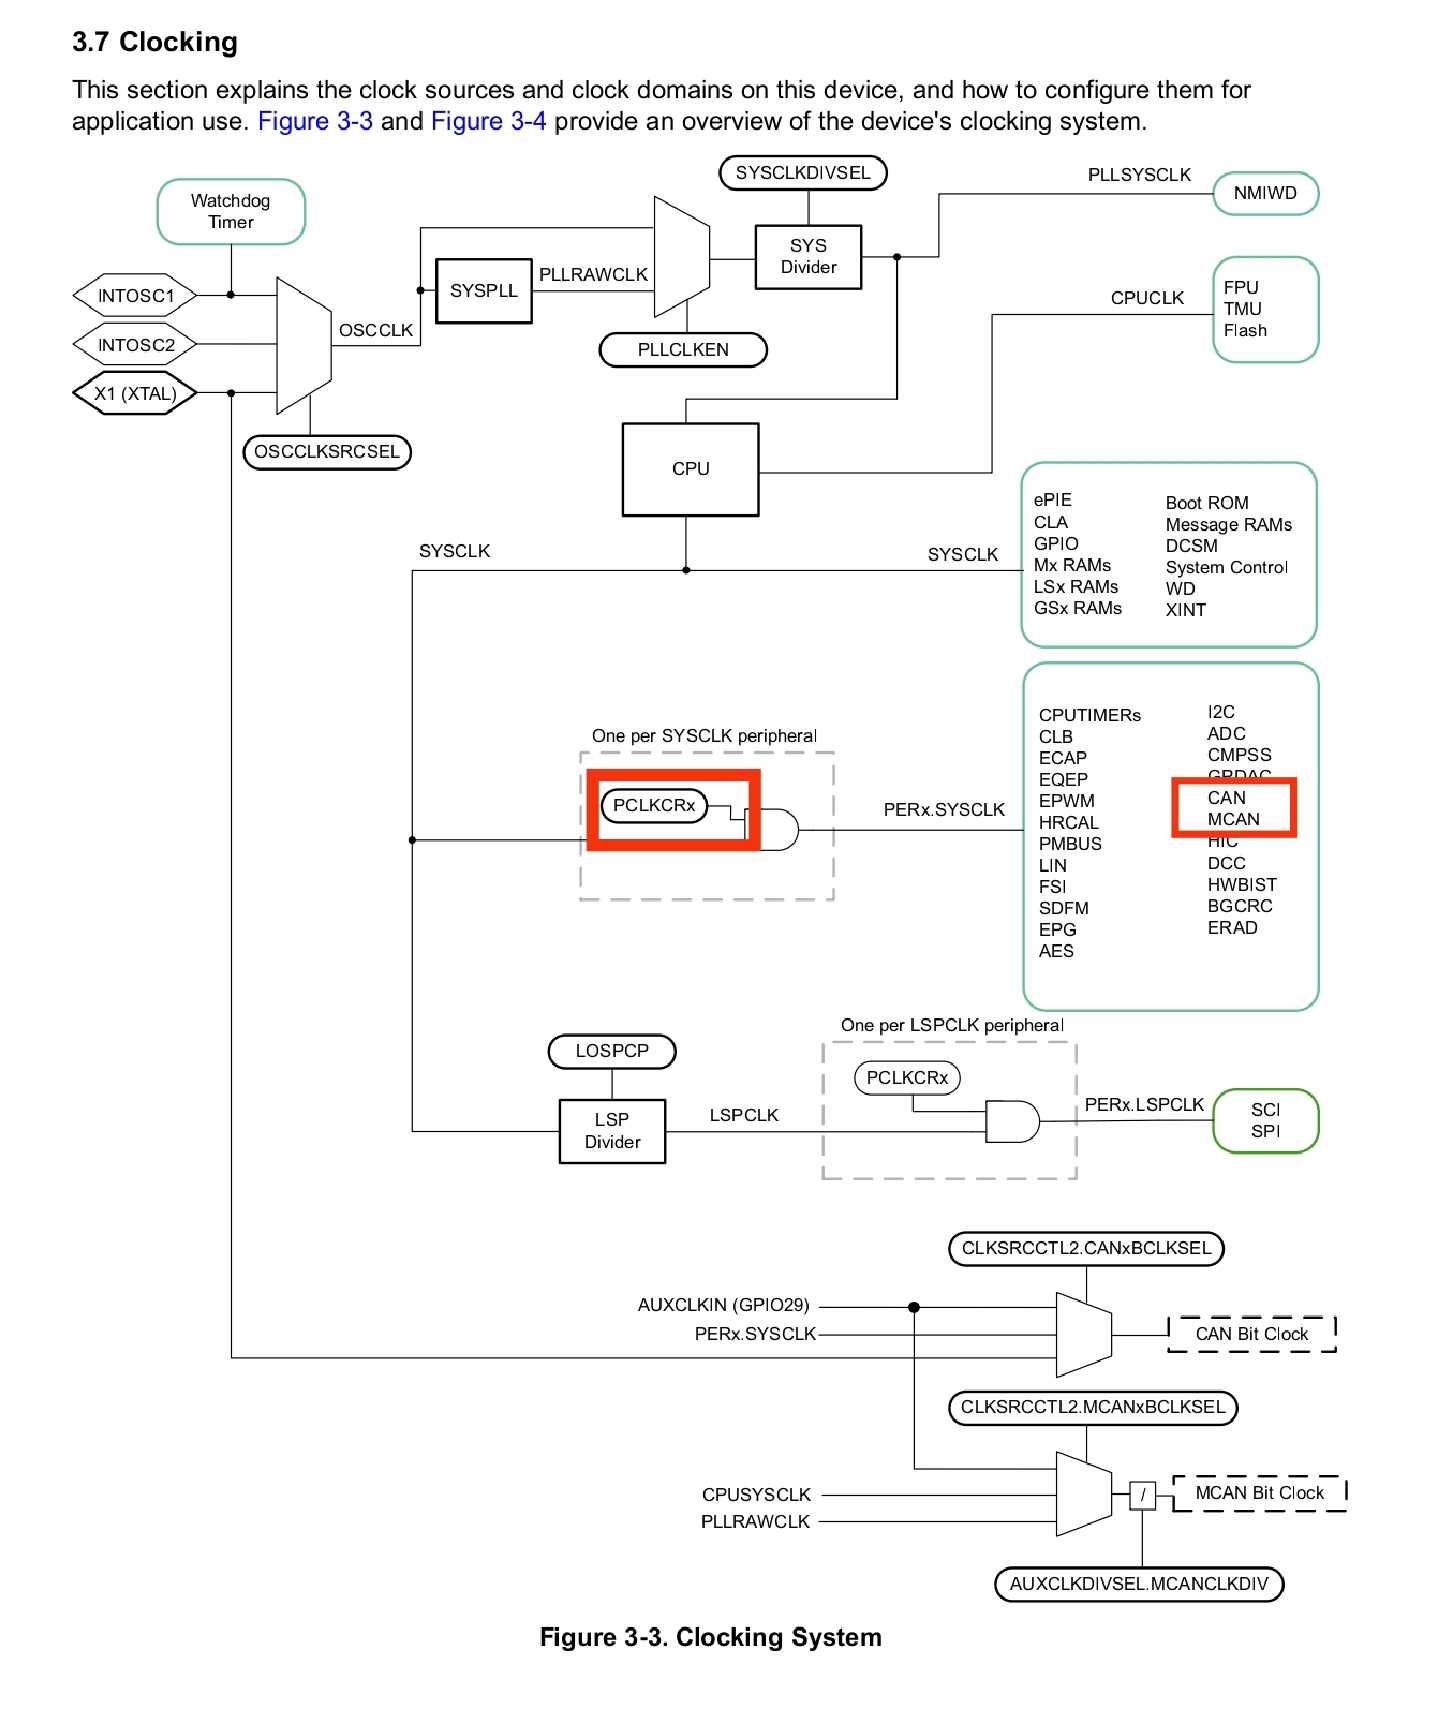
    //方法1
    SysCtl_enablePeripheral(SYSCTL_PERIPH_CLK_CANA);

    //方法2
    EALLOW;
    CpuSysRegs.PCLKCR10.bit.CAN_A = 1;//enable can Peripheral
    EDIS;
2.GPIO初始化
查找芯片手册,找对应引脚数的芯片,然后找使用的功能的复用通道。
我使用的是f280039。对应的引脚号:
SCIA_TX对应GPIO5,复用通道6。
SCIA_RX对应GPIO4,复用通道6。
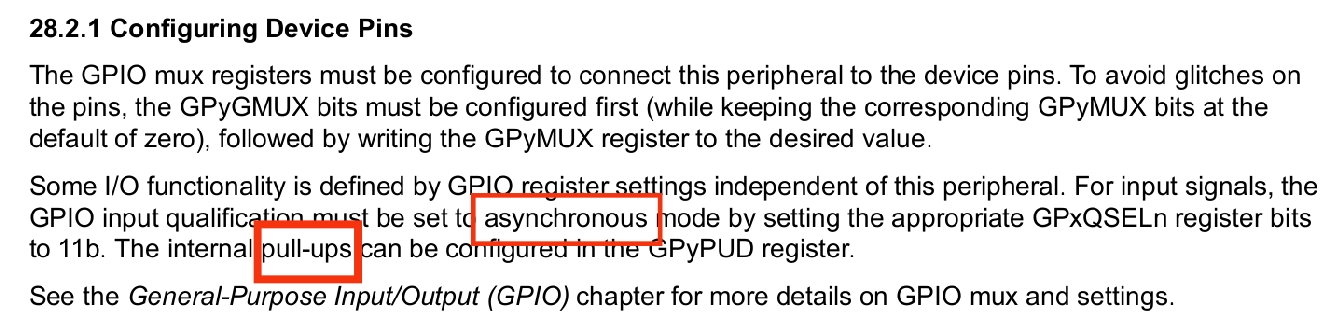
技术手册上写:输入gpio配置为异步、上拉。
GPIO配置
这里我参考的software的can官方例程。
    GPIO_setPinConfig(GPIO_5_CANA_RX);
    GPIO_setPinConfig(GPIO_4_CANA_TX);
3.CAN初始化配置
1.初始化CAN的controllers
2.设置波特率
3.使能中断时钟
4.配置中断服务函数
5.使能中断配置
6.配置邮箱ID、帧ID、帧格式、传输方向、掩码、过滤方式、数据长度(下面我会说明为什么这样配置)
7.启动CAN
    //
    // Initialize the CAN controllers
    //
    CAN_initModule(CANA_BASE);

    //
    // Set up the CAN bus bit rate to 500kHz for each module
    // Refer to the Driver Library User Guide for information on how to set
    // tighter timing control. Additionally, consult the device data sheet
    // for more information about the CAN module clocking.
    //
    CAN_setBitRate(CANA_BASE, DEVICE_SYSCLK_FREQ, 500000, 20);//(主频率)DEVICE_SYSCLK_FREQ = 120M |(波特率)CAN bus bit rate = 500kHz | (一般固定为20) bit time quanta=20

    //
    // Enable interrupts on the CAN A peripheral.
    //
    CAN_enableInterrupt(CANA_BASE, CAN_INT_IE0 | CAN_INT_ERROR |
                        CAN_INT_STATUS);

    //
    // Interrupts that are used in this example are re-mapped to
    // ISR functions found within this file.
    // This registers the interrupt handler in PIE vector table.
    //
    Interrupt_register(INT_CANA0, &canISR);

    //
    // Enable the CAN interrupt signal
    //
    Interrupt_enable(INT_CANA0);
    CAN_enableGlobalInterrupt(CANA_BASE, CAN_GLOBAL_INT_CANINT0);


    //
    // Initialize the transmit message object used for sending CAN messages.
    // Message Object Parameters:
    //      CAN Module: A
    //      Message Object ID Number: 1
    //      Message Identifier: 0x301
    //      Message Frame: Standard
    //      Message Type: Transmit
    //      Message ID Mask: 0x0
    //      Message Object Flags: Tx interrupt
    //      Message Data Length: 8 Bytes
    //
    CAN_setupMessageObject(CANA_BASE, TX_MSG_OBJ_ID, 0x301,
                           CAN_MSG_FRAME_STD, CAN_MSG_OBJ_TYPE_TX, 0,
                           CAN_MSG_OBJ_TX_INT_ENABLE, MSG_DATA_LENGTH);

    //
    // Initialize the receive message object used for receiving CAN messages.
    // Message Object Parameters:
    //      CAN Module: A
    //      Message Object ID Number: 1
    //      Message Identifier: 0x15555555
    //      Message Frame: Standard
    //      Message Type: Receive
    //      Message ID Mask: 0x0
    //      Message Object Flags: Rx Interrupt | ID Filter
    //      Message Data Length: 8 Bytes (Note that DLC field is a "don't care"
    //      for a Receive mailbox
    //
    CAN_setupMessageObject(CANA_BASE, RX_MSG_OBJ_ID, 0x101,
                           CAN_MSG_FRAME_STD, CAN_MSG_OBJ_TYPE_RX, 0,
                           (CAN_MSG_OBJ_RX_INT_ENABLE|CAN_MSG_OBJ_USE_ID_FILTER),
                            MSG_DATA_LENGTH);

    //
    // Start CAN module operations
    //
    CAN_startModule(CANA_BASE);
4.实现功能
掩码(Mask)
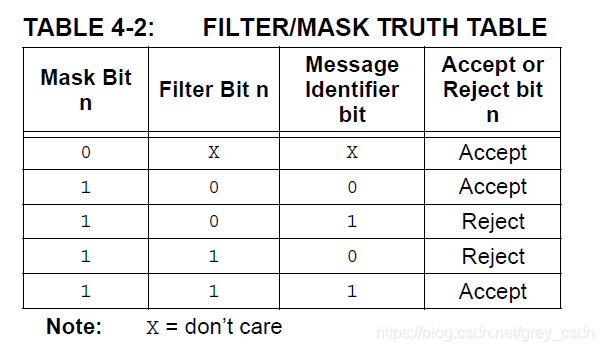
- 通过以上真值表可以直观理解maskid的功能。
- mask决定filter是否起作用,因此想要接收全部报文,直接mask设置为0就搞定。如果mask设置了,则相应位过滤器起作用。过滤器的作用就是:与我相同我才接收。
示例 1. 只接受 ID 为 0x00001567(十六进制值)的帧
-
将帧ID设置为0x00001567
-
将掩码设置为0x1FFFFFFF ---每个位都必须匹配过滤器
当帧到达时,其 ID 将与过滤器进行比较,并且所有位都必须匹配;任何与 ID 00001567 不匹配的帧都会被拒绝
示例 2. 只接受 ID 为 0x00001560 至 0x0000156F 的帧
-
将帧ID设置为0x00001560
-
将掩码设置为 0x1FFFFFF0 ---低 4 位不在乎
当帧到达时,其 ID 将与过滤器进行比较,并且除位 0 到 3 之外的所有位都必须匹配;拒绝其他帧的任何帧
示例 3. 只接受 ID 为 0x00001560 的帧到 0x00001567
-
将帧ID设置为0x00001560
-
将掩码设置为 0x1FFFFFF8 ---低 3 位不在乎
当帧到达时,其 ID 将与过滤器进行比较,并且除位 0 到 2 之外的所有位都必须匹配;拒绝其他帧的任何帧
示例 4. 接受任何帧id数据
-
将过滤器设置为 0
-
将 mask 设置为 0 ---Every Bits don't care
将Mask设置为:0,则所有Message ID都可以通过过滤器,即可以被接收或者发送。
同个邮箱接收不同的帧ID
    //可触发发送中断
    CAN_setupMessageObject(CANA_BASE, TX_MSG_OBJ_ID, 0x301,
                           CAN_MSG_FRAME_STD, CAN_MSG_OBJ_TYPE_TX, 0,
                           CAN_MSG_OBJ_TX_INT_ENABLE, MSG_DATA_LENGTH);

    /*接收 Mask=0,所有MessageID都可触发发送中断。
     *注意需要加上CAN_MSG_OBJ_USE_ID_FILTER,否则不管用
     */
    CAN_setupMessageObject(CANA_BASE, RX_MSG_OBJ_ID, 0x101,
                           CAN_MSG_FRAME_STD, CAN_MSG_OBJ_TYPE_RX, 0,
                           (CAN_MSG_OBJ_RX_INT_ENABLE|CAN_MSG_OBJ_USE_ID_FILTER),
MSG_DATA_LENGTH);注意:要实现同个邮箱接收不同的帧ID的功能,需要Mask=0,且需要加上CAN_MSG_OBJ_USE_ID_FILTER,这里的MessageID随便写什么都可以触发接收中断。
5.中断服务函数
发送和接收调用的是同一个服务函数。
__interrupt void
canISR(void)
{
    uint32_t status;

    //
    // Read the CAN interrupt status to find the cause of the interrupt
    //
    status = CAN_getInterruptCause(CANA_BASE);

    //
    // If the cause is a controller status interrupt, then get the status
    //
    if(status == CAN_INT_INT0ID_STATUS)
    {
        //
        // Read the controller status.  This will return a field of status
        // error bits that can indicate various errors.  Error processing
        // is not done in this example for simplicity.  Refer to the
        // API documentation for details about the error status bits.
        // The act of reading this status will clear the interrupt.
        //
        status = CAN_getStatus(CANA_BASE);

        //
        // Check to see if an error occurred.
        //
        if(((status  & ~(CAN_STATUS_TXOK | CAN_STATUS_RXOK)) != 7) &&
           ((status  & ~(CAN_STATUS_TXOK | CAN_STATUS_RXOK)) != 0))
        {
            //
            // Set a flag to indicate some errors may have occurred.
            //
            errorFlag = 1;
        }
    }

    //
    // Check if the cause is the transmit message object 1
    //
    else if(status == TX_MSG_OBJ_ID)
    {
        //
        // Getting to this point means that the TX interrupt occurred on
        // message object 1, and the message TX is complete.  Clear the
        // message object interrupt.
        //
        CAN_clearInterruptStatus(CANA_BASE, TX_MSG_OBJ_ID);

        //
        // Increment a counter to keep track of how many messages have been
        // sent.  In a real application this could be used to set flags to
        // indicate when a message is sent.
        //
        txMsgCount++;

        //
        // Since the message was sent, clear any error flags.
        //
        errorFlag = 0;
    }

    //
    // Check if the cause is the receive message object 2
    //
    else if(status == RX_MSG_OBJ_ID)
    {
        //
        // Get the received message
        //
//        CAN_readMessage(CANA_BASE, RX_MSG_OBJ_ID, rxMsgData);//普通接收数据
        CAN_readMessageWithID(CANA_BASE, RX_MSG_OBJ_ID , &CANframeType , &CANmsgID,
        rxMsgData);//该函数将接收数据放入数组rxMsgData,将传输方向放入CANframeType ,将帧ID放
                   //入CANmsgID

        //
        // Getting to this point means that the RX interrupt occurred on
        // message object 2, and the message RX is complete.  Clear the
        // message object interrupt.
        //
        CAN_clearInterruptStatus(CANA_BASE, RX_MSG_OBJ_ID);

        //
        // Increment a counter to keep track of how many messages have been
        // received. In a real application this could be used to set flags to
        // indicate when a message is received.
        //
        rxMsgCount++;

        //
        // Since the message was received, clear any error flags.
        //
        errorFlag = 0;
    }

    //
    // If something unexpected caused the interrupt, this would handle it.
    //
    else
    {
        //
        // Spurious interrupt handling can go here.
        //
    }

    //
    // Clear the global interrupt flag for the CAN interrupt line
    //
    CAN_clearGlobalInterruptStatus(CANA_BASE, CAN_GLOBAL_INT_CANINT0);

    //
    // Acknowledge this interrupt located in group 9
    //
    Interrupt_clearACKGroup(INTERRUPT_ACK_GROUP9);
}
函数CAN_readMessageWithID
CAN_readMessageWithID(CANA_BASE, RX_MSG_OBJ_ID , &CANframeType , &CANmsgID, rxMsgData);
输入:CANA_BASE、RX_MSG_OBJ_ID
输出:CANframeType、CANmsgID、rxMsgData
将接收数据输出到数组rxMsgData,将传输方向输出到CANframeType ,将帧ID输出到CANmsgID,接下来可以通过CANmsgID来判断帧ID
 switch(CANmsgID)
    {
        case 0x101://
        {
            //处理帧ID为0x101的数据
            break;
        }
        case 0x102:
        {
            //处理帧ID为0x102的数据
            break;
        }
        case 0x103:
        {
            //处理帧ID为0x103的数据
            break;
        }
        default:
        {

        }
    }
附录一:参考资料
1.STM32学习笔记(十) CAN通讯测试(环回模式) - 心的起始 - 博客园
2.TMS320F280049C 学习笔记23 CAN入门_tms320f280049c入门-CSDN博客
3.
TMS320F28379D:DCAN - 如何接收所有消息 ID?可以接收特定的,但不能在它发生变化时接收。- C2000 微控制器论坛 - C2000™︎ 微控制器 - TI E2E 支持论坛
4.CCS/TMS320F28379D:具有多个消息 ID 的 CAN 问题 - C2000 微控制器论坛 - C2000™︎ 微控制器 - TI E2E 支持论坛
5.DSP F28335:CAN配置[DSP CAN]-CSDN博客
7.Canbus ID 过滤器和掩码 - IAmAProgrammer - 博客园
附录二:代码
Can_Driver.c
/* Includes ------------------------------------------------------------------*/
#include "Can_Driver.h"
//#include "Can_IAP.h"
//#include "driverlib.h"


//
// Defines
//

volatile uint32_t CanErrorFlag = 0;    // CAN communication error flag
uint16_t CanrxFlag=0;//
uint16_t CantxFlag=0;//
uint16_t FillOK1=0;
uint16_t FillOK2=0;
CAN_MsgFrameType CANframeType;
uint32_t CANmsgID;
uint16_t txMsgData[Can_DATA_LENGTH]={0,0,0,1,2,3,4,5};
uint16_t rxMsgData[Can_DATA_LENGTH];   // Store the data received by CAN

__interrupt void canISR(void);

/********************
 * CAN RX(89) --> GPIO5
 * CAN TX(75) --> GPIO4
 */
void InitCanGPIO(void)
{
//    SysCtl_enablePeripheral(SYSCTL_PERIPH_CLK_CANA);
    EALLOW;
    CpuSysRegs.PCLKCR10.bit.CAN_A = 1;//enable can Peripheral
    EDIS;

//    Device_initGPIO(); // Disable pin locks.
    GPIO_setPinConfig(GPIO_5_CANA_RX);
    GPIO_setPinConfig(GPIO_4_CANA_TX);
}
void CanInit0(void)
{
//    Device_init();
    InitCanGPIO();
    CAN_initModule(CANA_BASE);// Initialize the CAN controller
    CAN_setBitRate(CANA_BASE, DEVICE_SYSCLK_FREQ, 500000, 20);//DEVICE_SYSCLK_FREQ = 120M | CAN bus bit rate = 500kHz | bit time quanta=20
    CAN_enableInterrupt(CANA_BASE, CAN_INT_IE0 | CAN_INT_ERROR |    // Enable interrupts on the CAN peripheral.
                        CAN_INT_STATUS);

//    Interrupt_initModule();
//    Interrupt_initVectorTable();
//    EINT;
//    ERTM;
    //
    // Interrupts that are used in this example are re-mapped to
    // ISR functions found within this file.
    // This registers the interrupt handler in PIE vector table.
    //
    Interrupt_register(INT_CANA0, &canISR);

    //
    // Enable the CAN interrupt signal
    //
    Interrupt_enable(INT_CANA0);
    CAN_enableGlobalInterrupt(CANA_BASE, CAN_GLOBAL_INT_CANINT0);

//    //
//    // Enable CAN test mode with external loopback
//    //
//    CAN_enableTestMode(CANA_BASE, CAN_TEST_EXL);

    CAN_setupMessageObject(CANA_BASE, TX_MSG_OBJ_ID, 0x301, CAN_MSG_FRAME_STD,
                           CAN_MSG_OBJ_TYPE_TX, 0, CAN_MSG_OBJ_TX_INT_ENABLE,
                           Can_DATA_LENGTH);
    CAN_setupMessageObject(CANA_BASE, RX_MSG_OBJ_ID, 0x1, CAN_MSG_FRAME_STD,
                           CAN_MSG_OBJ_TYPE_RX, 0xFFFFFFD2,  (CAN_MSG_OBJ_RX_INT_ENABLE|CAN_MSG_OBJ_USE_ID_FILTER)  ,
                           Can_DATA_LENGTH);
    CAN_setupMessageObject(CANA_BASE, RX_MSG_OBJ_ID, 0x101, CAN_MSG_FRAME_STD,
                           CAN_MSG_OBJ_TYPE_RX, 0xFFFFFFE1,  (CAN_MSG_OBJ_RX_INT_ENABLE|CAN_MSG_OBJ_USE_ID_FILTER)  ,
                           Can_DATA_LENGTH);


    //
    // Start CAN module operations
    //
    CAN_startModule(CANA_BASE);

    CAN_sendMessage(CANA_BASE, TX_MSG_OBJ_ID, Can_DATA_LENGTH, txMsgData);// send data once to initiate an interrupt
}


Uint16 spi_tx_buf[16]={0};
//extern uint32_t ARM_offset;
//extern uint32_t LastARM_offset;
/*********test*************/
Uint16 cantestbuf[128]={0};
Uint16 testk=0;

/*********test*************/

__interrupt void canISR(void)
{
    uint32_t status;

    /*********test*************/

    Uint16 i=0;
    while(i<128)
    {
        cantestbuf[i]=i;
        i++;
    }
    /*********test*************/

    status = CAN_getInterruptCause(CANA_BASE); // Read the CAN interrupt status to get the reason for the interrupt
    if(status == CAN_INT_INT0ID_STATUS) // controller status interrupt
    {
        status = CAN_getStatus(CANA_BASE);
        if(((status  & ~(CAN_STATUS_TXOK | CAN_STATUS_RXOK)) != 7) &&
           ((status  & ~(CAN_STATUS_TXOK | CAN_STATUS_RXOK)) != 0))
//        if(((status  & ~(CAN_STATUS_RXOK)) != CAN_STATUS_LEC_MSK) &&
//           ((status  & ~(CAN_STATUS_RXOK)) != CAN_STATUS_LEC_NONE))
        {
            CanErrorFlag = 1;
        }
    }


    else if(status == TX_MSG_OBJ_ID)
    {
//        CAN_setupMessageObject(CANA_BASE, TX_MSG_OBJ_ID, 0x1, CAN_MSG_FRAME_STD,
//                               CAN_MSG_OBJ_TYPE_TX, 0, CAN_MSG_OBJ_TX_INT_ENABLE,
//                               Can_DATA_LENGTH);
//        CAN_sendMessage(CANA_BASE , TX_MSG_OBJ_ID , Can_DATA_LENGTH , txMsgData);

        CantxFlag=1;
        //
        // Getting to this point means that the TX interrupt occurred on
        // message object 1, and the message TX is complete.  Clear the
        // message object interrupt.
        //
        CAN_clearInterruptStatus(CANA_BASE, TX_MSG_OBJ_ID);

        //
        // Increment a counter to keep track of how many messages have been
        // sent.  In a real application this could be used to set flags to
        // indicate when a message is sent.
        //
//        txMsgCount++;

        //
        // Since the message was sent, clear any error flags.
        //
//        CanErrorFlag=0;
    }

    //
    // Check if the cause is the receive message object 2
    //
    else if(status == RX_MSG_OBJ_ID)
    {
        //
        // Get the received message
        //
//        CAN_readMessage(CANA_BASE, RX_MSG_OBJ_ID, rxMsgData);

        CAN_readMessageWithID(CANA_BASE, RX_MSG_OBJ_ID , &CANframeType , &CANmsgID,
                              rxMsgData);
        CanrxFlag=1;
        CanRxTask(rxMsgData,CANmsgID);


        //
        // Getting to this point means that the RX interrupt occurred on
        // message object 2, and the message RX is complete.  Clear the
        // message object interrupt.
        //
        CAN_clearInterruptStatus(CANA_BASE, RX_MSG_OBJ_ID);

        //
        // Increment a counter to keep track of how many messages have been
        // received. In a real application this could be used to set flags to
        // indicate when a message is received.
        //
//        rxMsgCount++;

        //
        // Since the message was received, clear any error flags.
        //
        CanErrorFlag=0;
    }

    //
    // If something unexpected caused the interrupt, this would handle it.
    //
    else
    {
        //
        // Spurious interrupt handling can go here.
        //
    }

    //
    // Clear the global interrupt flag for the CAN interrupt line
    //
    CAN_clearGlobalInterruptStatus(CANA_BASE, CAN_GLOBAL_INT_CANINT0);

    //
    // Acknowledge this interrupt located in group 9
    //
    Interrupt_clearACKGroup(INTERRUPT_ACK_GROUP9);

}
Can_IAP.c
说明:跨帧组合,CAN接收的数据通过SPI传输出去,CAN一帧数据5字节、SPI一帧16字节。功能实现在代码switch的CanDataFrm中
每帧CAN数据有前3字节(偏移量,可忽略)和后5字节(bin数据)。5字节无法完整对齐到16位(2字节),需跨帧组合剩余字节。
#include "Can_IAP.h"
//#include "f28003x_device.h"     // Headerfile Include File
extern Uint16   SciUpFile[224+11] ;
extern Uint16   SciNode;
extern Uint16   ARM_offset;
extern Uint16   LastARM_offset;
extern uint32_t DSP_offset;
extern Uint16 FileRemainLength;
extern Uint16 MDSP_CRC;
extern Uint16 SciCRC0;
int sciupfilecnt = 0;      // SciUpFile当前写入位置
int SPI_index    = 0;      // spi_tx_buf当前填充位置
Uint16 File_LengthH,File_LengthL;
/*********test*************/
extern Uint16 cantestbuf[128];
extern Uint16 testk;
/*********test*************/
void CanRxTask(Uint16 *rxmsgdata,Uint32 canmsgID )
{

    switch(canmsgID)
    {
        case CanSkHandsFrm:
        {
            SciNode      =     rxMsgData[1];
            File_LengthH = ((( rxmsgdata[2]&0xff ) << 8) |
                             ( rxmsgdata[3]&0xff ));
            File_LengthL = ((( rxmsgdata[4]&0xff ) << 8) |
                             ( rxmsgdata[5]&0xff ));
            SciCRC0      = ((( rxMsgData[6]&0xff ) << 8) |
                             ( rxMsgData[7]&0xff ));

            File_Length  = (((Uint32) File_LengthH  << 16) |
                            ( File_LengthL ));
            FileRemainLength=File_Length;
            break;
        }

        case CanDataFrm:
        {
            ARM_offset = ((uint32_t)rxMsgData[0] << 16) | ((uint32_t)rxMsgData[1] << 8) | rxMsgData[2];
            LastARM_offset = ARM_offset;

            for(Uint16 k=0;k<5;k++)    // 2. 追加新数据到缓冲区
            {
                if (sciupfilecnt < UpFilesize)
                {
    //                SciUpFile[sciupfilecnt++]=rxMsgData[3+k];
                    /*********test*************/
                    SciUpFile[sciupfilecnt++]=cantestbuf[testk++];
                    /*********test*************/
                }
            }

            // 3. 处理缓冲区:组合16位值 → 填充SPI数组
            int pos = 0; // 当前处理位置
            while (pos + 1 < sciupfilecnt)
            { // 至少2字节可组合
                // 3.1 组合16位值(低字节在前)
                uint16_t val = (SciUpFile[pos + 1] << 8) | SciUpFile[pos];

                // 3.2 存入SPI数组
                spi_tx_buf[SPI_index++] = val;

                // 3.3 移动处理位置(跳过已处理的2字节)
                pos += 2;

                // 4. 检查SPI数组是否满

                if (SPI_index >= SPI_BUF_SIZE)
                {
    //                SPI_Transmit();  // 触发SPI发送
    //                FillOK2=1;
                    break;
                }

            }
            // 5. 处理剩余字节(跨帧保留)
            int remaining = sciupfilecnt - pos; // 未处理的字节数
            if (remaining > 0)
            {
                // 将剩余字节移到缓冲区头部
                for (int j = 0; j < remaining; j++)
                {
                    SciUpFile[j] = SciUpFile[pos + j];
                }
            }
            sciupfilecnt = remaining; // 更新缓冲区有效长度
            memset(&SciUpFile[sciupfilecnt],0,(UpFilesize-sciupfilecnt));//缓冲区无效数据删除为0
            break;
        }

        case CanCheckFrm:
        {

            break;
        }

        case CanEndFrm:
        {

            break;
        }

        default:
        {
            CanrxFlag=0;
        }
    }

}

void CanTxTask(Uint16 *txmsgdata,Uint32 canmsgID)
{
    switch(canmsgID)
    {
        case CanSkHandsFrm:
        {
            txmsgdata[0]=0x01;
            txmsgdata[1]=SciNode;
            txmsgdata[2]=(File_LengthH >> 8) & 0xff;
            txmsgdata[3]=File_LengthH & 0xff;
            txmsgdata[4]=(File_LengthL >> 8) & 0xff;
            txmsgdata[5]=File_LengthH & 0xff;
            txmsgdata[6]=(SciCRC0 >> 8) & 0xff;
            txmsgdata[7]= SciCRC0 & 0xff;
            break;
        }

        case CanDataFrm:
        {

            break;
        }

        case CanCheckFrm:
        {
            txmsgdata[0] = 0x03;
            txmsgdata[1] = SciNode;
            txmsgdata[2] = (DSP_offset >> 16) & 0xFF; // 次高8位
            txmsgdata[3] = (DSP_offset >> 8)  & 0xFF; // 次低8位
            txmsgdata[4] = DSP_offset & 0xFF;         // 最低8位
            memset(&txmsgdata[5],0,3);
            break;
        }

        case CanEndFrm:
        {
            txmsgdata[0] = 0x04;
            txmsgdata[1] = SciNode;
            memset(&txmsgdata[2],0,6);
            break;
        }
    }
}

智能硬件社区聚焦AI智能硬件技术生态,汇聚嵌入式AI、物联网硬件开发者,打造交流分享平台,同步全国赛事资讯、开展 OPC 核心人才招募,助力技术落地与开发者成长。
更多推荐
 18
18 0
0- 0


 已为社区贡献3条内容

所有评论(0)