ESP32C3 系列实战(1) --点亮小灯
本文介绍了基于ESP32-C3开发板的LED闪烁项目准备工作与实现过程。首先列出了所需的参考文档(乐鑫官网、合宙开发板文档)和工具(CH343驱动、VSCode及插件)。详细说明了ESP-IDF的安装步骤和项目文件结构,重点关注CMake配置、Kconfig菜单设置以及主程序blink.c的实现,其中通过GPIO控制实现了LED定时闪烁功能。
文章目录
准备工作
参考文档
-
乐鑫官网文档参考 https://docs.espressif.com/projects/esp-dev-kits/zh_CN/latest/esp32c3/resources.html
-
合宙ESP32C3开发板文档参考 https://wiki.luatos.com/chips/esp32c3/board.html
-
ESP-IDF 官网文档 https://docs.espressif.com/projects/esp-idf/zh_CN/stable/esp32c3/get-started/index.html
工具
-
IDE 开发工具:vscode + esp-idf 插件 + c/c++ 插件 + cmake 插件
安装 ESP-IDF
esp-idf 安装教程参考 ESP-IDF 官网文档 https://docs.espressif.com/projects/esp-idf/zh_CN/stable/esp32c3/get-started/index.html,稍微有点小麻烦,网上已有很多教程,例如: https://naiva.blog.csdn.net/article/details/142030279, 此处就不再赘述。
ESP32-C3 开发板
我买的是合宙ESP32-C3 开发板,可参考 合宙ESP32C3开发板文档,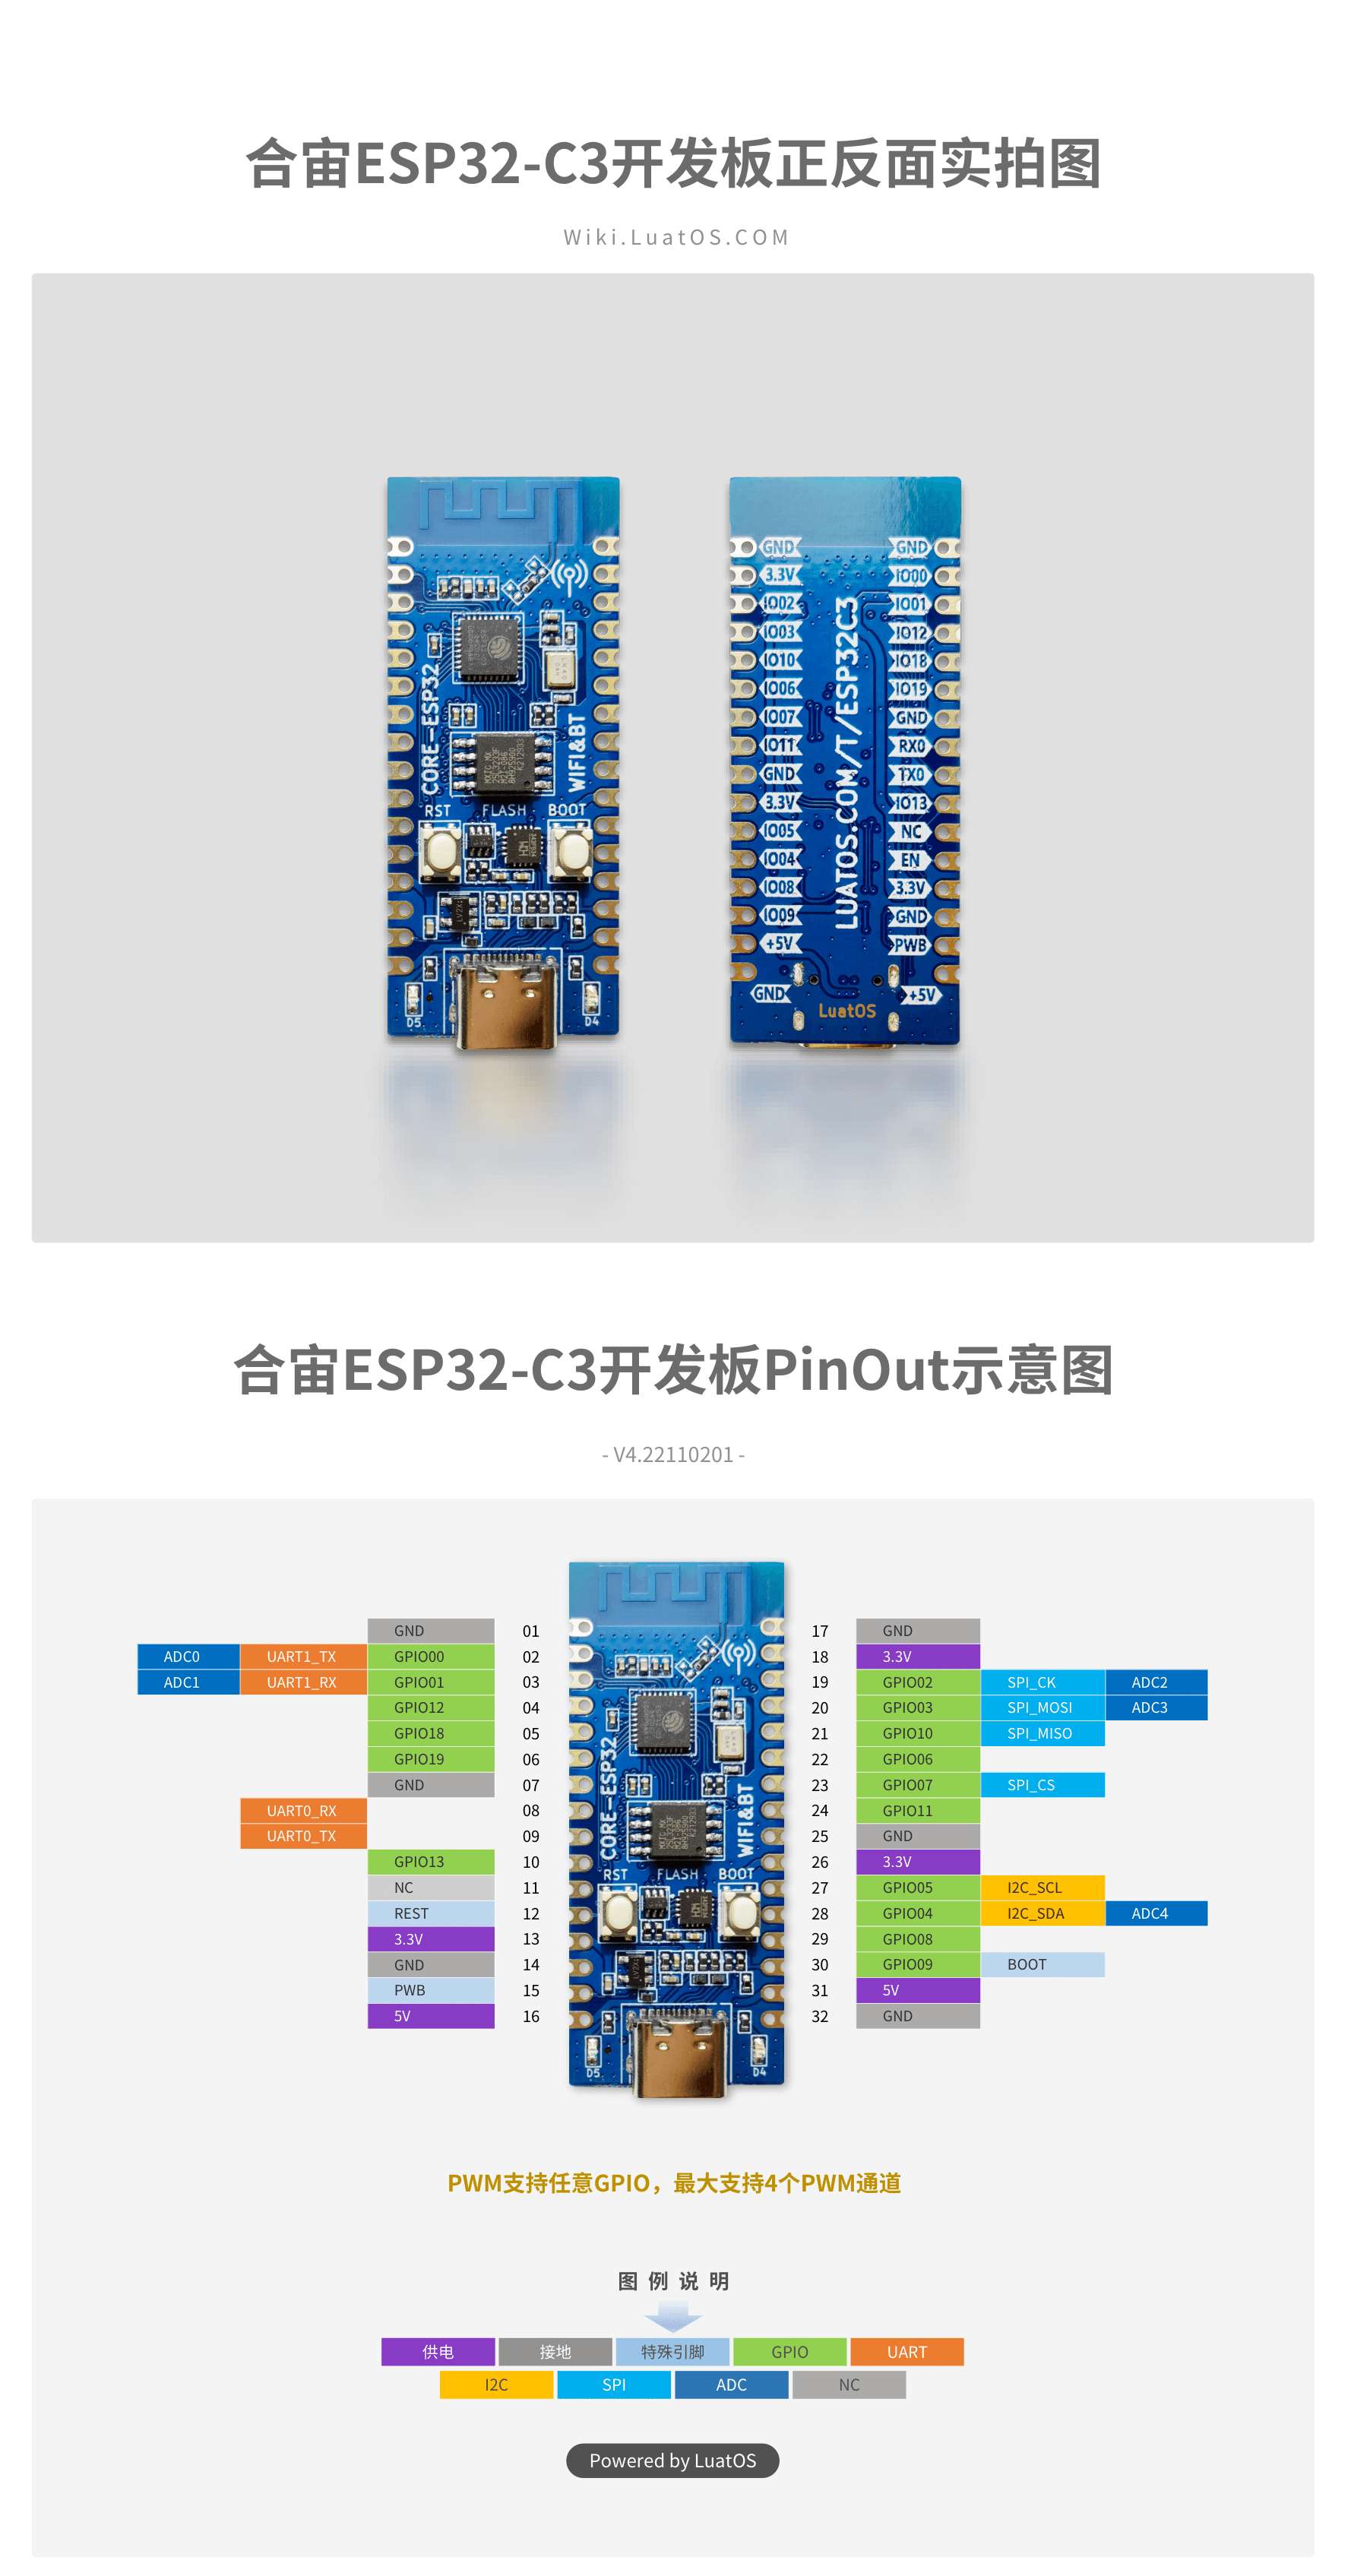
准备好了上述的工作,就开始进入激动人心的编程了,点亮一个 LED 灯!
项目结构
主要用到的文件如下:
.
├── CMakeLists.txt
├── main
│   ├── CMakeLists.txt
│   ├── Kconfig.projbuild
│   └── blink.c
└── sdkconfig.defaults
./CMakeLists.txt
声明环境
# The following five lines of boilerplate have to be in your project's
# CMakeLists in this exact order for cmake to work correctly
cmake_minimum_required(VERSION 3.5)

include($ENV{IDF_PATH}/tools/cmake/project.cmake)
project(blink)
./sdkconfig.defaults
空文件,保持默认,编译的时候会生成 sdkconfig 文件,用的就是默认的参数
#
./main/Kconfig.projbuild
project configuration menu ,idf.py menuconfig 用到, 比如这里设置端口为GPIO12, 会根据此配置生成 sdkconfig 文件,里面就有 #define CONFIG_BLINK_GPIO 12
menu "Example Configuration"

    config BLINK_GPIO
        int "Blink GPIO number"
        range 0 21
        default 12
        help
            GPIO number (IOxx) to blink on and off.

            Some GPIOs are used for other purposes (flash connections, etc.) and cannot be used to blink.

endmenu
./main/CMakeLists.txt
定义 src 目录 与 include 目录
# 定义 src 目录 与 include 目录
set(srcs "blink.c")
set(include_dirs ".")
idf_component_register(SRCS "${srcs}" INCLUDE_DIRS "${include_dirs}")
./main/blink.c
点亮小灯主程序
#include <stdio.h>
#include "freertos/FreeRTOS.h"
#include "freertos/task.h"
#include "esp_log.h"
#include "driver/gpio.h"
#include "sdkconfig.h"

/* Can use project configuration menu (idf.py menuconfig) to choose the GPIO to blink,
   or you can edit the following line and set a number here.
*/
#define BLINK_GPIO CONFIG_BLINK_GPIO

static const char *TAG = "blink";

void app_main(void)
{
    int i = 0;
    ESP_LOGE(TAG, "app_main");

    /* Configure the IOMUX register for pad BLINK_GPIO (some pads are
       muxed to GPIO on reset already, but some default to other
       functions and need to be switched to GPIO. Consult the
       Technical Reference for a list of pads and their default
       functions.)
    */
    gpio_reset_pin(BLINK_GPIO);
    /* Set the GPIO as a push/pull output */
    gpio_set_direction(BLINK_GPIO, GPIO_MODE_OUTPUT);
    while(1) {
        ESP_LOGI(TAG, "[%02d] Hello world!", i++);
        /* Blink off (output low) */
        printf("Turning off the LED\n");
        gpio_set_level(BLINK_GPIO, 0);
        vTaskDelay(1000 / portTICK_PERIOD_MS);
        ESP_LOGI(TAG, "[%02d] Hello world!", i++);
        /* Blink on (output high) */
        printf("Turning on the LED\n");
        gpio_set_level(BLINK_GPIO, 1);
        vTaskDelay(1000 / portTICK_PERIOD_MS);
    }
}
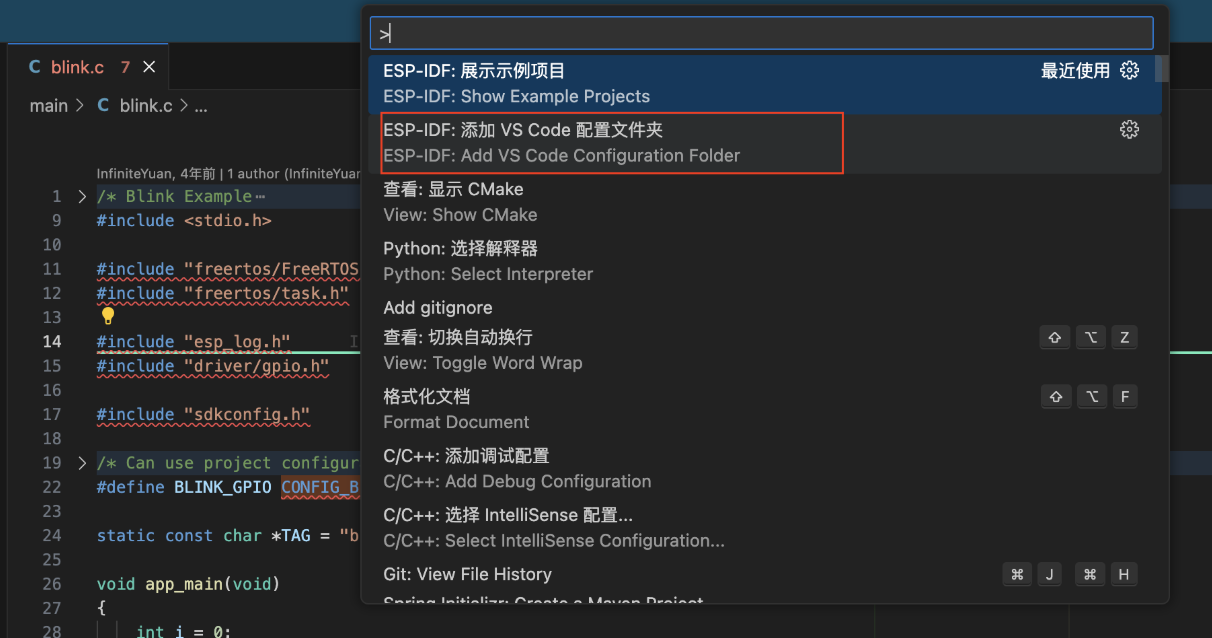
程序刚开始有很多报错,因为引用的是 ESP-IDF sdk 中的文件,因此要将其加入进path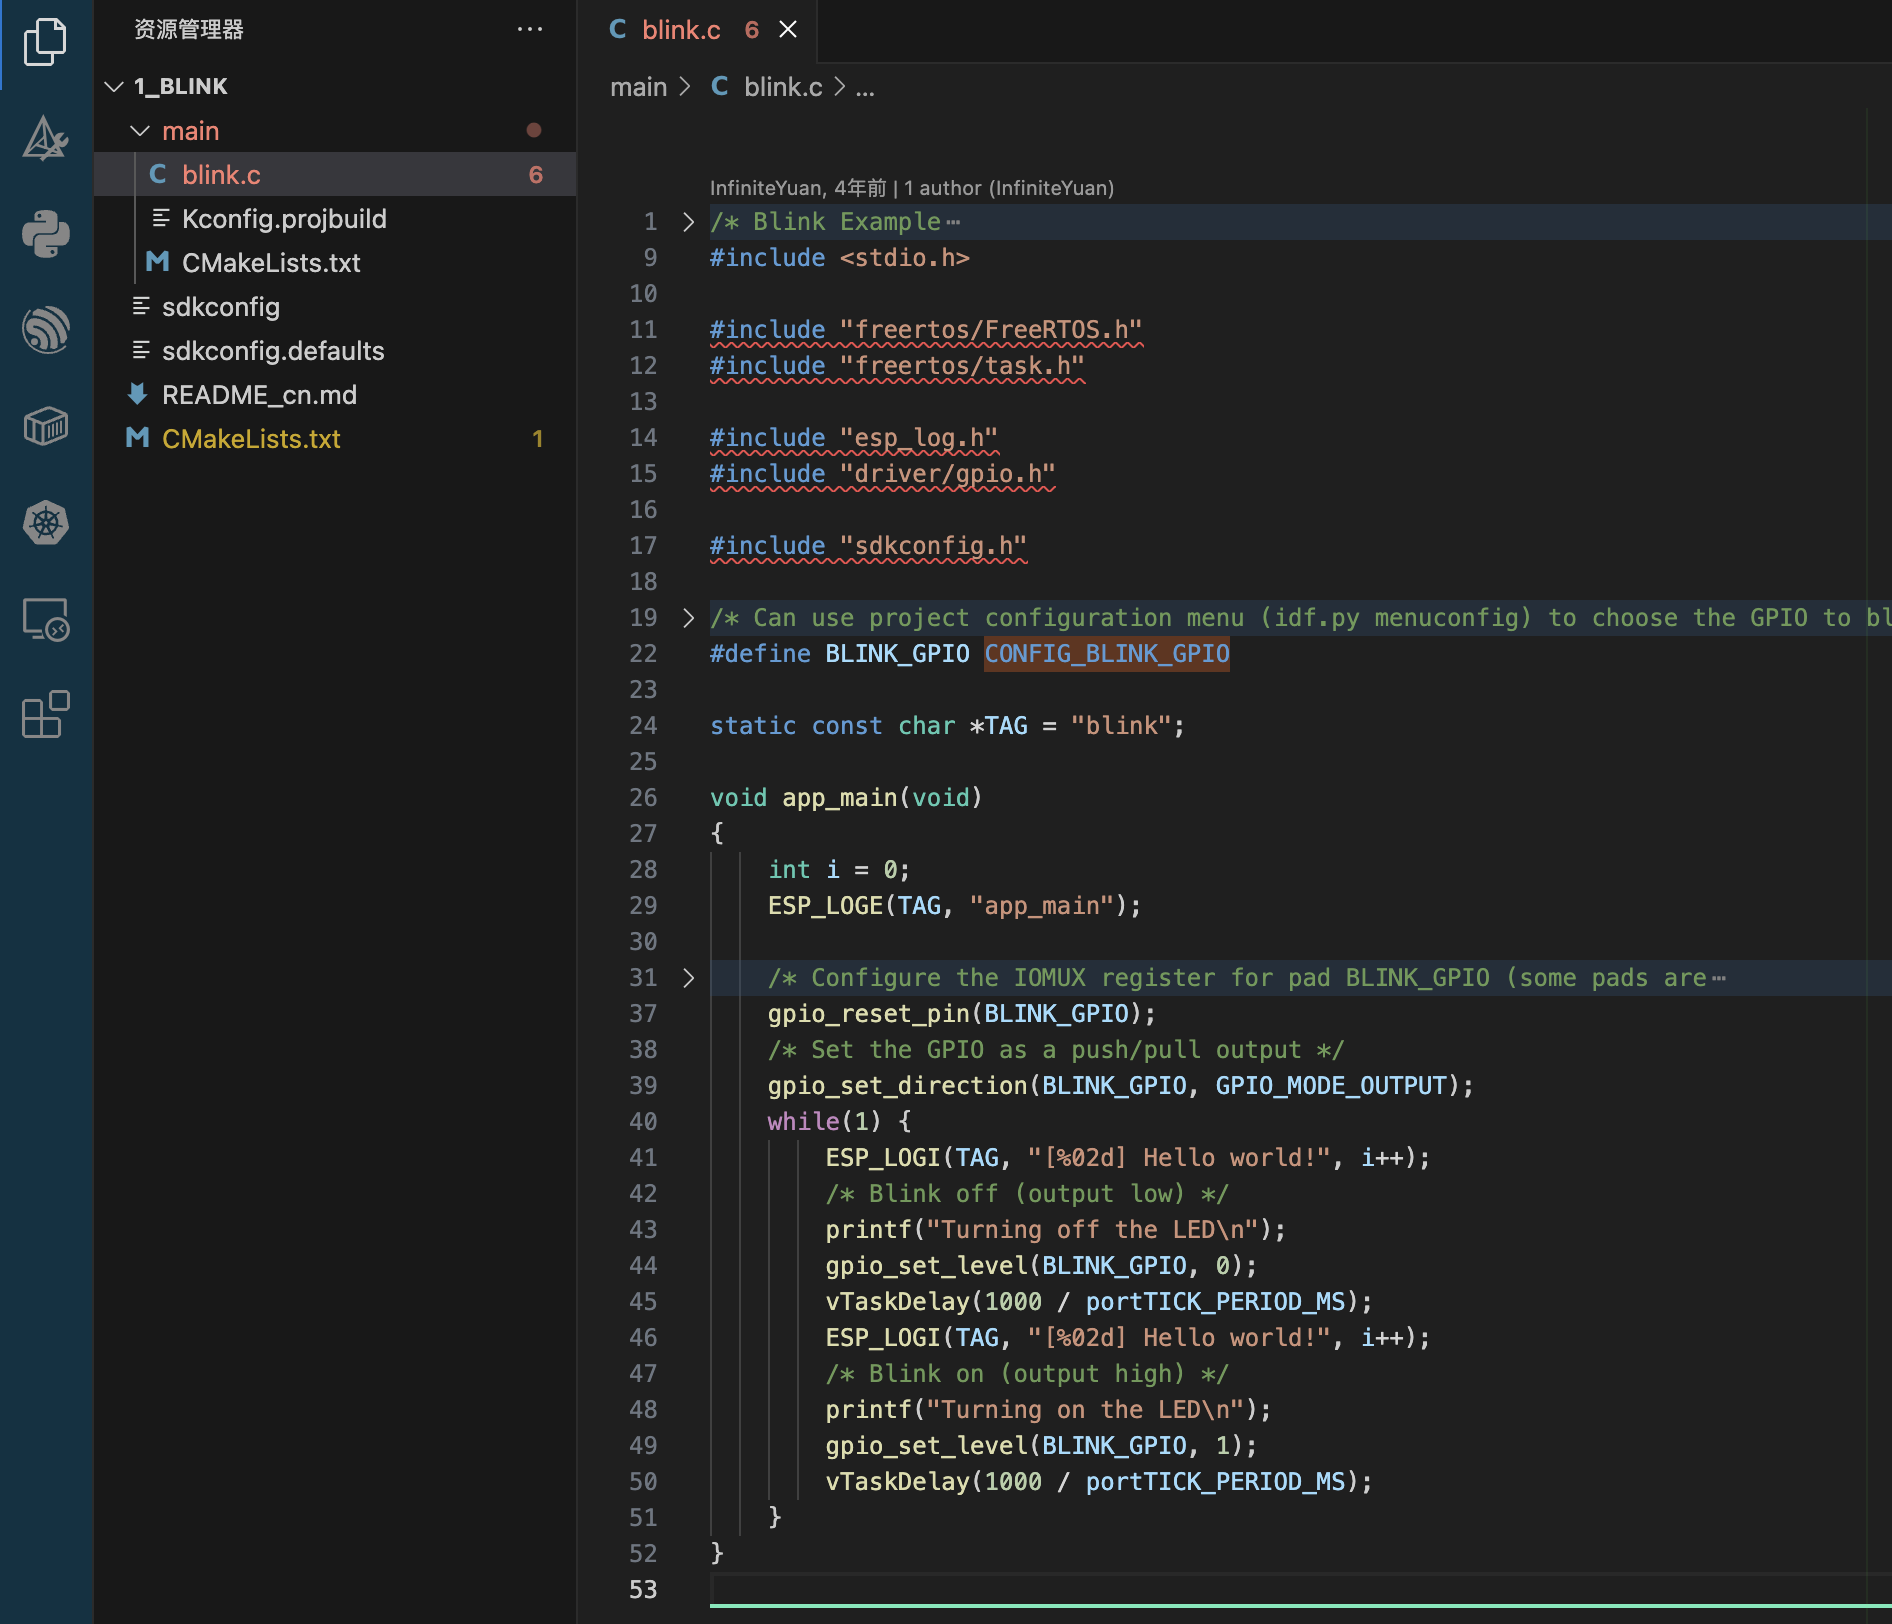
消除波浪线引用报错
先删除.vscode 文件夹,用ESP-IDF 插件添加 vscode 配置文件夹,会增加几个文件,会把 esp-idf 的路径给添加进去
.vscode
├── c_cpp_properties.json
├── launch.json
└── settings.json
c_cpp_properties.json
{
  "configurations": [
    {
      "name": "ESP-IDF",
      "compilerPath": "${config:idf.toolsPath}/tools/riscv32-esp-elf/esp-14.2.0_20241119/riscv32-esp-elf/bin/riscv32-esp-elf-gcc",
      "compileCommands": "${config:idf.buildPath}/compile_commands.json",
      "includePath": [
        "${config:idf.espIdfPath}/components/**",
        "${config:idf.espIdfPathWin}/components/**",
        "${workspaceFolder}/**"
      ],
      "browse": {
        "path": [
          "${config:idf.espIdfPath}/components",
          "${config:idf.espIdfPathWin}/components",
          "${workspaceFolder}"
        ],
        "limitSymbolsToIncludedHeaders": true
      }
    }
  ],
  "version": 4
}
launch.json
{
  "version": "0.2.0",
  "configurations": [
    {
      "type": "gdbtarget",
      "request": "attach",
      "name": "Eclipse CDT GDB Adapter"
    },
    {
      "type": "espidf",
      "name": "Launch",
      "request": "launch"
    }
  ]
}
settings.json
其中 idf.port 会把设备连接的端口记录进去,为后面的烧录准备
{
  "C_Cpp.intelliSenseEngine": "default",
  "idf.port": "/dev/tty.wchusbserial59090649341",
  "files.associations": {
    ".env*": "dotenv",
    "freertos.h": "c",
    "task.h": "c"
  },
  "idf.openOcdConfigs": [
    "board/esp32c3-builtin.cfg"
  ],
  "idf.customExtraVars": {
    "IDF_TARGET": "esp32c3"
  }
}
编译烧录
把配置分别按实际情况配置上,点编译,会生成 build 目录, 然后再点烧录,程序就烧录进开发板中了。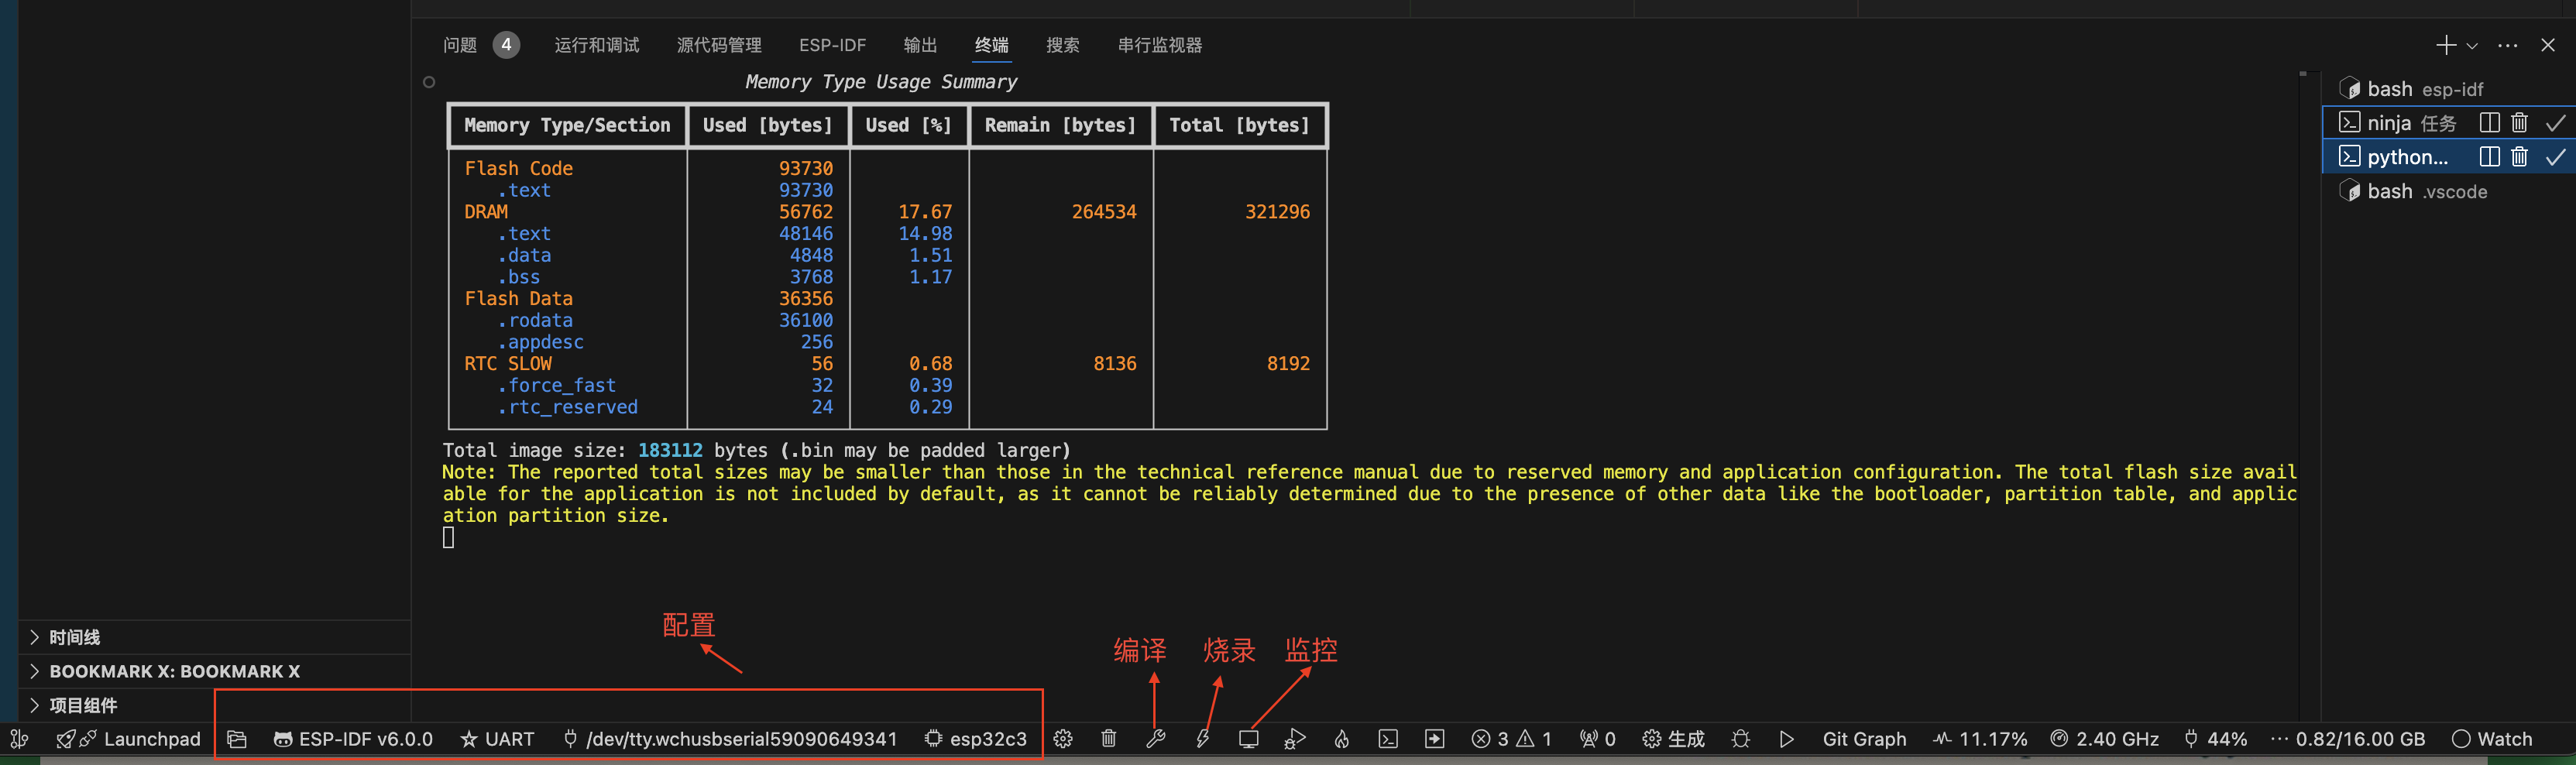
程序运行结果
这里就成功点亮 LED 小灯了
ESP32C3 点亮小灯

智能硬件社区聚焦AI智能硬件技术生态,汇聚嵌入式AI、物联网硬件开发者,打造交流分享平台,同步全国赛事资讯、开展 OPC 核心人才招募,助力技术落地与开发者成长。
更多推荐


 22
22 0
0- 0


 已为社区贡献1条内容

所有评论(0)