IMX6ULL移植LVGL(V8.2版本)
一、获取源码
获取lvgl源码。注意:此教程不适用于lvgl9.0以上版本,最好下载指定版本,这样教程就完全可以使用
git clone -b release/v8.2 https://github.com/lvgl/lv_port_linux_frame_buffer.git
git clone -b release/v8.2 https://github.com/lvgl/lvgl.git
git clone -b release/v8.2 https://github.com/lvgl/lv_drivers.git
先将下载好的源码文件夹lvgl和lv_drivers放在lv_port_linux_frame_buffer的路径下
ls lv_port_linux_frame_buffer
LICENSE  lv_conf.h  lv_drivers/  lv_drv_conf.h  lvgl/  main.c  Makefile  mouse_cursor_icon.c  README.md
二、修改源码
2.1 修改lv_conf.h
(1)第11行,使能此文件
/* clang-format off */
#if 1 /*Set it to "1" to enable the content*/
(2)第27行,将宏LV_COLOR_DEPTH设置为16。这里的宏LV_COLOR_DEPTH表示的是显示屏的颜色深度,由于我们使用的LCD屏幕是RGB565格式的(即表示RGB三个颜色通道分别用5bytes、6bytes、5bytes的空间来存储),所以色深应该设置为16(bytes)。
/*Color depth: 1 (1 byte per pixel), 8 (RGB332), 16 (RGB565), 32 (ARGB8888)*/
#define LV_COLOR_DEPTH 16
(3)第49行,使用LVGL内置内存池还是使用系统内存管理,本文linux系统内置mmu内存管理单元,所以使用系统管理
/*1: use custom malloc/free, 0: use the built-in `lv_mem_alloc()` and `lv_mem_free()`*/
#define LV_MEM_CUSTOM 1
(4)第81行,屏幕的刷新时间,单位是毫秒(ms)。
/*Default display refresh period. LVG will redraw changed areas with this period time*/
#define LV_DISP_DEF_REFR_PERIOD 10      /*[ms]*/

/*Input device read period in milliseconds*/
#define LV_INDEV_DEF_READ_PERIOD 10     /*[ms]*/
(5)第88行,设置系统获取心跳时间方式,LV_TICK_CUSTOM为1,custom_tick_get函数获取
LV_TICK_CUSTOM为0,你需要手动在系统的心跳中断里定期调用 lv_tick_inc(milliseconds)函数,告诉LVGL时间过去了多少毫秒。这种方式在裸机系统或需要确保时间精确性的场景中很常见。LV_TICK_CUSTOM为1,LVGL会自动通过你定义的custom_tick_get()来获取当前时间。
/*Use a custom tick source that tells the elapsed time in milliseconds.
 *It removes the need to manually update the tick with `lv_tick_inc()`)*/
#define LV_TICK_CUSTOM 1
#if LV_TICK_CUSTOM
    #define LV_TICK_CUSTOM_INCLUDE <stdint.h>         /*Header for the system time function*/
    #define LV_TICK_CUSTOM_SYS_TIME_EXPR (custom_tick_get())    /*Expression evaluating to current system time in ms*/
#endif   /*LV_TICK_CUSTOM*/
(6)第671行,为了看到移植的效果,我们先使能官方的demo,来检测是否移植成功:
/*Show some widget. It might be required to increase `LV_MEM_SIZE` */
#define LV_USE_DEMO_WIDGETS        1
#if LV_USE_DEMO_WIDGETS
#define LV_DEMO_WIDGETS_SLIDESHOW  0
#endif
2.2 修改lv_drv_conf.h
此文件用于配置显示屏所使用的底层驱动,FBDEV和DRM,本文采用FB驱动
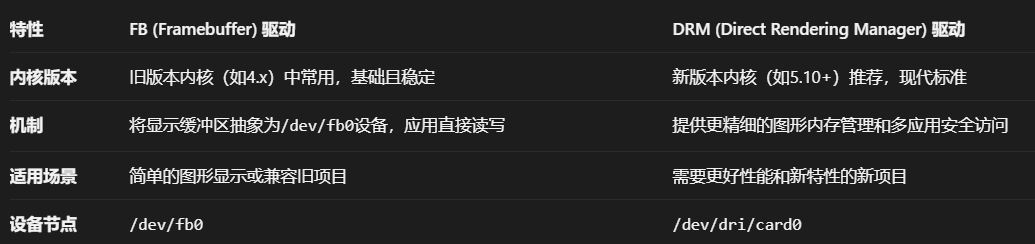
(1)第11行,使能此文件
/* clang-format off */
#if 1 /*Set it to "1" to enable the content*/
(2)第318行,是否使能FBDEV的驱动,由于我们使用FB驱动,因此使能
/*-----------------------------------------
 *  Linux frame buffer device (/dev/fbx)
 *-----------------------------------------*/
#ifndef USE_FBDEV
#  define USE_FBDEV          1
#endif
(3)第337行,是否使能DRM驱动,由于我们使用FB驱动,因此失能
/*-----------------------------------------
 *  DRM/KMS device (/dev/dri/cardX)
 *-----------------------------------------*/
#ifndef USE_DRM
#  define USE_DRM           0
#endif
(4)第441行,使能鼠标或者触摸板作为evdev界面,将USE_EVDEV设置为1。
指定evdev设备节点的路径,查看工控机下的/dev/input,使用hexdump命令来检测:hexdump event1。运行上面的命令之后,再点击LCD屏一下,如果发现终端输出了一大堆十六进制数,则说明LCD的evdev的输入设备节点是它,否则,就换一个event文件进行测试。
显示屏的分辨率来设置其中的EVDEV_HOR_MAX和EVDEV_VER_MAX,我们的LCD显示屏分辨率是800*480,所以两个宏分别设置为800和480。
#ifndef USE_EVDEV
#  define USE_EVDEV           1
#endif

#ifndef USE_BSD_EVDEV
#  define USE_BSD_EVDEV       0
#endif

#if USE_EVDEV || USE_BSD_EVDEV
#  define EVDEV_NAME   "/dev/input/event1"        /*You can use the "evtest" Linux tool to get the list of devices and test them*/
#  define EVDEV_SWAP_AXES         0               /*Swap the x and y axes of the touchscreen*/

#  define EVDEV_CALIBRATE         1               /*Scale and offset the touchscreen coordinates by using maximum and minimum values for each axis*/

#  if EVDEV_CALIBRATE
#    define EVDEV_HOR_MIN         0               /*to invert axis swap EVDEV_XXX_MIN by EVDEV_XXX_MAX*/
#    define EVDEV_HOR_MAX      800               /*"evtest" Linux tool can help to get the correct calibraion values>*/
#    define EVDEV_VER_MIN         0
#    define EVDEV_VER_MAX      480
#  endif  /*EVDEV_CALIBRATE*/
#endif  /*USE_EVDEV*/
2.3 修改main.c文件
(1)第三行,根据不同的驱动加入不同的头文件,本文默认第一条
#include "lv_drivers/display/fbdev.h"

//#include "lv_drivers/display/drm.h"
(2)第10行,修改显示缓冲区的大小,即800*480
#define DISP_BUF_SIZE (800 * 480)
(3)第18行,修改驱动设备的初始化函数
fbdev_init();

//drm_init();
(4)第27行,初始化和设置显示驱动
/*Initialize and register a display driver*/
static lv_disp_drv_t disp_drv;
lv_disp_drv_init(&disp_drv);
disp_drv.draw_buf   = &disp_buf;
disp_drv.flush_cb   = fbdev_flush;
disp_drv.hor_res    = 800;
disp_drv.ver_res    = 480;
lv_disp_drv_register(&disp_drv);

#if 0
/*Initialize and register a display driver*/
static lv_disp_drv_t disp_drv;
lv_disp_drv_init(&disp_drv);
disp_drv.draw_buf   = &disp_buf;
disp_drv.flush_cb   = drm_flush;
disp_drv.hor_res    = 800;
disp_drv.ver_res    = 480;
lv_disp_drv_register(&disp_drv);
#endif
(5)第46行,我们不使用鼠标作为LCD显示屏的输入设备,所以mouse部分将它注释掉
#if 0
    /*Set a cursor for the mouse*/
    LV_IMG_DECLARE(mouse_cursor_icon)
    lv_obj_t * cursor_obj = lv_img_create(lv_scr_act()); /*Create an image object for the cursor */
    lv_img_set_src(cursor_obj, &mouse_cursor_icon);           /*Set the image source*/
    lv_indev_set_cursor(mouse_indev, cursor_obj);             /*Connect the image  object to the driver*/
#endif
2.4 修改Makefile文件
(1)将CC编译器修改为自己的交叉编译器
CC = /usr/local/arm/gcc-linaro-7.5.0-2019.12-x86_64_arm-linux-gnueabihf/bin/arm-linux-gnueabihf-gcc
(2)注释掉第20行,使其不能编译鼠标输入设备的源码
# CSRCS +=$(LVGL_DIR)/mouse_cursor_icon.c
2.5 编译
编译,然后会生成一个demo文件,直接放到工控机下运行即可。
make -j48

三、实验结果
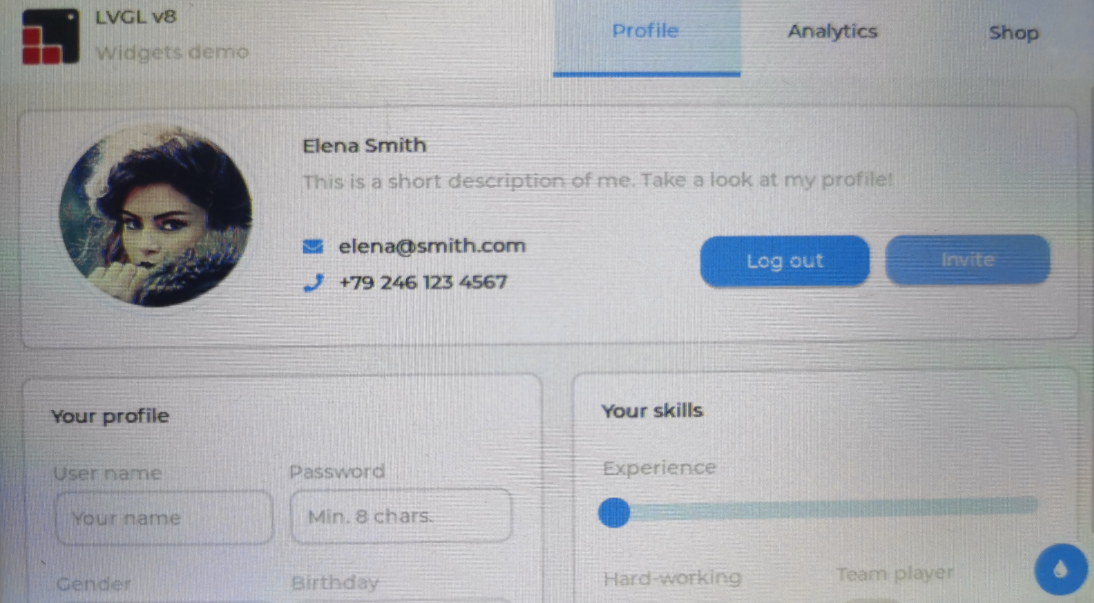

智能硬件社区聚焦AI智能硬件技术生态,汇聚嵌入式AI、物联网硬件开发者,打造交流分享平台,同步全国赛事资讯、开展 OPC 核心人才招募,助力技术落地与开发者成长。
更多推荐
 7
7 0
0- 0


 已为社区贡献3条内容

所有评论(0)