3.5【串口】格式化打印字符串
fputc:每次往控制台发送格式化字符串的一个字符。(ch:要发送的字符)_weak:代表函数能够重写。
·
一、格式化字符串的编程原理
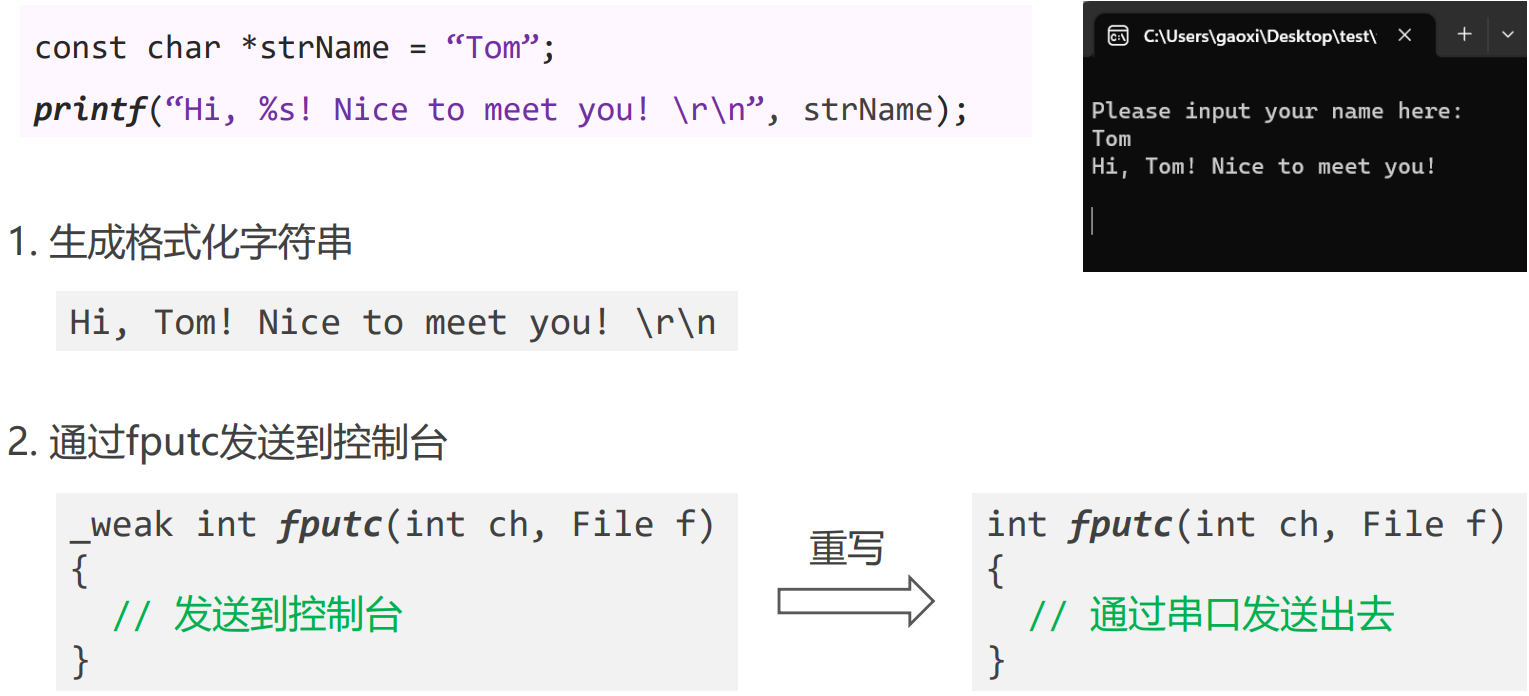
fputc:每次往控制台发送格式化字符串的一个字符。(ch:要发送的字符)
_weak:代表函数能够重写。
二、重写fputc函数
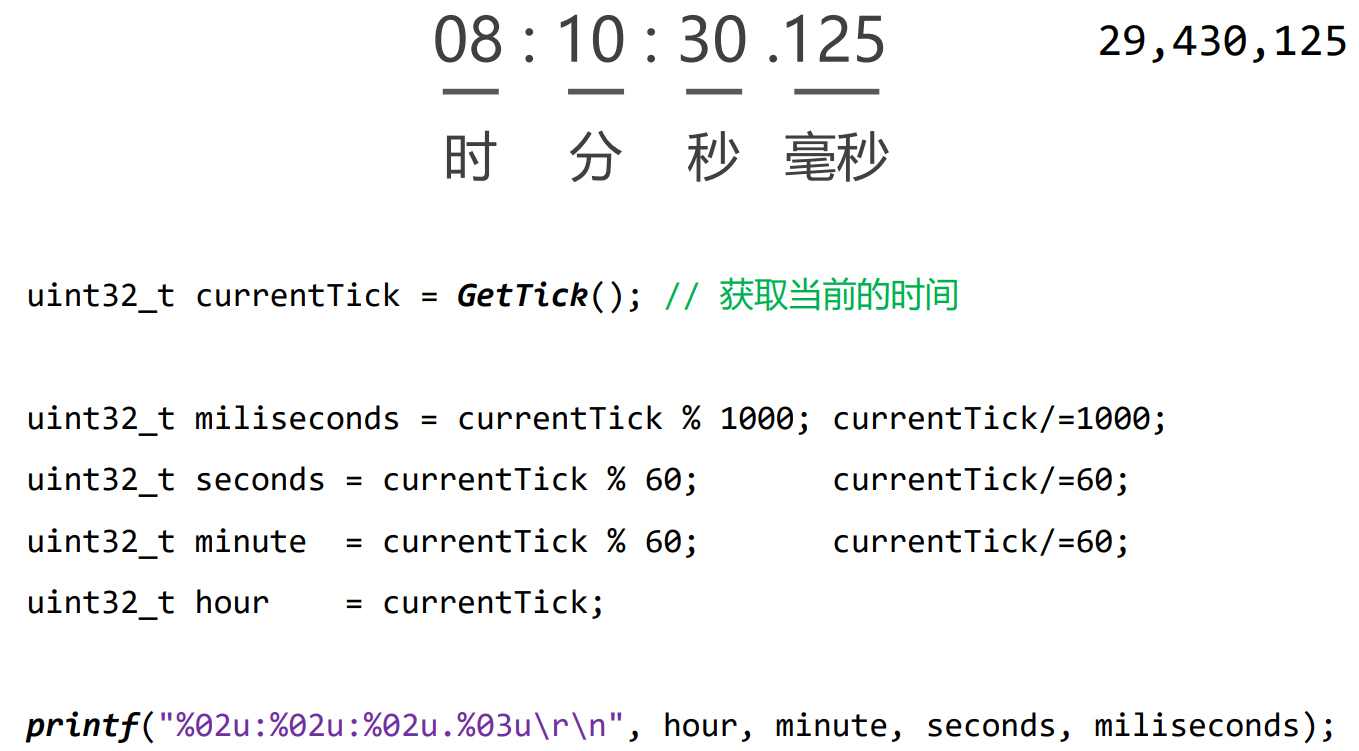
三、格式化时间字符串
#include "stm32f10x.h"
#include <stdio.h>
#include "delay.h"
void My_USART_SendBytes(USART_TypeDef *USARTx, uint8_t *pData, uint16_t Size);
void My_USART1_Init(void);
int main(void)
{
Delay_Init();
My_USART1_Init();
// printf("Hello world. \r\n");
while(1)
{
uint32_t currentTick = GetTick();
uint32_t miliSeconds = currentTick % 1000;
currentTick = currentTick / 1000;
uint32_t seconds = currentTick % 60;
currentTick = currentTick / 60;
uint32_t minutes = currentTick % 60;
currentTick = currentTick / 60;
uint32_t hour = currentTick;
printf("%02u:%02u:%02u.%03u\r\n", hour, minutes, seconds, miliSeconds);
Delay(100);
}
}
//
// @简介:通过串口发送多个字节
// @参数 USARTx:填写串口的名称
// @参数 pData:要发送的数据
// @参数 Size:要发送数据的数量,单位是字节
//
void My_USART_SendBytes(USART_TypeDef *USARTx, uint8_t *pData, uint16_t Size)
{
for(uint32_t i = 0; i < Size; i++)
{
// #1. 等待发送数据寄存器为空
while(USART_GetFlagStatus(USART1, USART_FLAG_TXE) == RESET);
// #2. 写入发数据寄存器当中
USART_SendData(USART1, pData[i]);
}
// 等待发送完成
while(USART_GetFlagStatus(USART1, USART_FLAG_TC) == RESET);
}
//
// @简介:对USART1进行初始化
// PB6 - Tx, PB7 - Rx
// 115200, 8, 1, None, 双向
//
void My_USART1_Init(void)
{
// #1. 初始化PB6和PB7
GPIO_InitTypeDef GPIO_InitStruct;
// // PA9 tx
// RCC_APB2PeriphClockCmd(RCC_APB2Periph_GPIOA, ENABLE);
// GPIO_InitStruct.GPIO_Pin = GPIO_Pin_9;
// GPIO_InitStruct.GPIO_Mode = GPIO_Mode_AF_PP;
// GPIO_InitStruct.GPIO_Speed = GPIO_Speed_10MHz;
// GPIO_Init(GPIOA, &GPIO_InitStruct);
//
// // PA10 rx
// RCC_APB2PeriphClockCmd(RCC_APB2Periph_GPIOA, ENABLE);
// GPIO_InitStruct.GPIO_Pin = GPIO_Pin_10;
// GPIO_InitStruct.GPIO_Mode = GPIO_Mode_IPU;
// GPIO_Init(GPIOA, &GPIO_InitStruct);
RCC_APB2PeriphClockCmd(RCC_APB2Periph_AFIO, ENABLE);
GPIO_PinRemapConfig(GPIO_Remap_USART1, ENABLE);
// PB6
RCC_APB2PeriphClockCmd(RCC_APB2Periph_GPIOB, ENABLE);
GPIO_InitStruct.GPIO_Pin = GPIO_Pin_6;
GPIO_InitStruct.GPIO_Mode = GPIO_Mode_AF_PP;
GPIO_InitStruct.GPIO_Speed = GPIO_Speed_10MHz;
GPIO_Init(GPIOB, &GPIO_InitStruct);
// PB7
RCC_APB2PeriphClockCmd(RCC_APB2Periph_GPIOB, ENABLE);
GPIO_InitStruct.GPIO_Pin = GPIO_Pin_7;
GPIO_InitStruct.GPIO_Mode = GPIO_Mode_IPU;
GPIO_Init(GPIOB, &GPIO_InitStruct);
// #2. 初始化USART1
RCC_APB2PeriphClockCmd(RCC_APB2Periph_USART1, ENABLE);
USART_InitTypeDef USART_InitStruct;
USART_InitStruct.USART_BaudRate = 115200;
USART_InitStruct.USART_Mode = USART_Mode_Tx | USART_Mode_Rx;
USART_InitStruct.USART_WordLength = USART_WordLength_8b;
USART_InitStruct.USART_StopBits = USART_StopBits_1;
USART_InitStruct.USART_Parity = USART_Parity_No;
USART_Init(USART1, &USART_InitStruct);
USART_Cmd(USART1, ENABLE); // 闭合总开关
}
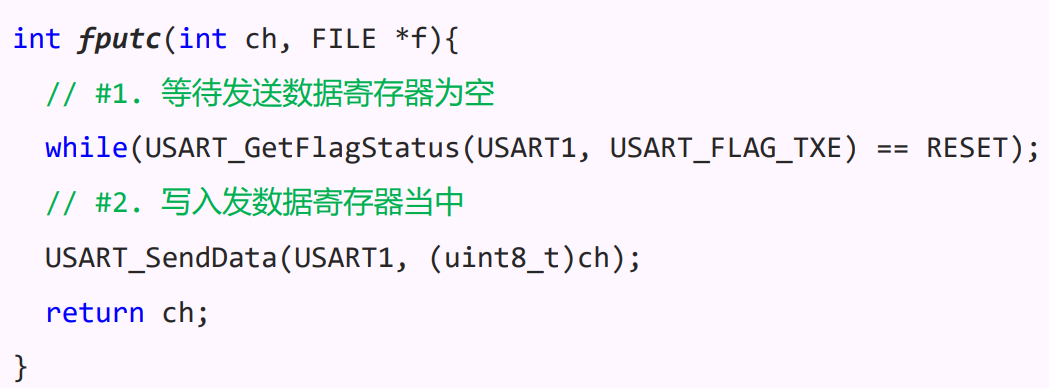
int fputc(int ch, FILE *f)
{
// #1. 等待TDR为空
while(USART_GetFlagStatus(USART1, USART_FLAG_TXE) == RESET);
// #2. 发送
USART_SendData(USART1, (uint8_t)ch);
return ch;
}

智能硬件社区聚焦AI智能硬件技术生态,汇聚嵌入式AI、物联网硬件开发者,打造交流分享平台,同步全国赛事资讯、开展 OPC 核心人才招募,助力技术落地与开发者成长。
更多推荐


 0
0 0
0- 0


 已为社区贡献5条内容

所有评论(0)