STM32软件加密完全指南:从入门到精通的固件防护实战
本文全面介绍STM32固件加密防护技术,涵盖UID绑定、MD5/AES加密、RDP保护等核心方法。首先分析嵌入式系统面临的安全威胁和攻击手段,包括调试接口读取、Bootloader漏洞等。重点讲解STM32芯片的硬件安全特性,如96位唯一ID和读保护(RDP)机制,提供详细的代码实现示例。文章对比软件加密与硬件加密芯片的优缺点,给出适用于不同场景的防护方案。最后强调量产流程中的安全注意事项,包括两
STM32软件加密完全指南:从入门到精通的固件防护实战
覆盖UID绑定、MD5/AES加密、RDP保护、调试接口禁用、OTA安全传输及反破解高级技巧
目录
- 为什么需要软件加密?——嵌入式安全威胁全景分析
- STM32平台安全特性详解
- 核心加密技术:UID绑定与MD5校验
- 高级加密:AES在固件保护和OTA传输中的应用
- 读保护(RDP)与调试接口禁用的正确姿势
- 量产流程闭环:两阶段烧录详解
- 反逆向与反调试高级技巧
- 常见攻击手法及应对策略
- 工程实践建议与代码模板
- 总结与展望
一、为什么需要软件加密?——嵌入式安全威胁全景分析
1.1 攻击者如何窃取你的固件?
在嵌入式产品生命周期中,存在多个攻击入口:
| 攻击向量 | 具体手段 | 所需工具 | 难度 | 危害程度 |
|---|---|---|---|---|
| 调试接口 | 连接JTAG/SWD,使用STM32CubeProgrammer直接读取Flash | ST-Link/J-Link + 上位机 | 低 | 极高(完整固件拷贝) |
| Bootloader漏洞 | 利用自定义Bootloader的未授权升级功能 | 串口工具 + 自制固件 | 中 | 高(植入恶意代码) |
| 内存 dumping | 利用程序漏洞(如缓冲区溢出)读取内存 | 调试器 + 漏洞利用代码 | 高 | 中(可泄露关键数据) |
| 侧信道攻击 | 功耗分析、电磁泄露、故障注入 | 示波器、电压毛刺发生器 | 很高 | 高(可提取密钥) |
| 芯片开盖 | 化学腐蚀去除封装,直接用探针读取Flash | 专业实验室设备 | 极高 | 极高(完全破解) |
1.2 被破解后的损失
- 知识产权泄露:核心算法被竞争对手直接复用
- 产品仿制:克隆设备充斥市场,损害品牌价值
- 安全漏洞扩散:如果固件包含安全缺陷,所有设备面临风险
- 授权收入损失:按设备授权的商业模式彻底失效
1.3 软件加密 vs 硬件加密芯片
| 特性 | 纯软件加密(本文方案) | 外置加密芯片(如ATECC608) |
|---|---|---|
| 成本 | 0元(利用MCU内置资源) | 5~15元/片 |
| PCB面积 | 无额外占用 | 需额外布局 |
| 安全性 | 中等(可被专业硬件攻击突破) | 高(密钥存储在独立安全元件中) |
| 密钥存储 | Flash中(可被开盖读取) | 芯片内部不可读存储器 |
| 适用场景 | 绝大多数消费/工业产品 | 金融、军工、高价值设备 |
结论:对于大多数嵌入式产品,软件加密已足够防御99%的盗版行为。本文方案是性价比最高的选择。
二、STM32平台安全特性详解
2.1 芯片唯一ID(UID)——不可伪造的硬件指纹
STM32全系列都包含一个96位的唯一标识符,固化在芯片内部特定地址。
各系列UID地址对照表:
| STM32系列 | UID基地址 | 备注 |
|---|---|---|
| STM32F0 | 0x1FFFF7AC | - |
| STM32F1 | 0x1FFFF7E8 | 最常用 |
| STM32F2/F4 | 0x1FFF7A10 | F4系列相同 |
| STM32F3 | 0x1FFFF7AC | 同F0 |
| STM32F7/H7 | 0x1FF0F420 | - |
| STM32G0 | 0x1FFF7590 | 新一代 |
| STM32L0 | 0x1FF80050 | 低功耗系列 |
| STM32L4 | 0x1FFF7590 | - |
UID数据结构(以F1为例):
地址偏移 | 内容
0x1FFFF7E8 | 字节0-3: wafer lot number (ASCII)
0x1FFFF7EC | 字节4-7: 晶圆坐标 + 芯片类型
0x1FFFF7F0 | 字节8-11: 唯一序列号
读取UID的标准代码:
// 通用UID读取函数
typedef struct {
    uint32_t UID[3];  // 3个32位整数,共96位
} STM32_UID_t;

void STM32_GetUID(STM32_UID_t *uid) {
    #if defined(STM32F1)
        uid->UID[0] = *(uint32_t*)0x1FFFF7E8;
        uid->UID[1] = *(uint32_t*)0x1FFFF7EC;
        uid->UID[2] = *(uint32_t*)0x1FFFF7F0;
    #elif defined(STM32F4)
        uid->UID[0] = *(uint32_t*)0x1FFF7A10;
        uid->UID[1] = *(uint32_t*)0x1FFF7A14;
        uid->UID[2] = *(uint32_t*)0x1FFF7A18;
    #elif defined(STM32F0)
        uid->UID[0] = *(uint32_t*)0x1FFFF7AC;
        uid->UID[1] = *(uint32_t*)0x1FFFF7B0;
        uid->UID[2] = *(uint32_t*)0x1FFFF7B4;
    #endif
}
2.2 读保护(RDP)——Flash防火墙
RDP通过配置选项字节(Option Bytes)中的RDP位来控制调试接口对Flash的访问权限。
RDP寄存器详解:
- 位于选项字节区域,地址为
0x1FFFF800(F1系列) - RDP值是一个8位数据及其取反校验
三个等级的详细行为:
| 等级 | RDP寄存器值 | 调试口读Flash | 调试口写Flash | 从RAM启动读Flash | 降级行为 |
|---|---|---|---|---|---|
| Level 0 | 0xAA | 允许 | 允许 | 允许 | - |
| Level 1 | 任意非0xAA非0xCC | 禁止 | 允许(需擦除) | 允许 | 自动擦除整个Flash |
| Level 2 | 0xCC | 禁止 | 禁止 | 禁止 | 不可降级(永久) |
Level 1降级时的自动擦除机制:当从Level 1降级到Level 0时,芯片会自动执行一次全片擦除。这是为了防止攻击者先降级再读取固件。因此,设置RDP后不用担心无法更新程序——正常的烧录操作会触发擦除,然后写入新固件。
配置RDP的代码示例:
#include "stm32f1xx_hal.h"

// 设置RDP Level 1(生产推荐)
HAL_StatusTypeDef FLASH_SetRDPLevel1(void) {
    HAL_StatusTypeDef status = HAL_OK;

    HAL_FLASH_Unlock();
    HAL_FLASH_OB_Unlock();

    FLASH_OBProgramInitTypeDef ob = {0};
    ob.OptionType = OPTIONBYTE_RDP;
    ob.RDPLevel = OB_RDP_LEVEL_1;   // 设置为Level 1

    status = HAL_FLASHEx_OBProgram(&ob);

    if (status == HAL_OK) {
        // 必须调用此函数使配置生效,芯片会重启
        HAL_FLASH_OB_Launch();
    }

    HAL_FLASH_OB_Lock();
    HAL_FLASH_Lock();

    return status;
}

// 永久锁定芯片(Level 2)⚠️ 不可逆,谨慎使用
HAL_StatusTypeDef FLASH_SetRDPLevel2(void) {
    // 注意:一旦设置Level 2,将无法再通过任何调试接口连接芯片
    // 也无法再升级固件!仅适用于100%定型的产品

    HAL_FLASH_Unlock();
    HAL_FLASH_OB_Unlock();

    FLASH_OBProgramInitTypeDef ob = {0};
    ob.OptionType = OPTIONBYTE_RDP;
    ob.RDPLevel = OB_RDP_LEVEL_2;

    HAL_StatusTypeDef status = HAL_FLASHEx_OBProgram(&ob);

    if (status == HAL_OK) {
        HAL_FLASH_OB_Launch();  // 重启后永久生效
    }

    return status;
}
2.3 调试接口控制(DBGMCU)
除了RDP,还可以通过软件直接禁用调试接口(即使RDP为Level 0时)。
AFIO_MAPR寄存器中的SWJ配置位:
| 配置值 | 效果 |
|---|---|
| 0x00 | 完全使能(JTAG+SWD) |
| 0x01 | 仅使能SWD,禁用JTAG |
| 0x02 | 完全禁用(释放PA13/PA14为普通GPIO) |
代码实现:
void DisableDebugInterfaces(void) {
    RCC->APB2ENR |= RCC_APB2ENR_AFIOEN;   // 使能AFIO时钟

    // 完全禁用JTAG和SWD
    AFIO->MAPR &= ~AFIO_MAPR_SWJ_CFG;
    AFIO->MAPR |= AFIO_MAPR_SWJ_CFG_DISABLE;  // 0x02

    // 注意:禁用后芯片将无法再通过调试器连接!
    // 需确保固件足够稳定,或预留恢复机制(如通过UART IAP)
}

// 仅禁用JTAG,保留SWD(常用于释放PB3/PB4/PB5用于其他功能)
void DisableJTAGOnly(void) {
    RCC->APB2ENR |= RCC_APB2ENR_AFIOEN;
    AFIO->MAPR &= ~AFIO_MAPR_SWJ_CFG;
    AFIO->MAPR |= AFIO_MAPR_SWJ_CFG_JTAGDISABLE;  // 0x01
}
三、核心加密技术:UID绑定与MD5校验
3.1 MD5算法在嵌入式中的应用
MD5(Message Digest Algorithm 5)将任意长度的数据映射为128位(16字节)的哈希值。虽然MD5在密码学上已不再安全(可碰撞),但在嵌入式设备绑定场景中,它仍然是合适的:
- 不需要抗碰撞:我们只要求相同输入(相同的UID)产生相同输出
- 单向性:无法从哈希值反推UID,攻击者拿到哈希也无直接价值
- 计算量小:在STM32F1上计算一次MD5约需几百微秒
- 代码体积小:完整MD5实现仅约2KB ROM
3.2 完整MD5实现(优化版,适合STM32)
// md5.h
#ifndef _MD5_H_
#define _MD5_H_

#include <stdint.h>

typedef struct {
    uint32_t total[2];      // 已处理的字节数
    uint32_t state[4];      // 中间摘要状态
    uint8_t buffer[64];     // 数据块缓冲区
} MD5_CTX;

void MD5_Init(MD5_CTX *ctx);
void MD5_Update(MD5_CTX *ctx, const uint8_t *input, uint32_t len);
void MD5_Final(uint8_t digest[16], MD5_CTX *ctx);
void MD5_Calc(const uint8_t *input, uint32_t len, uint8_t digest[16]);

#endif
// md5.c
#include "md5.h"
#include <string.h>

// 四个非线性函数
#define F(x, y, z) (((x) & (y)) | ((~x) & (z)))
#define G(x, y, z) (((x) & (z)) | ((y) & (~z)))
#define H(x, y, z) ((x) ^ (y) ^ (z))
#define I(x, y, z) ((y) ^ ((x) | (~z)))

// 循环左移
#define ROTATE_LEFT(x, n) (((x) << (n)) | ((x) >> (32 - (n))))

// 四轮运算中的变换宏
#define FF(a, b, c, d, x, s, ac) { \
    (a) += F((b), (c), (d)) + (x) + (ac); \
    (a) = ROTATE_LEFT((a), (s)); \
    (a) += (b); \
}
#define GG(a, b, c, d, x, s, ac) { \
    (a) += G((b), (c), (d)) + (x) + (ac); \
    (a) = ROTATE_LEFT((a), (s)); \
    (a) += (b); \
}
#define HH(a, b, c, d, x, s, ac) { \
    (a) += H((b), (c), (d)) + (x) + (ac); \
    (a) = ROTATE_LEFT((a), (s)); \
    (a) += (b); \
}
#define II(a, b, c, d, x, s, ac) { \
    (a) += I((b), (c), (d)) + (x) + (ac); \
    (a) = ROTATE_LEFT((a), (s)); \
    (a) += (b); \
}

// 标准MD5初始化向量
void MD5_Init(MD5_CTX *ctx) {
    ctx->total[0] = 0;
    ctx->total[1] = 0;
    ctx->state[0] = 0x67452301;
    ctx->state[1] = 0xEFCDAB89;
    ctx->state[2] = 0x98BADCFE;
    ctx->state[3] = 0x10325476;
}

// 处理一个64字节块
static void MD5_Process(MD5_CTX *ctx, const uint8_t block[64]) {
    uint32_t a = ctx->state[0];
    uint32_t b = ctx->state[1];
    uint32_t c = ctx->state[2];
    uint32_t d = ctx->state[3];
    uint32_t x[16];

    // 将字节块转换为32位字(小端序)
    for (int i = 0; i < 16; i++) {
        x[i] = (uint32_t)block[i*4] |
               ((uint32_t)block[i*4+1] << 8) |
               ((uint32_t)block[i*4+2] << 16) |
               ((uint32_t)block[i*4+3] << 24);
    }

    // 第一轮
    FF(a, b, c, d, x[ 0],  7, 0xD76AA478);
    FF(d, a, b, c, x[ 1], 12, 0xE8C7B756);
    FF(c, d, a, b, x[ 2], 17, 0x242070DB);
    FF(b, c, d, a, x[ 3], 22, 0xC1BDCEEE);
    FF(a, b, c, d, x[ 4],  7, 0xF57C0FAF);
    FF(d, a, b, c, x[ 5], 12, 0x4787C62A);
    FF(c, d, a, b, x[ 6], 17, 0xA8304613);
    FF(b, c, d, a, x[ 7], 22, 0xFD469501);
    FF(a, b, c, d, x[ 8],  7, 0x698098D8);
    FF(d, a, b, c, x[ 9], 12, 0x8B44F7AF);
    FF(c, d, a, b, x[10], 17, 0xFFFF5BB1);
    FF(b, c, d, a, x[11], 22, 0x895CD7BE);
    FF(a, b, c, d, x[12],  7, 0x6B901122);
    FF(d, a, b, c, x[13], 12, 0xFD987193);
    FF(c, d, a, b, x[14], 17, 0xA679438E);
    FF(b, c, d, a, x[15], 22, 0x49B40821);

    // 第二轮
    GG(a, b, c, d, x[ 1],  5, 0xF61E2562);
    GG(d, a, b, c, x[ 6],  9, 0xC040B340);
    GG(c, d, a, b, x[11], 14, 0x265E5A51);
    GG(b, c, d, a, x[ 0], 20, 0xE9B6C7AA);
    GG(a, b, c, d, x[ 5],  5, 0xD62F105D);
    GG(d, a, b, c, x[10],  9, 0x02441453);
    GG(c, d, a, b, x[15], 14, 0xD8A1E681);
    GG(b, c, d, a, x[ 4], 20, 0xE7D3FBC8);
    GG(a, b, c, d, x[ 9],  5, 0x21E1CDE6);
    GG(d, a, b, c, x[14],  9, 0xC33707D6);
    GG(c, d, a, b, x[ 3], 14, 0xF4D50D87);
    GG(b, c, d, a, x[ 8], 20, 0x455A14ED);
    GG(a, b, c, d, x[13],  5, 0xA9E3E905);
    GG(d, a, b, c, x[ 2],  9, 0xFCEFA3F8);
    GG(c, d, a, b, x[ 7], 14, 0x676F02D9);
    GG(b, c, d, a, x[12], 20, 0x8D2A4C8A);

    // 第三轮
    HH(a, b, c, d, x[ 5],  4, 0xFFFA3942);
    HH(d, a, b, c, x[ 8], 11, 0x8771F681);
    HH(c, d, a, b, x[11], 16, 0x6D9D6122);
    HH(b, c, d, a, x[14], 23, 0xFDE5380C);
    HH(a, b, c, d, x[ 1],  4, 0xA4BEEA44);
    HH(d, a, b, c, x[ 4], 11, 0x4BDECFA9);
    HH(c, d, a, b, x[ 7], 16, 0xF6BB4B60);
    HH(b, c, d, a, x[10], 23, 0xBEBFBC70);
    HH(a, b, c, d, x[13],  4, 0x289B7EC6);
    HH(d, a, b, c, x[ 0], 11, 0xEAA127FA);
    HH(c, d, a, b, x[ 3], 16, 0xD4EF3085);
    HH(b, c, d, a, x[ 6], 23, 0x04881D05);
    HH(a, b, c, d, x[ 9],  4, 0xD9D4D039);
    HH(d, a, b, c, x[12], 11, 0xE6DB99E5);
    HH(c, d, a, b, x[15], 16, 0x1FA27CF8);
    HH(b, c, d, a, x[ 2], 23, 0xC4AC5665);

    // 第四轮
    II(a, b, c, d, x[ 0],  6, 0xF4292244);
    II(d, a, b, c, x[ 7], 10, 0x432AFF97);
    II(c, d, a, b, x[14], 15, 0xAB9423A7);
    II(b, c, d, a, x[ 5], 21, 0xFC93A039);
    II(a, b, c, d, x[12],  6, 0x655B59C3);
    II(d, a, b, c, x[ 3], 10, 0x8F0CCC92);
    II(c, d, a, b, x[10], 15, 0xFFEFF47D);
    II(b, c, d, a, x[ 1], 21, 0x85845DD1);
    II(a, b, c, d, x[ 8],  6, 0x6FA87E4F);
    II(d, a, b, c, x[15], 10, 0xFE2CE6E0);
    II(c, d, a, b, x[ 6], 15, 0xA3014314);
    II(b, c, d, a, x[13], 21, 0x4E0811A1);
    II(a, b, c, d, x[ 4],  6, 0xF7537E82);
    II(d, a, b, c, x[11], 10, 0xBD3AF235);
    II(c, d, a, b, x[ 2], 15, 0x2AD7D2BB);
    II(b, c, d, a, x[ 9], 21, 0xEB86D391);

    ctx->state[0] += a;
    ctx->state[1] += b;
    ctx->state[2] += c;
    ctx->state[3] += d;
}

void MD5_Update(MD5_CTX *ctx, const uint8_t *input, uint32_t len) {
    uint32_t fill;
    uint32_t left = ctx->total[0] & 0x3F;
    uint32_t avail = 64 - left;

    ctx->total[0] += len;
    if (ctx->total[0] < len) {
        ctx->total[1]++;
    }

    if (left && len >= avail) {
        memcpy(ctx->buffer + left, input, avail);
        MD5_Process(ctx, ctx->buffer);
        input += avail;
        len -= avail;
        left = 0;
    }

    while (len >= 64) {
        MD5_Process(ctx, input);
        input += 64;
        len -= 64;
    }

    if (len) {
        memcpy(ctx->buffer + left, input, len);
    }
}

static const uint8_t PADDING[64] = {
    0x80, 0, 0, 0, 0, 0, 0, 0, 0, 0, 0, 0, 0, 0, 0, 0,
    0, 0, 0, 0, 0, 0, 0, 0, 0, 0, 0, 0, 0, 0, 0, 0,
    0, 0, 0, 0, 0, 0, 0, 0, 0, 0, 0, 0, 0, 0, 0, 0,
    0, 0, 0, 0, 0, 0, 0, 0, 0, 0, 0, 0, 0, 0, 0, 0
};

void MD5_Final(uint8_t digest[16], MD5_CTX *ctx) {
    uint32_t last, padn;
    uint32_t high, low;
    uint8_t msglen[8];

    high = (ctx->total[0] >> 29) | (ctx->total[1] << 3);
    low  = (ctx->total[0] << 3);

    // 小端序存储长度
    msglen[0] = (uint8_t)(low);
    msglen[1] = (uint8_t)(low >> 8);
    msglen[2] = (uint8_t)(low >> 16);
    msglen[3] = (uint8_t)(low >> 24);
    msglen[4] = (uint8_t)(high);
    msglen[5] = (uint8_t)(high >> 8);
    msglen[6] = (uint8_t)(high >> 16);
    msglen[7] = (uint8_t)(high >> 24);

    last = ctx->total[0] & 0x3F;
    padn = (last < 56) ? (56 - last) : (120 - last);

    MD5_Update(ctx, PADDING, padn);
    MD5_Update(ctx, msglen, 8);

    // 输出小端序
    for (int i = 0; i < 4; i++) {
        digest[i*4]   = (uint8_t)(ctx->state[i]);
        digest[i*4+1] = (uint8_t)(ctx->state[i] >> 8);
        digest[i*4+2] = (uint8_t)(ctx->state[i] >> 16);
        digest[i*4+3] = (uint8_t)(ctx->state[i] >> 24);
    }
}

void MD5_Calc(const uint8_t *input, uint32_t len, uint8_t digest[16]) {
    MD5_CTX ctx;
    MD5_Init(&ctx);
    MD5_Update(&ctx, input, len);
    MD5_Final(digest, &ctx);
}
3.3 密钥扩展:从16字节到1024字节的随机混淆
直接存储16字节的MD5哈希值在Flash中过于明显。更好的做法是将它隐藏在大量随机数据中:
#include <stdlib.h>

// 种子生成:使用UID部分数据混合
uint32_t GenerateSeed(const uint8_t *uid, uint8_t len) {
    uint32_t seed = 0;
    for (int i = 0; i < len; i += 2) {
        seed ^= (uid[i] << 8) | uid[i+1];
    }
    // 加入一些硬件特征作为额外混淆
    seed ^= HAL_GetTick();
    seed ^= (uint32_t)&seed;  // 栈地址随机化
    return seed;
}

// 生成1024字节混淆密钥
void GenerateObfuscatedKey(uint8_t *key_buffer, uint32_t buffer_size) {
    uint8_t uid[12];
    uint8_t md5_hash[16];

    // 读取UID
    STM32_GetUID((STM32_UID_t*)uid);

    // 计算MD5
    MD5_Calc(uid, 12, md5_hash);

    // 设置随机种子(使用UID派生,确保每次运行结果一致)
    uint32_t seed = GenerateSeed(uid, 12);
    srand(seed);

    // 填充:每64字节插入1字节MD5值,其余随机
    uint16_t md5_pos = 0;
    for (uint32_t i = 0; i < buffer_size; i++) {
        if ((i % 64 == 0) && (md5_pos < 16)) {
            key_buffer[i] = md5_hash[md5_pos++];
        } else {
            key_buffer[i] = (uint8_t)(rand() % 256);
        }
    }

    // 可选:对整个buffer再做一次异或混淆
    for (uint32_t i = 0; i < buffer_size; i++) {
        key_buffer[i] ^= (uint8_t)((i * 0x9E3779B9) >> 24);
    }
}
3.4 完整的密钥烧录程序(烧录器固件)
以下程序仅在生产第一台设备时运行一次,将密钥写入Flash:
// key_programmer.c
#include "main.h"
#include <stdio.h>

#define FLASH_KEY_ADDR  0x0800FC00   // 密钥存储地址(最后一个页)
#define KEY_SIZE        1024

extern void GenerateObfuscatedKey(uint8_t*, uint32_t);
extern HAL_StatusTypeDef Flash_Write(uint32_t addr, uint8_t *data, uint32_t len);

int main(void) {
    HAL_Init();
    SystemClock_Config();
    MX_USART1_UART_Init();

    printf("=== Key Programmer Started ===\r\n");

    uint8_t key_buffer[KEY_SIZE];

    // 生成密钥
    GenerateObfuscatedKey(key_buffer, KEY_SIZE);

    // 写入Flash
    if (Flash_Write(FLASH_KEY_ADDR, key_buffer, KEY_SIZE) == HAL_OK) {
        printf("Key written successfully at 0x%08X\r\n", FLASH_KEY_ADDR);

        // 可选:读取验证
        uint8_t verify[KEY_SIZE];
        memcpy(verify, (uint8_t*)FLASH_KEY_ADDR, KEY_SIZE);
        if (memcmp(key_buffer, verify, KEY_SIZE) == 0) {
            printf("Verification passed\r\n");
        } else {
            printf("Verification FAILED!\r\n");
            while(1);
        }
    } else {
        printf("Write failed!\r\n");
        while(1);
    }

    // 密钥烧录完成后,可以设置RDP Level 1并重启
    printf("Programming done. Setting RDP Level 1...\r\n");
    HAL_Delay(1000);
    FLASH_SetRDPLevel1();   // 会触发重启

    while(1);
}

// Flash写入函数(支持任意长度,自动按字编程)
HAL_StatusTypeDef Flash_Write(uint32_t addr, uint8_t *data, uint32_t len) {
    HAL_StatusTypeDef status = HAL_OK;

    // 确保地址对齐到4字节
    if ((addr & 0x03) != 0 || (len & 0x03) != 0) {
        return HAL_ERROR;
    }

    HAL_FLASH_Unlock();

    // 计算页地址并擦除
    uint32_t page_addr = addr & ~(FLASH_PAGE_SIZE - 1);
    FLASH_EraseInitTypeDef erase = {
        .TypeErase = FLASH_TYPEERASE_PAGES,
        .PageAddress = page_addr,
        .NbPages = 1
    };
    uint32_t page_error;
    status = HAL_FLASHEx_Erase(&erase, &page_error);
    if (status != HAL_OK) {
        HAL_FLASH_Lock();
        return status;
    }

    // 按字编程
    for (uint32_t i = 0; i < len; i += 4) {
        uint32_t word = *(uint32_t*)(data + i);
        status = HAL_FLASH_Program(FLASH_TYPEPROGRAM_WORD, addr + i, word);
        if (status != HAL_OK) break;
    }

    HAL_FLASH_Lock();
    return status;
}
3.5 应用程序中的校验逻辑
// app_check.c
#include "main.h"

#define FLASH_KEY_ADDR  0x0800FC00
#define KEY_SIZE        1024

// 从Flash读取密钥
void ReadKeyFromFlash(uint8_t *buffer) {
    uint32_t *src = (uint32_t*)FLASH_KEY_ADDR;
    uint32_t *dst = (uint32_t*)buffer;
    for (int i = 0; i < KEY_SIZE / 4; i++) {
        dst[i] = src[i];
    }
}

// 校验主函数(在main()最开头调用)
int VerifyDevice(void) {
    uint8_t generated[KEY_SIZE];
    uint8_t stored[KEY_SIZE];

    // 生成当前设备的密钥
    GenerateObfuscatedKey(generated, KEY_SIZE);

    // 读取预存密钥
    ReadKeyFromFlash(stored);

    // 比较
    if (memcmp(generated, stored, KEY_SIZE) == 0) {
        return 1;   // 验证通过
    }

    return 0;   // 非法设备
}

// 伪装失败响应:不是直接停机,而是逐渐出现异常
void FakeFailureResponse(void) {
    static int step = 0;
    step++;

    switch(step % 5) {
        case 0:
            // 随机复位
            HAL_NVIC_SystemReset();
            break;
        case 1:
            // 破坏某个外设配置
            TIM2->CR1 &= ~TIM_CR1_CEN;
            break;
        case 2:
            // 进入死循环但允许看门狗复位
            while(1);
            break;
        case 3:
            // 随机篡改关键变量
            *((volatile uint32_t*)0x20000000) = 0xDEADBEEF;
            break;
        default:
            // 延迟执行
            HAL_Delay(5000);
            break;
    }
}

// 在main()中的使用
int main(void) {
    HAL_Init();
    SystemClock_Config();

    // 尽早执行校验
    if (!VerifyDevice()) {
        // 校验失败,进入伪装模式
        while(1) {
            FakeFailureResponse();
        }
    }

    // 正常程序继续
    MX_GPIO_Init();
    MX_USART1_UART_Init();

    // 可选:设置RDP(如果尚未设置)
    // FLASH_SetRDPLevel1();

    while(1) {
        // 正常应用代码
    }
}
四、高级加密:AES在固件保护和OTA传输中的应用
4.1 AES-128-CBC实现(适合STM32的轻量级代码)
以下提供了一个优化内存占用的AES实现,适合资源受限的MCU:
// aes.h
#ifndef _AES_H_
#define _AES_H_

#include <stdint.h>

#define AES_KEY_LENGTH 128  // 128/192/256
#define AES_BLOCK_SIZE  16

#if AES_KEY_LENGTH == 128
    #define AES_ROUNDS 10
#elif AES_KEY_LENGTH == 192
    #define AES_ROUNDS 12
#else
    #define AES_ROUNDS 14
#endif

void AES_Init(const uint8_t *key);
void AES_ECB_Encrypt(const uint8_t *input, uint8_t *output);
void AES_ECB_Decrypt(const uint8_t *input, uint8_t *output);
void AES_CBC_Encrypt(const uint8_t *input, uint8_t *output, uint32_t len, const uint8_t *iv);
void AES_CBC_Decrypt(const uint8_t *input, uint8_t *output, uint32_t len, const uint8_t *iv);

#endif
// aes.c —— 核心实现(S盒、轮密钥、加解密)
#include "aes.h"
#include <string.h>

// S盒(加密用)
static const uint8_t Sbox[256] = {
    0x63, 0x7c, 0x77, 0x7b, 0xf2, 0x6b, 0x6f, 0xc5, 0x30, 0x01, 0x67, 0x2b, 0xfe, 0xd7, 0xab, 0x76,
    0xca, 0x82, 0xc9, 0x7d, 0xfa, 0x59, 0x47, 0xf0, 0xad, 0xd4, 0xa2, 0xaf, 0x9c, 0xa4, 0x72, 0xc0,
    0xb7, 0xfd, 0x93, 0x26, 0x36, 0x3f, 0xf7, 0xcc, 0x34, 0xa5, 0xe5, 0xf1, 0x71, 0xd8, 0x31, 0x15,
    0x04, 0xc7, 0x23, 0xc3, 0x18, 0x96, 0x05, 0x9a, 0x07, 0x12, 0x80, 0xe2, 0xeb, 0x27, 0xb2, 0x75,
    0x09, 0x83, 0x2c, 0x1a, 0x1b, 0x6e, 0x5a, 0xa0, 0x52, 0x3b, 0xd6, 0xb3, 0x29, 0xe3, 0x2f, 0x84,
    0x53, 0xd1, 0x00, 0xed, 0x20, 0xfc, 0xb1, 0x5b, 0x6a, 0xcb, 0xbe, 0x39, 0x4a, 0x4c, 0x58, 0xcf,
    0xd0, 0xef, 0xaa, 0xfb, 0x43, 0x4d, 0x33, 0x85, 0x45, 0xf9, 0x02, 0x7f, 0x50, 0x3c, 0x9f, 0xa8,
    0x51, 0xa3, 0x40, 0x8f, 0x92, 0x9d, 0x38, 0xf5, 0xbc, 0xb6, 0xda, 0x21, 0x10, 0xff, 0xf3, 0xd2,
    0xcd, 0x0c, 0x13, 0xec, 0x5f, 0x97, 0x44, 0x17, 0xc4, 0xa7, 0x7e, 0x3d, 0x64, 0x5d, 0x19, 0x73,
    0x60, 0x81, 0x4f, 0xdc, 0x22, 0x2a, 0x90, 0x88, 0x46, 0xee, 0xb8, 0x14, 0xde, 0x5e, 0x0b, 0xdb,
    0xe0, 0x32, 0x3a, 0x0a, 0x49, 0x06, 0x24, 0x5c, 0xc2, 0xd3, 0xac, 0x62, 0x91, 0x95, 0xe4, 0x79,
    0xe7, 0xc8, 0x37, 0x6d, 0x8d, 0xd5, 0x4e, 0xa9, 0x6c, 0x56, 0xf4, 0xea, 0x65, 0x7a, 0xae, 0x08,
    0xba, 0x78, 0x25, 0x2e, 0x1c, 0xa6, 0xb4, 0xc6, 0xe8, 0xdd, 0x74, 0x1f, 0x4b, 0xbd, 0x8b, 0x8a,
    0x70, 0x3e, 0xb5, 0x66, 0x48, 0x03, 0xf6, 0x0e, 0x61, 0x35, 0x57, 0xb9, 0x86, 0xc1, 0x1d, 0x9e,
    0xe1, 0xf8, 0x98, 0x11, 0x69, 0xd9, 0x8e, 0x94, 0x9b, 0x1e, 0x87, 0xe9, 0xce, 0x55, 0x28, 0xdf,
    0x8c, 0xa1, 0x89, 0x0d, 0xbf, 0xe6, 0x42, 0x68, 0x41, 0x99, 0x2d, 0x0f, 0xb0, 0x54, 0xbb, 0x16
};

// 逆S盒(解密用)
static const uint8_t InvSbox[256] = {
    0x52, 0x09, 0x6a, 0xd5, 0x30, 0x36, 0xa5, 0x38, 0xbf, 0x40, 0xa3, 0x9e, 0x81, 0xf3, 0xd7, 0xfb,
    0x7c, 0xe3, 0x39, 0x82, 0x9b, 0x2f, 0xff, 0x87, 0x34, 0x8e, 0x43, 0x44, 0xc4, 0xde, 0xe9, 0xcb,
    0x54, 0x7b, 0x94, 0x32, 0xa6, 0xc2, 0x23, 0x3d, 0xee, 0x4c, 0x95, 0x0b, 0x42, 0xfa, 0xc3, 0x4e,
    0x08, 0x2e, 0xa1, 0x66, 0x28, 0xd9, 0x24, 0xb2, 0x76, 0x5b, 0xa2, 0x49, 0x6d, 0x8b, 0xd1, 0x25,
    0x72, 0xf8, 0xf6, 0x64, 0x86, 0x68, 0x98, 0x16, 0xd4, 0xa4, 0x5c, 0xcc, 0x5d, 0x65, 0xb6, 0x92,
    0x6c, 0x70, 0x48, 0x50, 0xfd, 0xed, 0xb9, 0xda, 0x5e, 0x15, 0x46, 0x57, 0xa7, 0x8d, 0x9d, 0x84,
    0x90, 0xd8, 0xab, 0x00, 0x8c, 0xbc, 0xd3, 0x0a, 0xf7, 0xe4, 0x58, 0x05, 0xb8, 0xb3, 0x45, 0x06,
    0xd0, 0x2c, 0x1e, 0x8f, 0xca, 0x3f, 0x0f, 0x02, 0xc1, 0xaf, 0xbd, 0x03, 0x01, 0x13, 0x8a, 0x6b,
    0x3a, 0x91, 0x11, 0x41, 0x4f, 0x67, 0xdc, 0xea, 0x97, 0xf2, 0xcf, 0xce, 0xf0, 0xb4, 0xe6, 0x73,
    0x96, 0xac, 0x74, 0x22, 0xe7, 0xad, 0x35, 0x85, 0xe2, 0xf9, 0x37, 0xe8, 0x1c, 0x75, 0xdf, 0x6e,
    0x47, 0xf1, 0x1a, 0x71, 0x1d, 0x29, 0xc5, 0x89, 0x6f, 0xb7, 0x62, 0x0e, 0xaa, 0x18, 0xbe, 0x1b,
    0xfc, 0x56, 0x3e, 0x4b, 0xc6, 0xd2, 0x79, 0x20, 0x9a, 0xdb, 0xc0, 0xfe, 0x78, 0xcd, 0x5a, 0xf4,
    0x1f, 0xdd, 0xa8, 0x33, 0x88, 0x07, 0xc7, 0x31, 0xb1, 0x12, 0x10, 0x59, 0x27, 0x80, 0xec, 0x5f,
    0x60, 0x51, 0x7f, 0xa9, 0x19, 0xb5, 0x4a, 0x0d, 0x2d, 0xe5, 0x7a, 0x9f, 0x93, 0xc9, 0x9c, 0xef,
    0xa0, 0xe0, 0x3b, 0x4d, 0xae, 0x2a, 0xf5, 0xb0, 0xc8, 0xeb, 0xbb, 0x3c, 0x83, 0x53, 0x99, 0x61,
    0x17, 0x2b, 0x04, 0x7e, 0xba, 0x77, 0xd6, 0x26, 0xe1, 0x69, 0x14, 0x63, 0x55, 0x21, 0x0c, 0x7d
};

// 轮常量
static const uint8_t Rcon[11] = {
    0x00, 0x01, 0x02, 0x04, 0x08, 0x10, 0x20, 0x40, 0x80, 0x1b, 0x36
};

static uint8_t RoundKey[16 * (AES_ROUNDS + 1)];  // 轮密钥存储

// 字节代换
static void SubBytes(uint8_t *state) {
    for (int i = 0; i < 16; i++) {
        state[i] = Sbox[state[i]];
    }
}

static void InvSubBytes(uint8_t *state) {
    for (int i = 0; i < 16; i++) {
        state[i] = InvSbox[state[i]];
    }
}

// 行移位
static void ShiftRows(uint8_t *state) {
    uint8_t temp;
    // 第二行左移1
    temp = state[1];
    state[1] = state[5];
    state[5] = state[9];
    state[9] = state[13];
    state[13] = temp;
    // 第三行左移2
    temp = state[2];
    state[2] = state[10];
    state[10] = temp;
    temp = state[6];
    state[6] = state[14];
    state[14] = temp;
    // 第四行左移3
    temp = state[3];
    state[3] = state[15];
    state[15] = state[11];
    state[11] = state[7];
    state[7] = temp;
}

static void InvShiftRows(uint8_t *state) {
    uint8_t temp;
    // 第二行右移1
    temp = state[13];
    state[13] = state[9];
    state[9] = state[5];
    state[5] = state[1];
    state[1] = temp;
    // 第三行右移2
    temp = state[10];
    state[10] = state[2];
    state[2] = temp;
    temp = state[14];
    state[14] = state[6];
    state[6] = temp;
    // 第四行右移3
    temp = state[7];
    state[7] = state[11];
    state[11] = state[15];
    state[15] = state[3];
    state[3] = temp;
}

// GF(2^8)乘法辅助函数
static uint8_t xtime(uint8_t x) {
    return ((x << 1) ^ (((x >> 7) & 1) * 0x1b));
}

// 列混合
static void MixColumns(uint8_t *state) {
    uint8_t a, b, c, d;
    for (int i = 0; i < 4; i++) {
        a = state[i*4];
        b = state[i*4+1];
        c = state[i*4+2];
        d = state[i*4+3];
        state[i*4]   = xtime(a) ^ xtime(b) ^ b ^ c ^ d;
        state[i*4+1] = a ^ xtime(b) ^ xtime(c) ^ c ^ d;
        state[i*4+2] = a ^ b ^ xtime(c) ^ xtime(d) ^ d;
        state[i*4+3] = xtime(a) ^ a ^ b ^ c ^ xtime(d);
    }
}

static void InvMixColumns(uint8_t *state) {
    uint8_t a, b, c, d;
    for (int i = 0; i < 4; i++) {
        a = state[i*4];
        b = state[i*4+1];
        c = state[i*4+2];
        d = state[i*4+3];
        state[i*4]   = xtime(xtime(xtime(a ^ b ^ c ^ d) ^ (a ^ c) ^ (a ^ d)) ^ (a ^ b ^ c ^ d) ^ (a ^ b));
        state[i*4+1] = xtime(xtime(xtime(b ^ c ^ d ^ a) ^ (b ^ d) ^ (b ^ a)) ^ (b ^ c ^ d ^ a) ^ (b ^ c));
        state[i*4+2] = xtime(xtime(xtime(c ^ d ^ a ^ b) ^ (c ^ a) ^ (c ^ b)) ^ (c ^ d ^ a ^ b) ^ (c ^ d));
        state[i*4+3] = xtime(xtime(xtime(d ^ a ^ b ^ c) ^ (d ^ b) ^ (d ^ c)) ^ (d ^ a ^ b ^ c) ^ (d ^ a));
    }
}

// 轮密钥加
static void AddRoundKey(uint8_t *state, const uint8_t *roundKey) {
    for (int i = 0; i < 16; i++) {
        state[i] ^= roundKey[i];
    }
}

// 密钥扩展
void AES_Init(const uint8_t *key) {
    uint32_t i, j;
    uint8_t temp[4];
    uint32_t key_words = AES_KEY_LENGTH / 32;
    uint32_t round_key_words = (AES_ROUNDS + 1) * 4;

    // 复制原始密钥
    for (i = 0; i < key_words; i++) {
        RoundKey[i*4]   = key[i*4];
        RoundKey[i*4+1] = key[i*4+1];
        RoundKey[i*4+2] = key[i*4+2];
        RoundKey[i*4+3] = key[i*4+3];
    }

    // 生成剩余轮密钥
    for (i = key_words; i < round_key_words; i++) {
        // 取上一个4字节
        temp[0] = RoundKey[(i-1)*4];
        temp[1] = RoundKey[(i-1)*4+1];
        temp[2] = RoundKey[(i-1)*4+2];
        temp[3] = RoundKey[(i-1)*4+3];

        if (i % key_words == 0) {
            // 循环左移1字节
            uint8_t t = temp[0];
            temp[0] = temp[1];
            temp[1] = temp[2];
            temp[2] = temp[3];
            temp[3] = t;
            // S盒代换
            temp[0] = Sbox[temp[0]];
            temp[1] = Sbox[temp[1]];
            temp[2] = Sbox[temp[2]];
            temp[3] = Sbox[temp[3]];
            // 异或轮常量
            temp[0] ^= Rcon[i / key_words];
        } else if (key_words > 6 && (i % key_words) == 4) {
            temp[0] = Sbox[temp[0]];
            temp[1] = Sbox[temp[1]];
            temp[2] = Sbox[temp[2]];
            temp[3] = Sbox[temp[3]];
        }

        // 与前一轮密钥异或
        RoundKey[i*4]   = RoundKey[(i - key_words)*4]   ^ temp[0];
        RoundKey[i*4+1] = RoundKey[(i - key_words)*4+1] ^ temp[1];
        RoundKey[i*4+2] = RoundKey[(i - key_words)*4+2] ^ temp[2];
        RoundKey[i*4+3] = RoundKey[(i - key_words)*4+3] ^ temp[3];
    }
}

// ECB模式加密一个块
void AES_ECB_Encrypt(const uint8_t *input, uint8_t *output) {
    uint8_t state[16];
    memcpy(state, input, 16);

    AddRoundKey(state, RoundKey);
    for (int round = 1; round < AES_ROUNDS; round++) {
        SubBytes(state);
        ShiftRows(state);
        MixColumns(state);
        AddRoundKey(state, RoundKey + round * 16);
    }
    SubBytes(state);
    ShiftRows(state);
    AddRoundKey(state, RoundKey + AES_ROUNDS * 16);

    memcpy(output, state, 16);
}

void AES_ECB_Decrypt(const uint8_t *input, uint8_t *output) {
    uint8_t state[16];
    memcpy(state, input, 16);

    AddRoundKey(state, RoundKey + AES_ROUNDS * 16);
    for (int round = AES_ROUNDS - 1; round > 0; round--) {
        InvShiftRows(state);
        InvSubBytes(state);
        AddRoundKey(state, RoundKey + round * 16);
        InvMixColumns(state);
    }
    InvShiftRows(state);
    InvSubBytes(state);
    AddRoundKey(state, RoundKey);

    memcpy(output, state, 16);
}

// CBC模式加密(长度必须是16的倍数)
void AES_CBC_Encrypt(const uint8_t *input, uint8_t *output, uint32_t len, const uint8_t *iv) {
    uint8_t feedback[16];
    uint8_t block[16];

    memcpy(feedback, iv, 16);

    for (uint32_t i = 0; i < len; i += 16) {
        for (int j = 0; j < 16; j++) {
            block[j] = input[i + j] ^ feedback[j];
        }
        AES_ECB_Encrypt(block, output + i);
        memcpy(feedback, output + i, 16);
    }
}

void AES_CBC_Decrypt(const uint8_t *input, uint8_t *output, uint32_t len, const uint8_t *iv) {
    uint8_t feedback[16];
    uint8_t decrypted[16];
    uint8_t temp[16];

    memcpy(feedback, iv, 16);

    for (uint32_t i = 0; i < len; i += 16) {
        memcpy(temp, input + i, 16);
        AES_ECB_Decrypt(input + i, decrypted);
        for (int j = 0; j < 16; j++) {
            output[i + j] = decrypted[j] ^ feedback[j];
        }
        memcpy(feedback, temp, 16);
    }
}
4.2 OTA固件传输中的AES加密流程
整体架构: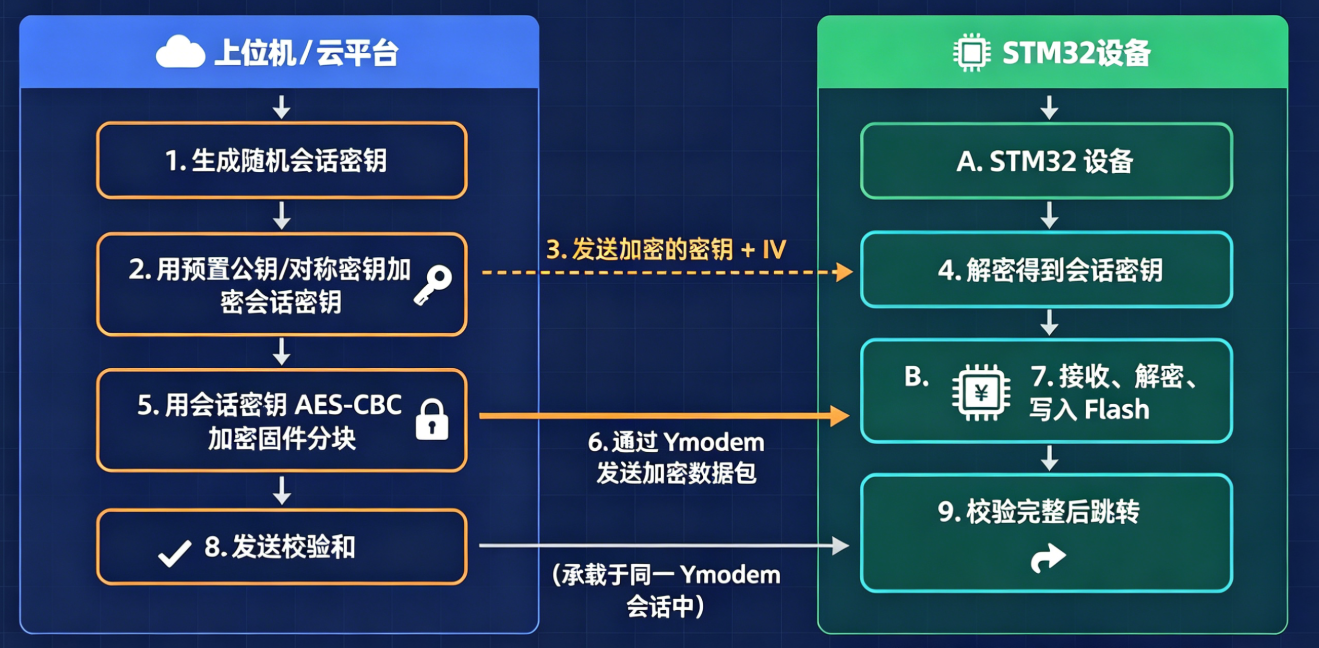
Ymodem数据包结构: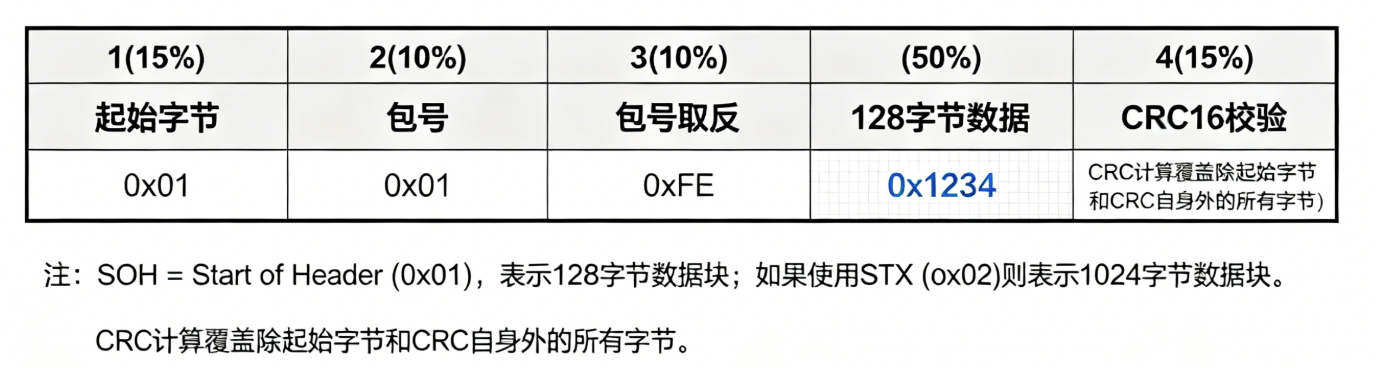
接收端解密处理:
// ota_decrypt.c
#include "aes.h"
#include "ymodem.h"

#define AES_KEY_SIZE    16
#define OTA_BLOCK_SIZE  128   // Ymodem数据块大小

static uint8_t session_key[AES_KEY_SIZE];
static uint8_t session_iv[AES_KEY_SIZE];
static uint8_t decrypt_buffer[OTA_BLOCK_SIZE];

// 解密Ymodem数据块(假设传输的是加密后的数据)
int OTA_ReceiveAndDecrypt(void) {
    Ymodem_Packet_t pkt;
    uint8_t plaintext[OTA_BLOCK_SIZE];

    while (1) {
        if (Ymodem_ReceivePacket(&pkt) != YMODEM_OK) {
            return -1;
        }

        if (pkt.type == YMODEM_EOT) {
            // 传输结束
            break;
        }

        if (pkt.type == YMODEM_DATA) {
            // 解密数据块(假设密文在pkt.data中,长度128字节)
            // 由于AES块大小为16,128是16的倍数,直接CBC解密
            AES_CBC_Decrypt(pkt.data, plaintext, OTA_BLOCK_SIZE, session_iv);

            // 将解密后的明文写入Flash
            Flash_Write(ota_current_addr, plaintext, OTA_BLOCK_SIZE);
            ota_current_addr += OTA_BLOCK_SIZE;
        }
    }

    return 0;
}

// 初始化:从预置密钥解密会话密钥(预置密钥烧录在Flash中,且与UID绑定)
void OTA_InitSession(const uint8_t *encrypted_key, const uint8_t *encrypted_iv) {
    uint8_t master_key[AES_KEY_SIZE];

    // 从UID派生主密钥
    uint8_t uid[12];
    STM32_GetUID((STM32_UID_t*)uid);
    MD5_Calc(uid, 12, master_key);  // 使用UID的MD5作为主密钥

    AES_Init(master_key);
    AES_ECB_Decrypt(encrypted_key, session_key);
    AES_ECB_Decrypt(encrypted_iv, session_iv);

    // 重新初始化AES为会话密钥
    AES_Init(session_key);
}
五、读保护(RDP)与调试接口禁用的正确姿势
5.1 不同安全等级的适用场景
| 等级 | 适用场景 | 注意事项 |
|---|---|---|
| Level 0 | 开发调试阶段 | 完全开放 |
| Level 1 | 生产阶段(产品已定型) | 可降级擦除,方便售后升级 |
| Level 2 | 高安全产品(如支付终端) | 不可逆,无法再调试或升级 |
5.2 安全的RDP配置流程(避免变砖)
// safe_rdp.c
// 在设置RDP之前,确保:
// 1. Bootloader足够稳定,支持通过UART/SPI等接口恢复固件
// 2. 关键参数已备份到备份寄存器或外部EEPROM
// 3. 设置看门狗,防止配置过程中卡死

void Safe_SetRDP(uint8_t level) {
    // 使能IWDG,设置超时5秒
    IWDG->KR = 0x5555;
    IWDG->PR = 4;          // 分频256
    IWDG->RLR = 3125;      // 约5秒 @40kHz
    IWDG->KR = 0xAAAA;
    IWDG->KR = 0xCCCC;

    // 备份关键数据(如设备序列号、校准参数)
    Backup_Data_Save();

    // 设置RDP
    HAL_FLASH_Unlock();
    HAL_FLASH_OB_Unlock();

    FLASH_OBProgramInitTypeDef ob = {0};
    ob.OptionType = OPTIONBYTE_RDP;
    if (level == 1) ob.RDPLevel = OB_RDP_LEVEL_1;
    else if (level == 2) ob.RDPLevel = OB_RDP_LEVEL_2;

    if (HAL_FLASHEx_OBProgram(&ob) == HAL_OK) {
        // 配置生效前的最后确认(例如等待串口命令)
        printf("About to set RDP Level %d. Type 'YES' to confirm: ", level);
        char confirm[4];
        if (GetUserInput(confirm, 4) && strcmp(confirm, "YES") == 0) {
            HAL_FLASH_OB_Launch();   // 系统重启,RDP生效
        }
    }

    HAL_FLASH_OB_Lock();
    HAL_FLASH_Lock();

    // 喂狗
    IWDG->KR = 0xAAAA;
}
5.3 调试接口禁用的替代方案
如果完全禁用调试接口导致售后无法诊断,可以采用条件编译保留某些调试入口:
// debug_config.h
#ifndef FINAL_PRODUCTION
    #define DEBUG_ENABLED  1
#else
    #define DEBUG_ENABLED  0
#endif

// main.c
void SystemInit_Security(void) {
    #if DEBUG_ENABLED == 0
        // 量产版本:完全禁用调试接口
        DisableDebugInterfaces();
    #else
        // 调试版本:但增加密码保护,例如通过特定串口序列临时启用
        if (CheckDebugPassword() == 0) {
            DisableDebugInterfaces();  // 密码错误仍禁用
        }
    #endif
}

// 调试密码验证(简单示例)
int CheckDebugPassword(void) {
    uint8_t password[8] = {0};
    // 从Flash读取预设密码(已由生产工具写入)
    memcpy(password, (uint8_t*)0x0800F000, 8);
    // 与用户输入的比对(这里假设通过UART输入)
    uint8_t input[8];
    UART_Receive(input, 8, 1000);
    return memcmp(password, input, 8) == 0;
}
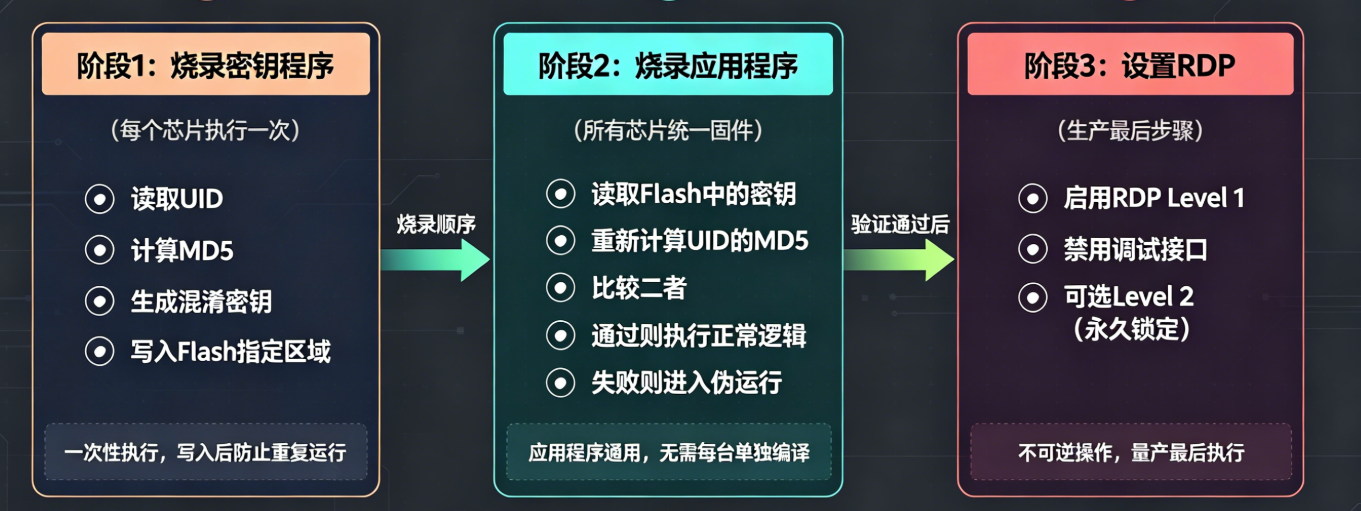
六、量产流程闭环:两阶段烧录详解
6.1 整体流程图
6.2 生产自动化脚本示例(Python + STM32CubeProgrammer)
# production_tool.py
import subprocess
import serial
import time

def flash_key_programmer(device_id, port):
    """烧录密钥程序并执行"""
    # 1. 下载密钥烧录固件
    subprocess.run(f"STM32_Programmer_CLI -c port={port} -w key_programmer.bin 0x08000000 -hardRst", shell=True)

    # 2. 等待程序运行并打印密钥信息
    ser = serial.Serial(port, 115200, timeout=10)
    output = ser.read(1024)
    if b"Key written successfully" in output:
        print(f"Device {device_id}: Key programmed OK")
        return True
    else:
        print(f"Device {device_id}: Key programming FAILED")
        return False

def flash_application(port):
    """烧录应用程序"""
    subprocess.run(f"STM32_Programmer_CLI -c port={port} -w app.bin 0x08000000 -hardRst", shell=True)
    # 验证应用程序是否正常运行(例如检查心跳串口输出)
    ser = serial.Serial(port, 115200, timeout=5)
    if b"Application started" in ser.read(512):
        return True
    return False

def set_rdp_level1(port):
    """设置RDP Level 1"""
    subprocess.run(f"STM32_Programmer_CLI -c port={port} -ob rdp=LEVEL_1 -hardRst", shell=True)
    time.sleep(2)
    # 再次尝试连接应被拒绝(或需要全片擦除)
    result = subprocess.run(f"STM32_Programmer_CLI -c port={port} -r8 0x08000000 4", shell=True, capture_output=True)
    if "Error" in result.stderr.decode() or "Read protected" in result.stderr.decode():
        print("RDP Level 1 activated successfully")
        return True
    return False

# 批量生产
devices = ["COM3", "COM4", "COM5"]  # 多个烧录工位
for i, port in enumerate(devices):
    print(f"Processing device {i+1} on {port}")
    if flash_key_programmer(i, port):
        if flash_application(port):
            set_rdp_level1(port)
        else:
            print(f"Device {i+1} app flash failed")
6.3 防止密钥程序被二次运行
密钥烧录程序应该设计为一次性的:写入密钥后,要么自毁,要么设置一个标志位防止重复运行。
// key_programmer.c 中添加
#define FLAG_ADDR   0x0800F000
#define PROGRAMMED_FLAG  0x5A5A5A5A

int main(void) {
    // 检查是否已编程
    uint32_t flag = *(uint32_t*)FLAG_ADDR;
    if (flag == PROGRAMMED_FLAG) {
        printf("This chip has already been programmed! Exiting.\r\n");
        while(1);  // 不执行密钥写入
    }

    // ... 正常生成和写入密钥 ...

    // 写入编程完成标志
    HAL_FLASH_Unlock();
    HAL_FLASH_Program(FLASH_TYPEPROGRAM_WORD, FLAG_ADDR, PROGRAMMED_FLAG);
    HAL_FLASH_Lock();

    // 可选:将自身擦除(更彻底的自毁)
    // Flash_Erase_Self();
}
七、反逆向与反调试高级技巧
7.1 时间检测(检测是否被单步调试)
#include <stm32f1xx.h>

// 检测是否被调试器单步执行(通过执行时间差异)
int IsBeingDebugged(void) {
    uint32_t start = DWT->CYCCNT;
    // 执行一段固定长度的代码(例如10次简单运算)
    for (int i = 0; i < 100; i++) {
        __NOP();
    }
    uint32_t elapsed = DWT->CYCCNT - start;

    // 正常执行时,100个NOP大约需要100个周期
    // 如果被单步调试,每个NOP后都会中断,时间会远大于正常值
    return (elapsed > 500);  // 阈值根据实际情况调整
}

// 需要在初始化时使能DWT周期计数器
void EnableDWT(void) {
    CoreDebug->DEMCR |= CoreDebug_DEMCR_TRCENA_Msk;
    DWT->CYCCNT = 0;
    DWT->CTRL |= DWT_CTRL_CYCCNTENA_Msk;
}
7.2 代码完整性检查(防补丁)
#include "crc.h"

// 计算代码段的CRC(例如整个应用程序)
uint32_t CalculateCodeCRC(void) {
    // 假设应用程序从0x08002000到0x08020000
    uint32_t start = 0x08002000;
    uint32_t end = 0x08020000;
    uint32_t crc = 0xFFFFFFFF;

    for (uint32_t addr = start; addr < end; addr += 4) {
        crc = HAL_CRC_Calculate(&hcrc, *(uint32_t*)addr, 1);
    }
    return crc;
}

void IntegrityCheck(void) {
    uint32_t calc_crc = CalculateCodeCRC();
    uint32_t stored_crc = *(uint32_t*)0x0801FFFC;  // 预先存储的CRC值

    if (calc_crc != stored_crc) {
        // 代码被篡改,进入自毁或伪装模式
        FaultHandler();
    }
}

// 在编译后自动计算CRC并写入文件末尾
// 使用objcopy或自定义脚本完成
7.3 栈回溯检测(防函数挂钩)
通过检测返回地址是否在合理的代码段范围内:
#define CODE_START   0x08000000
#define CODE_END     0x08020000

// 在关键函数入口调用
void CheckCaller(void) {
    uint32_t return_addr = (uint32_t)__builtin_return_address(0);
    if (return_addr < CODE_START || return_addr > CODE_END) {
        // 返回地址非法,可能被挂钩或缓冲区溢出攻击
        SystemHalt();
    }
}
7.4 虚拟化混淆:将关键代码加密存储在Flash中,运行时解密到RAM执行
// 关键函数加密存储
#pragma location = ".encrypted_section"
const uint8_t critical_code_encrypted[] = {
    0x1F, 0x8B, 0x08, ... /* 加密后的机器码 */
};

// 运行时解密并执行
void ExecuteCriticalFunction(void) {
    uint8_t decrypted[1024];
    uint32_t func_addr;

    // 使用UID派生密钥解密
    DecryptCode(critical_code_encrypted, decrypted, sizeof(decrypted));

    // 获取解密后的函数指针
    func_addr = (uint32_t)decrypted;

    // 设置MPU将RAM区域设为可执行(如果使用MPU)
    // 跳转执行
    void (*func)(void) = (void(*)(void))func_addr;
    func();

    // 执行完毕后擦除
    memset(decrypted, 0, sizeof(decrypted));
}
八、常见攻击手法及应对策略
8.1 攻击手法一览
| 攻击类型 | 方法 | 防范措施 |
|---|---|---|
| 简单复制 | 读取Flash后烧录到空白芯片 | UID绑定,复制后UID不匹配 |
| 降级攻击 | 将RDP Level 1降级为0 | 降级自动擦除Flash(硬件保证) |
| 电压故障注入 | 在芯片校验UID时注入毛刺跳过判断 | 多次校验、随机延迟、看门狗 |
| 功耗分析 | 通过功耗曲线推断密钥 | 增加噪声操作、平衡功耗 |
| 温度/时钟攻击 | 异常时钟使加密出错 | 时钟安全系统(CSS)、温度传感器 |
| 固件补丁 | 修改判断分支(如JEQ改JNE) | CRC校验、代码段锁定 |
| 内存dump | 通过漏洞读取RAM中的密钥 | 使用后立即擦除密钥 |
| 模拟器运行 | 在模拟器中绕过硬件UID读取 | 检测硬件特性(如唯一ID的特定模式) |
8.2 针对故障注入的防御代码
volatile int auth_result = 0;

void Anti_Glitch_Check(void) {
    uint32_t start_tick = HAL_GetTick();
    int local_result = 0;

    // 重复校验5次,每次使用不同的方法
    for (int i = 0; i < 5; i++) {
        local_result |= (VerifyDevice() ? 0 : 1);
        // 随机延迟
        DelayMicroseconds(rand() % 100);
    }

    // 如果任意一次失败,判定非法
    if (local_result != 0) {
        auth_result = 0;
        // 增加看门狗复位前记录
        StoreFailureLog();
        while(1);  // 死循环,等待看门狗复位
    } else {
        auth_result = 1;
    }

    // 检查执行时间是否异常(故障注入会导致循环提前退出)
    uint32_t end_tick = HAL_GetTick();
    if ((end_tick - start_tick) < 5 * MIN_EXEC_TIME) {
        // 太快了,可能某些校验被跳过
        FaultHandler();
    }
}

// 调用点分散
void RuntimeCheckPoints(void) {
    static int counter = 0;
    counter++;
    if (counter % 1000 == 0) {
        Anti_Glitch_Check();  // 每1000次循环重新校验
    }
}
九、工程实践建议与代码模板
9.1 项目文件组织
Project/
├── Bootloader/               # 支持加密OTA的Bootloader
│   ├── main.c
│   ├── ymodem.c
│   └── aes.c
├── KeyProgrammer/            # 生产用密钥烧录程序
│   ├── main.c
│   ├── md5.c
│   └── flash_write.c
├── Application/              # 主应用程序
│   ├── main.c
│   ├── security_check.c
│   ├── md5.c
│   └── fake_failure.c
├── Common/                   # 共用库
│   ├── crc.c
│   ├── uid.c
│   └── random.c
└── Scripts/
    ├── production_tool.py
    └── crc_calc.py
9.2 安全头文件模板
// security_config.h
#ifndef _SECURITY_CONFIG_H_
#define _SECURITY_CONFIG_H_

// 是否启用调试(开发版定义,量产版取消定义)
// #define DEBUG_ENABLED

// 安全等级
#define SECURITY_LEVEL_HIGH      1   // 启用所有检查,设置RDP Level 1
#define SECURITY_LEVEL_ULTRA     2   // 设置RDP Level 2
#define SECURITY_LEVEL_LOW       0   // 仅基本UID检查

#ifndef SECURITY_LEVEL
    #ifdef FINAL_PRODUCTION
        #define SECURITY_LEVEL SECURITY_LEVEL_HIGH
    #else
        #define SECURITY_LEVEL SECURITY_LEVEL_LOW
    #endif
#endif

// 密钥存储地址(通过UID偏移计算)
#define FLASH_KEY_BASE    0x0800FC00
#define FLASH_KEY_SIZE    1024

// 防拆检测引脚(可选)
#define ANTI_TAMPER_PIN   GPIO_PIN_0, GPIOA

#endif
9.3 最终生产main.c模板
// main.c for production
#include "security_config.h"
#include "uid.h"
#include "flash_key.h"
#include "anti_debug.h"

int main(void) {
    HAL_Init();
    SystemClock_Config();

    // 1. 早期安全检查(在时钟、外设初始化之前)
    #if SECURITY_LEVEL >= SECURITY_LEVEL_HIGH
        if (!VerifyDevice()) {
            // 失败处理:进入伪装模式
            FakeRunMode();
        }
    #endif

    // 2. 基础外设初始化
    MX_GPIO_Init();
    MX_USART1_UART_Init();

    // 3. 运行时完整性检查
    #if SECURITY_LEVEL >= SECURITY_LEVEL_HIGH
        IntegrityCheck();
    #endif

    // 4. 应用初始化
    App_Init();

    // 5. 最终设置RDP(如果尚未设置)
    #if SECURITY_LEVEL == SECURITY_LEVEL_HIGH && !defined(RDP_ALREADY_SET)
        ConfigureRDP_Level1();
    #elif SECURITY_LEVEL == SECURITY_LEVEL_ULTRA
        ConfigureRDP_Level2();  // 不可逆,务必确认
    #endif

    while(1) {
        App_Loop();

        // 6. 周期性检查(可选)
        #if SECURITY_LEVEL >= SECURITY_LEVEL_HIGH
        static uint32_t last_check = 0;
        if (HAL_GetTick() - last_check > 60000) {  // 每分钟检查一次
            last_check = HAL_GetTick();
            if (!VerifyDevice()) {
                FakeRunMode();
            }
        }
        #endif
    }
}
十、总结与展望
10.1 方案总结
本文详细介绍了基于STM32平台的软件加密完整解决方案,核心包括:
| 技术手段 | 防护目标 | 实现难度 | 安全性增益 |
|---|---|---|---|
| UID绑定 | 防止固件拷贝到其他芯片 | 低 | ★★★★ |
| MD5哈希 | 防止简单破解,增加逆向难度 | 低 | ★★★ |
| 混淆存储(1024字节) | 隐藏密钥特征,对抗模式匹配 | 中 | ★★★ |
| RDP保护 | 防止调试口读取Flash | 低 | ★★★★★ |
| 调试接口禁用 | 物理阻断调试通道 | 低 | ★★★★ |
| AES传输加密 | 保护OTA升级过程中的固件 | 中 | ★★★★ |
| 反调试/完整性检查 | 对抗动态分析和固件补丁 | 高 | ★★★ |
10.2 安全是过程,不是结果
没有绝对安全的系统,但通过多层防护可以:
- 将破解成本提升到超过重写代码的成本
- 增加破解时间,使攻击者失去耐心
- 保护核心算法,让仿制品无法完全复制功能
10.3 进一步强化方向
- 使用TrustZone(STM32L5/U5系列):隔离安全和非安全区域
- 外接安全芯片:如ATECC608、MAXQ1061,存储密钥并执行认证
- 启用FPU/MPU:限制可执行的内存区域
- 使用硬件加密加速器:STM32F4/F7/H7系列内置CRYP模块
- 引入证书链:基于X.509的固件签名验证
10.4 结束语
嵌入式软件加密是一项系统工程,需要贯穿产品设计、开发、生产和维护全生命周期。本文提供的技术和代码可以直接应用于STM32项目中,帮助你构建起多层防护体系,有效保护知识产权。建议在实际使用中根据产品价值和安全需求,选择适当的安全等级,并持续关注新型攻击手段,及时更新防护策略。

智能硬件社区聚焦AI智能硬件技术生态,汇聚嵌入式AI、物联网硬件开发者,打造交流分享平台,同步全国赛事资讯、开展 OPC 核心人才招募,助力技术落地与开发者成长。
更多推荐


 17
17 0
0- 0


 已为社区贡献7条内容

所有评论(0)