stm32写sd卡
·
说实话写sd卡文件并不是个很可靠的记录数据的方式, 他有问题是只能事后发现,除非有什么提醒, 记录文件有太多不确定性,磁盘满了,坏区,创建文件,扇区,这不算最好的方式, 网络发送,蓝牙串口,有得选的话就不用写文件的方式. 虽然被我淘汰了但这套代码确实可用,只是未经充分测试.测试要话太久.这里把这套代码整理记录下来.
首先不知道为什么 f_mount一执行就会阻断ucosiii.所以只在裸机里用了. 具体见项目hx711_pull_test_std
main.c的主要代码
#include "stm32f10x.h"
#include "sdio_sd.h"
#include "ff.h"

FATFS fs;         /* Work area (file system object) for logical drive */
FIL fsrc;         /* file objects */
FRESULT res;
UINT br;

/* ---------- 配置 ---------- */
#define SAMPLE_COUNT   1000                    /* 采样次数 */
#define SAMPLE_SIZE    sizeof(int32_t)         /* 每个采样 4 字节 */
#define BUF_SIZE       (SAMPLE_COUNT * SAMPLE_SIZE)  /* 4000 字节 */
#define WRITES_PER_FILE 3                             /* 每个文件写 50 次 */

/* ---------- 全局 / 静态缓冲区 ---------- */
static char data_buf[BUF_SIZE];               /* 拼装后的 char 数组 */ /*static 可以容量大,且声明周期长*/

/* ---------- 文件管理(静态, 跨调用保持状态) ---------- */
static FIL     s_file;
static uint8_t s_file_open  = 0;
static uint8_t s_write_cnt  = 0;
static uint32_t s_file_idx  = 0;

void  Delay (uint32_t nCount)
{
      /* SysTick 简易延时,72MHz 主频下大约 1ms */
    while (nCount--)
    {
        volatile uint32_t count = 7200;
        while (count--);
    }
}
/* 采集一轮并写入 SD 卡, 外部调用这个即可 */
void CollectAndSave(void)
{
    UINT    bw;
    FRESULT res;

    /* 1. 采集数据到缓冲区 */

    /* 2. 如果当前没有打开的文件, 创建新文件 */
    if (!s_file_open)
    {
        char fname[32];
				printf("new file \n");
        snprintf(fname, sizeof(fname), "log_%04lu.bin", (unsigned long)s_file_idx);

        res = f_open(&s_file, fname, FA_WRITE | FA_CREATE_NEW);
				printf("f_open: res=%d, fname=%s\n", res, fname);  // 加这行
				if (res != FR_OK) return;

        s_file_open = 1;
        s_write_cnt = 0;
    }

    /* 3. 写入(写指针自动后移, 无需 f_lseek) */
    res = f_write(&s_file, data_buf, BUF_SIZE, &bw);
		printf("f_write: res=%d, bw=%u\n", res, (unsigned)bw);//期望res=0, bw=4000
		if (res != FR_OK || bw != BUF_SIZE) {
			printf("write wrong\n");
			f_close(&s_file);
			s_file_open = 0;
			return;  // 写失败直接返回
		}

    /* 4. 可选: 立即刷到卡, 防止掉电丢数据
     *    如果追求极致速度可以去掉, 靠 f_close 统一刷
     */
    res = f_sync(&s_file);
		printf("f_sync: res=%d\n", res);

    /* 5. 计数, 满 50 次则关闭当前文件, 下次调用自动建新文件 */
    s_write_cnt++;
    if (s_write_cnt >= WRITES_PER_FILE)
    {
        res = f_close(&s_file);
				printf("f_close: res=%d\n", res);
        s_file_open = 0;
        s_file_idx++;

    }
}
/* 系统关闭前调用, 确保当前文件正确关闭 */
void SaveFlush(void)
{
    if (s_file_open)
    {
        f_close(&s_file);
        s_file_open = 0;
    }
}

int main(void)
{

		uint8_t is_sleeping = 0;
		int16_t count = 0;

		/*
		每秒读100次, 10秒存一次. 存50次换新文件

		hx711_count 拼接1000个数据后,写文件
		写文件一次store_count加1 到50开新文件

	每个文件包含 50 次(每次1000个数据)采样的数据(50 × 4000 = 200KB)。*/
	SD_Init();
	res = f_mount(0,&fs);
		printf("f_mount: res=%d\n", res);
while (1){
	hx711_read = ((HX711_Read()-8211730)*347)>> 16;
			//printf("buf = %d\n", hx711_read);
			if (hx711_count < SAMPLE_COUNT){
				 /*纯二进制拷贝(推荐, 体积小、速度快)
				二进制文件里就是连续的 4 字节 int32_t,用 Python 几行就能转成可读的 CSV 或文本
				用纯二进制的方式,单片机端省空间、省时间、代码也简洁,可读性转换的事交给上位机做就行。
         * 把 int32_t 的 4 个字节按小端序拷贝到 char 数组中
         * memcpy 由编译器保证对齐安全
         */
        memcpy(&data_buf[hx711_count * SAMPLE_SIZE], &hx711_read, SAMPLE_SIZE);
				hx711_count ++;
			}else{ //data_buf 里存了1000个数据, 写文件
				/* 在 CollectAndSave 开头、f_write 之前加 */
				int i;
				int32_t *p = (int32_t *)data_buf;
				for (i = 0; i < 5; i++)
				{
						printf("buf[%d] = %ld\n", i, (long)p[i]);
				}
				hx711_count = 0;

				//写入文件,
				CollectAndSave();

			}

			Delay(10);

}
这个代码很条理清晰, 写文件的操作全部交给CollectAndSave去做, 外部拼接二进制数据, 解读交给上位机 . 二进制数据一般用.bin后缀
依赖的文件
sdio-sd.c/.h
ff.c/.h
diskio.c/.h
ffconf.h
注意diskio.c的disk_write需要改动, 不改的话小文件写没问题,但多块写会卡死,修改为如下,绕过多块写的代码
DRESULT disk_write (
	BYTE drv,			/* Physical drive nmuber (0..) */
	const BYTE *buff,	        /* Data to be written */
	DWORD sector,		/* Sector address (LBA) */
	BYTE count			/* Number of sectors to write (1..255) */
)
{
	SD_Error Status;
	//printf("disk_write: sector=%lu, count=%u\n", (unsigned long)sector, count);
  if( !count )
  {
    return RES_PARERR;  /* count不能等于0,否则返回参数错误 */
  }

  switch (drv)
  {
    case 0:
    if(count==1)            /* 1个sector的写操作 */
    {
       Status = SD_WriteBlock( (uint8_t *)(&buff[0]) ,sector << 9 , SDCardInfo.CardBlockSize);
    }
    else                    /* 多个sector的写操作 */
    {
       //Status = SD_WriteMultiBlocks( (uint8_t *)(&buff[0]) ,sector << 9 ,SDCardInfo.CardBlockSize,count);
			BYTE i;
       for (i = 0; i < count; i++)//问题确认在 SD_WriteMultiBlocks,多块写本身就挂死。那就保持单块写
       {
           Status = SD_WriteBlock((uint8_t *)(&buff[i * 512]),
                                  (sector + i) << 9,
                                  SDCardInfo.CardBlockSize);
           if (Status != SD_OK) break;
       }
    }
    if(Status == SD_OK)
    {
       return RES_OK;
    }
    else
    {
			//printf("disk_write 1wrong:%d \n",Status);
       return RES_ERROR;
    }
    case 2:
	   break;
    default :
       break;
  }
	//printf("disk_write 2wrong:%d \n",Status);
 return RES_ERROR;
}
引脚定义
补充引脚定义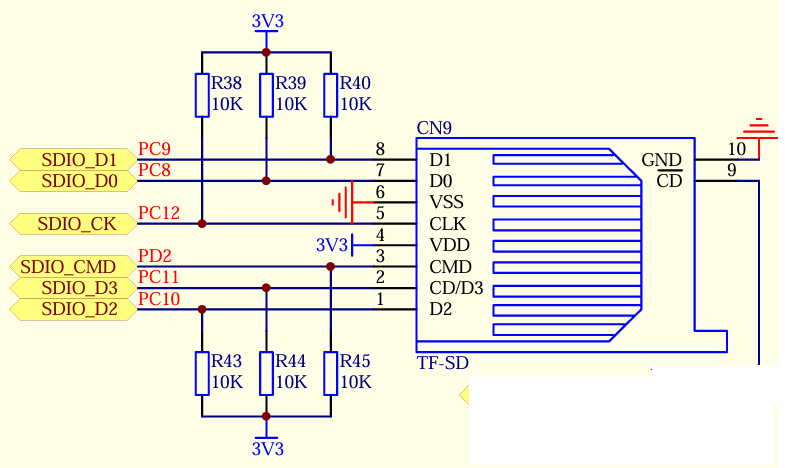
补充与硬件有关的代码
void SD_LowLevel_Init(void)
{
  GPIO_InitTypeDef  GPIO_InitStructure;

  /*!< GPIOC and GPIOD Periph clock enable */
  RCC_APB2PeriphClockCmd(RCC_APB2Periph_GPIOC | RCC_APB2Periph_GPIOD | SD_DETECT_GPIO_CLK, ENABLE);

  /*!< Configure PC.08, PC.09, PC.10, PC.11, PC.12 pin: D0, D1, D2, D3, CLK pin */
  GPIO_InitStructure.GPIO_Pin = GPIO_Pin_8 | GPIO_Pin_9 | GPIO_Pin_10 | GPIO_Pin_11 | GPIO_Pin_12;
  GPIO_InitStructure.GPIO_Speed = GPIO_Speed_50MHz;
  GPIO_InitStructure.GPIO_Mode = GPIO_Mode_AF_PP;
  GPIO_Init(GPIOC, &GPIO_InitStructure);

  /*!< Configure PD.02 CMD line */
  GPIO_InitStructure.GPIO_Pin = GPIO_Pin_2;
  GPIO_Init(GPIOD, &GPIO_InitStructure);

  /*!< Configure SD_CD pin: SD Card detect pin */
//  GPIO_InitStructure.GPIO_Pin = SD_DETECT_PIN;
//  GPIO_InitStructure.GPIO_Mode = GPIO_Mode_IPU;
//  GPIO_Init(SD_DETECT_GPIO_PORT, &GPIO_InitStructure);

  /*!< Enable the SDIO AHB Clock */
  RCC_AHBPeriphClockCmd(RCC_AHBPeriph_SDIO, ENABLE);

  /*!< Enable the DMA2 Clock */
  RCC_AHBPeriphClockCmd(RCC_AHBPeriph_DMA2, ENABLE);
}

智能硬件社区聚焦AI智能硬件技术生态,汇聚嵌入式AI、物联网硬件开发者,打造交流分享平台,同步全国赛事资讯、开展 OPC 核心人才招募,助力技术落地与开发者成长。
更多推荐

 5
5 0
0- 0


 已为社区贡献1条内容

所有评论(0)