使用CLion进行嵌入式开发并配置micro-ROS 接入ROS2生态
·
使用CLion进行嵌入式开发并配置micro-ROS 接入ROS2生态
环境
- Ubuntu 22.04
- ROS2-Humble
- MPU:STM32F407VET6
- 树莓派4b(已安装好ROS2-Humble)
- 可访问国际互联网的代理
性能较弱的芯片可能无法运行microros
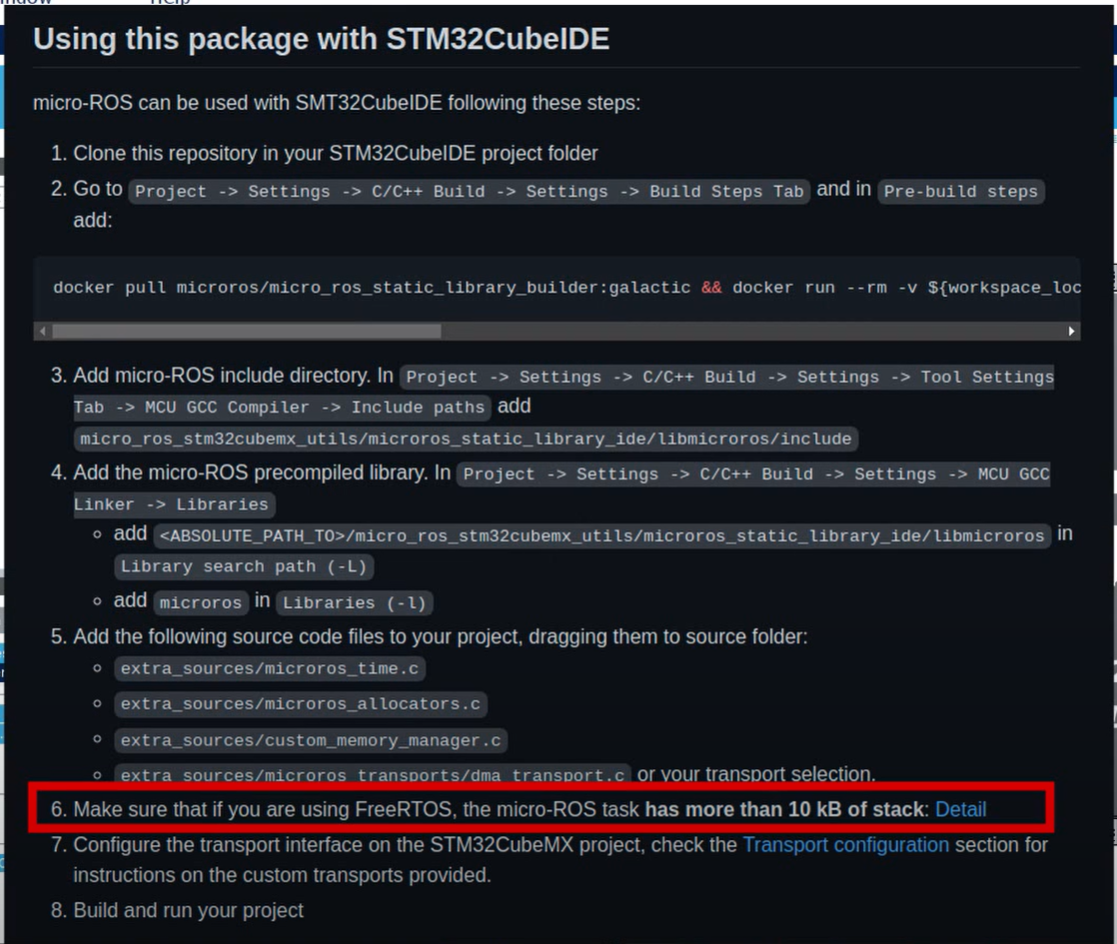
配置开发环境
配置CLlion开发嵌入式
参考稚晖君的博客https://zhuanlan.zhihu.com/p/145801160,以下步骤建立在已经安装好CLion喝CubeMX的情况下进行
- 下载arm-none-eabi-gcc,解压
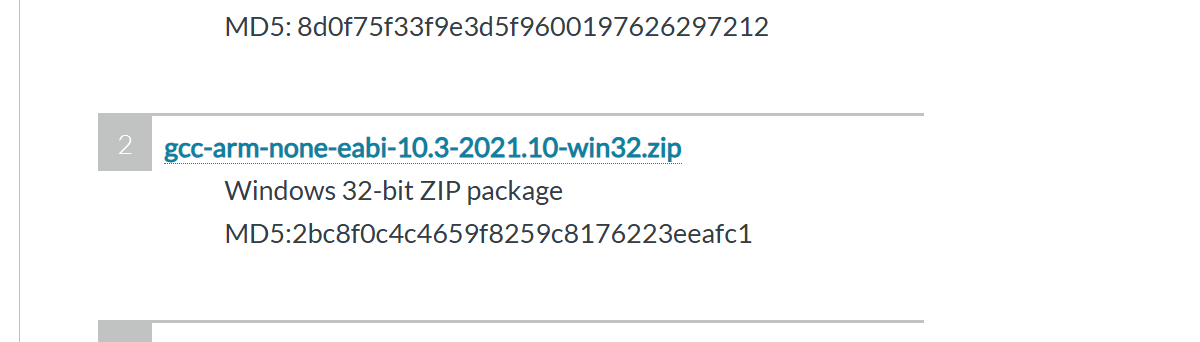
- 打开CLion,安装设置→构建、执行、部署→工具链,点击左上角加号添加一个工具链
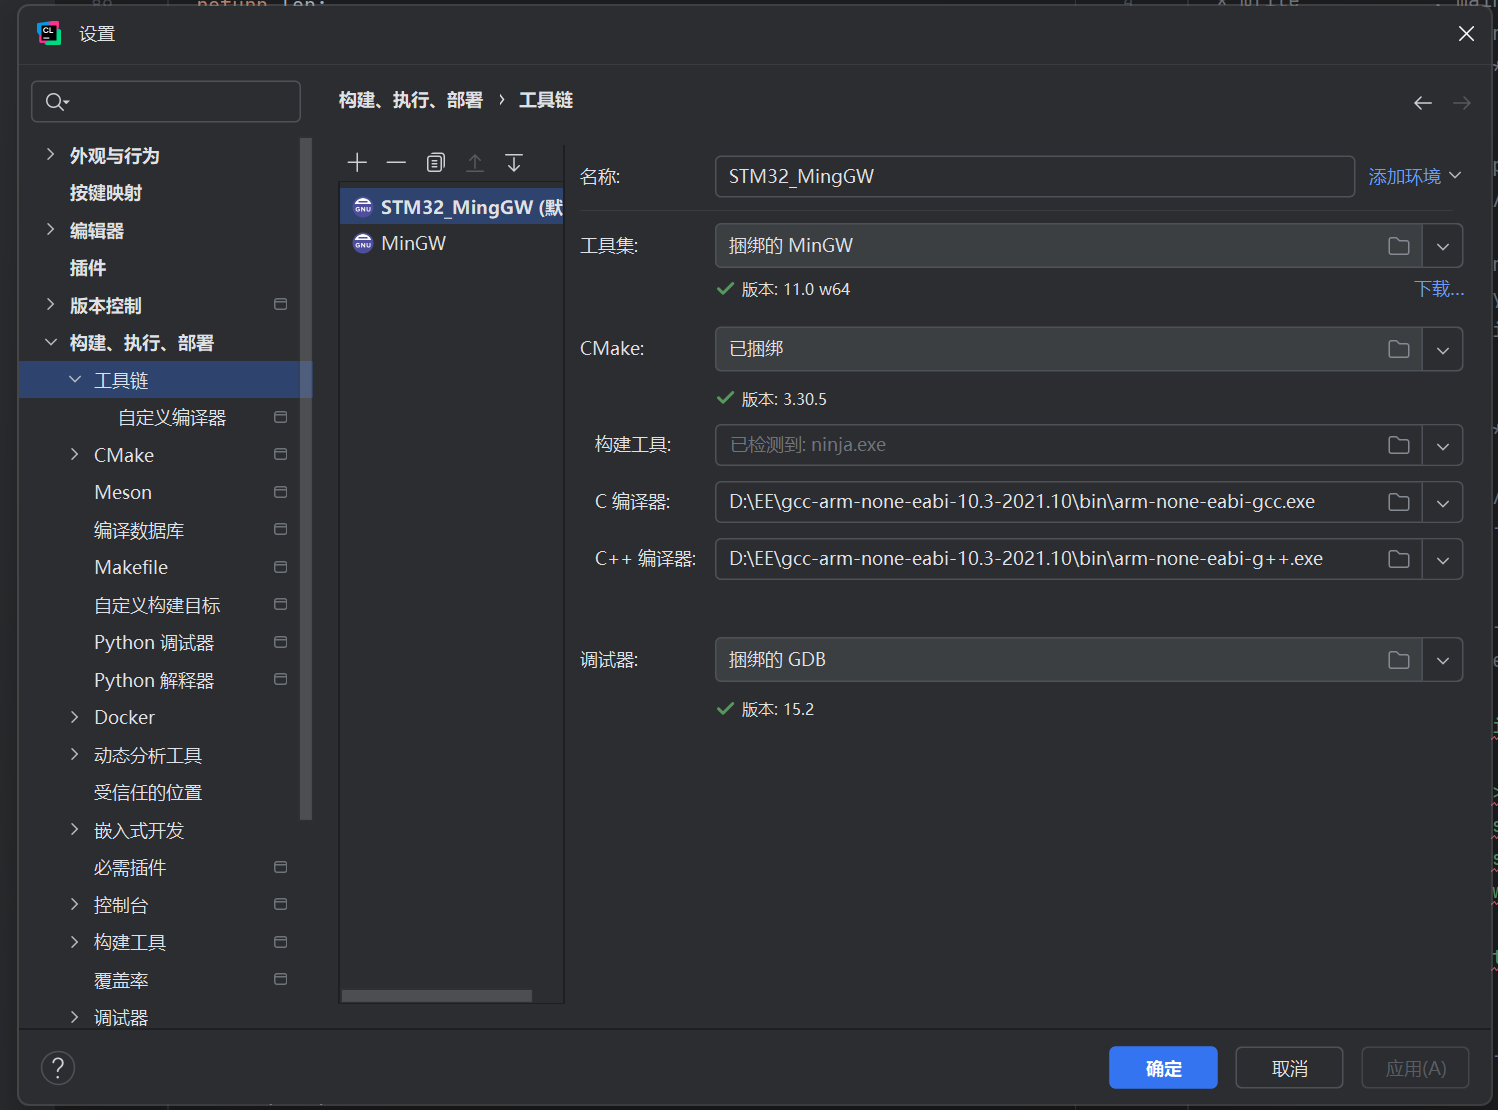
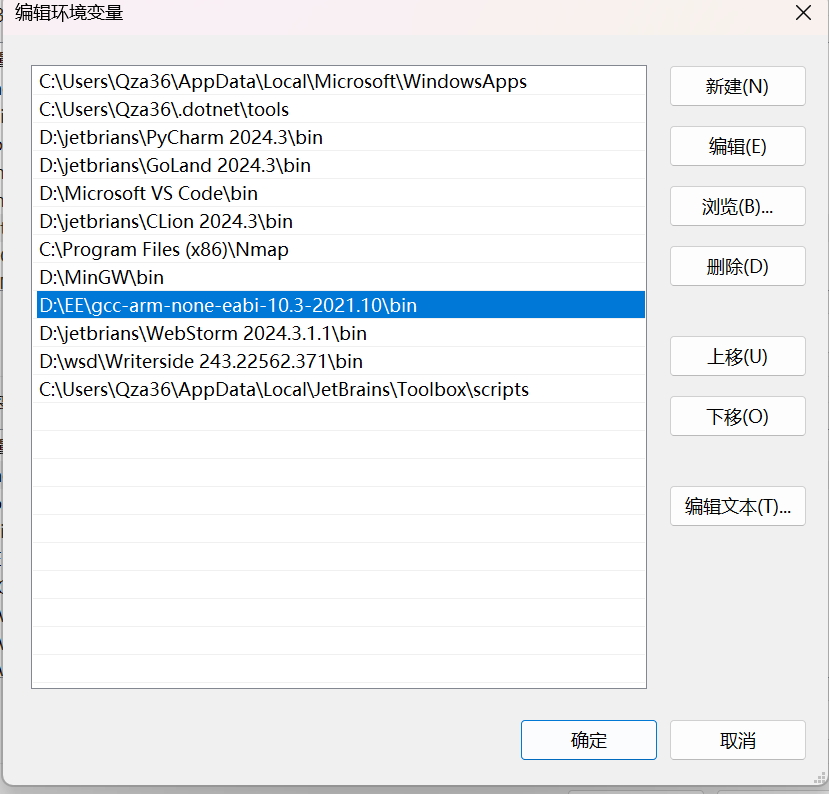
其中C和C++编译器选择上一步解压的arm-none-eabi-gcc,并把bin文件夹添加到环境变量
测试会在编译micro-Ros app中进行
使用CubeMX配置芯片
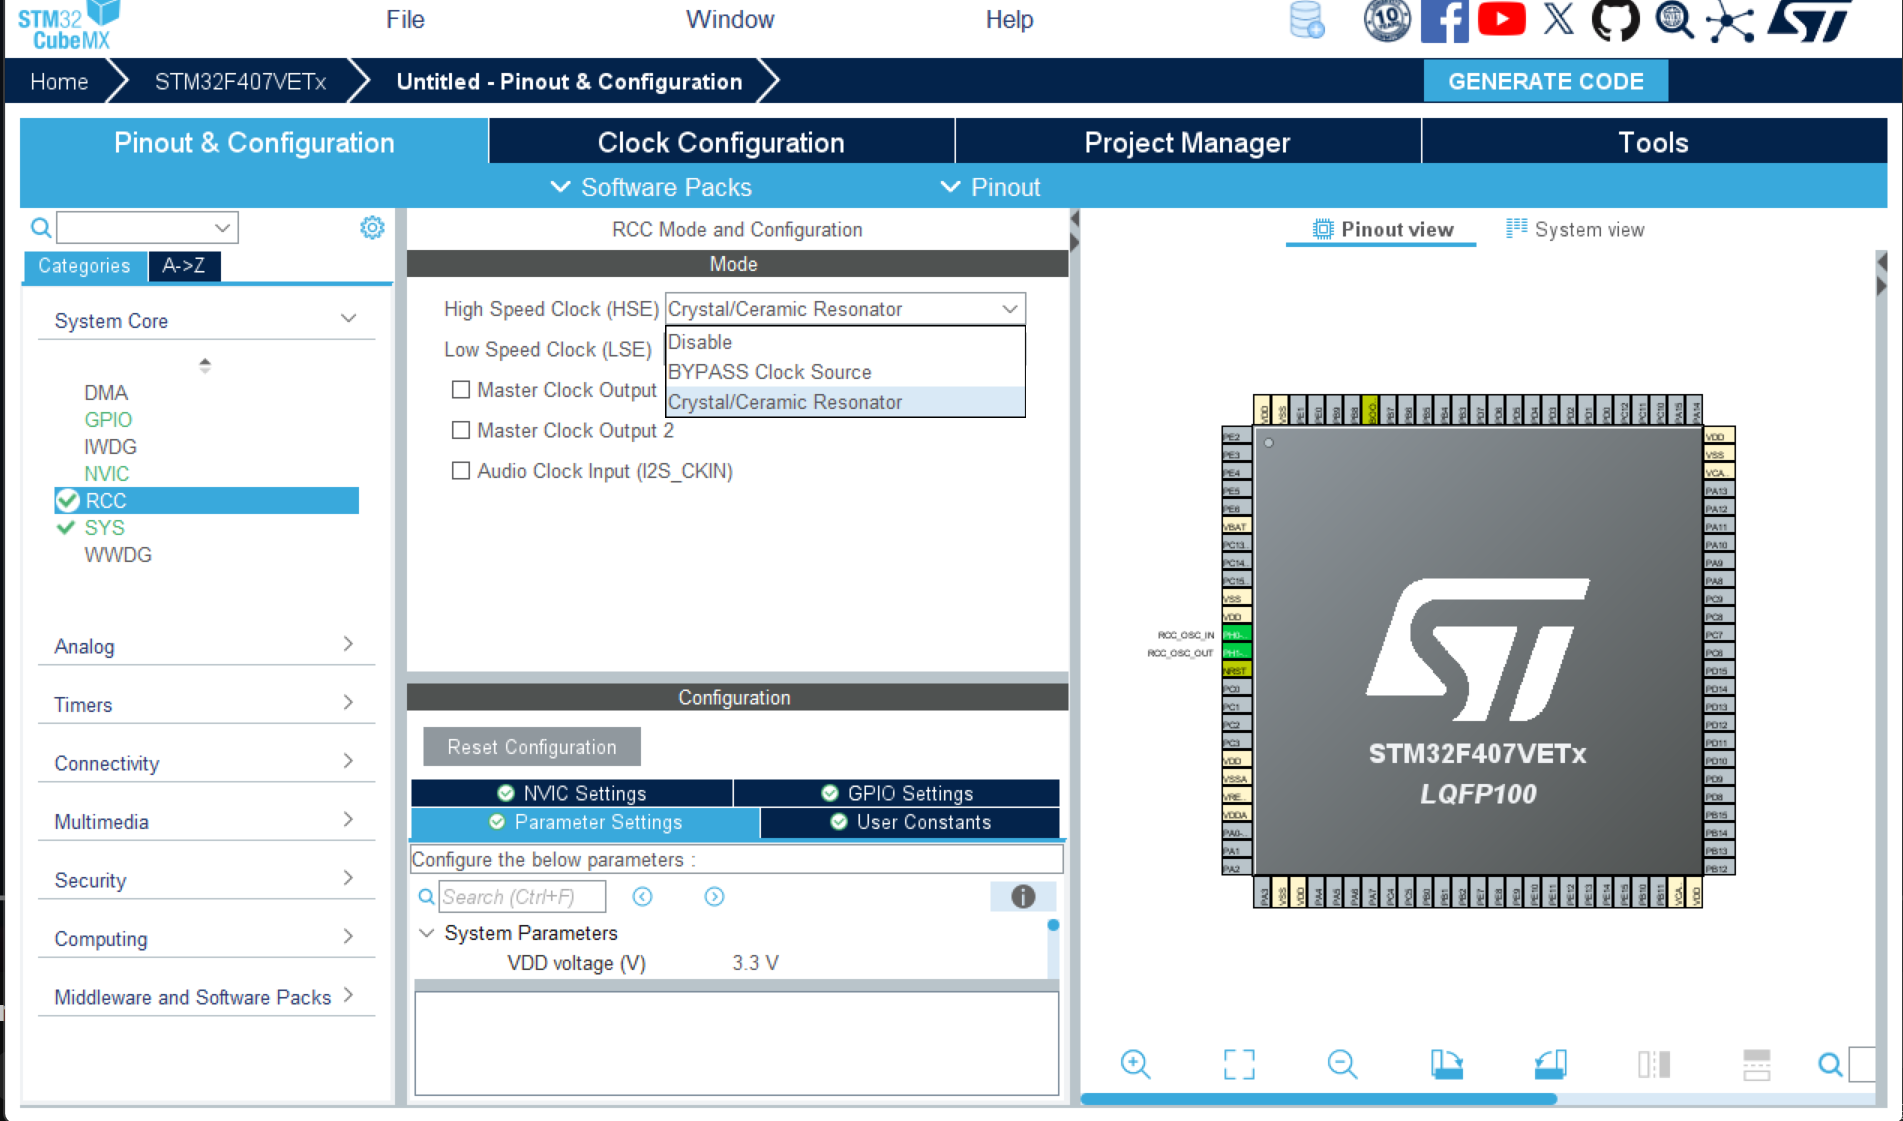
- 选择芯片型号STM32F407VET6
- RCC配置,HSE选择crystal
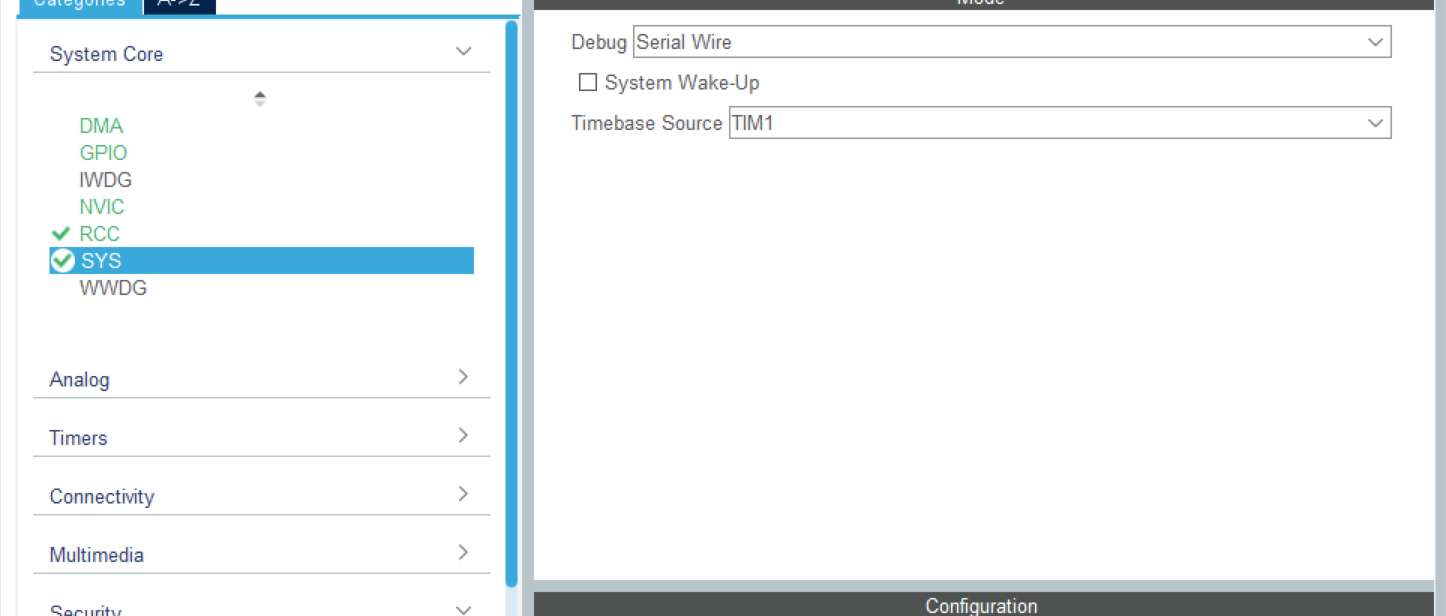
- 打开debugtimebase ,source 选择tim1
-
配置FREERTOS
选择中间件Middleware→freertos,interface选v2,选择Tasks and Queues,双击Tasks,配置如下
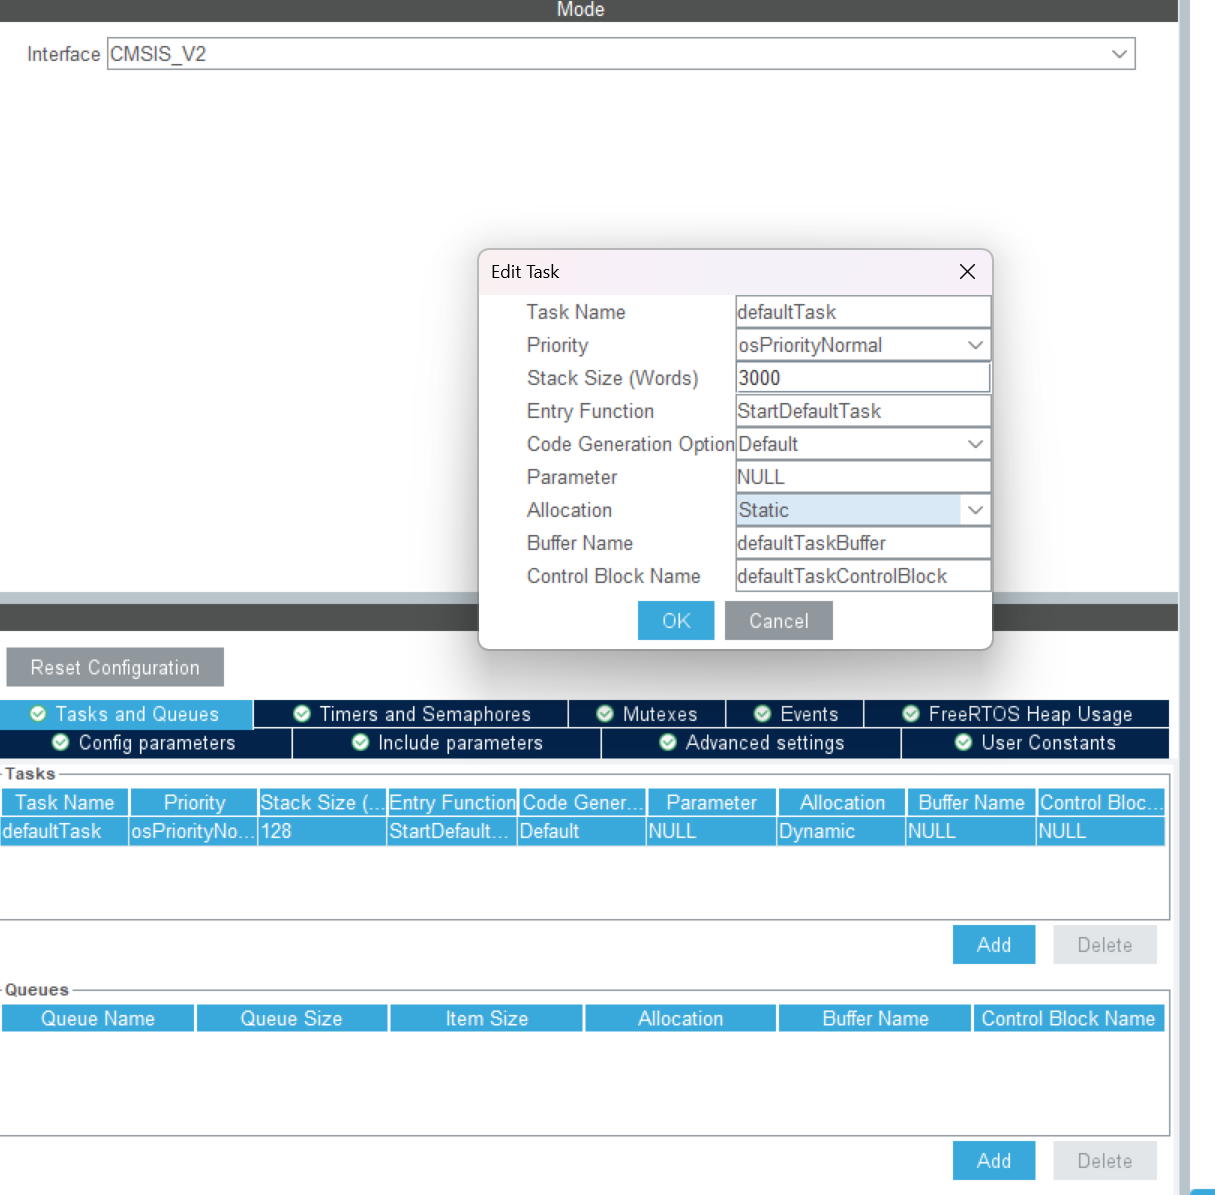
OK保存配置
-
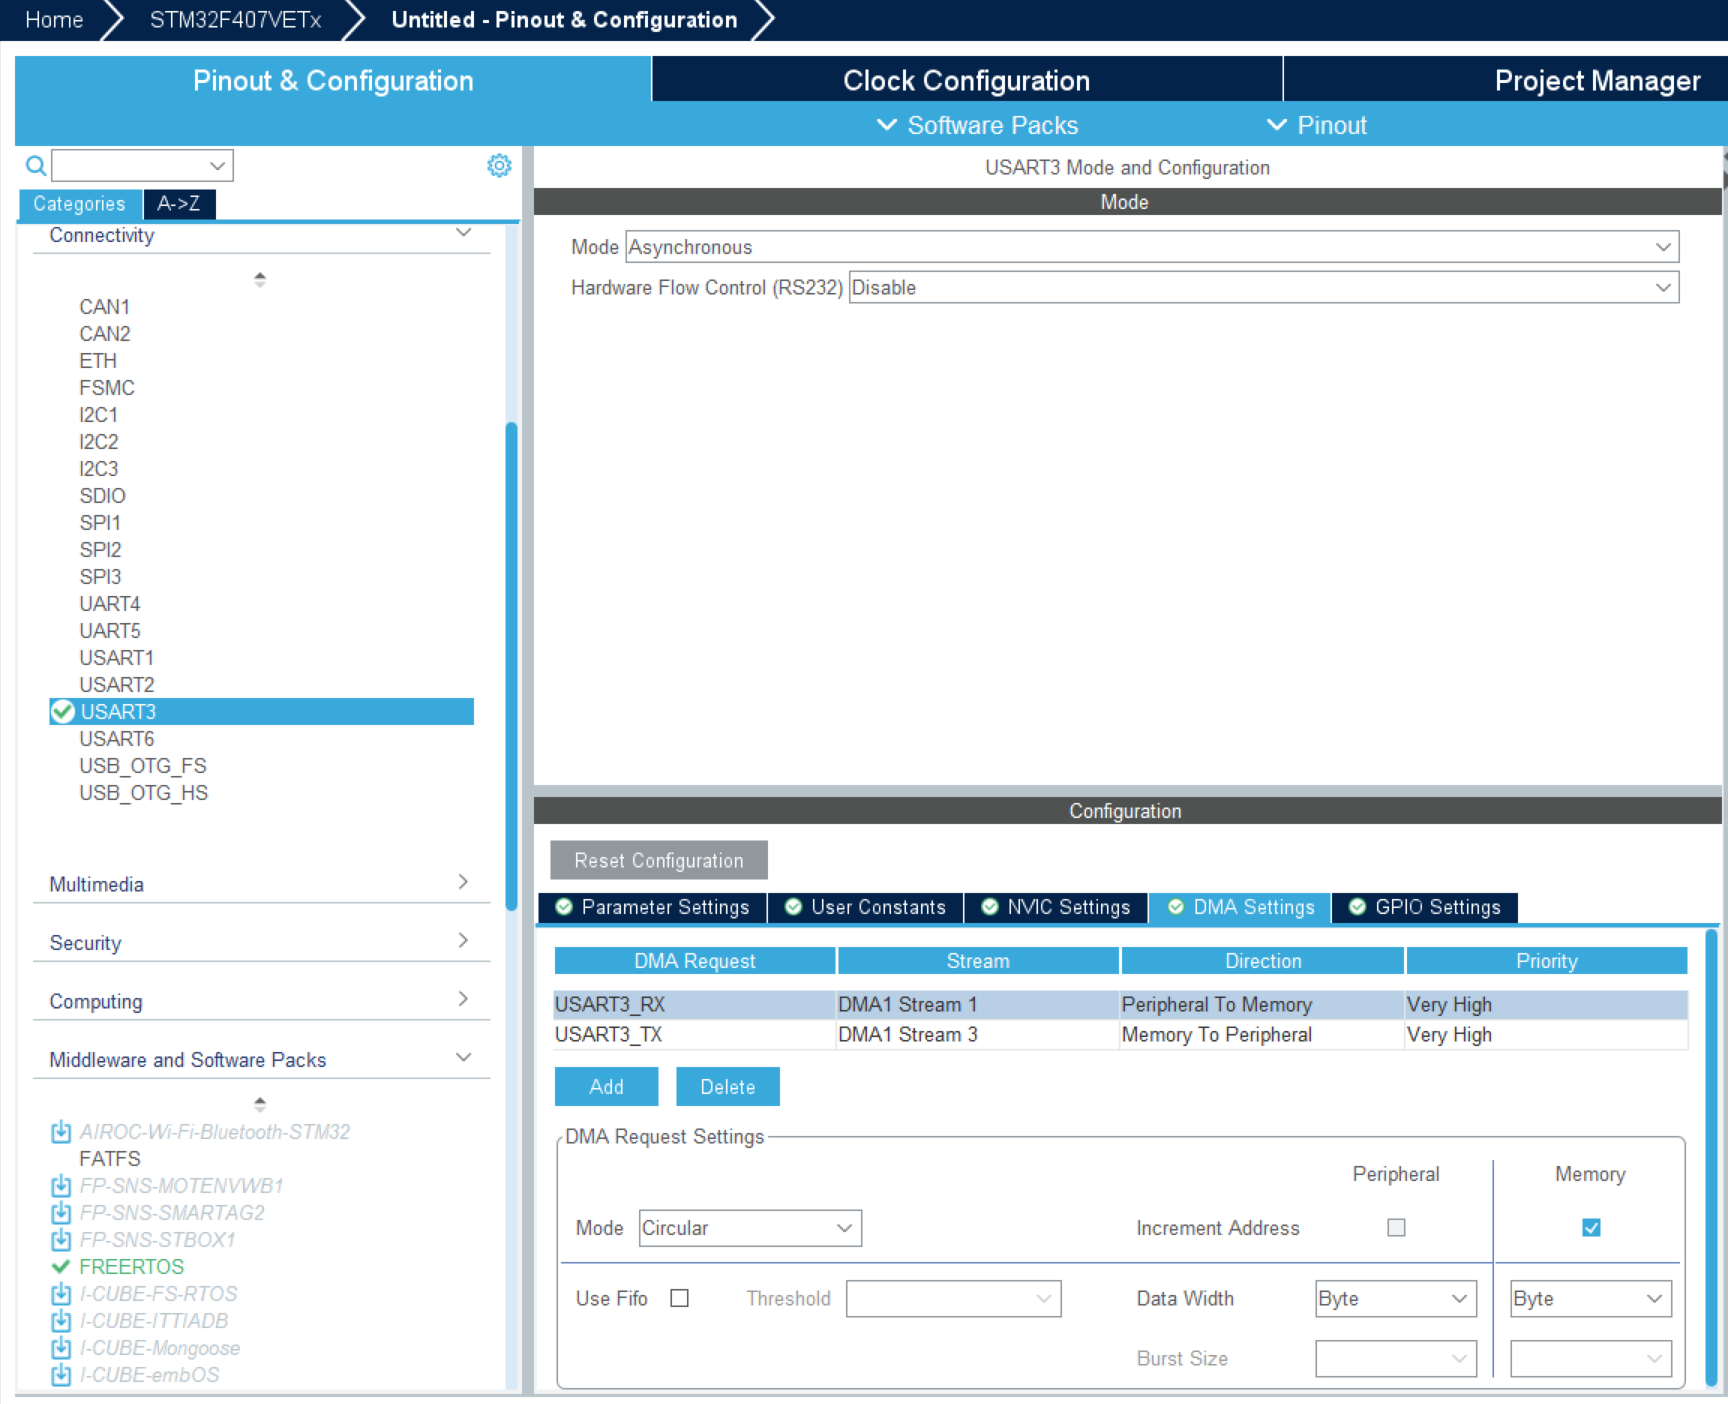
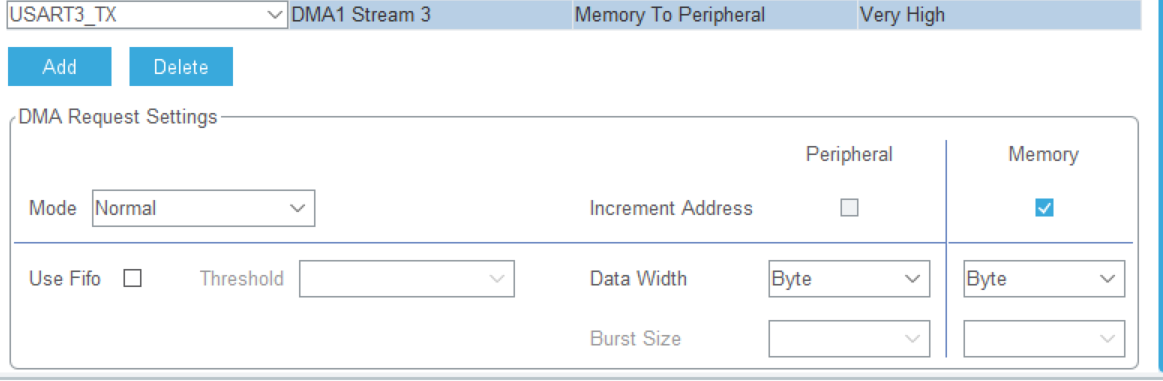
串口配置
- DMA
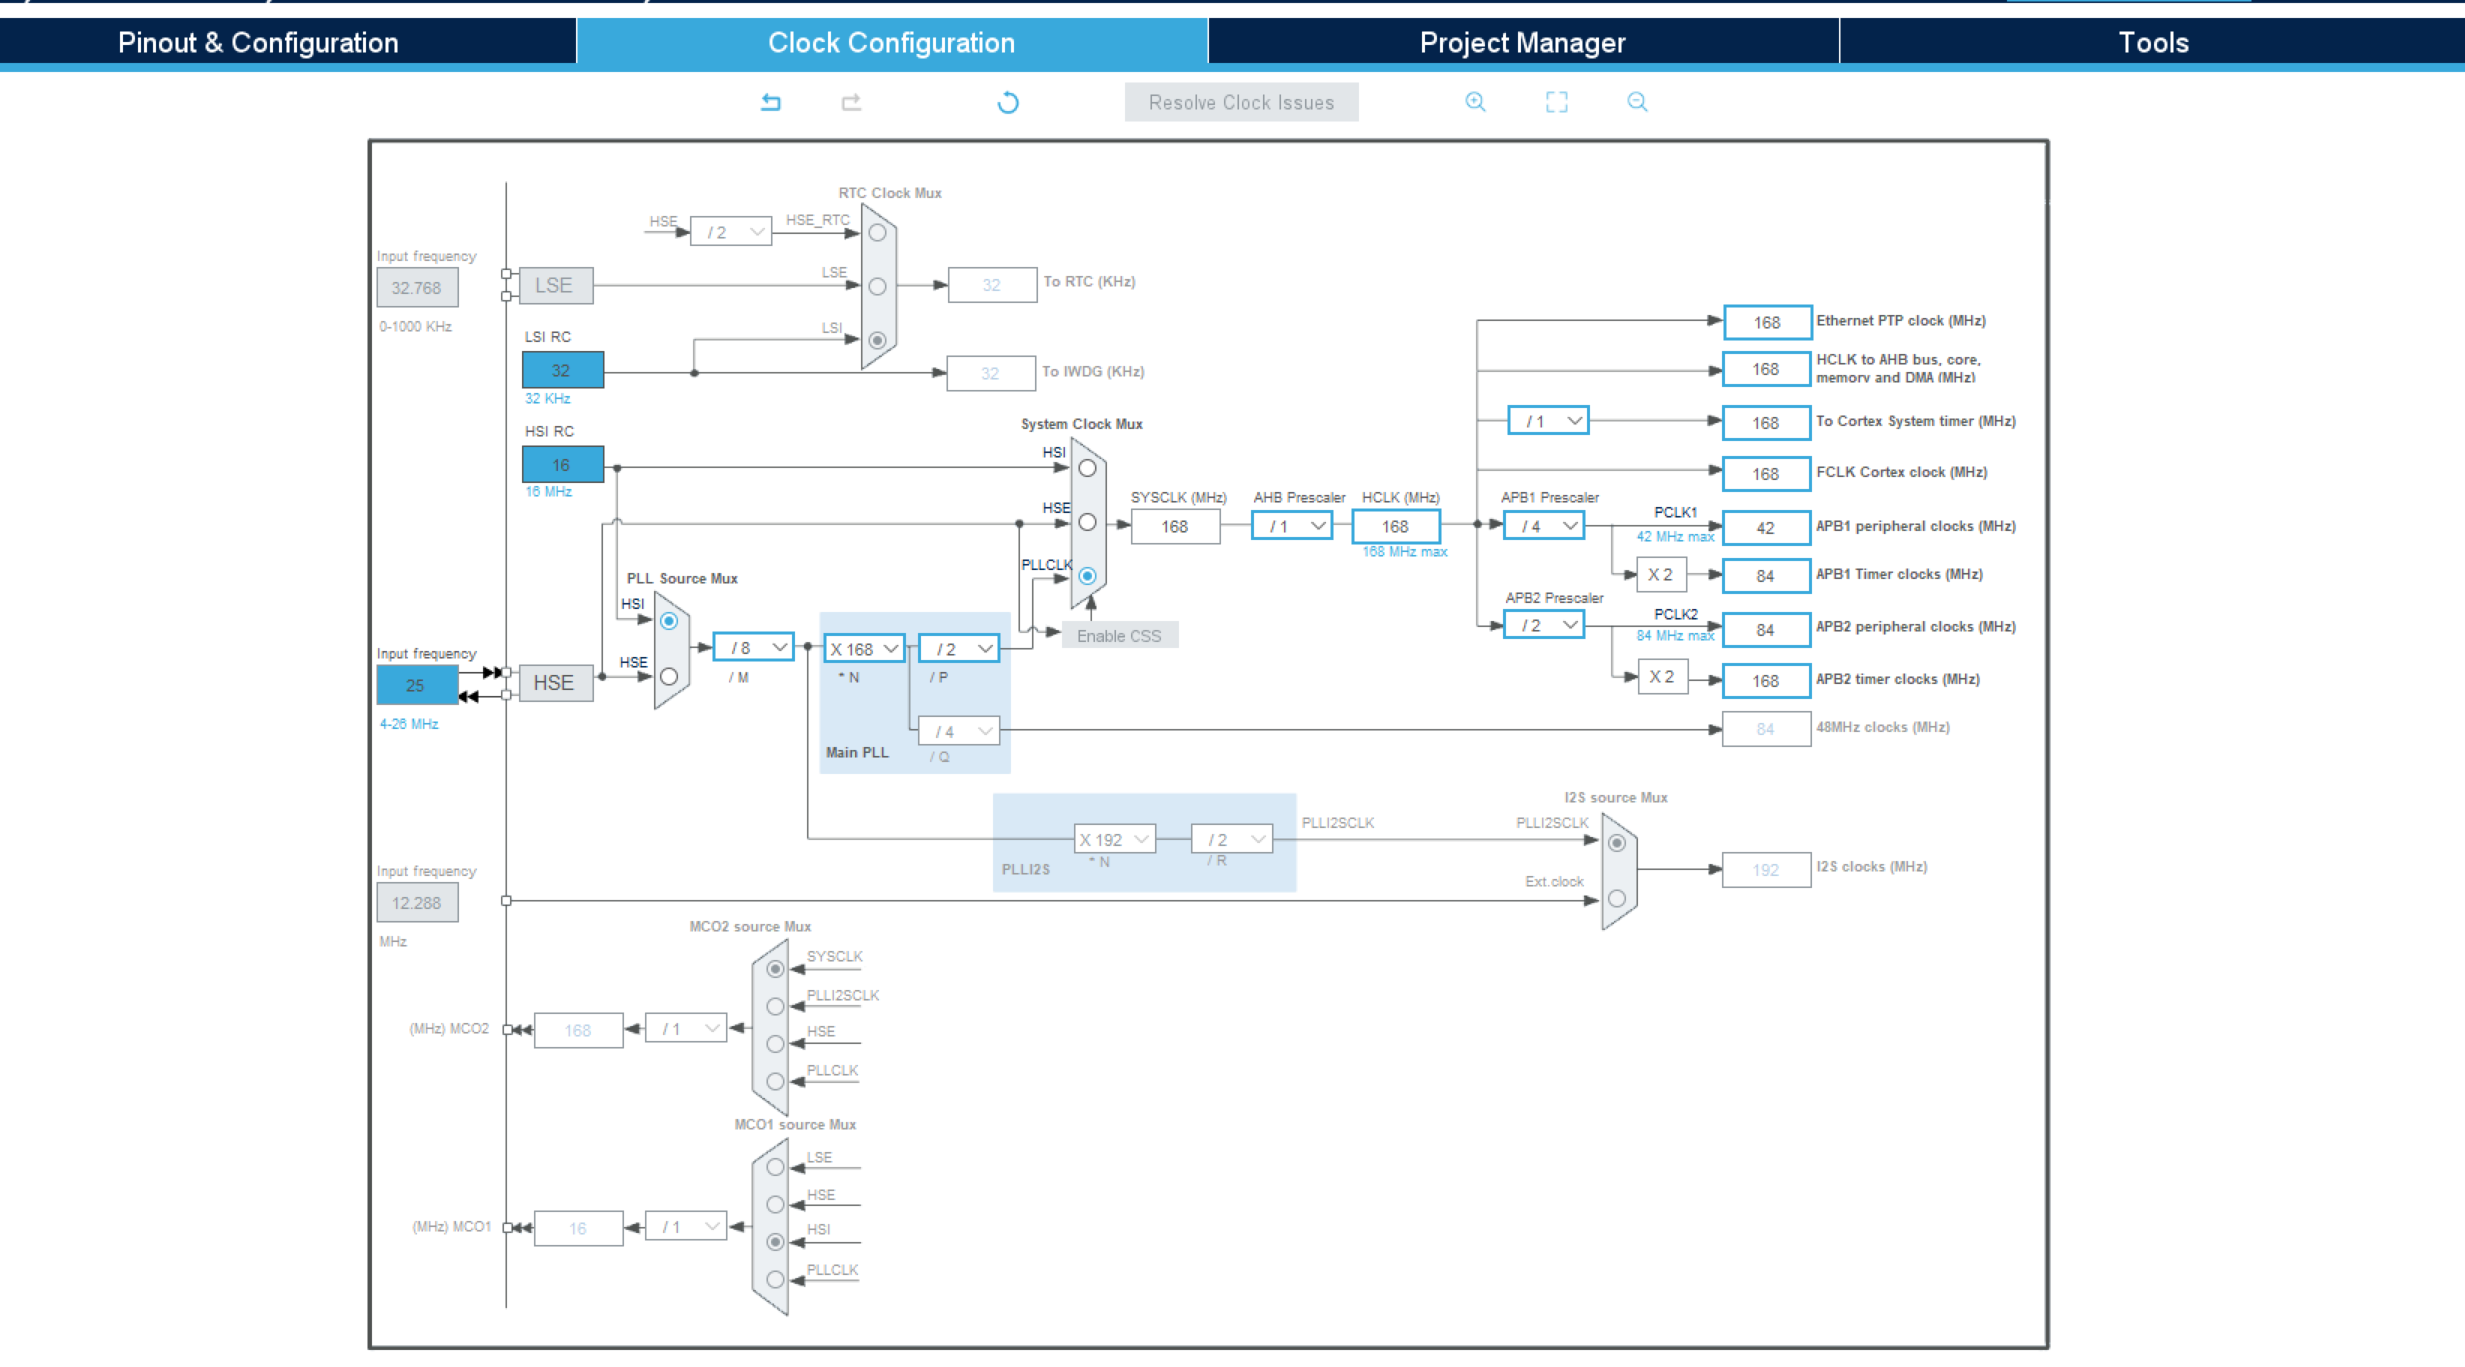
- Clock Configuration
-
Project Mangager
Toolchain IDE选择Makefile
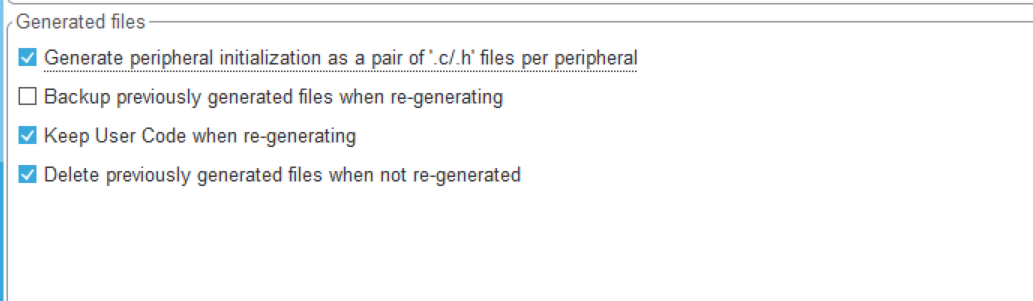
CodeGenerator
-
生成代码
创建microros-ROS app
准备工作
- 使用CLion打开刚才生成的文件夹
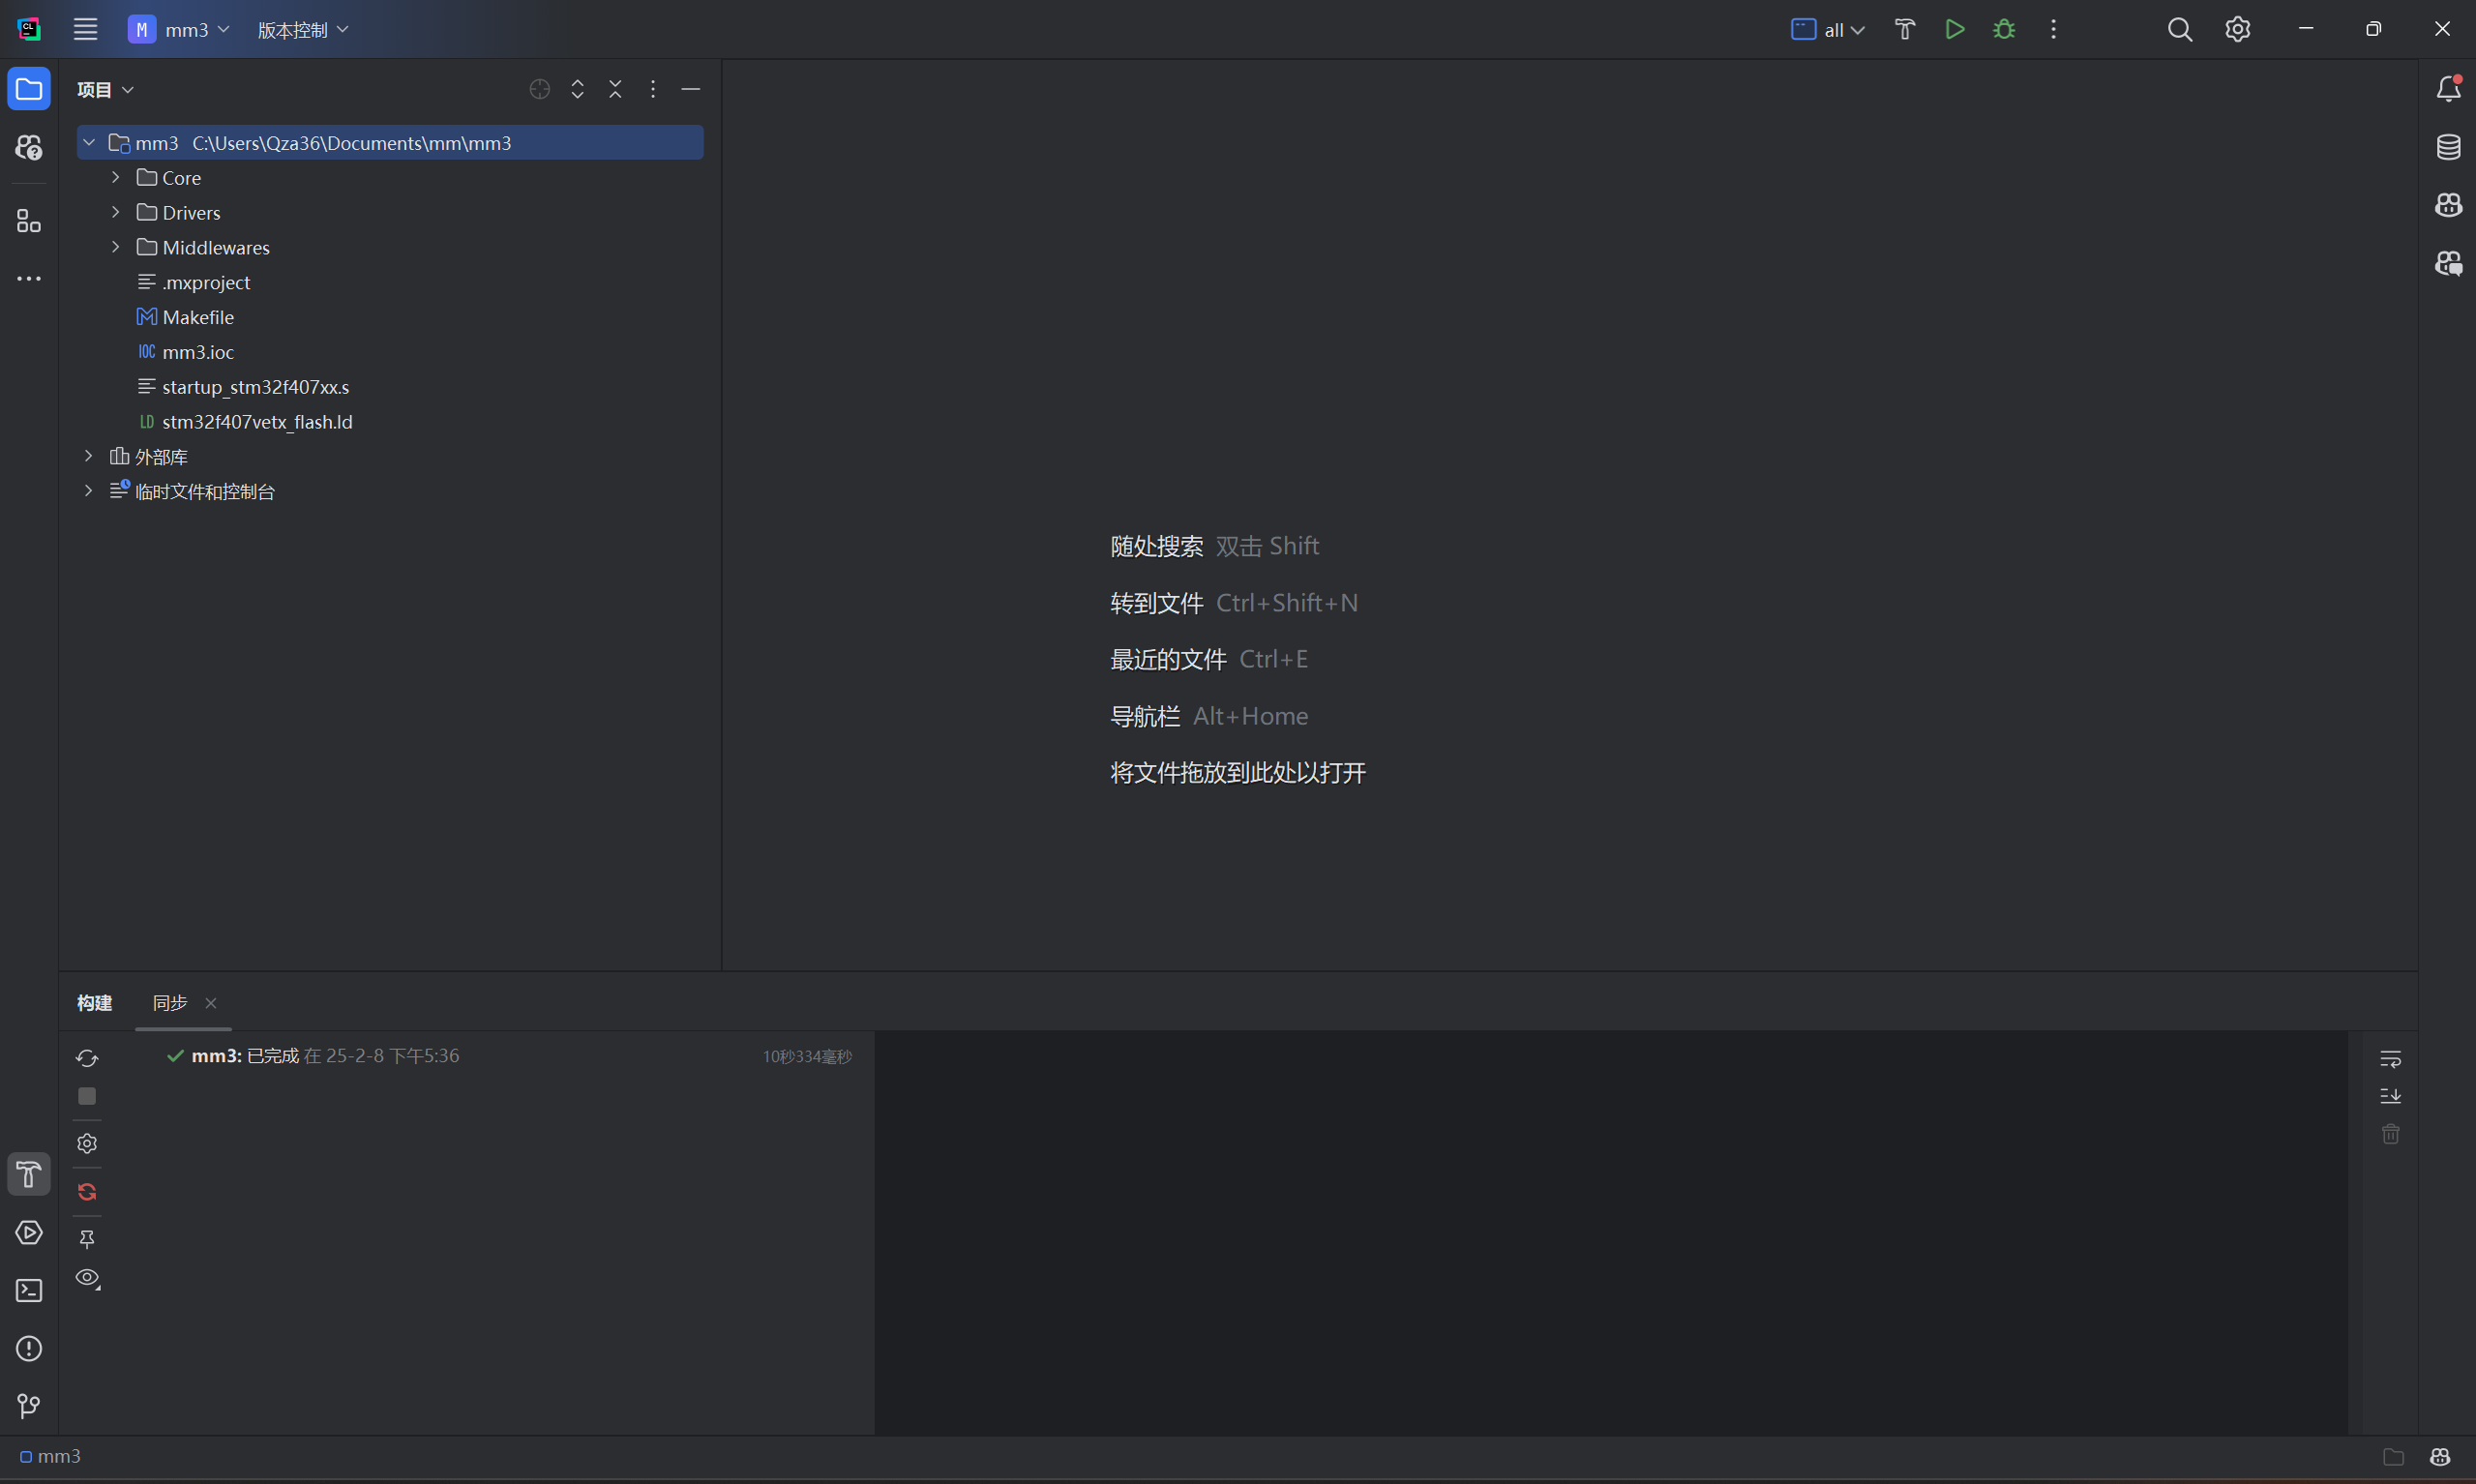
- 点击小锤子构建,输出以下构建成功,会多出一个build文件夹

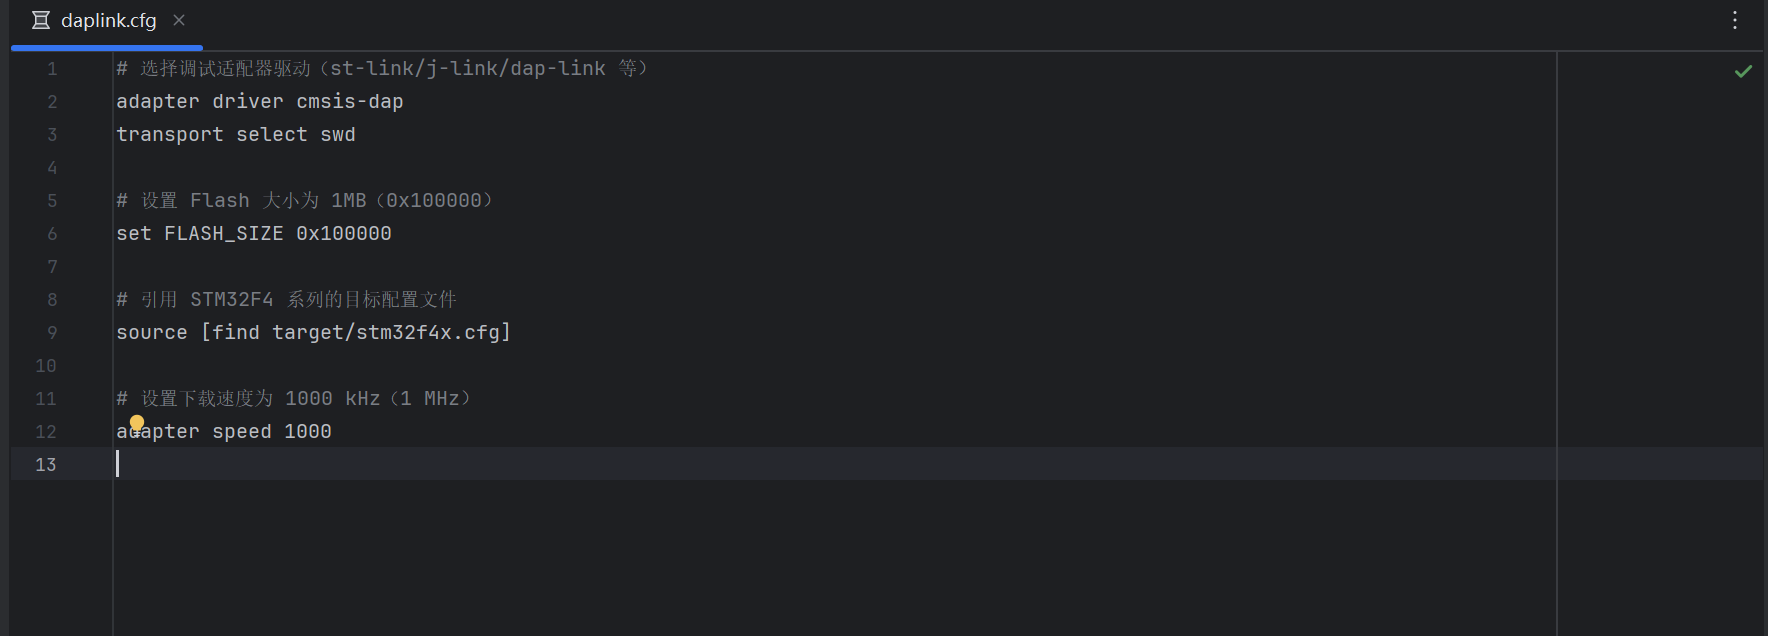
- 创建config文件夹,创建daplink.cfg,根据下载自定义文件内容
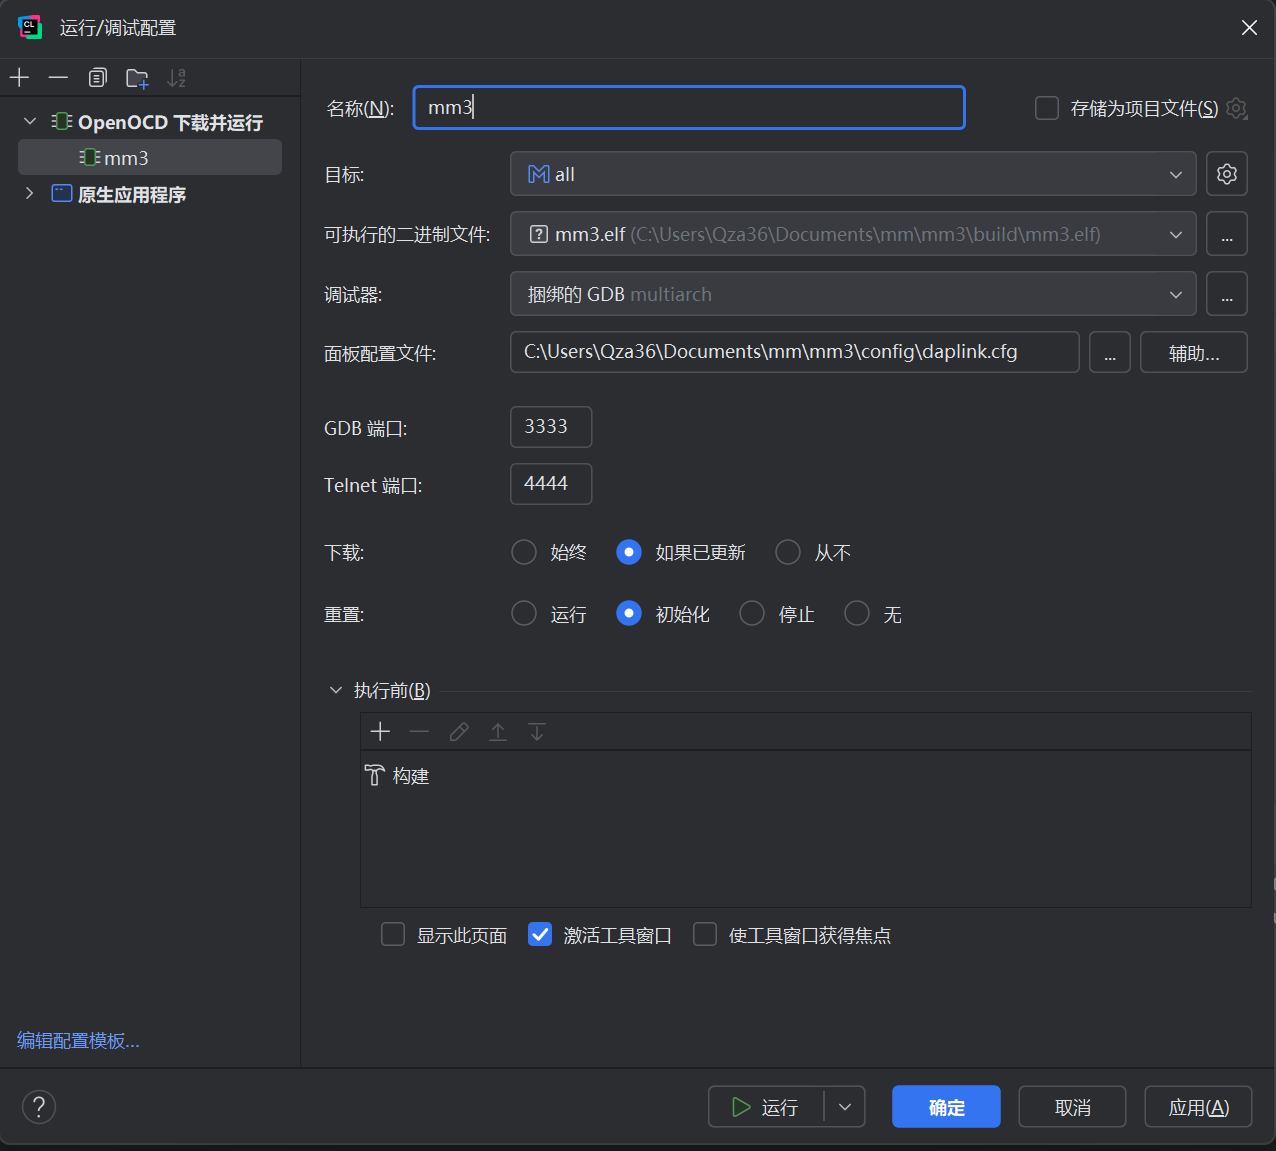
- 点击小锤子旁边的运行/调试配置,点击加号选择‘OpenOCD下载并运行’,根据自己路径填写可执行的二进制文件和面板配置文件
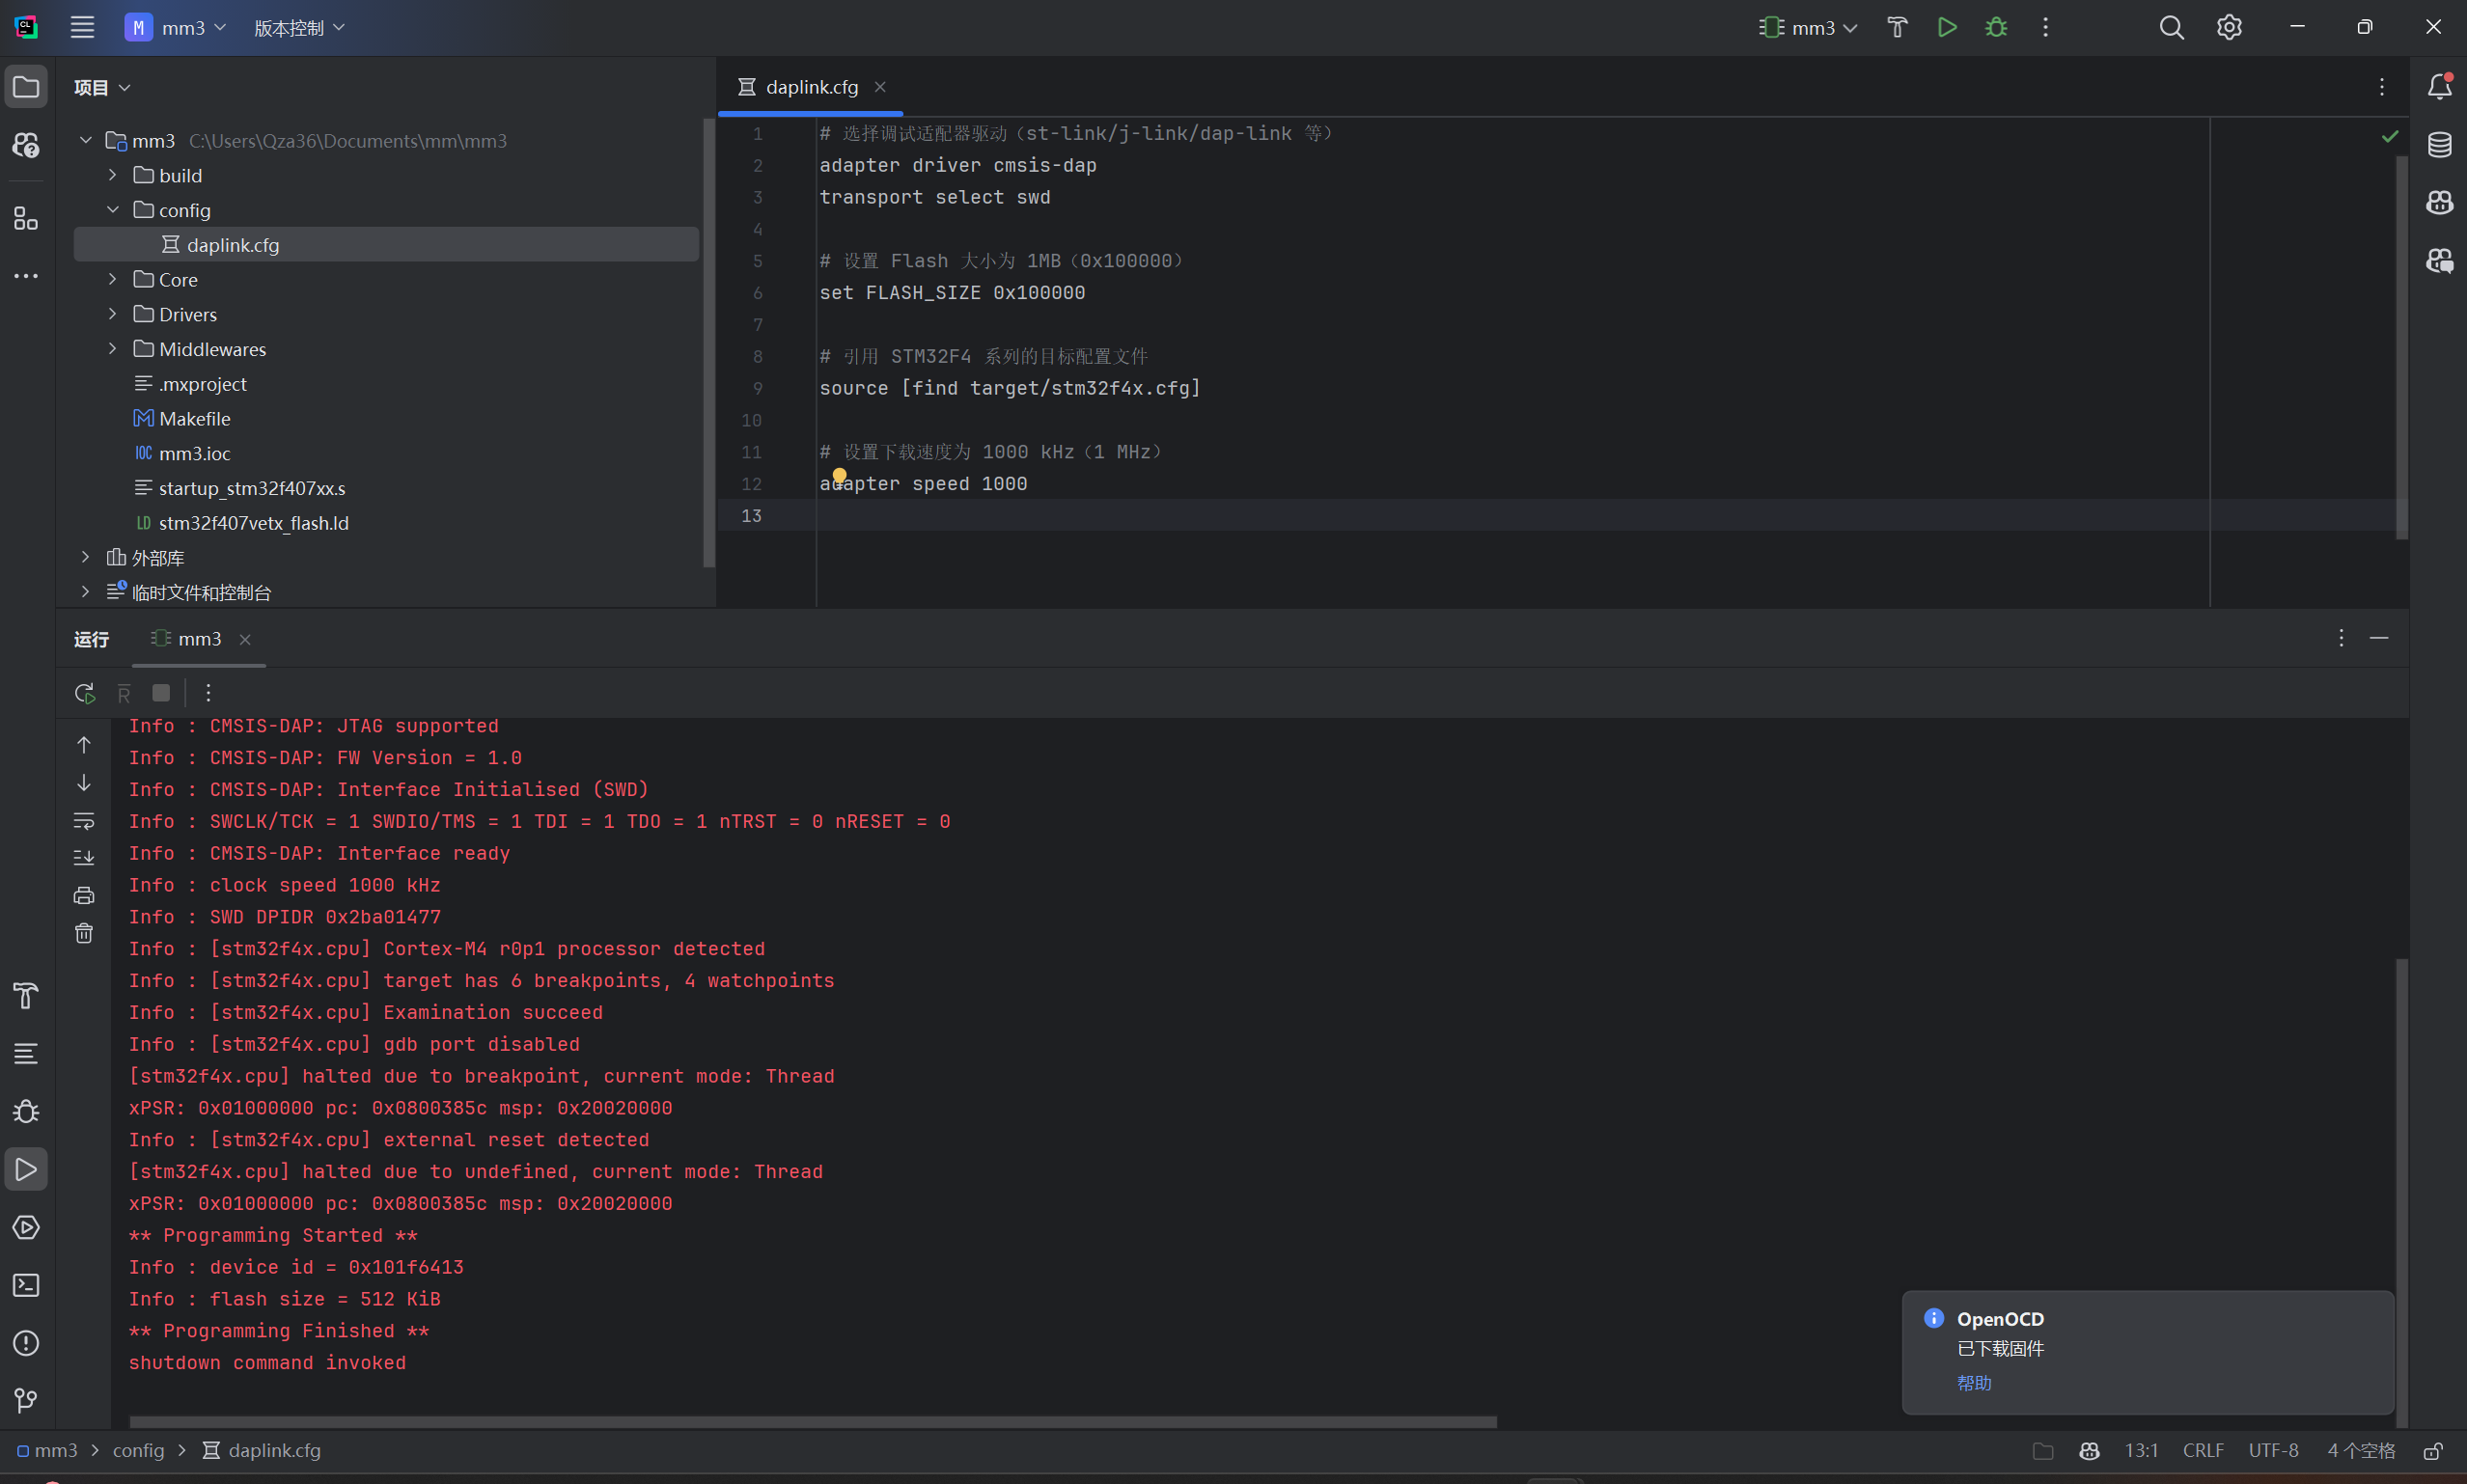
- 连接开发版,烧录代码,点击小锤子旁的绿色三角,提示已下载固件表示烧录成功
创建micoro-ROS app
- 克隆https://github.com/micro-ROS/micro_ros_stm32cubemx_utils到项目文件夹
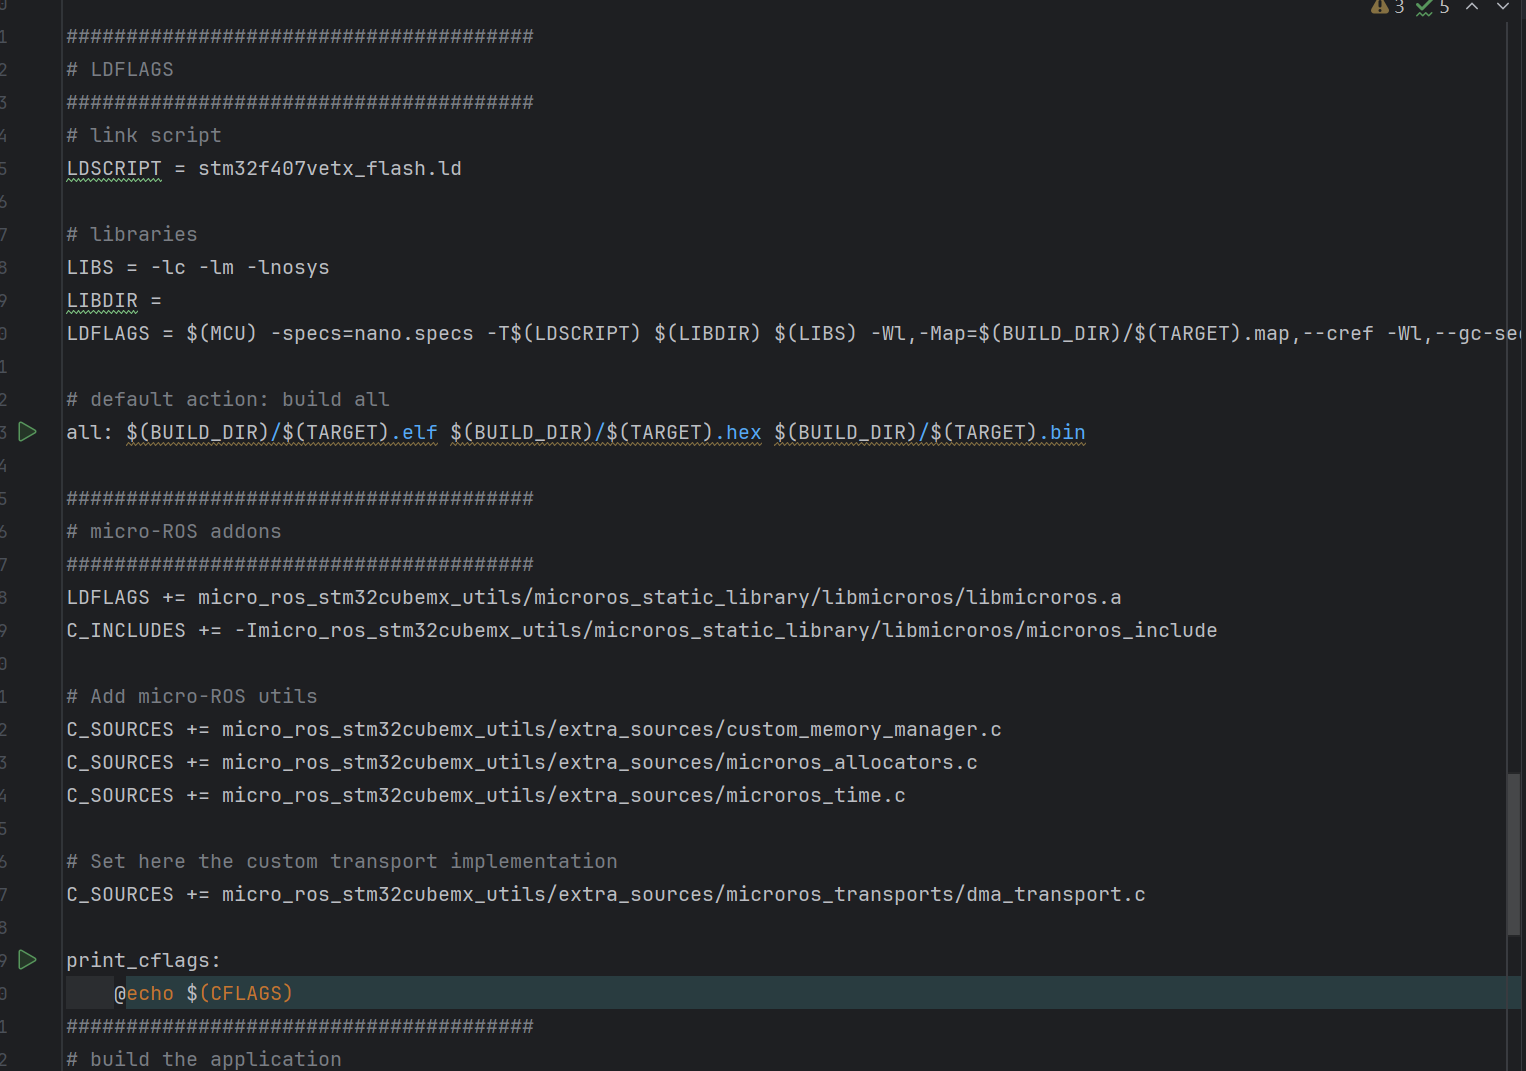
- 将以下内容复制到Makefile,注意复制到
# build the application 之前的一行
#######################################
# micro-ROS addons
#######################################
LDFLAGS += micro_ros_stm32cubemx_utils/microros_static_library/libmicroros/libmicroros.a
C_INCLUDES += -Imicro_ros_stm32cubemx_utils/microros_static_library/libmicroros/microros_include

# Add micro-ROS utils
C_SOURCES += micro_ros_stm32cubemx_utils/extra_sources/custom_memory_manager.c
C_SOURCES += micro_ros_stm32cubemx_utils/extra_sources/microros_allocators.c
C_SOURCES += micro_ros_stm32cubemx_utils/extra_sources/microros_time.c

# Set here the custom transport implementation
C_SOURCES += micro_ros_stm32cubemx_utils/extra_sources/microros_transports/dma_transport.c

print_cflags:
   @echo $(CFLAGS)
- 执行静态库生成工具,我的代理端口是7897
docker run -it --rm -v ${PWD}:/project --env MICROROS_LIBRARY_FOLDER=micro_ros_stm32cubemx_utils/microros_static_library --env http_proxy=http://host.docker.internal:7897 --env https_proxy=http://host.docker.internal:7897 microros/micro_ros_static_library_builder:humble
- 编辑freertos.c,以下替换头文件
/* USER CODE BEGIN Header */
/**
  ******************************************************************************
  * File Name          : freertos.c
  * Description        : Code for freertos applications
  ******************************************************************************
  * @attention
  *
  * Copyright (c) 2024 STMicroelectronics.
  * All rights reserved.
  *
  * This software is licensed under terms that can be found in the LICENSE file
  * in the root directory of this software component.
  * If no LICENSE file comes with this software, it is provided AS-IS.
  *
  ******************************************************************************
  */
/* USER CODE END Header */

/* Includes ------------------------------------------------------------------*/
#include "FreeRTOS.h"
#include "task.h"
#include "main.h"
#include "cmsis_os.h"

/* Private includes ----------------------------------------------------------*/
/* USER CODE BEGIN Includes */
#include "usart.h"
#include <rcl/rcl.h>
#include <rcl/error_handling.h>
#include <rclc/rclc.h>
#include <rclc/executor.h>
#include <uxr/client/transport.h>
#include <rmw_microxrcedds_c/config.h>
#include <rmw_microros/rmw_microros.h>
#include <std_msgs/msg/int32.h>
#include <geometry_msgs/msg/twist.h>

/* USER CODE END Includes */

/* Private typedef -----------------------------------------------------------*/
typedef StaticTask_t osStaticThreadDef_t;
/* USER CODE BEGIN PTD */
bool cubemx_transport_open(struct uxrCustomTransport * transport);
bool cubemx_transport_close(struct uxrCustomTransport * transport);
size_t cubemx_transport_write(struct uxrCustomTransport* transport, const uint8_t * buf, size_t len, uint8_t * err);
size_t cubemx_transport_read(struct uxrCustomTransport* transport, uint8_t* buf, size_t len, int timeout, uint8_t* err);

void * microros_allocate(size_t size, void * state);
void microros_deallocate(void * pointer, void * state);
void * microros_reallocate(void * pointer, size_t size, void * state);
void * microros_zero_allocate(size_t number_of_elements, size_t size_of_element, void * state);
- 编辑freertos.c里的StartDefaultTask函数
和main.c的while功能类似,来完成主要的逻辑,这段代码可以在micro_ros_stm32cubemx_utils/sample_main.c中找到,里面提供了各种实例
void StartDefaultTask(void *argument)
{
    /* USER CODE BEGIN StartDefaultTask */
    /* Infinite loop */
    // micro-ROS configuration

    rmw_uros_set_custom_transport(
      true,
      (void *) &huart1,
      cubemx_transport_open,
      cubemx_transport_close,
      cubemx_transport_write,
      cubemx_transport_read);

    rcl_allocator_t freeRTOS_allocator = rcutils_get_zero_initialized_allocator();
    freeRTOS_allocator.allocate = microros_allocate;
    freeRTOS_allocator.deallocate = microros_deallocate;
    freeRTOS_allocator.reallocate = microros_reallocate;
    freeRTOS_allocator.zero_allocate =  microros_zero_allocate;

    if (!rcutils_set_default_allocator(&freeRTOS_allocator)) {
        printf("Error on default allocators (line %d)\n", __LINE__);
    }

    // micro-ROS app

    rcl_publisher_t publisher;
    std_msgs__msg__Int32 msg;
    rclc_support_t support;
    rcl_allocator_t allocator;
    rcl_node_t node;

    allocator = rcl_get_default_allocator();

    //create init_options
    rclc_support_init(&support, 0, NULL, &allocator);

    // create node
    rclc_node_init_default(&node, "cubemx_node", "", &support);

    // create publisher
    rclc_publisher_init_default(
      &publisher,
      &node,
      ROSIDL_GET_MSG_TYPE_SUPPORT(std_msgs, msg, Int32),
      "cubemx_publisher");

    msg.data = 0;

    for(;;)
    {
      rcl_ret_t ret = rcl_publish(&publisher, &msg, NULL);
      if (ret != RCL_RET_OK)
      {
        printf("Error publishing (line %d)\n", __LINE__);
      }

      msg.data++;
      osDelay(10);
    }
    /* USER CODE END StartDefaultTask */
}
上面的代码创建了一个节点和一个发布者,发布一个整型数字,每次循环加一
- 编译烧录
配置ros-agent与micoro-ROS通信
-
使用SSH连接树莓派
若忘记IP地址可用Nmap扫描
nmap -sn 192.168.1.0/24
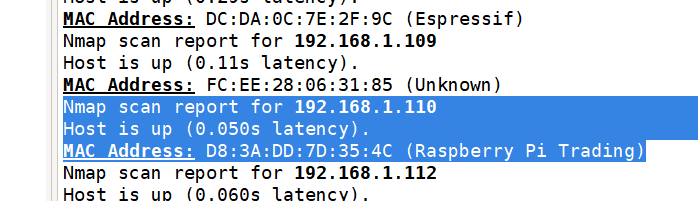
- 安装ros-agent
sudo apt-get install -y build-essential
mkdir -p microros_ws/src
cd microros_ws/src
git clone http://github.fishros.org/https://github.com/fishros/micro-ROS-Agent.git -b humble
git clone http://github.fishros.org/https://github.com/micro-ROS/micro_ros_msgs.git -b humble
cd ~/microros_ws/
colcon build
source install/setup.bash
- 使用usb转ttl将开发版和树莓派连接
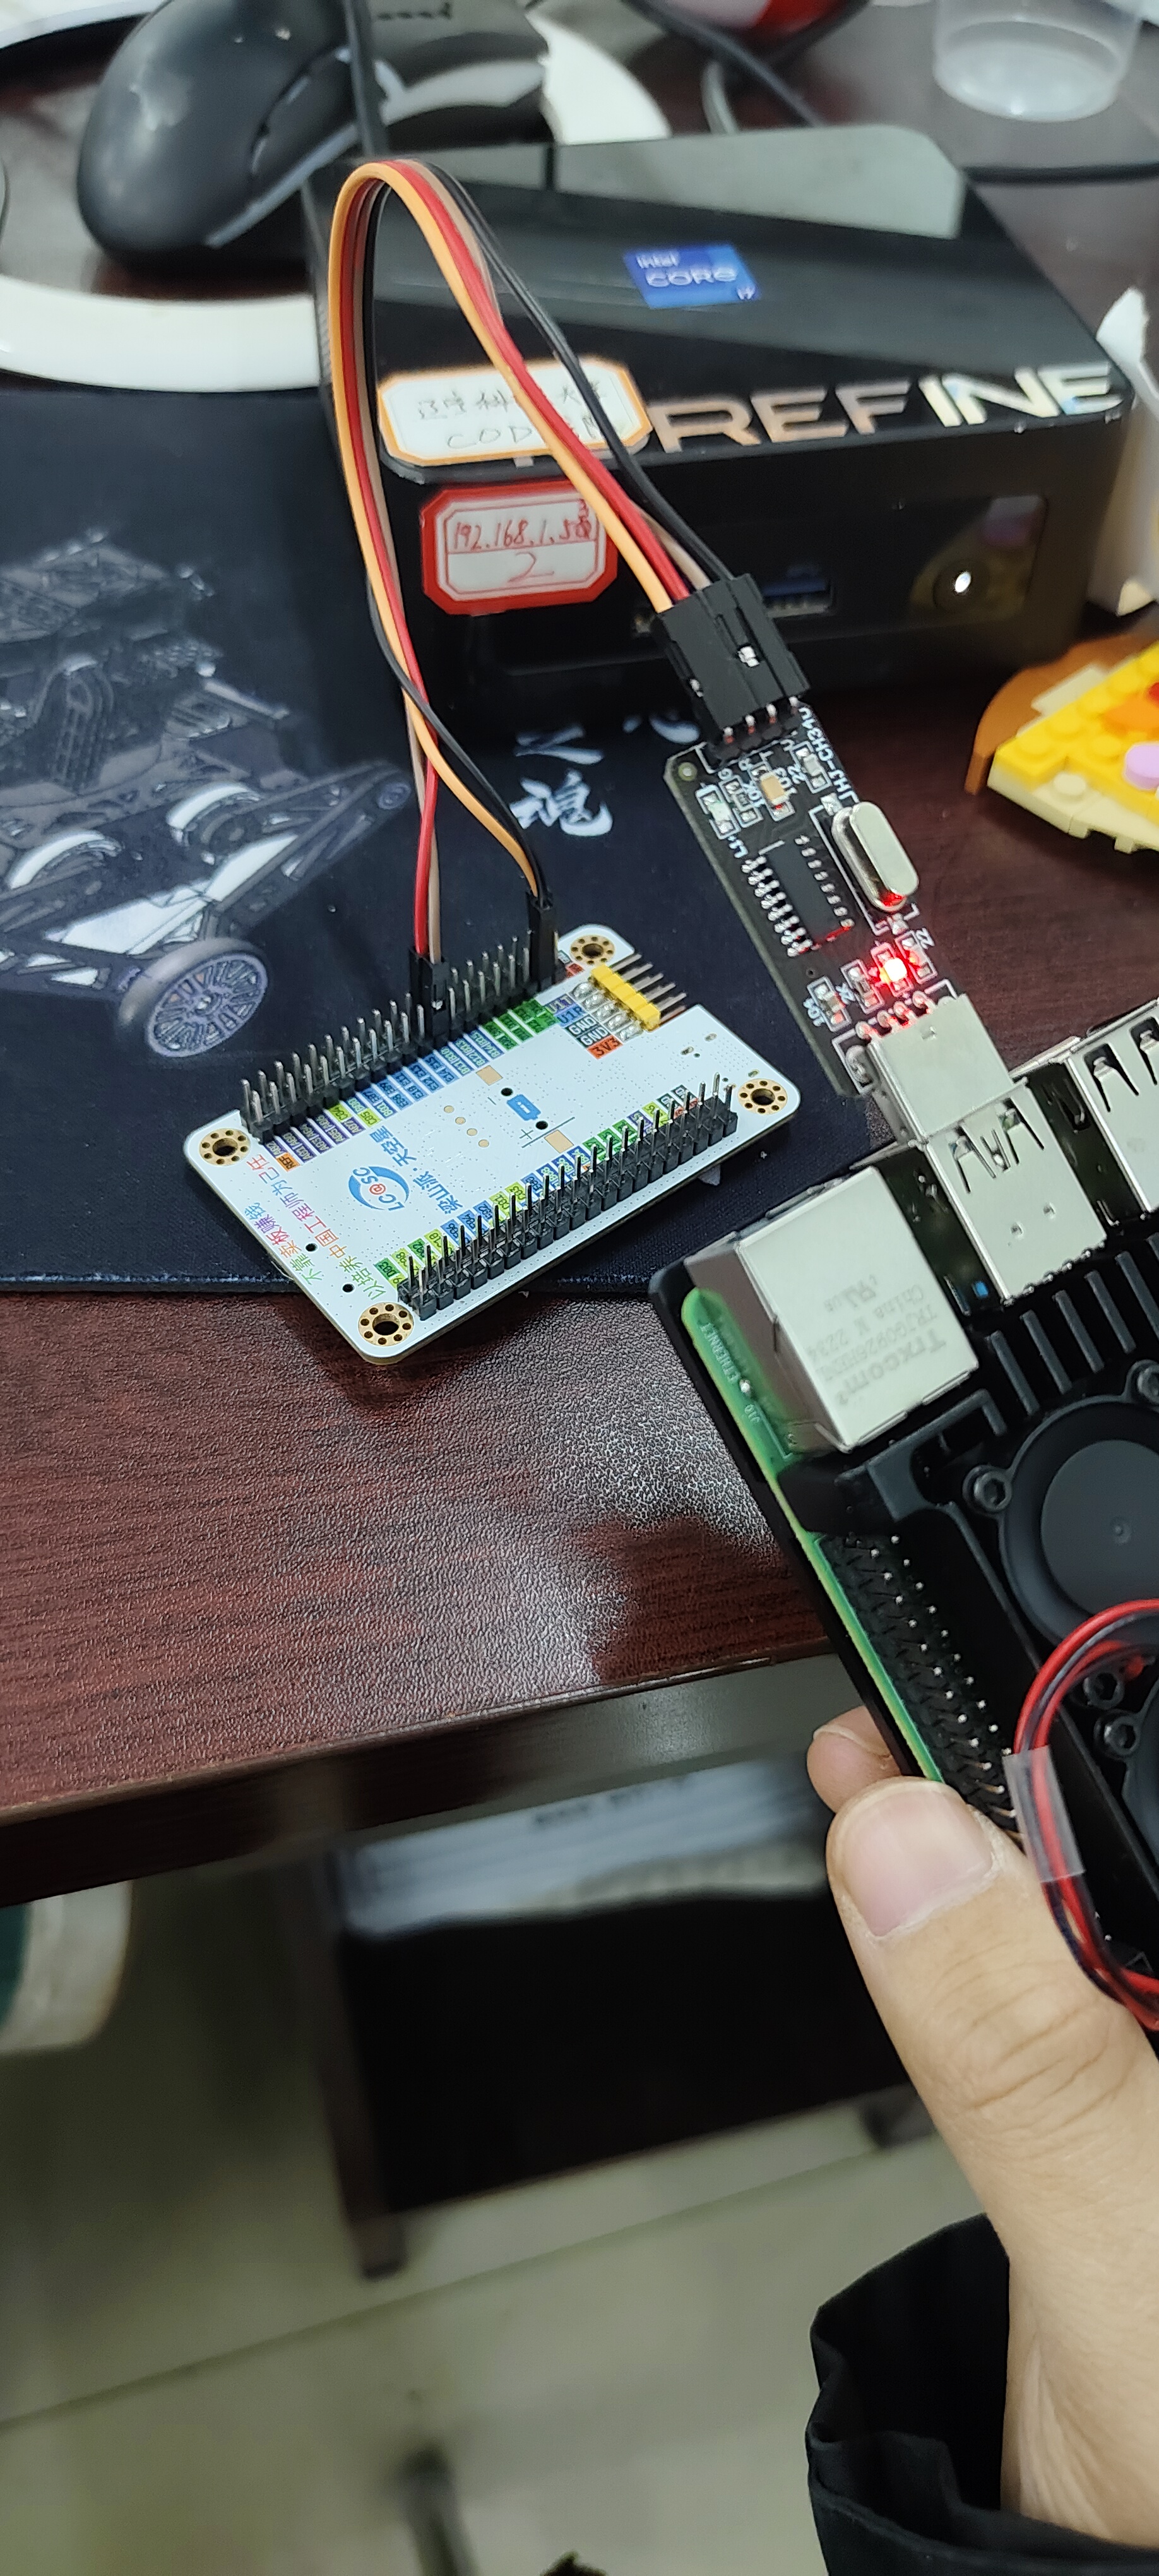
- 运行agent
ros2 run micro_ros_agent micro_ros_agent serial -b 115200 --dev /dev/ttyUSB0
注意波特率,一般默认是115200,设备号一般是ttyUSB0
按下RST键,通信成功


使用foxglove进行可视化
- 安装
sudo apt install ros-$ROS_DISTRO-foxglove-bridge
- Launch
ros2 launch foxglove_bridge foxglove_bridge_launch.xml

注意端口是8756
- 打开foxglove建立连接
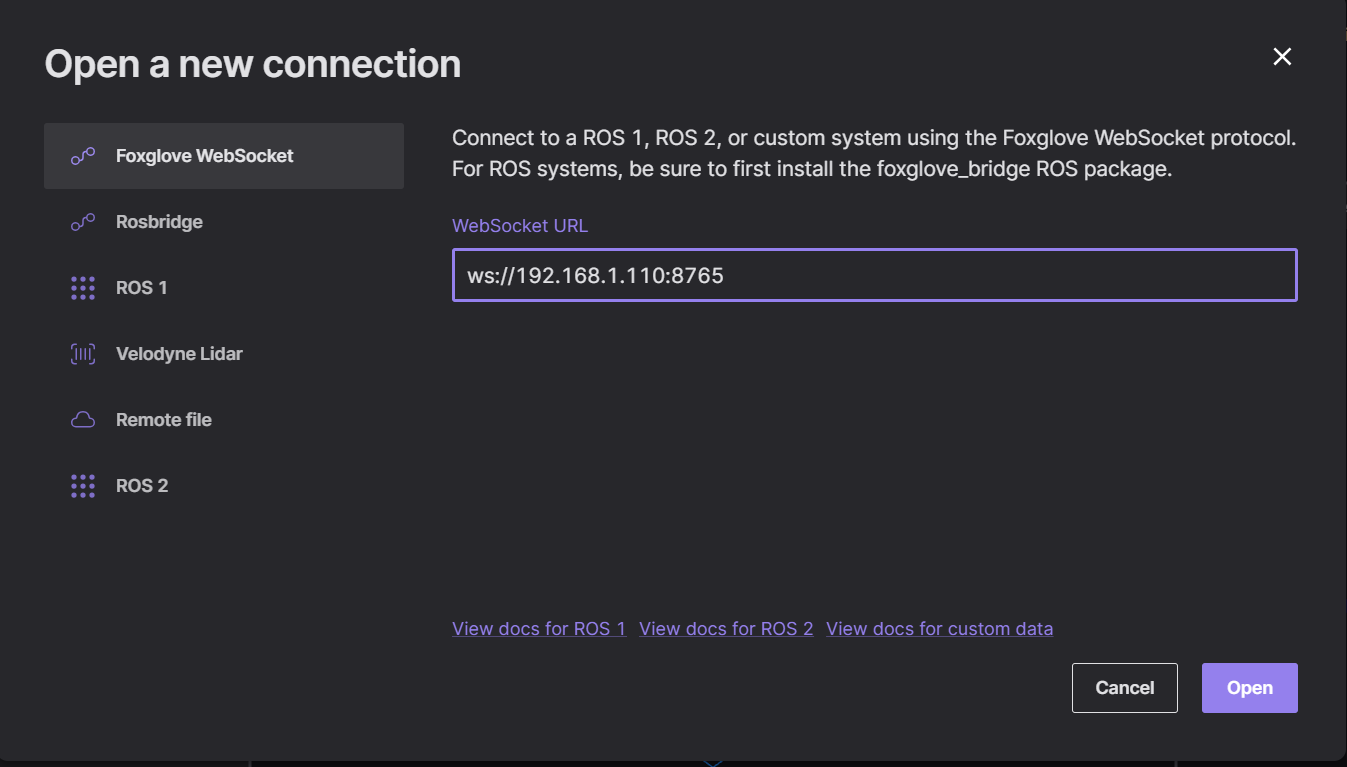
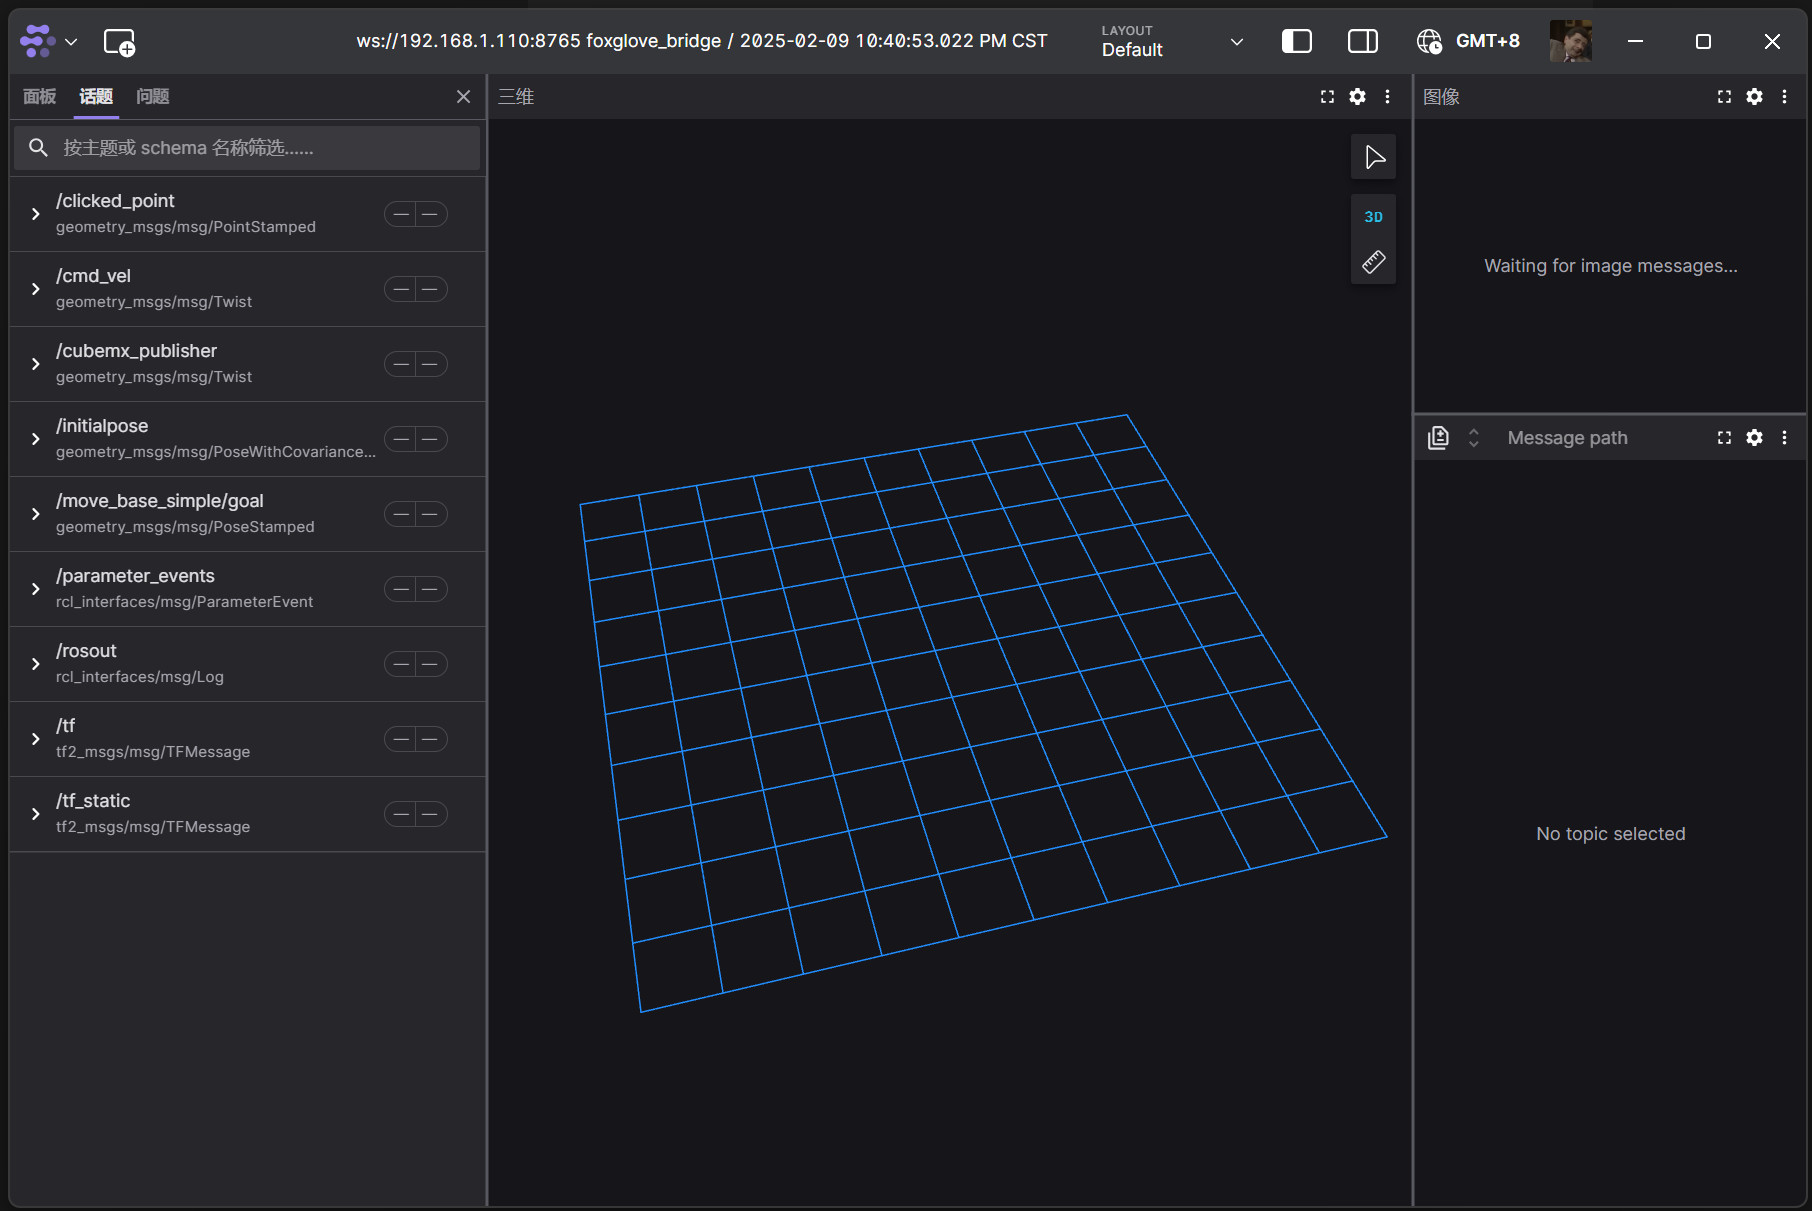
可以看到micro-ROS的话题出现在这里了

智能硬件社区聚焦AI智能硬件技术生态,汇聚嵌入式AI、物联网硬件开发者,打造交流分享平台,同步全国赛事资讯、开展 OPC 核心人才招募,助力技术落地与开发者成长。
更多推荐
 11
11 0
0- 0


 已为社区贡献1条内容

所有评论(0)