【android opencv学习笔记】Day 38: 双视图几何
·
【android opencv学习笔记】Day 1: Switch类
双视图几何
在立体视觉、三维重建和图像拼接中,基础矩阵(Fundamental Matrix)是描述两幅图像之间几何关系的核心工具。
它能将一幅图像上的点映射到另一幅图像上的对极线,极大地缩小了特征匹配的搜索范围。
本文将从基础矩阵原理、OpenCV API解析到Android NDK工程实现,带你完整掌握基础矩阵的计算与应用,并提供可直接发布的博文内容与可运行源码。
基础矩阵核心原理
1. 对极几何基础
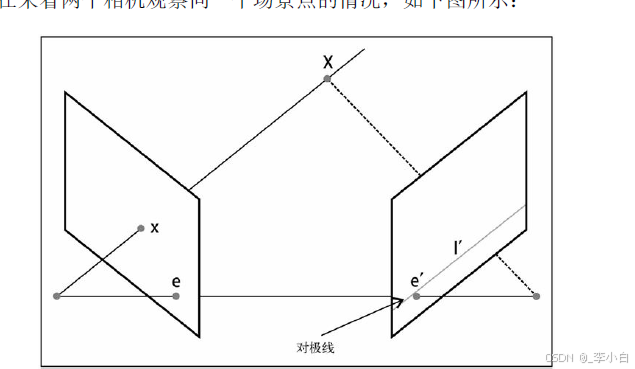
当两个相机从不同视角拍摄同一场景时,三维空间中的一个点 XXX 在两幅图像上分别成像为 xxx 和 x′x'x′。连接两个相机光心的直线称为基线,基线与图像平面的交点称为极点(Epipole)。
- 从左相机光心出发,穿过点 xxx 的射线,在右相机图像上的投影就是对极线(Epipolar Line)。
- 对极约束:点 x′x'x′ 必须位于 xxx 的对极线上。这一约束由基础矩阵 FFF 描述:
p′TFp=0p'^T F p = 0p′TFp=0
其中 ppp 和 p′p'p′ 是两幅图像上的对应点(齐次坐标),FFF 是 3×33 \times 33×3 的基础矩阵。
2. 基础矩阵的几何意义
基础矩阵 FFF 是一个秩为2的矩阵,它将一幅图像上的点 ppp 映射到另一幅图像上的对极线 l′=Fpl' = Fpl′=Fp。所有对极线都通过极点 e′e'e′,即 Fe=0Fe = 0Fe=0。
3. 求解基础矩阵
求解基础矩阵需要至少7对对应点,常用方法包括:
- 7点法(CV_FM_7POINT):使用7对匹配点,求解非线性方程组,最多可能得到3个解;
- 8点法(CV_FM_8POINT):使用8对或更多匹配点,通过线性最小二乘法求解,是最常用的方法。
OpenCV核心API解析
1. cv::findFundamentalMat:计算基础矩阵
Mat findFundamentalMat(
    InputArray points1,          // 第一幅图像的点集(Point2f)
    InputArray points2,          // 第二幅图像的点集(Point2f)
    int method = FM_RANSAC,      // 求解方法(7点/8点/RANSAC等)
    double ransacReprojThreshold = 3.0, // RANSAC重投影误差阈值
    double confidence = 0.99,     // RANSAC置信度
    OutputArray mask = noArray()  // 输出内点掩码
);
method:求解方法,常用FM_8POINT(8点法)和FM_RANSAC(带RANSAC的鲁棒估计);mask:输出内点掩码,标记哪些点是有效的匹配点。
2. cv::computeCorrespondEpilines:计算对极线
void computeCorrespondEpilines(
    InputArray points,           // 图像点集
    int whichImage,              // 1或2,表示点属于哪幅图像
    InputArray F,                // 基础矩阵
    OutputArray lines            // 输出对极线参数(a, b, c,对应ax+by+c=0)
);
whichImage:1表示点属于第一幅图像,计算其在第二幅图像上的对极线;2则相反。
3. cv::drawKeypoints/cv::drawMatches:绘制关键点与匹配
void drawMatches(
    InputArray img1, const vector<KeyPoint>& keypoints1,
    InputArray img2, const vector<KeyPoint>& keypoints2,
    const vector<DMatch>& matches1to2,
    InputOutputArray outImg,
    const Scalar& flags = DrawMatchesFlags::DEFAULT
);
- 用于可视化两幅图像上的匹配点对,直观验证匹配质量。
Android完整工程实现
本工程基于 Android NDK + OpenCV,实现从两张输入图像的特征检测、匹配、基础矩阵计算到对极线绘制的完整流程。
1. 布局文件 activity_main.xml
<?xml version="1.0" encoding="utf-8"?>
<ScrollView xmlns:android="http://schemas.android.com/apk/res/android"
    android:layout_width="match_parent"
    android:layout_height="match_parent"
    android:background="#f5f5f5">

    <LinearLayout
        android:layout_width="match_parent"
        android:layout_height="wrap_content"
        android:orientation="vertical"
        android:padding="10dp">

        <!-- 图像1 -->
        <LinearLayout
            android:layout_width="match_parent"
            android:layout_height="wrap_content"
            android:orientation="vertical"
            android:layout_marginBottom="10dp">
            <TextView
                android:layout_width="wrap_content"
                android:layout_height="wrap_content"
                android:text="图像1"
                android:textSize="16sp"
                android:textStyle="bold"/>
            <ImageView
                android:id="@+id/iv_img1"
                android:layout_width="match_parent"
                android:layout_height="220dp"
                android:scaleType="fitCenter"
                android:background="#ffffff"/>
        </LinearLayout>

        <!-- 图像2 -->
        <LinearLayout
            android:layout_width="match_parent"
            android:layout_height="wrap_content"
            android:orientation="vertical"
            android:layout_marginBottom="10dp">
            <TextView
                android:layout_width="wrap_content"
                android:layout_height="wrap_content"
                android:text="图像2"
                android:textSize="16sp"
                android:textStyle="bold"/>
            <ImageView
                android:id="@+id/iv_img2"
                android:layout_width="match_parent"
                android:layout_height="220dp"
                android:scaleType="fitCenter"
                android:background="#ffffff"/>
        </LinearLayout>

        <!-- 匹配结果 -->
        <LinearLayout
            android:layout_width="match_parent"
            android:layout_height="wrap_content"
            android:orientation="vertical"
            android:layout_marginBottom="10dp">
            <TextView
                android:layout_width="wrap_content"
                android:layout_height="wrap_content"
                android:text="匹配结果"
                android:textSize="16sp"
                android:textStyle="bold"/>
            <ImageView
                android:id="@+id/iv_matches"
                android:layout_width="match_parent"
                android:layout_height="220dp"
                android:scaleType="fitCenter"
                android:background="#ffffff"/>
        </LinearLayout>

        <!-- 对极线结果 -->
        <LinearLayout
            android:layout_width="match_parent"
            android:layout_height="wrap_content"
            android:orientation="vertical">
            <TextView
                android:layout_width="wrap_content"
                android:layout_height="wrap_content"
                android:text="对极线结果"
                android:textSize="16sp"
                android:textStyle="bold"/>
            <ImageView
                android:id="@+id/iv_epilines"
                android:layout_width="match_parent"
                android:layout_height="220dp"
                android:scaleType="fitCenter"
                android:background="#ffffff"/>
        </LinearLayout>

    </LinearLayout>
</ScrollView>
2. 上层 Kotlin 代码 MainActivity.kt
package com.example.fundamentalmatrix

import android.graphics.Bitmap
import android.graphics.BitmapFactory
import android.os.Bundle
import android.widget.ImageView
import androidx.appcompat.app.AppCompatActivity

class MainActivity : AppCompatActivity() {

    companion object {
        init {
            System.loadLibrary("native-lib")
        }
    }

    /**
     * JNI原生方法:计算基础矩阵并绘制匹配与对极线
     * @param img1 输入图像1
     * @param img2 输入图像2
     * @param outMatches 输出匹配结果图像
     * @param outEpilines 输出对极线结果图像
     */
    private external fun processFundamentalMatrix(
        img1: Bitmap,
        img2: Bitmap,
        outMatches: Bitmap,
        outEpilines: Bitmap
    )

    override fun onCreate(savedInstanceState: Bundle?) {
        super.onCreate(savedInstanceState)
        setContentView(R.layout.activity_main)

        // 加载2048×2048测试图像
        val img1 = BitmapFactory.decodeResource(resources, R.drawable.img1)
        val img2 = BitmapFactory.decodeResource(resources, R.drawable.img2)

        // 创建输出位图
        val matchesBitmap = Bitmap.createBitmap(img1.width * 2, img1.height, Bitmap.Config.ARGB_8888)
        val epilinesBitmap = Bitmap.createBitmap(img2.width, img2.height, Bitmap.Config.ARGB_8888)

        // 调用原生算法
        processFundamentalMatrix(img1, img2, matchesBitmap, epilinesBitmap)

        // 展示结果
        findViewById<ImageView>(R.id.iv_img1).setImageBitmap(img1)
        findViewById<ImageView>(R.id.iv_img2).setImageBitmap(img2)
        findViewById<ImageView>(R.id.iv_matches).setImageBitmap(matchesBitmap)
        findViewById<ImageView>(R.id.iv_epilines).setImageBitmap(epilinesBitmap)
    }
}
3. 底层 C++ JNI 代码 native-lib.cpp
#include <jni.h>
#include <opencv2/opencv.hpp>
#include <opencv2/features2d.hpp>
#include <opencv2/xfeatures2d.hpp>
#include <android/bitmap.h>
#include <vector>
#include <algorithm>

using namespace cv;
using namespace std;
using namespace xfeatures2d;

/**
 * Bitmap 转 OpenCV Mat(RGBA -> BGR)
 */
Mat bitmapToMat(JNIEnv *env, jobject bitmap) {
    AndroidBitmapInfo info;
    void* pixels = nullptr;
    AndroidBitmap_getInfo(env, bitmap, &info);
    AndroidBitmap_lockPixels(env, bitmap, &pixels);

    Mat rgba(info.height, info.width, CV_8UC4, pixels);
    Mat bgr;
    cvtColor(rgba, bgr, COLOR_RGBA2BGR);
    AndroidBitmap_unlockPixels(env, bitmap);
    return bgr;
}

/**
 * OpenCV Mat 转 Bitmap(支持灰度图和彩色图)
 */
void matToBitmap(JNIEnv *env, const Mat& srcMat, jobject dstBitmap) {
    AndroidBitmapInfo info;
    void* pixels = nullptr;
    AndroidBitmap_getInfo(env, dstBitmap, &info);
    AndroidBitmap_lockPixels(env, dstBitmap, &pixels);

    Mat rgba;
    if (srcMat.channels() == 1) {
        cvtColor(srcMat, rgba, COLOR_GRAY2RGBA);
    } else {
        cvtColor(srcMat, rgba, COLOR_BGR2RGBA);
    }
    memcpy(pixels, rgba.data, info.width * info.height * 4);
    AndroidBitmap_unlockPixels(env, dstBitmap);
}

/**
 * 绘制对极线
 */
void drawEpilines(Mat& img, const vector<Vec3f>& lines, const vector<Point2f>& points) {
    for (size_t i = 0; i < lines.size(); ++i) {
        const Vec3f& line = lines[i];
        const Point2f& pt = points[i];
        // 绘制对极线 ax + by + c = 0
        line(img, Point(0, -line[2]/line[1]), Point(img.cols, -(line[0]*img.cols + line[2])/line[1]), Scalar(255,255,255), 1);
        // 绘制对应点
        circle(img, pt, 5, Scalar(0,0,255), -1);
    }
}

/**
 * 基础矩阵计算核心流程
 */
void fundamentalMatrixProcess(const Mat& img1, const Mat& img2, Mat& outMatches, Mat& outEpilines) {
    // 1. 转灰度图
    Mat gray1, gray2;
    cvtColor(img1, gray1, COLOR_BGR2GRAY);
    cvtColor(img2, gray2, COLOR_BGR2GRAY);

    // 2. 特征检测与匹配(使用SIFT)
    Ptr<SIFT> sift = SIFT::create(2000);
    vector<KeyPoint> kp1, kp2;
    Mat des1, des2;
    sift->detectAndCompute(gray1, noArray(), kp1, des1);
    sift->detectAndCompute(gray2, noArray(), kp2, des2);

    // 3. 匹配器
    BFMatcher matcher(NORM_L2);
    vector<vector<DMatch>> knnMatches;
    matcher.knnMatch(des1, des2, knnMatches, 2);

    // 4. Lowe's ratio test
    vector<DMatch> goodMatches;
    for (auto& match : knnMatches) {
        if (match[0].distance < 0.75 * match[1].distance) {
            goodMatches.push_back(match[0]);
        }
    }

    // 5. 提取匹配点对
    vector<Point2f> pts1, pts2;
    for (auto& match : goodMatches) {
        pts1.push_back(kp1[match.queryIdx].pt);
        pts2.push_back(kp2[match.trainIdx].pt);
    }

    // 6. 计算基础矩阵(RANSAC鲁棒估计)
    Mat mask;
    Mat fundamentalMat = findFundamentalMat(pts1, pts2, FM_RANSAC, 3.0, 0.99, mask);

    // 筛选内点
    vector<Point2f> inlierPts1, inlierPts2;
    for (size_t i = 0; i < pts1.size(); ++i) {
        if (mask.at<uchar>(i)) {
            inlierPts1.push_back(pts1[i]);
            inlierPts2.push_back(pts2[i]);
        }
    }

    // 7. 绘制匹配结果
    drawMatches(img1, kp1, img2, kp2, goodMatches, outMatches, Scalar::all(-1), Scalar::all(-1), mask);

    // 8. 计算并绘制对极线(取前10个内点示例)
    outEpilines = img2.clone();
    vector<Vec3f> lines;
    if (inlierPts1.size() >= 10) {
        vector<Point2f> samplePts(inlierPts1.begin(), inlierPts1.begin() + 10);
        computeCorrespondEpilines(samplePts, 1, fundamentalMat, lines);
        drawEpilines(outEpilines, lines, vector<Point2f>(inlierPts2.begin(), inlierPts2.begin() + 10));
    }
}

/**
 * JNI入口函数
 */
extern "C" JNIEXPORT void JNICALL
Java_com_example_fundamentalmatrix_MainActivity_processFundamentalMatrix(
        JNIEnv *env, jobject thiz,
        jobject img1,
        jobject img2,
        jobject outMatches,
        jobject outEpilines)
{
    // Bitmap 转 Mat
    Mat matImg1 = bitmapToMat(env, img1);
    Mat matImg2 = bitmapToMat(env, img2);
    Mat matMatches, matEpilines;

    // 执行基础矩阵计算流程
    fundamentalMatrixProcess(matImg1, matImg2, matMatches, matEpilines);

    // 结果回传给上层Bitmap
    matToBitmap(env, matMatches, outMatches);
    matToBitmap(env, matEpilines, outEpilines);
}
基础矩阵的进阶应用
1. 立体校正
利用基础矩阵可对图像进行立体校正,使两幅图像的对极线水平对齐,大幅提升后续立体匹配的效率和精度。
2. 三维重建
结合相机内参矩阵,可从基础矩阵推导出本质矩阵(Essential Matrix),进而恢复相机的相对位姿,实现三维场景重建。
3. 图像拼接
基础矩阵是图像拼接的基础,通过对极约束优化匹配结果,提升拼接的稳定性和准确性。
总结
- 核心原理:基础矩阵描述了两幅图像之间的对极几何关系,核心约束为 p′TFp=0p'^T F p = 0p′TFp=0;
- 关键流程:特征检测与匹配 → 基础矩阵计算 → 对极线验证;
- 工程价值:源码基于Android NDK + OpenCV实现,可直接用于立体视觉、三维重建、图像拼接等项目;
- 精度保障:使用RANSAC鲁棒估计法,自动剔除外点,确保基础矩阵计算的稳定性。


智能硬件社区聚焦AI智能硬件技术生态,汇聚嵌入式AI、物联网硬件开发者,打造交流分享平台,同步全国赛事资讯、开展 OPC 核心人才招募,助力技术落地与开发者成长。
更多推荐

 3
3 0
0- 0


 已为社区贡献2条内容

所有评论(0)