Windows 下配置 ESP32-P4-Eval-Board 1.6 的 NuttX 编译环境
本文记录在 Windows 环境中为 ESP32-P4-Function-Ev-Board 1.6 配置 Apache NuttX 开发环境,并完成 esp32p4-function-ev-board:nsh 编译验证的完整过程。
本次环境尽量复用机器上已有的 ESP32 / ESP-IDF 工具链,只补齐 NuttX 编译过程中缺失的部分。
0 开箱检查
ESP32-P4-Function-Ev-Board 1.6 包括一个开发板、摄像头和7寸触摸屏,组装之后,可以运行出厂程序,确认开发板套件一切正常。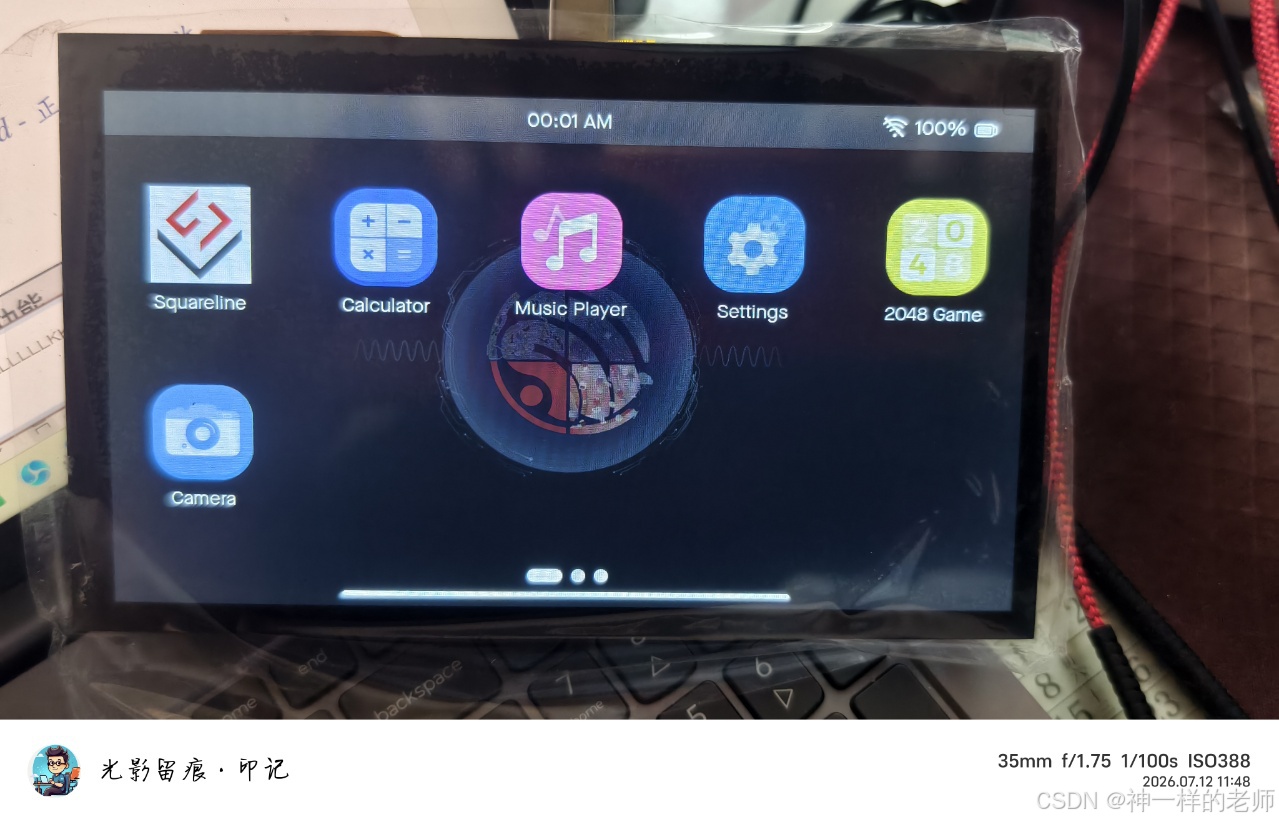
1. 环境概况
本次工作目录:
D:\esp32p4-nuttx
已存在可复用工具:
ESP-IDF:        D:\esp\master\esp-idf
CMake:          C:\Espressif\tools\cmake\4.0.3\bin\cmake.exe
Ninja:          C:\Espressif\tools\ninja\1.12.1\ninja.exe
Python venv:    C:\Espressif\tools\python\master\venv
RISC-V GCC:     C:\Espressif\tools\riscv32-esp-elf\esp-15.2.0_20251204\riscv32-esp-elf
esptool:        C:\Espressif\tools\python\master\venv\Scripts\esptool.exe
Git Bash:       C:\Program Files\Git\bin\bash.exe
本次验证使用的版本:
riscv32-esp-elf-gcc 15.2.0
cmake 4.0.3
ninja 1.12.1
esptool 5.3.0
2. 获取 NuttX 和 apps 源码
在工作目录中克隆 NuttX 主仓库和 apps 仓库:
cd D:\esp32p4-nuttx

git clone --depth 1 https://github.com/apache/nuttx.git nuttx
git clone --depth 1 https://github.com/apache/nuttx-apps.git apps
本次验证时的提交:
nuttx: bdd68ed1
apps:  1d15c81
ESP32-P4 相关板级目录位于:
nuttx\boards\risc-v\esp32p4
其中 ESP32-P4-Eval-Board 对应的配置为:
esp32p4-function-ev-board:nsh
3. 准备 MinGW / make
NuttX 的部分工具链流程依赖类 Unix 工具。Windows 下可以使用 MinGW64。
如果系统中没有可用的 MinGW64,可以从https://github.com/niXman/mingw-builds-binaries/releases下载,解压本地安装包:
C:\Users\haili\Downloads\x86_64-16.1.0-release-win32-seh-msvcrt-rt_v14-rev1.7z
本次解压到:
D:\esp32p4-nuttx\mingw64
如果只使用 CMake + Ninja 构建,最终主要依赖的是:
mingw64\bin
Git\usr\bin
Git\bin
4. 创建 Python 虚拟环境
NuttX 的 Kconfig 解析需要 kconfiglib。ESP-IDF 自带的 Python 环境中可能是 Espressif 定制版本,解析 NuttX Kconfig 时可能报错,因此建议单独创建 NuttX 专用 venv:
cd D:\esp32p4-nuttx

python -m venv .venv
.\.venv\Scripts\python.exe -m pip install kconfiglib==14.1.0
如果当前网络代理影响 pip,可以临时清理代理环境变量:
$env:HTTP_PROXY=''
$env:HTTPS_PROXY=''
$env:ALL_PROXY=''
5. 处理 RISC-V 工具链名称
NuttX CMake 的 RISC-V 工具链逻辑会查找:
riscv64-unknown-elf-gcc
但 ESP32-P4 实际可使用 Espressif 提供的:
riscv32-esp-elf-gcc
ESP32-P4 使用 rv32imac_zicsr_zifencei 和 ilp32 目标参数,因此可以复用 riscv32-esp-elf 工具链。
本次做法是在工作区创建本地工具目录:
D:\esp32p4-nuttx\tools\bin
然后把 Espressif 工具链中的可执行文件复制并重命名为 NuttX CMake 期望的前缀,例如:
riscv32-esp-elf-gcc.exe      -> riscv64-unknown-elf-gcc.exe
riscv32-esp-elf-g++.exe      -> riscv64-unknown-elf-g++.exe
riscv32-esp-elf-ld.exe       -> riscv64-unknown-elf-ld.exe
riscv32-esp-elf-ar.exe       -> riscv64-unknown-elf-ar.exe
riscv32-esp-elf-objcopy.exe  -> riscv64-unknown-elf-objcopy.exe
riscv32-esp-elf-objdump.exe  -> riscv64-unknown-elf-objdump.exe
同时需要设置:
$env:GCC_EXEC_PREFIX='C:\Espressif\tools\riscv32-esp-elf\esp-15.2.0_20251204\riscv32-esp-elf\libexec\gcc\'
否则重命名后的 GCC 可能找不到内部的 cc1。
6. 设置编译环境变量
推荐准备一个环境脚本 env-esp32p4-nuttx.ps1:
$Root = $PSScriptRoot

$toolPaths = @(
  (Join-Path $Root ".venv\Scripts"),
  "C:\Espressif\tools\python\master\venv\Scripts",
  (Join-Path $Root "tools\bin"),
  (Join-Path $Root "mingw64\bin"),
  "C:\Espressif\tools\riscv32-esp-elf\esp-15.2.0_20251204\riscv32-esp-elf\bin",
  "C:\Espressif\tools\cmake\4.0.3\bin",
  "C:\Espressif\tools\ninja\1.12.1",
  "C:\Program Files\Git\usr\bin",
  "C:\Program Files\Git\bin"
)

$existingToolPaths = $toolPaths | Where-Object { Test-Path $_ }
$env:Path = ($existingToolPaths -join ";") + ";" + $env:Path
$env:GCC_EXEC_PREFIX = "C:\Espressif\tools\riscv32-esp-elf\esp-15.2.0_20251204\riscv32-esp-elf\libexec\gcc\"

Write-Host "ESP32-P4 NuttX environment ready at $Root"
加载环境:
cd D:\esp32p4-nuttx
. .\env-esp32p4-nuttx.ps1
检查工具:
riscv64-unknown-elf-gcc --version
cmake --version
ninja --version
esptool version
7. 使用 CMake 配置 NuttX
推荐使用 CMake + Ninja,而不是 Windows 下直接走传统 Makefile 流程。
配置命令如下:
cmake `
  -S D:\esp32p4-nuttx\nuttx `
  -B D:\esp32p4-nuttx\build `
  -G Ninja `
  -DCMAKE_MAKE_PROGRAM="C:\Espressif\tools\ninja\1.12.1\ninja.exe" `
  -DBOARD_CONFIG="esp32p4-function-ev-board:nsh" `
  -DNUTTX_APPS_DIR="D:\esp32p4-nuttx\apps" `
  -DPython3_EXECUTABLE="D:\esp32p4-nuttx\.venv\Scripts\python.exe" `
  -DEXTRA_FLAGS="-std=gnu11"
其中:
BOARD_CONFIG=esp32p4-function-ev-board:nsh
表示为 ESP32-P4 Function EV Board 启用 NSH 示例配置。
-DEXTRA_FLAGS="-std=gnu11" 用于避免部分 ESP HAL / newlib 头文件在更新 C 标准下的兼容问题。
8. 处理 ESP HAL stdatomic.h 兼容问题
本次编译过程中遇到 ESP HAL 代码和当前工具链 <stdatomic.h> 宏定义不兼容的问题,例如:
request for member '__val' in something not a structure or union
以及:
field name not in record or union initializer
原因是 ESP HAL 部分代码使用 atomic_init、ATOMIC_VAR_INIT 等宏,但当前工具链的实现会把 _Atomic 标量按结构字段形式处理,导致编译失败。
解决方法是在 ESP HAL 的 platform_include 下放置一个兼容包装头:
build\arch\risc-v\src\common\espressif\esp-hal-3rdparty\nuttx\src\components\esp_libc\platform_include\stdatomic.h
核心内容如下:
#pragma once
#include_next <stdatomic.h>

#ifdef ATOMIC_VAR_INIT
# undef ATOMIC_VAR_INIT
#endif
#define ATOMIC_VAR_INIT(val) (val)

#ifdef atomic_init
# undef atomic_init
#endif
#define atomic_init(ptr, val) __atomic_store_n((ptr), (val), __ATOMIC_RELAXED)

#ifdef atomic_store
# undef atomic_store
#endif
#define atomic_store(ptr, val) __atomic_store_n((ptr), (val), __ATOMIC_SEQ_CST)

#ifdef atomic_load
# undef atomic_load
#endif
#define atomic_load(ptr) __atomic_load_n((ptr), __ATOMIC_SEQ_CST)

#ifdef atomic_compare_exchange_strong
# undef atomic_compare_exchange_strong
#endif
#define atomic_compare_exchange_strong(ptr, expected, desired) \
  __atomic_compare_exchange_n((ptr), (expected), (desired), false, __ATOMIC_SEQ_CST, __ATOMIC_SEQ_CST)

#ifdef atomic_compare_exchange_weak
# undef atomic_compare_exchange_weak
#endif
#define atomic_compare_exchange_weak(ptr, expected, desired) \
  __atomic_compare_exchange_n((ptr), (expected), (desired), true, __ATOMIC_SEQ_CST, __ATOMIC_SEQ_CST)

#ifdef atomic_fetch_or
# undef atomic_fetch_or
#endif
#define atomic_fetch_or(ptr, val) __atomic_fetch_or((ptr), (val), __ATOMIC_SEQ_CST)

#ifdef atomic_fetch_and
# undef atomic_fetch_and
#endif
#define atomic_fetch_and(ptr, val) __atomic_fetch_and((ptr), (val), __ATOMIC_SEQ_CST)

#ifdef atomic_fetch_add
# undef atomic_fetch_add
#endif
#define atomic_fetch_add(ptr, val) __atomic_fetch_add((ptr), (val), __ATOMIC_SEQ_CST)

#ifdef atomic_fetch_sub
# undef atomic_fetch_sub
#endif
#define atomic_fetch_sub(ptr, val) __atomic_fetch_sub((ptr), (val), __ATOMIC_SEQ_CST)
如果另一个目录也存在 ESP libc 的 platform_include,也可以同步放置:
build\arch\risc-v\src\common\espressif\esp-hal-3rdparty\components\esp_libc\platform_include\stdatomic.h
9. 处理 libgcc.a 依赖
由于工具链可执行文件被重命名,CMake / Ninja 可能把 libgcc.a 解析成当前构建目录下的相对依赖。
可以直接复制一份:
Copy-Item `
  -LiteralPath "C:\Espressif\tools\riscv32-esp-elf\esp-15.2.0_20251204\riscv32-esp-elf\lib\gcc\riscv32-esp-elf\15.2.0\libgcc.a" `
  -Destination "D:\esp32p4-nuttx\build\libgcc.a"
10. 编译
执行:
cmake --build D:\esp32p4-nuttx\build --parallel 4
如果 PATH 中没有 esptool,最后的 elf2image 会失败:
esptool.py elf2image failed
需要确保以下路径在 PATH 中:
C:\Espressif\tools\python\master\venv\Scripts
成功时会看到类似输出:
-- Generate NuttX image (esptool elf2image)
esptool v5.3.0
Creating ESP32-P4 image...
Image has only RAM segments visible. ROM segments are hidden and SHA256 digest is not appended.
Merged 2 ELF sections.
Successfully created ESP32-P4 image.
-- Generated: nuttx.bin
11. 编译产物
本次编译完成后,主要产物位于:
D:\esp32p4-nuttx\build
产物如下:
nuttx           600788 bytes
nuttx.bin       264856 bytes
nuttx.hex       632951 bytes
nuttx.map      1454116 bytes
nuttx.manifest      22 bytes
其中:
nuttx      ELF 文件
nuttx.bin  ESP32-P4 可用镜像
nuttx.hex  Intel HEX 格式产物
nuttx.map  链接 map 文件
12. 烧录和串口验证
12.1 烧录地址
本次配置使用的是 ESP32-P4 simple boot:
CONFIG_ESPRESSIF_SIMPLE_BOOT=y
NuttX 脚本中 ESP32-P4 simple boot 的应用偏移为:
0x2000
因此烧录时需要把 nuttx.bin 写到 0x2000。
12.2 烧录 nsh 配置
默认 esp32p4-function-ev-board:nsh 构建产物位于:
D:\esp32p4-nuttx\build\nuttx.bin
以开发板枚举出的串口 COM4 为例,烧录命令如下:
esptool --chip esp32p4 -p COM4 -b 460800 write-flash -fs 4MB -fm dio -ff 80m 0x2000 .\build\nuttx.bin
本次实际烧录日志显示:
Connected to ESP32-P4 on COM4
Wrote 264856 bytes (133649 compressed) at 0x00002000
Hash of data verified.
Hard resetting via RTS pin...
这说明镜像已经正确写入 Flash。
12.3 nsh 配置的控制台位置
需要注意,默认 nsh 配置的控制台不是 USB-Serial/JTAG 对应的 COM4,而是 UART0:
CONFIG_UART0_SERIAL_CONSOLE=y
CONFIG_UART0_TXPIN=37
CONFIG_UART0_RXPIN=38
CONFIG_UART0_BAUD=115200
# CONFIG_ESPRESSIF_USBSERIAL is not set
因此,烧录默认 nsh 镜像后,如果直接打开 COM4 看不到输出,这是正常现象。需要使用 USB-TTL 转串口连接 UART0:
USB-TTL RX -> ESP32-P4 GPIO37 / UART0 TX
USB-TTL TX -> ESP32-P4 GPIO38 / UART0 RX
USB-TTL GND -> ESP32-P4 GND
串口参数:
115200 8N1
12.4 编译 USB 控制台版本
如果希望直接通过烧录用的 USB 口查看 NSH,可以改用板级配置:
esp32p4-function-ev-board:usbconsole
推荐单独使用一个构建目录:
cmake -S D:\esp32p4-nuttx\nuttx -B D:\esp32p4-nuttx\build-usbconsole -G Ninja -DCMAKE_MAKE_PROGRAM="C:\Espressif\tools\ninja\1.12.1\ninja.exe" -DBOARD_CONFIG="esp32p4-function-ev-board:usbconsole" -DNUTTX_APPS_DIR="D:\esp32p4-nuttx\apps" -DPython3_EXECUTABLE="D:\esp32p4-nuttx\.venv\Scripts\python.exe" -DEXTRA_FLAGS="-std=gnu11"
注意:PowerShell 中不要把路径字符串断行到中间,否则 CMake 会把换行当成路径的一部分,出现类似下面的错误:
Application directory D:

  \esp32p4-nuttx\apps is not found
正确做法是整行复制命令,或者只在参数之间换行。
编译:
cmake --build D:\esp32p4-nuttx\build-usbconsole --parallel 4
本次 usbconsole 构建生成的主要产物为:
nuttx           442848 bytes
nuttx.bin       225292 bytes
nuttx.hex       430188 bytes
nuttx.map      1227351 bytes
其配置中启用了 USB 串口控制台:
CONFIG_ESPRESSIF_USBSERIAL=y
CONFIG_SERIAL_CONSOLE=y
CONFIG_OTHER_SERIAL_CONSOLE=y
CONFIG_NSH_CONSOLE=y
12.5 烧录 usbconsole 配置
烧录 usbconsole 版本:
esptool --chip esp32p4 -p COM4 -b 460800 write-flash -fs 4MB -fm dio -ff 80m 0x2000 .\build-usbconsole\nuttx.bin
烧录完成后打开串口:
python -m serial.tools.miniterm COM4 115200
如果没有立刻看到输出,可以按一下开发板 RESET,或者在终端中敲几次回车。正常情况下会看到:
NuttShell (NSH)
nsh>
可以执行:
nsh> help
nsh> hello
nsh> ps
本次 usbconsole 镜像的 Builtin Apps 包含:
dd
dumpstack
nsh
sh
hello
其中 hello 是示例程序,用于验证 NuttX 应用框架和 builtin app 机制是否正常。
13. 一键构建脚本
为了后续复用,可以准备一个 build-esp32p4-nuttx.ps1,完成环境加载、首次 CMake 配置、兼容头写入、libgcc.a 复制和构建:
powershell -ExecutionPolicy Bypass -File .\build-esp32p4-nuttx.ps1
脚本核心流程:
1. 加载 env-esp32p4-nuttx.ps1
2. 如果 build.ninja 不存在,则执行 CMake 配置
3. 写入 ESP HAL stdatomic.h 兼容头
4. 复制 libgcc.a 到 build 目录
5. 执行 cmake --build build --parallel 4
6. 整理 nuttx.manifest
14. 常见问题
14.1 kconfiglib 解析失败
如果使用 ESP-IDF 自带 Python 环境,可能遇到 NuttX Kconfig 解析失败。建议单独创建 .venv 并安装官方 kconfiglib。
python -m venv .venv
.\.venv\Scripts\python.exe -m pip install kconfiglib==14.1.0
14.2 CMake 找不到 RISC-V 编译器
确认 tools\bin 中存在 NuttX 期望的工具名前缀:
riscv64-unknown-elf-gcc.exe
riscv64-unknown-elf-objcopy.exe
同时确认:
$env:GCC_EXEC_PREFIX
已经指向 Espressif RISC-V GCC 的 libexec\gcc\ 目录。
14.3 esptool.py elf2image failed
先检查 esptool 是否在 PATH 中:
where.exe esptool
esptool version
如果找不到,把下面路径加入 PATH:
C:\Espressif\tools\python\master\venv\Scripts
14.4 atomic_init / ATOMIC_VAR_INIT 编译失败
这是 ESP HAL 与当前 RISC-V newlib / GCC 头文件组合下的兼容问题。可通过本文第 8 节中的 stdatomic.h 包装头解决。
15. 总结
Windows 下编译 ESP32-P4 的 NuttX 并不需要完全重新安装 ESP-IDF 工具链。关键点是:
1. 使用 NuttX + apps 双仓库
2. 使用 esp32p4-function-ev-board:nsh 或 usbconsole 配置
3. 使用 CMake + Ninja
4. 单独准备 NuttX Python venv 和 kconfiglib
5. 复用 Espressif riscv32-esp-elf 工具链
6. 处理工具链前缀、GCC_EXEC_PREFIX、libgcc.a
7. 确保 esptool 在 PATH 中,并按 simple boot 地址 0x2000 烧录
8. 修正 ESP HAL stdatomic.h 兼容问题
完成以上配置后,Windows 下可以稳定生成:
nuttx
nuttx.hex
nuttx.bin
nuttx.map
其中 nuttx.bin 即为后续烧录 ESP32-P4-Eval-Board 的主要镜像文件。

智能硬件社区聚焦AI智能硬件技术生态,汇聚嵌入式AI、物联网硬件开发者,打造交流分享平台,同步全国赛事资讯、开展 OPC 核心人才招募,助力技术落地与开发者成长。
更多推荐
 7
7 0
0- 0



 已为社区贡献12条内容

所有评论(0)