PP-OCRv5 ONNX部署以及手搓方案
1、为啥要ONNX格式部署
把话题拉回到机器视觉领域,据我所知,主流浪潮是使用C#做应用开发语言。ONNX格式自然也就十分的受欢迎。大家不用安装庞大的paddlepaddle框架,也不需要用python写个识别算法。一切都用onnxruntime库搞定,省心省事省力!十分妙哉。
此外还有一些好处,比如配合INT8等量化技术,ONNX模型体积缩小,推理速度提升,而在精度损失极小;如果对跨平台有要求,ONNX也丝毫不逊色,各大操作系统它都支持,硬件上也会有惊喜:在Intel CPU上用OpenVINO加速,在NVIDIA GPU上用TensorRT加速,在高通或瑞芯微的NPU上也能高效运行。
2、来自RapidOCR的快速部署
RapidOCR就是为了解决PaddleOCR的部署困境。它整体框架如下:
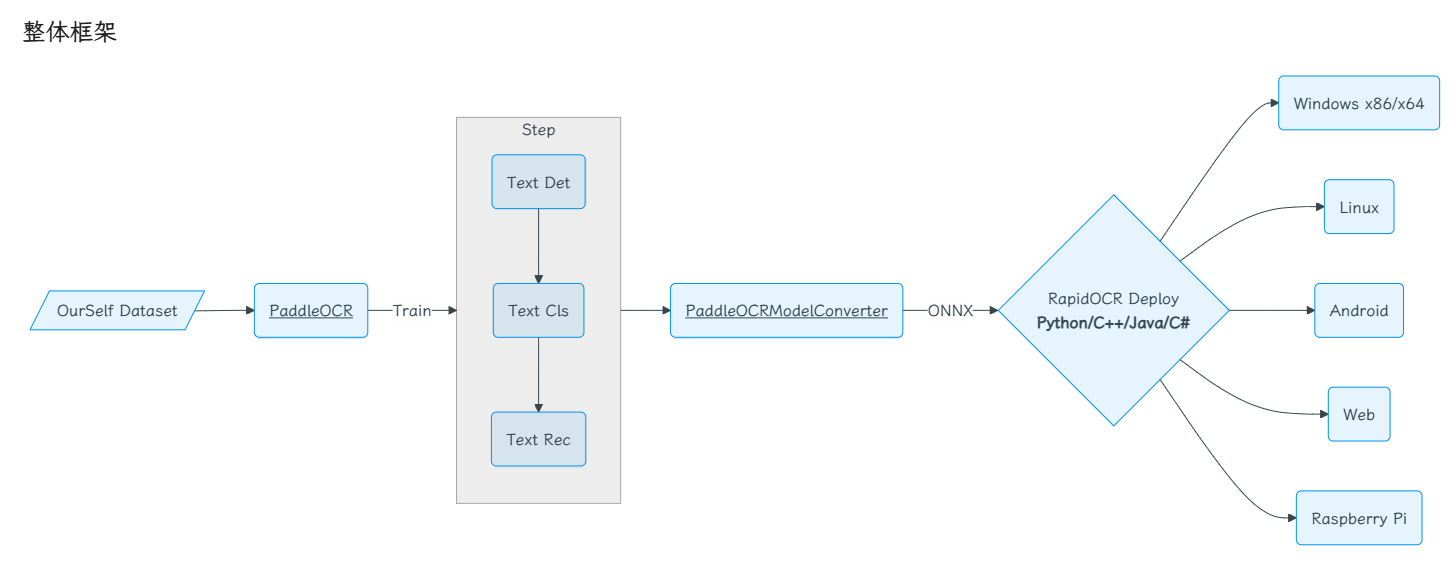
使用它,配合onnxruntime库,很少的代码就可以完成识别的工作。下面是一个简单的例子:
from rapidocr_onnxruntime import RapidOCR
from pathlib import Path

det_model = Path("models/PP-OCRv5_server_det_onnx.onnx")
rec_model = Path("models/PP-OCRv5_server_rec_onnx.onnx")
cls_model = Path("models/PP-OCRv5_server_cls_onnx.onnx")
dict_file = Path("models/ppocrv5_dict.txt")

engine = RapidOCR(
    Det_model_path=str(det_model),
    Rec_model_path=str(rec_model),
    Rec_char_dict_path=str(dict_file),
    Rec_rec_img_shape=[3, 48, 320],
    Cls_model_path=str(cls_model) if cls_model.exists() else None
)

img_path = "../pic002.png"
result, elapse = engine(img_path)

if result:
    det_time, cls_time, rec_time = elapse
    total_time = sum(elapse)
    print(f"检测耗时: {det_time:.2f}ms")
    print(f"分类耗时: {cls_time:.2f}ms")
    print(f"识别耗时: {rec_time:.2f}ms")
    print(f"总耗时: {total_time:.2f}ms")
    for line in result:
        box = line[0]
        text = line[1]
        score = float(line[2])
        print(f"文字: {text}, 置信度: {score:.4f}")
else:
    print("未识别到文字")
在GPU的加持下,识别效果如下:
检测耗时: 0.41ms
分类耗时: 0.08ms
识别耗时: 0.57ms
总耗时: 1.06ms
文字: 五、中文识别, 置信度: 0.8509
文字: 六、高级应用场景, 置信度: 0.8788
文字: 5.1, 置信度: 0.6642
文字: 结构化数据提取, 置信度: 0.7905
可以看到,检测和识别耗时还是非常多的。原生的Paddle框架在GPU条件下,整体识别是在100毫秒内的。同时,它的置信度也不高。这都是推动我去手搓一个ONNX部署方案的原因。
3、手搓一个ONNX部署方案
手搓一个方案,它有几个好处:一是它会强迫让我们理解原理,出了问题能定位到根本原因;二是生产环境往往需要特定的前后处理逻辑,我们在很多场景下要做到按需定制;三是通过手搓,可以去掉不需要的功能,还可以做一些性能优化。
3.1 整体模块设计
之前在讲解OCR系统时提到过,所有OCR系统都可以划分为三个核心模块:文本检测、方向分类和文本识别。如下示意图所示。
                    ┌─────────────────┐
                    │   图片输入       │
                    └────────┬────────┘
                             ↓
                    ┌─────────────────┐
                    │  文本检测器      │ ← 找到文字在哪里
                    │  (TextDetector)  │
                    └────────┬────────┘
                             ↓
                    ┌─────────────────┐
                    │  方向分类器      │ ← 判断文字是否颠倒
                    │ (TextClassifier) │
                    └────────┬────────┘
                             ↓
                    ┌─────────────────┐
                    │  文本识别器      │ ← 把图片变成文字
                    │ (TextRecognizer) │
                    └────────┬────────┘
                             ↓
                    ┌─────────────────┐
                    │  结构化输出      │
                    │  [{box, text, score}] │
                    └─────────────────┘
代码结构大致如下:
class InferenceSessionManager:
    """统一管理ONNX Runtime会话"""

class TextDetector:
    """文本检测器"""

class TextClassifier:
    """方向分类器"""

class TextRecognizer:
    """文本识别器"""

class OCR:
    """OCR主入口"""
3.2 文本检测器
检测器的职责是输入一张图片,输出多个文本框的坐标。PP-OCR的检测模型基于DB(Differentiable Binarization)算法:输出不是直接的文本框,而是一个概率图(每个像素是文字的概率),需要通过后处理把概率图转换成文本框。
3.2.1 预处理设计
预处理的目标是把任意尺寸、任意格式的输入图像,转换成一个符合模型输入要求的标准化张量。
通常会经过图像尺寸处理、颜色空间转换、归一化和标准化等几个步骤。
class TextDetector:
    def __init__(self, model_path, use_gpu=True):
        self.session = InferenceSessionManager.create_session(model_path, use_gpu=use_gpu)
        self.input_name = self.session.get_inputs()[0].name
        self.output_names = [o.name for o in self.session.get_outputs()]

    def resize_image(self, img, max_side_len=960):
        """保持宽高比,限制最大边长,并对齐到32的倍数"""
        h, w = img.shape[:2]
        resize_w = w
        resize_h = h

        # 限制最大边长(控制推理时间)
        if max(resize_h, resize_w) > max_side_len:
            ratio = float(max_side_len) / max(resize_h, resize_w)
            resize_h = int(resize_h * ratio)
            resize_w = int(resize_w * ratio)

        # 对齐到32的倍数(模型有5次下采样,2^5=32)
        resize_h = resize_h if resize_h % 32 == 0 else (resize_h // 32 + 1) * 32
        resize_w = resize_w if resize_w % 32 == 0 else (resize_w // 32 + 1) * 32

        img = cv2.resize(img, (resize_w, resize_h))
        return img, (resize_h / h, resize_w / w)

    def preprocess(self, img):
        """图像预处理:转RGB、归一化、标准化"""
        img = cv2.cvtColor(img, cv2.COLOR_BGR2RGB)
        img, ratio = self.resize_image(img)

        # 归一化到[0,1]
        img = img.astype(np.float32) / 255.0

        # 标准化(ImageNet的均值和标准差)
        mean = np.array([0.485, 0.456, 0.406], dtype=np.float32)
        std = np.array([0.229, 0.224, 0.225], dtype=np.float32)
        img = (img - mean) / std

        # 转换维度:HWC -> CHW,并添加batch维度
        img = np.transpose(img, (2, 0, 1))
        img = np.expand_dims(img, axis=0)

        return img, ratio
3.2.2 后处理设计
后处理的核心任务是把模型的概率图输出(每个像素属于文本区域的概率)转换成真实的文本框坐标,并还原到原始图像尺寸。
设计思路可以看这个流程图:
模型输出 (1, H, W)
    ↓
【标准化】去除多余维度 → (H, W)
    ↓
【二值化】preds > 0.3 → mask (0/1掩码)
    ↓
【连通域标记】ndimage.label → 带标签的掩码
    ↓
【遍历每个区域】
    ├─ 获取像素坐标
    ├─ 过滤小区域(<10像素)
    ├─ 计算轴对齐矩形框
    ├─ 过滤小面积(<100像素)
    ├─ 精确扩张(unclip)
    └─ 存储有效框
    ↓
【排序】按y坐标为主,x坐标为辅
    ↓
【坐标还原】除以缩放比例 → 原图坐标
    ↓
输出文本框列表
代码实现:
def postprocess_optimized(self, pred, ratio_w, ratio_h, thresh=0.3, unclip_ratio=1.6):
    preds = pred[0]

    # 处理不同维度的输出
    if len(preds.shape) == 4:
        preds = preds[0]
    if len(preds.shape) == 3:
        preds = preds.squeeze(0)

    # 二值化
    mask = (preds > thresh).astype(np.uint8)

    # 使用连通域分析(C实现,非常快)
    labeled_mask, num_features = ndimage.label(mask)

    boxes = []

    for i in range(1, num_features + 1):
        ys, xs = np.where(labeled_mask == i)

        # 过滤太小的区域(可能是噪声)
        if len(ys) < 10:
            continue

        # 快速计算最小外接矩形
        x_min, x_max = xs.min(), xs.max()
        y_min, y_max = ys.min(), ys.max()

        # 用轴对齐矩形(比minAreaRect快很多)
        # 如需精确旋转框,可以调用cv2.minAreaRect
        box = np.array([
            [x_min, y_min],
            [x_max, y_min],
            [x_max, y_max],
            [x_min, y_max]
        ], dtype=np.float32)

        # 检查面积
        area = (x_max - x_min) * (y_max - y_min)
        if area < 100:
            continue

        # 精确unclip(基于周长扩张)
        box_unclip = self.unclip_accurate(box, unclip_ratio)

        # 再次检查面积
        unclip_area = cv2.contourArea(box_unclip)
        if unclip_area < 100:
            continue

        boxes.append(box_unclip)

    # 按y坐标排序(从上到下)
    if boxes:
        boxes = self.sorted_boxes(boxes)

    # 还原到原始图像尺寸
    boxes = [[(int(p[0] / ratio_w), int(p[1] / ratio_h)) for p in box] for box in boxes]
    return boxes

def unclip_accurate(self, box, unclip_ratio):
    """
    精确的unclip实现,基于面积-周长比

    原理:DB算法的输出是收缩后的文本框,需要向外扩张恢复原始大小
    扩张距离 = unclip_ratio * 面积 / 周长
    """
    area = cv2.contourArea(box)
    perimeter = cv2.arcLength(box, True)

    if perimeter == 0 or area < 1:
        return box

    d = unclip_ratio * area / perimeter

    # 向中心方向扩张
    center = np.mean(box, axis=0)
    direction = box - center
    norm = np.linalg.norm(direction, axis=1, keepdims=True)
    norm[norm == 0] = 1
    direction = direction / norm

    new_box = box + direction * d
    return new_box.astype(np.float32)

def sorted_boxes(self, boxes):
    """按y坐标排序,y相近时按x排序"""
    if len(boxes) == 0:
        return boxes
    boxes = sorted(boxes, key=lambda x: (x[0][1], x[0][0]))
    return boxes
3.3 方向分类器
识别时对文字的方向是很敏感的,不是正向的文字,识别率非常低。所以才有了方向分类器。
我们的方向分类器的功能包括:判断每个文本框的文字是正常方向还是颠倒的;将颠倒的文本框旋转180度,使其变为正常方向,为后续的文字识别模块提供正向输入。
有方向分类器参与的流程:
原始图片
    ↓
【检测模型】→ 文本区域坐标
    ↓
【裁剪】根据坐标裁剪出文本框
    ↓
【方向分类器】← 这里!
    ├─ 正常 → 直接送入识别
    └─ 颠倒 → 旋转180度后送入识别
    ↓
【识别模型】识别文字内容
    ↓
输出识别结果
代码实现:
class TextClassifier:
    def __init__(self, model_path, use_gpu=True):
        self.session = InferenceSessionManager.create_session(
            model_path,
            use_gpu=use_gpu,
            gpu_mem_limit=1 * 1024 * 1024 * 1024  # 分类器只需1GB
        )
        self.input_name = self.session.get_inputs()[0].name
        self.output_names = [o.name for o in self.session.get_outputs()]

    def preprocess(self, img):
        """固定尺寸160x80,分类任务不需要高分辨率"""
        img = cv2.resize(img, (160, 80))
        img = cv2.cvtColor(img, cv2.COLOR_BGR2RGB)
        img = img.astype(np.float32) / 255.0

        # 使用ImageNet标准化参数
        mean = np.array([0.485, 0.456, 0.406], dtype=np.float32)
        std = np.array([0.229, 0.224, 0.225], dtype=np.float32)
        img = (img - mean) / std

        img = np.transpose(img, (2, 0, 1))
        img = np.expand_dims(img, axis=0)
        return img

    def __call__(self, img_list):
        """对每个裁剪图判断是否需要旋转180度"""
        if len(img_list) == 0:
            return img_list, [], []

        results = []
        for img in img_list:
            img_input = self.preprocess(img)
            pred = self.session.run(self.output_names, {self.input_name: img_input.astype(np.float32)})[0][0]
            label = np.argmax(pred)  # 0:正常, 1:需要旋转
            score = float(pred[label])
            results.append((label, score))

        # 对需要旋转的图片进行180度旋转
        img_list = [cv2.rotate(img, cv2.ROTATE_180) if label == 1 else img
                    for img, (label, _) in zip(img_list, results)]
        labels = [label for label, _ in results]
        scores = [score for _, score in results]

        return img_list, labels, scores
3.4 文本识别器
文本识别是OCR中最复杂的模块,主要挑战有:文本行长度不一致 → 无法直接batch;CTC解码需要处理blank和重复字符;宽度变化大,需要动态调整。
识别流程:
# 输入:裁剪的文字图片
img = Image.open("chinese_text.jpg")  # 24x240

# 1. 预处理
preprocessed = recognizer.preprocess(img)
# 尺寸:48x256(高度固定48,宽度对齐到256)
# 归一化:[-1, 1]范围

# 2. 模型推理
pred = session.run(...)
# 输出:pred[0] 形状 (64, 6625)
# 64个时间步,每个步6625个类别的概率

# 3. CTC解码
preds_idx = [0, 123, 123, 0, 456, 0, 0, 456, 789, 0, ...]
解码后:text = "中国好"

# 4. 返回结果
result = ("中国好", 0.883)
具体实现:
class TextRecognizer:
    def __init__(self, model_path, dict_file, use_gpu=True):
        self.session = InferenceSessionManager.create_session(
            model_path,
            use_gpu=use_gpu,
            gpu_mem_limit=2 * 1024 * 1024 * 1024
        )
        self.input_name = self.session.get_inputs()[0].name
        self.output_names = [o.name for o in self.session.get_outputs()]

        # 加载字典
        with open(dict_file, 'r', encoding='utf-8') as f:
            self.characters = [line.strip() for line in f]
        self.characters = ['blank'] + self.characters  # blank是CTC的特殊字符
        self.target_height = 48  # 模型固定高度

    def preprocess(self, img):
        """预处理:固定高度48,动态宽度"""
        h, w = img.shape[:2]
        ratio = self.target_height / h
        new_w = int(w * ratio)

        # 确保宽度是32的倍数
        new_w = max(new_w, 32)
        new_w = new_w if new_w % 32 == 0 else (new_w // 32 + 1) * 32

        # 限制最大宽度
        if new_w > 1600:
            new_w = 1600

        img = cv2.resize(img, (new_w, self.target_height))
        img = cv2.cvtColor(img, cv2.COLOR_BGR2RGB)

        # 归一化到[-1, 1](识别模型使用这个范围)
        img = img.astype(np.float32) / 255.0
        mean = np.array([0.5, 0.5, 0.5], dtype=np.float32)
        std = np.array([0.5, 0.5, 0.5], dtype=np.float32)
        img = (img - mean) / std

        img = np.transpose(img, (2, 0, 1))
        img = np.expand_dims(img, axis=0)
        return img

    def postprocess(self, pred):
        """
        CTC解码:将模型输出转换为文本
        规则:
        1. 跳过blank字符(索引0)
        2. 连续重复的字符只保留一个
        """
        preds = pred[0]
        preds_idx = np.argmax(preds, axis=2)[0]  # 每个位置最可能的字符索引
        preds_prob = np.max(preds, axis=2)[0]    # 对应的置信度

        text = ''
        scores = []
        last_char = None

        for i, pred_idx in enumerate(preds_idx):
            if pred_idx != 0:  # 不是blank
                if pred_idx != last_char:  # 与上一个不同才添加
                    text += self.characters[pred_idx]
                    scores.append(preds_prob[i])
                    last_char = pred_idx

        if len(scores) > 0:
            avg_score = sum(scores) / len(scores)
        else:
            avg_score = 0.0

        return text, avg_score

    def __call__(self, img_list):
        """逐张识别(先这样...)"""
        if not img_list:
            return []

        results = []
        for img in img_list:
            img_input = self.preprocess(img)
            pred = self.session.run(self.output_names, {self.input_name: img_input.astype(np.float32)})
            text, score = self.postprocess(pred)
            results.append((text, score))

        return results
4、试试效果
性能统计
============================================================
图片读取:         0.54 ms  (  0.2%)
文本检测:        13.03 ms  (  4.0%)
图片裁剪:         0.04 ms  (  0.0%)
方向分类:        13.31 ms  (  4.1%)
文本识别:       298.93 ms  ( 91.7%)
------------------------------------------------------------
总耗时:         325.86 ms
============================================================

识别到 6 个文本区域:
------------------------------------------------------------
 1. [0.989] 五、
 2. [1.000] 中文识别
 3. [0.957] 六、
 4. [1.000] 高级应用场景
 5. [0.993] 5.1
 6. [1.000] 结构化数据提取
虽然没有纯paddle识别的速度快,但是咱们比RapidOCR又快又准啊!这样可还行?
5、最后
为了在GPU下推理,我们不单单要安装onnxruntime-gpu(1.25.1),还要安装cuda相关的软件:
1、cuDNN 9.22.0:https://developer.nvidia.com/cudnn-downloads?target_os=Windows&target_arch=x86_64&target_version=11&target_type=exe_local
2、CUDA Toolkit cuda_12.8: https://developer.download.nvidia.cn/compute/cuda/12.8.0/local_installers/cuda_12.8.0_571.96_windows.exe
哈哈,感觉又把部署的难度提升了…
有需要源码文件的同学,请联系我!

智能硬件社区聚焦AI智能硬件技术生态,汇聚嵌入式AI、物联网硬件开发者,打造交流分享平台,同步全国赛事资讯、开展 OPC 核心人才招募,助力技术落地与开发者成长。
更多推荐
 8
8 0
0- 0


 已为社区贡献4条内容

所有评论(0)