ESP32-S3开发教程12:WIFI扫描与连接
本文代码已上传开源仓库:ESP32-S3教学资产:包括了一些在ESP32-S3上的简单工程,基于ESP-IDF框架 - AtomGit | GitCode
在 ESP32-S3 开发中,WiFi 是最常用的功能之一。本文将详细解析一个完整的 WiFi 封装模块,包括头文件、源文件和主程序的每一行代码,帮助你深入理解 ESP-IDF WiFi 编程。
一、wifi_conn.h 头文件详解
完整代码:
#ifndef WIFI_CONN_H_
#define WIFI_CONN_H_

#include "esp_types.h"
#include <stdbool.h>
#include "esp_err.h"
#include "stdint.h"
#include "esp_wifi_types.h"

#define WIFI_SSID      "zhangfanding"
#define WIFI_PASS      "12345678"
#define MAX_SCAN_RESULTS 10

typedef struct {
    char ssid[33];
    int8_t rssi;
    wifi_auth_mode_t authmode;
} wifi_ap_info_t;

void wifi_conn_init(void);
bool wifi_is_connected(void);
void wifi_get_ip(char *ip_buf, size_t buf_size);
int8_t wifi_get_rssi(void);
esp_err_t wifi_scan_ap(wifi_ap_info_t *ap_list, uint16_t *ap_count);
esp_err_t wifi_connect_to_ap(const char *ssid, const char *password);
void wifi_disconnect(void);
void wifi_reconnect(void);
void wifi_get_ssid(char *ssid_buf, size_t buf_size);

#endif
#ifndef WIFI_CONN_H_
#define WIFI_CONN_H_
第 1-2 行 :头文件保护宏,防止重复包含。 #ifndef 检查是否未定义 WIFI_CONN_H_ ,如果是则定义它,直到 #endif 结束。
#include "esp_types.h"
#include <stdbool.h>
#include "esp_err.h"
#include "stdint.h"
#include "esp_wifi_types.h"
第 4-8 行 :包含必要的头文件:
- esp_types.h :ESP-IDF 基础类型定义
- stdbool.h :C 标准布尔类型(true/false)
- esp_err.h :ESP-IDF 错误码定义
- stdint.h :标准整数类型(uint8_t、int8_t 等)
- esp_wifi_types.h :WiFi 相关类型定义
#define WIFI_SSID      "zhangfanding"
#define WIFI_PASS      "12345678"
#define MAX_SCAN_RESULTS 10
第 10-12 行 :宏定义:
- WIFI_SSID :要连接的 WiFi 名称
- WIFI_PASS :WiFi 密码
- MAX_SCAN_RESULTS :扫描结果最大数量限制为 10 个
typedef struct {
    char ssid[33];
    int8_t rssi;
    wifi_auth_mode_t authmode;
} wifi_ap_info_t;
第 14-18 行 :定义 WiFi AP 信息结构体:
- ssid[33] :存储 SSID 名称(最大 32 字符 + 1 个结束符)
- rssi :信号强度(dBm),int8_t 范围 -128 到 127
- authmode :加密方式(来自 esp_wifi_types.h )
void wifi_conn_init(void);
bool wifi_is_connected(void);
void wifi_get_ip(char *ip_buf, size_t buf_size);
int8_t wifi_get_rssi(void);
esp_err_t wifi_scan_ap(wifi_ap_info_t *ap_list, uint16_t *ap_count);
esp_err_t wifi_connect_to_ap(const char *ssid, const char *password);
void wifi_disconnect(void);
void wifi_reconnect(void);
void wifi_get_ssid(char *ssid_buf, size_t buf_size);
第 20-28 行 :函数声明,提供对外接口:
- wifi_conn_init() :初始化 WiFi
- wifi_is_connected() :检查连接状态
- wifi_get_ip() :获取 IP 地址
- wifi_get_rssi() :获取信号强度
- wifi_scan_ap() :扫描附近 AP
- wifi_connect_to_ap() :连接指定 AP
- wifi_disconnect() :断开连接
- wifi_reconnect() :重新连接
- wifi_get_ssid() :获取当前 SSID
#endif第 30 行 :头文件保护结束。
二、wifi_conn.c 源文件详解
完整代码:
2.1 头文件包含和静态变量
#include "wifi_conn.h"
#include "freertos/FreeRTOS.h"
#include "freertos/task.h"
#include "esp_wifi.h"
#include "esp_event.h"
#include "esp_log.h"
#include "nvs_flash.h"
#include "esp_netif.h"
#include <string.h>
第 1-9 行 :包含所需头文件:
- wifi_conn.h :我们自己的头文件
- freertos/FreeRTOS.h 和 freertos/task.h :FreeRTOS 内核和任务管理
- esp_wifi.h :WiFi 驱动 API
- esp_event.h :事件循环 API
- esp_log.h :日志系统
- nvs_flash.h :非易失性存储(NVS)
- esp_netif.h :网络接口抽象
- string.h :字符串操作函数
static const char *TAG = "WIFI_CONN";
static bool g_wifi_connected = false;
static esp_ip4_addr_t g_ip_addr = {0};
static char g_current_ssid[33] = {0};
static bool g_auto_reconnect = true;
第 11-15 行 :静态变量(仅本文件可见):
- TAG :日志标签,用于标识日志来源
- g_wifi_connected :WiFi 连接状态标志
- g_ip_addr :存储 IPv4 地址
- g_current_ssid :当前连接的 SSID
- g_auto_reconnect :自动重连标志
2.2 WiFi 事件处理函数
static void wifi_event_handler(void* arg, esp_event_base_t event_base,
                                int32_t event_id, void* event_data) {
第 17-18 行 :定义事件处理回调函数,参数:
- arg :用户数据(注册时传入)
- event_base :事件类型(WIFI_EVENT 或 IP_EVENT)
- event_id :具体事件 ID
- event_data :事件附带的数据
    if (event_base == WIFI_EVENT && event_id == WIFI_EVENT_STA_START) {
        esp_wifi_connect();
第 19-20 行 :当 WiFi Station 模式启动时,自动发起连接。
    } else if (event_base == WIFI_EVENT && event_id == WIFI_EVENT_STA_DISCONNECTED) {
        g_wifi_connected = false;
        ESP_LOGW(TAG, "Disconnected");
        if (g_auto_reconnect) {
            ESP_LOGI(TAG, "Auto reconnect enabled, reconnecting...");
            vTaskDelay(pdMS_TO_TICKS(1000));
            esp_wifi_connect();
        }
第 21-28 行 :处理断开连接事件:
- 清除连接状态标志
- 打印警告日志
- 如果启用自动重连,等待 1 秒后重连
- vTaskDelay(pdMS_TO_TICKS(1000)) :延时 1000 毫秒(FreeRTOS 节拍)
    } else if (event_base == IP_EVENT && event_id == IP_EVENT_STA_GOT_IP) {
        g_wifi_connected = true;
        ip_event_got_ip_t* ip_event = (ip_event_got_ip_t*)event_data;
        g_ip_addr = ip_event->ip_info.ip;
        ESP_LOGI(TAG, "Connected! IP: " IPSTR, IP2STR(&ip_event->ip_info.ip));
    }
}
第 29-35 行 :处理获取 IP 事件:
- 设置连接状态为 true
- 将事件数据转换为 ip_event_got_ip_t 类型
- 保存 IP 地址到静态变量
- 使用 IPSTR 和 IP2STR 宏格式化打印 IP 地址
2.3 WiFi 初始化函数
void wifi_conn_init(void) {
    esp_err_t ret = nvs_flash_init();
第 37-38 行 :初始化 NVS(非易失性存储),WiFi 驱动需要用它保存配置。
    if (ret == ESP_ERR_NVS_NO_FREE_PAGES || ret == ESP_ERR_NVS_NEW_VERSION_FOUND) {
        ESP_ERROR_CHECK(nvs_flash_erase());
        ret = nvs_flash_init();
    }
    ESP_ERROR_CHECK(ret);
第 39-43 行 :处理 NVS 初始化错误:
- 如果 NVS 没有空闲页或版本不匹配,先擦除再重新初始化
- ESP_ERROR_CHECK() :错误检查宏,如果返回值不是 ESP_OK 则程序崩溃
    ESP_ERROR_CHECK(esp_netif_init());
    ESP_ERROR_CHECK(esp_event_loop_create_default());
    esp_netif_create_default_wifi_sta();
第 45-47 行 :
- 初始化网络接口抽象层
- 创建默认事件循环
- 创建默认 WiFi Station 网络接口
    wifi_init_config_t cfg = WIFI_INIT_CONFIG_DEFAULT();
    ESP_ERROR_CHECK(esp_wifi_init(&cfg));
第 49-50 行 :
- 使用默认配置初始化 WiFi
- WIFI_INIT_CONFIG_DEFAULT() 宏提供默认配置
    ESP_ERROR_CHECK(esp_event_handler_register(WIFI_EVENT, ESP_EVENT_ANY_ID, &wifi_event_handler, NULL));
    ESP_ERROR_CHECK(esp_event_handler_register(IP_EVENT, IP_EVENT_STA_GOT_IP, &wifi_event_handler, NULL));
第 52-53 行 :注册事件处理器:
- 注册所有 WiFi 事件
- 注册获取 IP 事件
- 都使用同一个回调函数 wifi_event_handler
    wifi_config_t wifi_config = {
        .sta = {
            .ssid = WIFI_SSID,
            .password = WIFI_PASS,
            .scan_method = WIFI_ALL_CHANNEL_SCAN,
            .sort_method = WIFI_CONNECT_AP_BY_SIGNAL,
            .threshold.rssi = -70,
            .threshold.authmode = WIFI_AUTH_WPA2_PSK,
        },
    };
第 55-64 行 :配置 WiFi Station 参数:
- ssid 和 password :使用宏定义的账号密码
- scan_method :全信道扫描
- sort_method :按信号强度排序
- threshold.rssi :最小信号强度阈值 -70 dBm
- threshold.authmode :至少需要 WPA2 加密
strncpy(g_current_ssid, WIFI_SSID, sizeof(g_current_ssid) - 1);第 65 行 :保存当前 SSID 到静态变量。
    ESP_ERROR_CHECK(esp_wifi_set_mode(WIFI_MODE_STA));
    ESP_ERROR_CHECK(esp_wifi_set_config(WIFI_IF_STA, &wifi_config));
    ESP_ERROR_CHECK(esp_wifi_set_ps(WIFI_PS_NONE));
    ESP_ERROR_CHECK(esp_wifi_start());
第 66-69 行 :
- 设置为 Station 模式
- 应用配置
- 禁用省电模式( WIFI_PS_NONE )
- 启动 WiFi
    ESP_LOGI(TAG, "WiFi initialized, connecting to %s", WIFI_SSID);
}
第 71-72 行 :打印初始化完成日志。
2.4 连接状态查询函数
bool wifi_is_connected(void) {
    return g_wifi_connected;
}
第 74-76 行 :返回内部连接状态标志。
2.5 获取IP地址函数
void wifi_get_ip(char *ip_buf, size_t buf_size) {
    if (ip_buf == NULL || buf_size < 16) {
        return;
    }
    snprintf(ip_buf, buf_size, IPSTR, IP2STR(&g_ip_addr));
}
第 78-83 行 :
- 参数检查:指针非空且缓冲区至少 16 字节(xxx.xxx.xxx.xxx\0)
- 使用 snprintf 安全格式化 IP 地址字符串
3.6 获取信号强度函数
int8_t wifi_get_rssi(void) {
    if (!g_wifi_connected) {
        return -127;
    }
第 85-88 行 :如果未连接,返回最小 RSSI 值 -127。
    wifi_ap_record_t ap_info;
    esp_err_t ret = esp_wifi_sta_get_ap_info(&ap_info);
    if (ret == ESP_OK) {
        return ap_info.rssi;
    }
    return -127;
}
第 89-95 行 :
- 定义 AP 信息结构体
- 获取当前连接的 AP 信息
- 成功则返回 RSSI,否则返回 -127
3.7 扫描附近AP函数
esp_err_t wifi_scan_ap(wifi_ap_info_t *ap_list, uint16_t *ap_count) {
    if (ap_list == NULL || ap_count == NULL) {
        return ESP_ERR_INVALID_ARG;
    }
第 97-100 行 :参数有效性检查。
    uint16_t max_count = *ap_count;
    if (max_count > MAX_SCAN_RESULTS) {
        max_count = MAX_SCAN_RESULTS;
    }
第 102-105 行 :限制最大扫描数量不超过 MAX_SCAN_RESULTS 。
    wifi_scan_config_t scan_config = {
        .ssid = NULL,
        .bssid = NULL,
        .channel = 0,
        .show_hidden = false,
        .scan_type = WIFI_SCAN_TYPE_ACTIVE,
        .scan_time.active.min = 100,
        .scan_time.active.max = 300,
    };
第 107-115 行 :配置扫描参数:
- ssid = NULL :不指定 SSID,扫描所有
- bssid = NULL :不指定 BSSID
- channel = 0 :扫描所有信道
- show_hidden = false :不显示隐藏 SSID
- scan_type = WIFI_SCAN_TYPE_ACTIVE :主动扫描
- 每个信道扫描时间 100-300ms
    ESP_LOGI(TAG, "Starting WiFi scan...");
    esp_err_t ret = esp_wifi_scan_start(&scan_config, true);
    if (ret != ESP_OK) {
        ESP_LOGE(TAG, "Scan start failed: %s", esp_err_to_name(ret));
        return ret;
    }
第 117-122 行 :
- 打印开始扫描日志
- 启动扫描, true 表示阻塞等待扫描完成
- 错误处理并打印错误信息
    wifi_ap_record_t ap_records[MAX_SCAN_RESULTS];
    uint16_t found = MAX_SCAN_RESULTS;
    ret = esp_wifi_scan_get_ap_records(&found, ap_records);
    if (ret != ESP_OK) {
        ESP_LOGE(TAG, "Get scan records failed: %s", esp_err_to_name(ret));
        return ret;
    }
第 124-130 行 :
- 定义临时数组存储扫描结果
- 获取扫描记录
- found 输入时是最大数量,输出时是实际发现数量
    uint16_t copy_count = (found < max_count) ? found : max_count;
    for (uint16_t i = 0; i < copy_count; i++) {
        strncpy(ap_list[i].ssid, (char*)ap_records[i].ssid, sizeof(ap_list[i].ssid) - 1);
        ap_list[i].ssid[sizeof(ap_list[i].ssid) - 1] = '\0';
        ap_list[i].rssi = ap_records[i].rssi;
        ap_list[i].authmode = ap_records[i].authmode;
    }
    *ap_count = copy_count;
第 132-139 行 :
- 计算实际要复制的数量
- 循环复制数据到用户提供的数组
- 确保字符串以 \0 结尾
- 返回实际数量
    ESP_LOGI(TAG, "Scan complete, found %d APs", found);
    return ESP_OK;
}
第 141-142 行 :打印完成日志,返回成功。
3.8 连接到指定AP函数
esp_err_t wifi_connect_to_ap(const char *ssid, const char *password) {
    if (ssid == NULL || strlen(ssid) == 0) {
        return ESP_ERR_INVALID_ARG;
    }
第 145-148 行 :检查 SSID 参数有效性。
    g_auto_reconnect = true;
    strncpy(g_current_ssid, ssid, sizeof(g_current_ssid) - 1);
第 150-151 行 :启用自动重连,保存新 SSID。
    wifi_config_t wifi_config = {0};
    strncpy((char*)wifi_config.sta.ssid, ssid, sizeof(wifi_config.sta.ssid) - 1);
    if (password != NULL) {
        strncpy((char*)wifi_config.sta.password, password, sizeof(wifi_config.sta.password) - 1);
    }
第 153-157 行 :
- 初始化配置结构体为 0
- 复制 SSID
- 如果密码不为空则复制密码
    wifi_config.sta.scan_method = WIFI_ALL_CHANNEL_SCAN;
    wifi_config.sta.sort_method = WIFI_CONNECT_AP_BY_SIGNAL;
    wifi_config.sta.threshold.rssi = -70;
    wifi_config.sta.threshold.authmode = WIFI_AUTH_WPA2_PSK;
第 158-161 行 :设置扫描和连接参数。
    ESP_ERROR_CHECK(esp_wifi_set_config(WIFI_IF_STA, &wifi_config));
    ESP_LOGI(TAG, "Connecting to %s...", ssid);
    return esp_wifi_connect();
}
第 163-165 行 :应用配置并发起连接。
3.9 断开连接函数
void wifi_disconnect(void) {
    g_auto_reconnect = false;
    esp_wifi_disconnect();
    g_wifi_connected = false;
    ESP_LOGI(TAG, "WiFi disconnected");
}
第 168-173 行 :
- 禁用自动重连
- 调用断开连接 API
- 清除连接状态
- 打印日志
3.10 重新连接函数
void wifi_reconnect(void) {
    g_auto_reconnect = true;
    if (g_wifi_connected) {
        esp_wifi_disconnect();
        vTaskDelay(pdMS_TO_TICKS(500));
    }
    esp_wifi_connect();
    ESP_LOGI(TAG, "Reconnecting to %s...", g_current_ssid);
}
第 175-183 行 :
- 启用自动重连
- 如果已连接,先断开并等待 500ms
- 发起连接
- 打印日志
3.11 获取当前SSID函数
void wifi_get_ssid(char *ssid_buf, size_t buf_size) {
    if (ssid_buf == NULL || buf_size < 1) {
        return;
    }
    strncpy(ssid_buf, g_current_ssid, buf_size - 1);
    ssid_buf[buf_size - 1] = '\0';
}
第 185-191 行 :
- 参数检查
- 安全复制字符串
- 确保以 \0 结尾
三、main.c主程序详解
完整代码:
#include <stdio.h>
#include "freertos/FreeRTOS.h"
#include "freertos/task.h"
#include "esp_log.h"
#include "wifi_conn.h"

static const char *TAG = "MAIN";

void app_main(void)
{
    ESP_LOGI(TAG, "ESP32-S3 WiFi 功能扩展教学例程启动");

    wifi_conn_init();

    uint8_t demo_step = 0;

    while (1) {
        if (wifi_is_connected()) {
            char ip[16];
            char ssid[33];
            int8_t rssi = wifi_get_rssi();
            wifi_get_ip(ip, sizeof(ip));
            wifi_get_ssid(ssid, sizeof(ssid));

            ESP_LOGI(TAG, "已连接 - SSID: %s, IP: %s, RSSI: %d dBm", ssid, ip, rssi);
        } else {
            ESP_LOGI(TAG, "WiFi 未连接");
        }

        if (demo_step == 5 && wifi_is_connected()) {
            ESP_LOGI(TAG, "演示: 扫描附近的 WiFi...");
            wifi_ap_info_t ap_list[MAX_SCAN_RESULTS];
            uint16_t ap_count = MAX_SCAN_RESULTS;

            if (wifi_scan_ap(ap_list, &ap_count) == ESP_OK) {
                ESP_LOGI(TAG, "扫描完成,发现 %d 个 AP:", ap_count);
                for (uint16_t i = 0; i < ap_count; i++) {
                    ESP_LOGI(TAG, "  [%d] %s (RSSI: %d dBm)", i + 1, ap_list[i].ssid, ap_list[i].rssi);
                }
            }
            demo_step++;
        }

        demo_step++;
        vTaskDelay(pdMS_TO_TICKS(3000));
    }
}
接下来,我们来逐行讲解:
#include <stdio.h>
#include "freertos/FreeRTOS.h"
#include "freertos/task.h"
#include "esp_log.h"
#include "wifi_conn.h"
第 1-5 行 :包含必要头文件,包括我们的 wifi_conn.h 。
static const char *TAG = "MAIN";第 7 行 :定义主程序的日志标签。
void app_main(void)
{
    ESP_LOGI(TAG, "ESP32-S3 WiFi 功能扩展教学例程启动");
第 9-11 行 : app_main 是 ESP-IDF 程序入口,打印启动日志。
wifi_conn_init();第 13 行 :调用 WiFi 初始化函数。
uint8_t demo_step = 0;第 15 行 :定义演示步骤计数器。
    while (1) {
        if (wifi_is_connected()) {
            char ip[16];
            char ssid[33];
            int8_t rssi = wifi_get_rssi();
            wifi_get_ip(ip, sizeof(ip));
            wifi_get_ssid(ssid, sizeof(ssid));

            ESP_LOGI(TAG, "已连接 - SSID: %s, IP: %s, RSSI: %d dBm", ssid, ip, rssi);
        } else {
            ESP_LOGI(TAG, "WiFi 未连接");
        }
第 17-28 行 :主循环,每 3 秒打印一次状态:
- 检查是否连接
- 如果已连接,获取并打印 SSID、IP、RSSI
- 如果未连接,打印未连接提示
        if (demo_step == 5 && wifi_is_connected()) {
            ESP_LOGI(TAG, "演示: 扫描附近的 WiFi...");
            wifi_ap_info_t ap_list[MAX_SCAN_RESULTS];
            uint16_t ap_count = MAX_SCAN_RESULTS;

            if (wifi_scan_ap(ap_list, &ap_count) == ESP_OK) {
                ESP_LOGI(TAG, "扫描完成,发现 %d 个 AP:", ap_count);
                for (uint16_t i = 0; i < ap_count; i++) {
                    ESP_LOGI(TAG, "  [%d] %s (RSSI: %d dBm)", i + 1, ap_list[i].ssid, ap_list[i].rssi);
                }
            }
            demo_step++;
        }
第 30-42 行 :第 5 步时(约 15 秒后)执行扫描演示:
- 定义 AP 信息数组
- 调用扫描函数
- 遍历打印扫描结果
        demo_step++;
        vTaskDelay(pdMS_TO_TICKS(3000));
    }
}
第 44-46 行 :
- 增加步骤计数器
- 延时 3 秒
- 循环继续
四、编译烧录测试
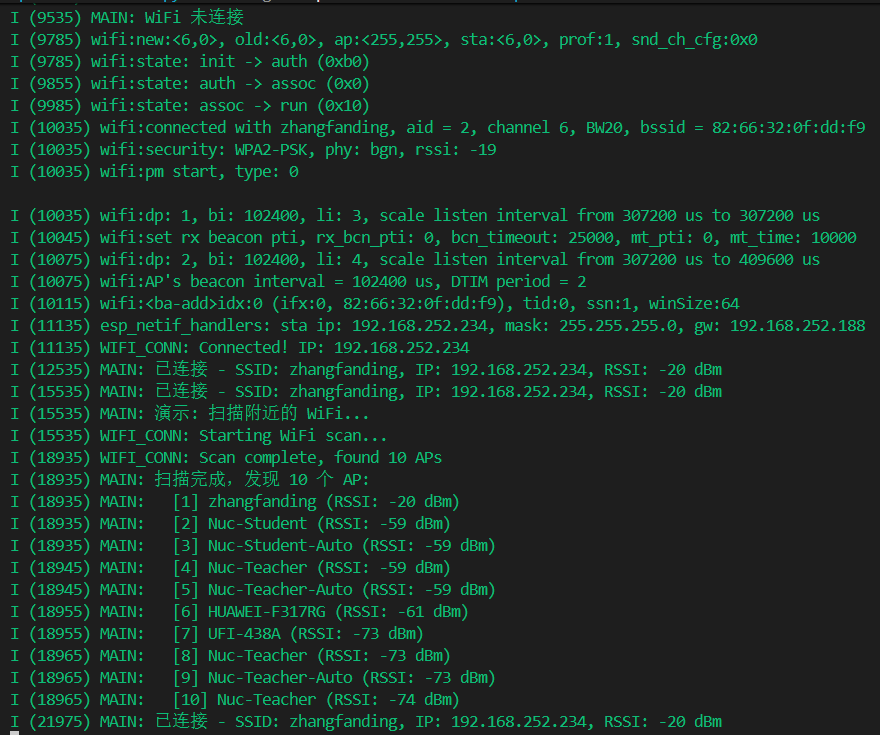
点击编译烧录,确认无误后,打开日志,可以看到芯片输出了如下内容:

智能硬件社区聚焦AI智能硬件技术生态,汇聚嵌入式AI、物联网硬件开发者,打造交流分享平台,同步全国赛事资讯、开展 OPC 核心人才招募,助力技术落地与开发者成长。
更多推荐

 14
14 0
0- 0


 已为社区贡献9条内容

所有评论(0)