【教程】树莓派驱动 0.96 寸 SSD1315 OLED 屏幕完整指南
转载请注明出处:小锋学长生活大爆炸[xfxuezhagn.cn]
如果本文帮助到了你,欢迎[点赞、收藏、关注]哦~
0.96 寸 OLED 屏幕是树莓派项目中最常用的显示模块之一。本文中的屏幕采用 SSD1315 驱动芯片,该芯片与常见的 SSD1306 寄存器完全兼容,因此可以直接使用现有的 SSD1306 驱动库。本文将带你从零开始,完成接线、配置到代码运行的全过程。
一、硬件准备
| 物品 | 说明 |
|---|---|
| 树莓派(任意型号) | 3B/3B+/4B/Zero 均可 |
| 0.96 寸 OLED 屏幕 | SSD1315 驱动,4 针 I2C 接口 |
| 杜邦线 | 母对母 4 根 |
二、硬件接线(I2C)
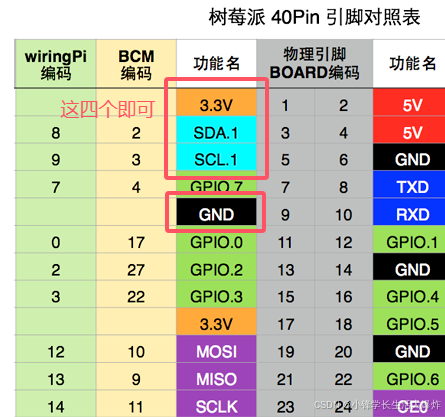
OLED 模块通常为 4 针 I2C 接口,接线方式如下:
| OLED 引脚 | 树莓派引脚(BCM 编号) | 物理排针号 | 说明 |
|---|---|---|---|
| VCC | 3.3V 或 5V | Pin 1 / Pin 2 | 电源正极(多数模块支持 3.3V~5V) |
| GND | GND | Pin 6 / Pin 9 / Pin 14 等 | 电源负极 |
| SCL | GPIO 3 | Pin 5 | I2C 时钟线 |
| SDA | GPIO 2 | Pin 3 | I2C 数据线 |
⚠️ 注意:如果你的 OLED 是 7 针 SPI 接口,接线方式不同,请参考 SPI 方案。
三、开启树莓派 I2C 功能
在终端中执行以下命令:
sudo raspi-config依次选择:
Interface Options → I2C → Yes → Finish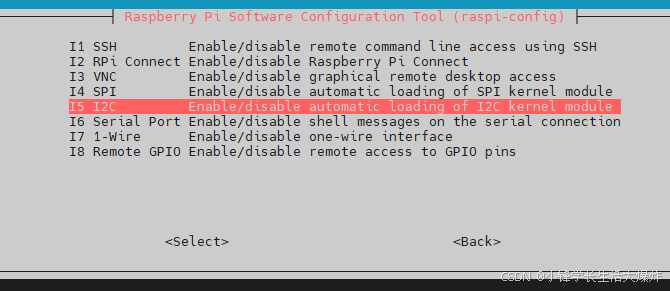
完成后重启树莓派:
sudo reboot四、检测 I2C 设备
重启后,安装 i2c-tools(通常已预装):
sudo apt install i2c-tools扫描 I2C 总线上的设备:
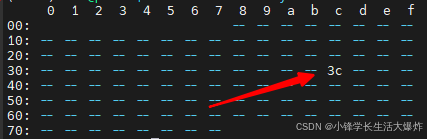
sudo i2cdetect -y 1如果接线正确,你会看到类似下面的输出,其中 3c 就是 OLED 屏幕的 I2C 地址:
看到
3c就说明硬件和通信都正常,可以进行下一步了!
五、安装 Python 驱动库
推荐使用 luma.oled,它对 SSD1306/SSD1315 支持良好,API 简洁易用。
sudo apt update
sudo apt install python3-pip python3-dev python3-venv \
    libfreetype6-dev libjpeg-dev libopenjp2-7 libtiff5 -y

pip3 install luma.oled
六、基础显示示例
创建测试文件 oled_test.py:
#!/usr/bin/env python3
from luma.core.interface.serial import i2c
from luma.core.render import canvas
from luma.oled.device import ssd1306
from PIL import ImageFont
import time

# 初始化 I2C,地址为 0x3C,分辨率 128x64
serial = i2c(port=1, address=0x3C)
device = ssd1306(serial, width=128, height=64)

# 使用默认字体
font = ImageFont.load_default()

with canvas(device) as draw:
    draw.text((0, 0),  "Raspberry Pi", font=font, fill="white")
    draw.text((0, 16), "SSD1315 OLED", font=font, fill="white")
    draw.text((0, 32), "I2C Addr: 0x3C", font=font, fill="white")
    draw.text((0, 48), "Hello World!", font=font, fill="white")

print("内容已显示,保持 30 秒...")
time.sleep(30)
运行:
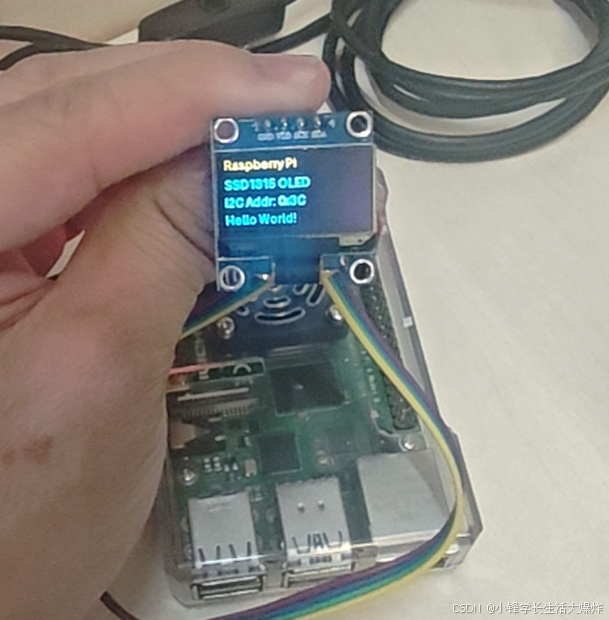
python3 oled_test.py如果一切正常,你的 OLED 屏幕上将显示四行文字!
七、进阶:实时系统信息监控
下面这段代码可以实时显示 IP 地址、CPU 温度、日期和时间:
#!/usr/bin/env python3
from luma.core.interface.serial import i2c
from luma.core.render import canvas
from luma.oled.device import ssd1306
from PIL import ImageFont
import subprocess
import time

# 初始化设备
serial = i2c(port=1, address=0x3C)
device = ssd1306(serial, width=128, height=64)
font = ImageFont.load_default()

def get_ip():
    cmd = "hostname -I | cut -d' ' -f1"
    return subprocess.check_output(cmd, shell=True).decode().strip()

def get_cpu_temp():
    with open("/sys/class/thermal/thermal_zone0/temp", "r") as f:
        return round(int(f.read()) / 1000, 1)

try:
    while True:
        with canvas(device) as draw:
            draw.text((0, 0),  f"IP: {get_ip()}", font=font, fill="white")
            draw.text((0, 16), f"CPU: {get_cpu_temp()}°C", font=font, fill="white")
            draw.text((0, 32), time.strftime("%Y-%m-%d"), font=font, fill="white")
            draw.text((0, 48), time.strftime("%H:%M:%S"), font=font, fill="white")
        time.sleep(1)
except KeyboardInterrupt:
    print("\n已退出")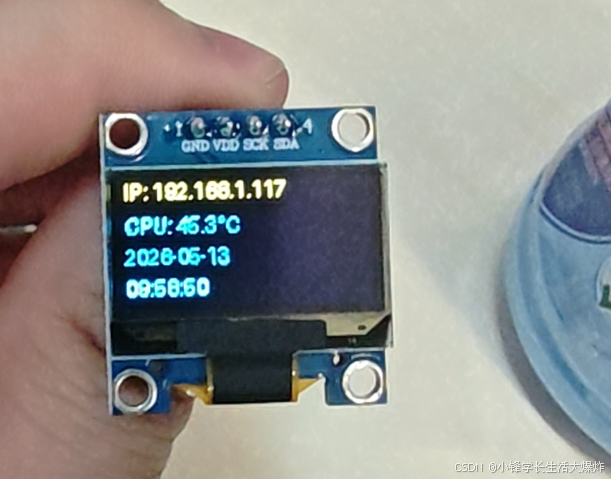
如果你的是oled带4个按键的,就可以实现更多功能。
| 按键 | 功能 | BCM 引脚 | 物理引脚 |
|---|---|---|---|
| K1 | return / 取消 / 返回 | BCM4 | Pin 7 |
| K2 | enter / 确认 | BCM17 | Pin 11 |
| K3 | 向下 | BCM27 | Pin 13 |
| K4 | 向上 | BCM22 | Pin 15 |
#!/usr/bin/env python3
# -*- coding: utf-8 -*-
"""
树莓派 OLED 系统监控面板 - 适配双色 OLED 版
功能说明:
1. 在 128x64 OLED 屏幕上显示系统运行状态。
2. 顶部黄色区域显示当前时间和实时网速。
3. 下方蓝色区域显示 IP 地址、CPU 温度、CPU 使用率、内存占用率和磁盘占用率。
4. 启动时显示居中的启动页文字。
5. 支持配置屏幕旋转方向和屏幕对比度。
6. CPU 温度超过阈值时显示闪烁告警符号。
7. 顶部时间冒号闪烁显示。
8. 支持 K1/K2/K3/K4 按键选择信息行。
9. 在 IP 行按 K2 可以进入网卡 inet 地址界面,K1 返回。
10. 在 CPU 行按 K2 可以进入进程查看界面,K1 返回。
11. 进程界面支持 CPU、MEM、CMD 三列对齐显示,并可左右滚动查看完整 CMD。
"""
import os
import time
import subprocess
from luma.core.interface.serial import i2c
from luma.core.render import canvas
from luma.oled.device import ssd1306
from PIL import Image, ImageDraw, ImageFont
try:
import RPi.GPIO as GPIO
except (ImportError, RuntimeError):
GPIO = None
# =========================
# OLED 基础配置
# =========================
# 树莓派默认 I2C 总线通常为 1
I2C_PORT = 1
# SSD1306 OLED 常见 I2C 地址为 0x3C
I2C_ADDRESS = 0x3C
# 屏幕刷新间隔,单位为秒
REFRESH_INTERVAL = 1.0
# 屏幕旋转方向
# 0 表示不旋转
# 1 表示顺时针旋转 90°
# 2 表示旋转 180°
# 3 表示顺时针旋转 270°
SCREEN_ROTATE = 0
# 屏幕对比度,范围 0-255
# 数值越大越亮,越小越暗
# OLED 没有传统 LCD 背光,这里调节的是 SSD1306 对比度
SCREEN_CONTRAST = 160
# 需要检查的网络接口,优先 wlan0,再检查 eth0
NETWORK_INTERFACES = ("wlan0", "eth0")
# =========================
# 刷新策略配置
# =========================
# 低频信息刷新间隔,单位为主循环次数
# 如果 REFRESH_INTERVAL = 1.0,那么 10 次就是约 10 秒
IP_REFRESH_TICKS = 600
MEMORY_REFRESH_TICKS = 5
DISK_REFRESH_TICKS = 10
# 时间冒号闪烁间隔,单位为秒
TIME_COLON_BLINK_INTERVAL = 1.0
# CPU 温度告警阈值
CPU_WARN_TEMP = 50.0
# CPU 告警符号
# 如果 OLED 显示为方框,可以改成 " ▲" 或 " !"
CPU_ALERT_SYMBOL = " ⚠"
# CPU 告警符号闪烁间隔,单位为秒
CPU_BLINK_INTERVAL = 1.0
# =========================
# 按键与选择箭头配置
# =========================
# 使用 BCM 编号方式。
# K1 连接 BCM4,K2 连接 BCM17,K3 连接 BCM27,K4 连接 BCM22。
BUTTONS = (
("K1", 4),
("K2", 17),
("K3", 27),
("K4", 22),
)
# 默认按键一端接 GPIO,另一端接 GND。
# 使用内部上拉,按下时 GPIO 读到低电平。
BUTTON_ACTIVE_LOW = True
# 按键消抖时间,单位为秒。
BUTTON_DEBOUNCE_SECONDS = 0.05
# 主循环按键轮询间隔,单位为秒。
# 该值越小,按键响应越快。
BUTTON_POLL_INTERVAL = 0.03
# OLED 画面重绘间隔,单位为秒。
# 系统数据仍然按 REFRESH_INTERVAL 的节奏刷新。
DISPLAY_REFRESH_INTERVAL = 0.2
# 进程列表刷新间隔,单位为秒。
PROCESS_REFRESH_INTERVAL = 1.0
# IP 详情界面刷新间隔,单位为秒。
IP_DETAIL_REFRESH_INTERVAL = 5.0
# 进程界面最多显示的进程数量。
# 128x64 屏幕使用 12px 字体时,表头下方可以紧凑显示 4 行。
PROCESS_DISPLAY_ROWS = 4
# 进程界面三列的布局。
# CPU 和 MEM 的数据列使用右对齐。
# 为了给 CMD 留出更多空间,数据列宽只按最大数值 100.0 计算,不按表头宽度计算。
PROCESS_CPU_HEADER_X = 0
PROCESS_VALUE_WIDTH_TEXT = "100.0"
PROCESS_COLUMN_GAP_TEXT = " "
# 进程界面中 CMD 横向滚动步长,单位为像素。
PROCESS_CMD_SCROLL_STEP = 8
# IP 详情界面最多显示的 inet 地址数量。
# 如果地址超过一页,可以在该界面使用 K4/K3 上下滚动。
IP_DETAIL_DISPLAY_ROWS = 4
# IP 详情界面中网卡名最多显示最后 5 位。
IP_DETAIL_IFACE_CHARS = 5
# 选择箭头符号。
# 如果当前字体无法显示,可以改成 ">"。
SELECT_ARROW = "▶"
# 选择箭头可停留的三行。
ROW_IP = 0
ROW_CPU = 1
ROW_RAM = 2
SELECT_ROW_COUNT = 3
# 当前显示模式。
SCREEN_MAIN = "main"
SCREEN_PROCESS = "process"
SCREEN_IP_DETAIL = "ip_detail"
# 为选择箭头预留的左侧宽度。
SELECT_TEXT_X = 12
# =========================
# OLED 初始化
# =========================
# 初始化 I2C 通信接口
serial = i2c(port=I2C_PORT, address=I2C_ADDRESS)
# 初始化 OLED 设备
device = ssd1306(
serial,
width=128,
height=64,
rotate=SCREEN_ROTATE
)
# 设置屏幕对比度
device.contrast(SCREEN_CONTRAST)
# =========================
# 字体配置
# =========================
# 主界面字体,支持中文、箭头和温度符号
FONT_MAIN = ImageFont.truetype("/home/sxf/.fonts/chinese.ttf", 12)
# 启动页标题字体
FONT_TITLE = ImageFont.truetype("/home/sxf/.fonts/chinese.ttf", 12)
# IP 详情界面使用较小字号,保证 wlan0 192.168.1.117 这类内容能显示在一行。
FONT_SMALL = ImageFont.truetype("/home/sxf/.fonts/chinese.ttf", 10)
# 默认字体,后续绘制函数默认使用这个字体
FONT = FONT_MAIN
# 双色屏分界线大约在第 15-16 行
# 0-15 行为黄色区域
# 16-63 行为蓝色区域
# =========================
# 全局运行状态
# =========================
_last_cpu = None
_last_net = None
def create_status():
"""
创建屏幕显示状态。
高频数据每次循环更新。
低频数据按 tick 间隔更新。
"""
return {
"temp": 0.0,
"cpu_pct": 0.0,
"mem_pct": 0.0,
"disk_pct": 0.0,
"ip": "Loading",
"rx_speed": 0.0,
"tx_speed": 0.0,
}
def update_status(status, tick):
"""
更新屏幕显示状态。
tick 从 0 开始。
高频数据每次更新。
低频数据按配置的 tick 间隔更新。
"""
status["temp"] = get_cpu_temp()
status["cpu_pct"] = get_cpu_usage()
status["rx_speed"], status["tx_speed"] = get_network_speed()
if tick % MEMORY_REFRESH_TICKS == 0:
_, _, status["mem_pct"] = get_memory_info()
if tick % DISK_REFRESH_TICKS == 0:
status["disk_pct"] = get_disk_usage()
if tick % IP_REFRESH_TICKS == 0:
status["ip"] = get_ip_address()
def set_screen_contrast(level):
"""
设置 OLED 屏幕对比度。
参数:
level 范围为 0-255。
数值越大,显示越亮。
数值越小,显示越暗。
"""
level = max(0, min(255, int(level)))
device.contrast(level)
def screen_off():
"""
关闭 OLED 显示。
适合夜间或暂时不需要显示时使用。
"""
device.hide()
def screen_on():
"""
打开 OLED 显示。
与 screen_off 配合使用。
"""
device.show()
def get_cpu_temp():
"""
获取 CPU 温度。
树莓派 CPU 温度通常存放在:
/sys/class/thermal/thermal_zone0/temp
文件中的数值单位是毫摄氏度,因此需要除以 1000。
返回值单位为摄氏度。
"""
try:
with open("/sys/class/thermal/thermal_zone0/temp", "r") as f:
return round(int(f.read().strip()) / 1000, 1)
except (OSError, ValueError):
return 0.0
def get_cpu_alert_symbol(temp):
"""
根据 CPU 温度返回闪烁告警符号。
小于等于 CPU_WARN_TEMP 不显示。
大于 CPU_WARN_TEMP 时闪烁显示。
"""
if temp <= CPU_WARN_TEMP:
return ""
is_visible = int(time.monotonic() / CPU_BLINK_INTERVAL) % 2 == 0
return CPU_ALERT_SYMBOL if is_visible else ""
def get_cpu_usage():
"""
获取 CPU 使用率百分比。
计算方式:
1. 从 /proc/stat 读取 CPU 累计时间。
2. 记录上一次的 idle 和 total。
3. 当前值减去上一次的值,得到间隔时间内的 CPU 使用情况。
4. 使用率 = 1 - idle_delta / total_delta。
首次调用时没有历史数据,因此返回 0.0。
"""
global _last_cpu
try:
with open("/proc/stat", "r") as f:
parts = f.readline().split()
values = list(map(int, parts[1:]))
# idle 是空闲时间,iowait 也计入等待时间
idle = values[3] + values[4]
# total 是所有 CPU 状态时间的总和
total = sum(values)
if _last_cpu is None:
_last_cpu = (idle, total)
return 0.0
last_idle, last_total = _last_cpu
idle_delta = idle - last_idle
total_delta = total - last_total
_last_cpu = (idle, total)
if total_delta <= 0:
return 0.0
usage = (1.0 - idle_delta / total_delta) * 100
return round(usage, 1)
except (OSError, ValueError, IndexError):
return 0.0
def get_memory_info():
"""
获取内存信息。
返回值:
total 总内存,单位 KB
used 已用内存,单位 KB
mem_pct 已用内存百分比
"""
try:
mem_info = {}
with open("/proc/meminfo", "r") as f:
for line in f:
key, value = line.split(":", 1)
mem_info[key] = int(value.strip().split()[0])
total = mem_info.get("MemTotal", 1)
available = mem_info.get("MemAvailable", 0)
used = total - available
if total <= 0:
return 1, 0, 0.0
return total, used, round(used / total * 100, 1)
except (OSError, ValueError, IndexError):
return 1, 0, 0.0
def get_disk_usage():
"""
获取根目录磁盘使用率。
os.statvfs("/") 返回文件系统统计信息。
f_blocks 表示总块数。
f_bavail 表示普通用户可用块数。
f_frsize 表示块大小。
"""
try:
stat = os.statvfs("/")
total = stat.f_blocks * stat.f_frsize
free = stat.f_bavail * stat.f_frsize
if total <= 0:
return 0.0
return round((total - free) / total * 100, 1)
except OSError:
return 0.0
def get_ip_address():
"""
获取当前设备的 IPv4 地址。
优先检查 wlan0。
如果 wlan0 没有 IP,再检查 eth0。
"""
for iface in NETWORK_INTERFACES:
try:
result = subprocess.run(
["ip", "-4", "addr", "show", iface],
capture_output=True,
text=True,
timeout=1
)
except (OSError, subprocess.SubprocessError):
continue
if result.returncode != 0:
continue
for line in result.stdout.splitlines():
if "inet " in line:
return line.strip().split()[1].split("/")[0]
return "No IP"
def get_all_interface_inet_addresses():
"""
获取所有网卡的 IPv4 inet 地址。
数据来源等价于执行:
ip -4 -o addr show
返回值为列表,每个元素包含 iface 和 addr。
addr 保留 CIDR 前缀,例如 192.168.1.10/24。
"""
try:
result = subprocess.run(
["ip", "-4", "-o", "addr", "show"],
capture_output=True,
text=True,
timeout=1
)
except (OSError, subprocess.SubprocessError):
return []
if result.returncode != 0:
return []
addresses = []
for line in result.stdout.splitlines():
parts = line.split()
# ip -o 输出格式通常为:
# 2: eth0 inet 192.168.1.10/24 brd ...
if len(parts) < 4:
continue
iface = parts[1]
family = parts[2]
address = parts[3]
if family != "inet":
continue
addresses.append({
# 保留完整网卡名,显示时再按界面宽度截取。
"iface": iface,
"addr": address,
})
return addresses
def get_time_text():
"""
获取当前时间文本。
冒号每隔一段时间显示或隐藏一次。
例如:
12:34:56
12 34 56
"""
current_time = time.strftime("%H:%M:%S")
colon_visible = int(time.monotonic() / TIME_COLON_BLINK_INTERVAL) % 2 == 0
if colon_visible:
return current_time
return current_time.replace(":", " ")
def get_network_speed():
"""
获取实时网络上传和下载速度。
数据来源:
/proc/net/dev
计算方式:
1. 读取 wlan0 或 eth0 的累计接收字节数和发送字节数。
2. 与上一次读取的字节数做差。
3. 除以时间间隔,得到每秒字节数。
4. 再除以 1024 * 1024,换算为 MB/s。
返回值:
rx_speed 下载速度,单位 MB/s
tx_speed 上传速度,单位 MB/s
"""
global _last_net
try:
rx_bytes = None
tx_bytes = None
with open("/proc/net/dev", "r") as f:
for line in f:
if ":" not in line:
continue
iface, data = line.split(":", 1)
iface = iface.strip()
if iface not in NETWORK_INTERFACES:
continue
fields = data.split()
if len(fields) < 16:
continue
rx_bytes = int(fields[0])
tx_bytes = int(fields[8])
break
if rx_bytes is None or tx_bytes is None:
return 0.0, 0.0
except (OSError, ValueError, IndexError):
return 0.0, 0.0
now = time.monotonic()
if _last_net is None:
_last_net = (now, rx_bytes, tx_bytes)
return 0.0, 0.0
last_time, last_rx, last_tx = _last_net
elapsed = now - last_time
_last_net = (now, rx_bytes, tx_bytes)
if elapsed <= 0:
return 0.0, 0.0
rx_speed = round((rx_bytes - last_rx) / elapsed / 1024 / 1024, 1)
tx_speed = round((tx_bytes - last_tx) / elapsed / 1024 / 1024, 1)
return rx_speed, tx_speed
def is_ignored_process_command(command):
"""
判断进程命令是否需要在进程页中过滤。
当前主要过滤 ps 命令自身。
例如:
ps -ef
ps -eo pcpu=,pmem=,args= --sort=-pcpu
/bin/ps -ef
这样可以避免用于采集进程列表的 ps 自身出现在 OLED 进程页里。
"""
if not command:
return True
first_part = command.strip().split(None, 1)[0]
command_name = os.path.basename(first_part.rstrip("/"))
return command_name == "ps"
def get_top_processes(limit=PROCESS_DISPLAY_ROWS):
"""
获取当前 CPU 占用较高的进程列表。
数据来源等价于执行:
ps -eo pcpu=,pmem=,args= --sort=-pcpu
显示字段保留 CPU、MEM 和 CMD。
CMD 使用完整命令行,不再截取最后一级命令名。
OLED 右侧会自动截断,进程界面可通过 K4/K3 横向滚动查看 CMD。
会过滤 ps 命令自身,避免采集命令出现在列表里。
"""
try:
result = subprocess.run(
[
"ps",
"-eo",
"pcpu=,pmem=,args=",
"--sort=-pcpu",
],
capture_output=True,
text=True,
timeout=1
)
except (OSError, subprocess.SubprocessError):
return []
if result.returncode != 0:
return []
processes = []
for line in result.stdout.splitlines():
parts = line.strip().split(None, 2)
if len(parts) < 3:
continue
try:
cpu_pct = float(parts[0])
mem_pct = float(parts[1])
except ValueError:
continue
command = parts[2].strip()
if is_ignored_process_command(command):
continue
processes.append({
"cpu_pct": cpu_pct,
"mem_pct": mem_pct,
"command": command,
})
if len(processes) >= limit:
break
return processes
def extract_command_name(command_line):
"""
兼容保留的命令名提取函数。
当前进程界面已经改为显示完整 CMD,主流程不再调用此函数。
"""
command_line = command_line.strip()
if not command_line:
return ""
first_part = command_line.split()[0]
# 内核线程通常形如 [kworker/0:1],不要使用 basename 破坏显示。
if first_part.startswith("[") and first_part.endswith("]"):
command = first_part
else:
command = os.path.basename(first_part.rstrip("/")) or first_part
return command[:10]
def get_text_size(draw, text, font=FONT):
"""
获取指定文字的宽度和高度。
新版本 PIL 支持 textbbox。
老版本 PIL 可能只支持 textsize。
"""
try:
bbox = draw.textbbox((0, 0), text, font=font)
return bbox[2] - bbox[0], bbox[3] - bbox[1]
except AttributeError:
return draw.textsize(text, font=font)
def draw_center_text(draw, y, text, font=FONT):
"""
在指定 y 坐标绘制水平居中的文字。
"""
text_w, _ = get_text_size(draw, text, font)
x = max(0, (device.width - text_w) // 2)
draw.text((x, y), text, font=font, fill="white")
def draw_right_text(draw, y, text, font=FONT, right=127):
"""
在指定 y 坐标绘制右对齐文字。
right 默认为 127,对应 128 像素宽屏幕的最右侧。
"""
text_w, _ = get_text_size(draw, text, font)
x = max(0, right - text_w)
draw.text((x, y), text, font=font, fill="white")
def get_process_column_layout(draw, font=FONT):
"""
计算进程界面 CPU、MEM、CMD 三列的横向坐标。
CPU 和 MEM 数值使用右对齐。
数据列宽只按 100.0 这种最大显示值计算,避免表头过宽导致 CMD 被挤出屏幕。
CPU 与 MEM、MEM 与 CMD 之间都使用 PROCESS_COLUMN_GAP_TEXT 指定的间距。
"""
gap_w, _ = get_text_size(draw, PROCESS_COLUMN_GAP_TEXT, font=font)
value_col_w, _ = get_text_size(draw, PROCESS_VALUE_WIDTH_TEXT, font=font)
cpu_x = PROCESS_CPU_HEADER_X
cpu_right_x = cpu_x + value_col_w
mem_x = cpu_right_x + gap_w
mem_right_x = mem_x + value_col_w
cmd_x = mem_right_x + gap_w
return {
"cpu_x": cpu_x,
"cpu_right_x": cpu_right_x,
"mem_x": mem_x,
"mem_right_x": mem_right_x,
"cmd_x": cmd_x,
}
def get_process_max_cmd_scroll(processes, font=FONT):
"""
计算进程界面 CMD 列最大可横向滚动距离。
返回值单位为像素。
"""
if not processes:
return 0
image = Image.new("1", (1, 1))
measure_draw = ImageDraw.Draw(image)
layout = get_process_column_layout(measure_draw, font=font)
cmd_x = layout["cmd_x"]
visible_width = max(0, device.width - cmd_x)
if visible_width <= 0:
return 0
max_cmd_width = 0
for process in processes:
command = process.get("command", "")
cmd_width, _ = get_text_size(measure_draw, command, font=font)
max_cmd_width = max(max_cmd_width, cmd_width)
return max(0, max_cmd_width - visible_width)
def draw_selection_arrow(draw, selected_row):
"""
在当前选中的信息行左侧绘制向右三角箭头。
selected_row 为 None 时不显示箭头。
"""
if selected_row is None:
return
row_y_positions = {
ROW_IP: 17,
ROW_CPU: 31,
ROW_RAM: 45,
}
y = row_y_positions.get(selected_row)
if y is None:
return
draw.text((0, y), SELECT_ARROW, font=FONT, fill="white")
def draw_screen(draw, status, selected_row=None):
"""
绘制主监控界面。
draw_screen 只负责显示,不负责采集数据。
顶部黄色区域:
左侧显示当前时间。
右侧显示下载和上传速度。
下方蓝色区域分为三行:
第 17 行显示 IP 地址。
第 31 行显示 CPU 温度和 CPU 使用率。
第 45 行显示 RAM 和 DSK 使用率。
selected_row 为 None 时不显示选择箭头。
selected_row 为 ROW_IP、ROW_CPU 或 ROW_RAM 时,在对应行左侧显示箭头。
"""
temp = status["temp"]
cpu_pct = status["cpu_pct"]
mem_pct = status["mem_pct"]
disk_pct = status["disk_pct"]
ip = status["ip"]
rx_speed = status["rx_speed"]
tx_speed = status["tx_speed"]
now = get_time_text()
# ↓ 表示下载速度,↑ 表示上传速度
# 这里省略单位 MB/s,节省屏幕空间
net_text = f"↓{rx_speed:.1f} ↑{tx_speed:.1f}"
# 黄色区域,0-15 行
draw.text((0, 0), now, font=FONT, fill="white")
draw_right_text(draw, 0, net_text, font=FONT)
# 顶部区域下方画一条横线,作为视觉分隔
draw.line((0, 15, 127, 15), fill="white")
# 蓝色区域,16-63 行
# 没有显示选择箭头时,三行从最左侧 x=0 开始显示。
# 显示选择箭头时,才为三行统一预留 SELECT_TEXT_X 像素。
text_x = SELECT_TEXT_X if selected_row is not None else 0
draw_selection_arrow(draw, selected_row)
draw.text((text_x, 17), f"IP: {ip}", font=FONT, fill="white")
cpu_alert = get_cpu_alert_symbol(temp)
cpu_text = f"CPU: {temp:.0f}°C ({int(cpu_pct)}%){cpu_alert}"
draw.text((text_x, 31), cpu_text, font=FONT, fill="white")
draw.text(
(text_x, 45),
f"RAM: {int(mem_pct)}% DSK: {int(disk_pct)}%",
font=FONT,
fill="white"
)
def draw_process_screen(draw, processes, cmd_scroll=0):
"""
绘制进程查看界面。
该界面类似精简版 top,只显示三列:
CPU(%) 当前进程 CPU 占用率,保留 1 位小数。
MEM(%) 当前进程内存占用率,保留 1 位小数。
CMD 完整命令行。过长时 OLED 会自动截断,可用 K4/K3 左右滚动查看。
"""
cpu_header = "CPU(%)"
mem_header = "MEM(%)"
cmd_header = "CMD"
# CPU 与 MEM 之间只保留一个空格宽度。
# 这里按当前字体动态计算列宽,避免不同字体下出现间距过大或错位。
layout = get_process_column_layout(draw, font=FONT)
cpu_x = layout["cpu_x"]
cpu_right_x = layout["cpu_right_x"]
mem_x = layout["mem_x"]
mem_right_x = layout["mem_right_x"]
cmd_x = layout["cmd_x"]
# 顶部黄色区域显示列名。
# 表头使用紧凑文本,数据行使用像素列坐标对齐,这样 CMD 可以更早开始显示。
draw.text((0, 0), f"{cpu_header} {mem_header} {cmd_header}", font=FONT, fill="white")
draw.line((0, 15, 127, 15), fill="white")
# 16-63 行高度为 48 像素,使用 12px 字体时刚好显示 4 行。
row_y_positions = (16, 28, 40, 52)
if not processes:
draw.text((0, 28), "No process", font=FONT, fill="white")
return
max_scroll = get_process_max_cmd_scroll(processes)
cmd_scroll = max(0, min(int(cmd_scroll), max_scroll))
# CMD 列从 cmd_x 开始,左侧固定列区域不允许被滚动内容覆盖。
fixed_column_right = cmd_x - 1
for index, process in enumerate(processes[:PROCESS_DISPLAY_ROWS]):
y = row_y_positions[index]
cpu_pct = process["cpu_pct"]
mem_pct = process["mem_pct"]
command = process["command"]
cpu_text = f"{cpu_pct:.1f}"
mem_text = f"{mem_pct:.1f}"
# 先绘制可横向滚动的 CMD。超出屏幕右侧的部分会被 OLED 画布自动截断。
draw.text((cmd_x - cmd_scroll, y), command, font=FONT, fill="white")
# 再清理并绘制固定列,避免 CMD 左移时覆盖 CPU 和 MEM。
draw.rectangle((0, y, fixed_column_right, y + 11), fill="black")
draw_right_text(draw, y, cpu_text, font=FONT, right=cpu_right_x)
draw_right_text(draw, y, mem_text, font=FONT, right=mem_right_x)
def draw_ip_detail_screen(draw, addresses, offset=0):
"""
绘制所有网卡 inet 地址界面。
一页显示 4 行。
如果地址数量超过一页,可以通过 offset 显示后续内容。
网卡名只显示最后 5 位,IP 地址不显示 CIDR 后缀,方便在 128 像素宽度内显示。
"""
draw.text((0, 0), "IFACE INET", font=FONT_SMALL, fill="white")
draw.line((0, 15, 127, 15), fill="white")
row_y_positions = (16, 28, 40, 52)
if not addresses:
draw.text((0, 28), "No inet", font=FONT_SMALL, fill="white")
return
visible_addresses = addresses[offset:offset + IP_DETAIL_DISPLAY_ROWS]
for index, item in enumerate(visible_addresses):
y = row_y_positions[index]
iface = item["iface"]
addr = item["addr"]
# 网口名只显示最后 5 位,不足 5 位时右侧补空格。
# 例如 abcdefg 显示为 cdefg,lo 显示为 "lo "。
iface_display = iface[-IP_DETAIL_IFACE_CHARS:].ljust(IP_DETAIL_IFACE_CHARS)
# ip -4 -o addr show 返回的地址通常带 CIDR,例如 192.168.1.117/24。
# OLED 上只显示纯 IP,保证 wlan0 192.168.1.117 这类内容能放进一行。
addr_display = addr.split("/", 1)[0]
row_text = f"{iface_display} {addr_display}"
draw.text((0, y), row_text, font=FONT_SMALL, fill="white")
def setup_buttons():
"""
初始化四个按键输入。
当前配置使用 BCM 编号和内部上拉。
按键按下时读取到 GPIO.LOW。
"""
if GPIO is None:
raise RuntimeError("未找到 RPi.GPIO,请在树莓派环境中运行,或先安装 RPi.GPIO / rpi-lgpio")
GPIO.setwarnings(False)
GPIO.setmode(GPIO.BCM)
pull_mode = GPIO.PUD_UP if BUTTON_ACTIVE_LOW else GPIO.PUD_DOWN
for _, pin in BUTTONS:
GPIO.setup(pin, GPIO.IN, pull_up_down=pull_mode)
def read_pressed_button():
"""
读取当前按下的按键名称。
如果没有按键按下,返回 None。
如果多个按键同时按下,按照 BUTTONS 中的顺序返回第一个。
"""
for name, pin in BUTTONS:
value = GPIO.input(pin)
if BUTTON_ACTIVE_LOW:
if value == GPIO.LOW:
return name
else:
if value == GPIO.HIGH:
return name
return None
def read_debounced_button():
"""
读取消抖后的按键名称。
第一次检测到按下后等待一小段时间,再次确认是否仍是同一按键。
"""
first = read_pressed_button()
if first is None:
return None
time.sleep(BUTTON_DEBOUNCE_SECONDS)
second = read_pressed_button()
if first == second:
return first
return None
def wait_button_release(button_name):
"""
等待指定按键松开。
这样可以避免长按一次按键时,在终端中反复打印同一个按键名称。
"""
while read_pressed_button() == button_name:
time.sleep(0.02)
def handle_main_screen_button(button_name, selected_row):
"""
根据主界面的按键动作更新当前选择箭头位置。
约定:
K4 表示向上。
K3 表示向下。
K2 表示 enter / 确认。
K1 表示 return / 取消。
兼容前一版行为:没有箭头时按 K2,先在 IP 行显示箭头。
当箭头位于 IP 行时按 K2,调用方会进入网卡 inet 地址界面。
当箭头位于 CPU 行时按 K2,调用方会进入进程查看界面。
"""
if button_name == "K1":
return None, None
if button_name == "K2":
if selected_row is None:
return ROW_IP, None
if selected_row == ROW_IP:
return selected_row, SCREEN_IP_DETAIL
if selected_row == ROW_CPU:
return selected_row, SCREEN_PROCESS
return selected_row, None
if selected_row is None:
return selected_row, None
if button_name == "K4":
return max(ROW_IP, selected_row - 1), None
if button_name == "K3":
return min(ROW_RAM, selected_row + 1), None
return selected_row, None
def main_monitor_with_buttons():
"""
系统监控与按键选择箭头入口。
保留原有监控显示逻辑,同时增加按键监听:
K4 向上移动选择箭头。
K3 向下移动选择箭头。
K2 作为 enter / 确认,没有箭头时先在 IP 行显示箭头。
K1 作为 return / 取消,主界面取消箭头,进程界面返回主界面。
当选择箭头停在 IP 行时按 K2,进入所有网卡 inet 地址界面。
当选择箭头停在 CPU 行时按 K2,进入进程查看界面。
进程查看界面只显示 CPU、MEM、CMD 三列,CMD 支持横向滚动。
"""
print("OLED 监控已启动(按键选择与进程查看版),按 Ctrl+C 退出")
print("K4=上移, K3=下移, K2=确认, K1=取消/返回")
print("IP 行按 K2 进入网卡 inet 地址界面,K1 返回")
print("CPU 行按 K2 进入进程界面,K4/K3 左右移动 CMD,K1 返回")
print("K1=BCM4, K2=BCM17, K3=BCM27, K4=BCM22")
# 启动时应用一次对比度设置
set_screen_contrast(SCREEN_CONTRAST)
# 初始化按键输入
setup_buttons()
# 启动页显示一次
with canvas(device) as draw:
draw_center_text(draw, 15, "System Monitor", font=FONT_TITLE)
draw_center_text(draw, 49, "小锋学长生活大爆炸", font=FONT)
time.sleep(1.5)
status = create_status()
processes = []
process_cmd_scroll = 0
inet_addresses = []
ip_detail_offset = 0
tick = 0
selected_row = None
screen_mode = SCREEN_MAIN
next_status_update = 0.0
next_process_update = 0.0
next_ip_detail_update = 0.0
next_display_refresh = 0.0
try:
while True:
now = time.monotonic()
# 按键采用短轮询,让选择箭头和界面切换响应更及时。
pressed_button = read_debounced_button()
if pressed_button is not None:
if screen_mode == SCREEN_PROCESS:
if pressed_button == "K1":
screen_mode = SCREEN_MAIN
elif pressed_button == "K4":
process_cmd_scroll = max(0, process_cmd_scroll - PROCESS_CMD_SCROLL_STEP)
elif pressed_button == "K3":
max_scroll = get_process_max_cmd_scroll(processes)
process_cmd_scroll = min(
max_scroll,
process_cmd_scroll + PROCESS_CMD_SCROLL_STEP
)
elif screen_mode == SCREEN_IP_DETAIL:
if pressed_button == "K1":
screen_mode = SCREEN_MAIN
elif pressed_button == "K2":
inet_addresses = get_all_interface_inet_addresses()
ip_detail_offset = min(
ip_detail_offset,
max(0, len(inet_addresses) - IP_DETAIL_DISPLAY_ROWS)
)
next_ip_detail_update = time.monotonic() + IP_DETAIL_REFRESH_INTERVAL
elif pressed_button == "K4":
ip_detail_offset = max(0, ip_detail_offset - 1)
elif pressed_button == "K3":
max_offset = max(0, len(inet_addresses) - IP_DETAIL_DISPLAY_ROWS)
ip_detail_offset = min(max_offset, ip_detail_offset + 1)
else:
selected_row, target_screen = handle_main_screen_button(
pressed_button,
selected_row
)
if target_screen == SCREEN_IP_DETAIL:
screen_mode = SCREEN_IP_DETAIL
inet_addresses = get_all_interface_inet_addresses()
ip_detail_offset = 0
next_ip_detail_update = time.monotonic() + IP_DETAIL_REFRESH_INTERVAL
elif target_screen == SCREEN_PROCESS:
screen_mode = SCREEN_PROCESS
processes = get_top_processes(PROCESS_DISPLAY_ROWS)
process_cmd_scroll = 0
next_process_update = time.monotonic() + PROCESS_REFRESH_INTERVAL
else:
pass
with canvas(device) as draw:
if screen_mode == SCREEN_PROCESS:
draw_process_screen(draw, processes, process_cmd_scroll)
elif screen_mode == SCREEN_IP_DETAIL:
draw_ip_detail_screen(draw, inet_addresses, ip_detail_offset)
else:
draw_screen(draw, status, selected_row)
wait_button_release(pressed_button)
next_display_refresh = 0.0
now = time.monotonic()
# 系统数据仍然按 REFRESH_INTERVAL 的节奏刷新。
if now >= next_status_update:
update_status(status, tick)
tick += 1
next_status_update = now + REFRESH_INTERVAL
# 进程界面下,进程列表按 PROCESS_REFRESH_INTERVAL 刷新。
if screen_mode == SCREEN_PROCESS and now >= next_process_update:
processes = get_top_processes(PROCESS_DISPLAY_ROWS)
process_cmd_scroll = min(
process_cmd_scroll,
get_process_max_cmd_scroll(processes)
)
next_process_update = now + PROCESS_REFRESH_INTERVAL
# IP 详情界面下,网卡 inet 地址按 IP_DETAIL_REFRESH_INTERVAL 刷新。
if screen_mode == SCREEN_IP_DETAIL and now >= next_ip_detail_update:
inet_addresses = get_all_interface_inet_addresses()
ip_detail_offset = min(
ip_detail_offset,
max(0, len(inet_addresses) - IP_DETAIL_DISPLAY_ROWS)
)
next_ip_detail_update = now + IP_DETAIL_REFRESH_INTERVAL
# OLED 画面可以更频繁重绘,用于时间冒号闪烁和按键状态显示。
if now >= next_display_refresh:
with canvas(device) as draw:
if screen_mode == SCREEN_PROCESS:
draw_process_screen(draw, processes, process_cmd_scroll)
elif screen_mode == SCREEN_IP_DETAIL:
draw_ip_detail_screen(draw, inet_addresses, ip_detail_offset)
else:
draw_screen(draw, status, selected_row)
next_display_refresh = now + DISPLAY_REFRESH_INTERVAL
time.sleep(BUTTON_POLL_INTERVAL)
except KeyboardInterrupt:
print("\n已退出")
finally:
if GPIO is not None:
GPIO.cleanup()
# 清空 OLED 屏幕
with canvas(device) as draw:
pass
def main_monitor_original():
"""
程序入口。
启动流程:
1. 打印启动提示。
2. 应用屏幕对比度设置。
3. 显示启动页。
4. 初始化状态。
5. 进入循环,每隔 REFRESH_INTERVAL 秒刷新一次 OLED。
6. 按 Ctrl+C 退出时清空屏幕。
"""
print("OLED 监控已启动(双色屏适配版),按 Ctrl+C 退出")
# 启动时应用一次对比度设置
set_screen_contrast(SCREEN_CONTRAST)
# 启动页显示一次
with canvas(device) as draw:
draw_center_text(draw, 15, "System Monitor", font=FONT_TITLE)
draw_center_text(draw, 49, "小锋学长生活大爆炸", font=FONT)
time.sleep(1.5)
status = create_status()
tick = 0
try:
while True:
update_status(status, tick)
with canvas(device) as draw:
draw_screen(draw, status)
tick += 1
time.sleep(REFRESH_INTERVAL)
except KeyboardInterrupt:
print("\n已退出")
# 清空 OLED 屏幕
with canvas(device) as draw:
pass
def main():
"""当前默认入口:运行系统监控与按键选择箭头功能。"""
# 原有纯系统监控逻辑保留在 main_monitor_original() 中。
# 如需恢复不带按键监听的旧逻辑,可以注释下一行并改为调用 main_monitor_original()。
# main_monitor_original()
main_monitor_with_buttons()
if __name__ == "__main__":
main()
八、显示中文
默认字体不支持中文,需要加载中文字体。以霞鹜文楷字体为例,开源免费,显示效果很好:
mkdir -p ~/.fonts && wget -q -O ~/.fonts/chinese.ttf "https://pcdn.xfxuezhang.cn/https://github.com/lxgw/LxgwWenKai/releases/download/v1.510/LXGWWenKai-Regular.ttf"对于缺少字体,可以参考以下两种方式:
方案一:安装其他 apt 字体包
# 方案 A:思源黑体(Noto CJK,现代且完整)
sudo apt install -y fonts-noto-cjk

# 方案 B:文泉驿微米黑(更轻量)
sudo apt install -y fonts-wqy-microhei
装完后在 Python 中使用:
# 思源黑体路径
font = ImageFont.truetype("/usr/share/fonts/opentype/noto/NotoSansCJK-Regular.ttc", 12)

# 或文泉驿微米黑路径
font = ImageFont.truetype("/usr/share/fonts/truetype/wqy/wqy-microhei.ttc", 12)
方案二:直接下载字体文件
如果 apt 里都没有,直接下载一个开源中文字体到本地:
# 创建字体目录
mkdir -p ~/.fonts

# 下载思源黑体(Google 官方源,7MB 左右)
wget -O ~/.fonts/NotoSansSC-Regular.otf \
  "https://github.com/googlefonts/noto-cjk/raw/main/Sans/OTF/SimplifiedChinese/NotoSansSC-Regular.otf"
然后在代码里直接用:
font = ImageFont.truetype("/home/pi/.fonts/NotoSansSC-Regular.otf", 12)
在代码中加载:
from PIL import ImageFont

# 加载中文字体,字号 12
font = ImageFont.truetype("/home/pi/.fonts/chinese.ttf", 12)

with canvas(device) as draw:
    draw.text((0, 0), "你好,树莓派!", font=font, fill="white")
    draw.text((0, 20), "SSD1315 屏幕测试", font=font, fill="white")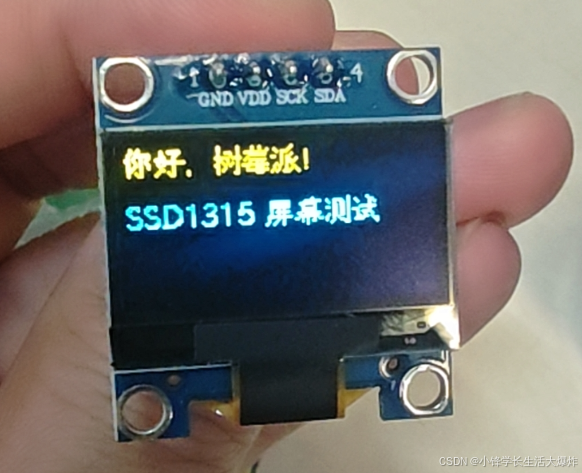
九、完整版!树莓派系统监控面板
下面是一个功能完整的 树莓派 OLED 系统监控面板,可以实时显示 CPU、内存、磁盘、网络、IP 和温度等关键信息。
#!/usr/bin/env python3
# -*- coding: utf-8 -*-
"""
树莓派 OLED 系统监控面板 - 适配双色 OLED 版

功能说明:
1. 在 128x64 OLED 屏幕上显示系统运行状态。
2. 顶部黄色区域显示当前时间和实时网速。
3. 下方蓝色区域显示 IP 地址、CPU 温度、CPU 使用率、内存占用率和磁盘占用率。
4. 启动时显示居中的启动页文字。
5. 支持配置屏幕旋转方向和屏幕对比度。
6. CPU 温度超过阈值时显示闪烁告警符号。
7. 顶部时间冒号闪烁显示。
"""

import os
import time
import subprocess

from luma.core.interface.serial import i2c
from luma.core.render import canvas
from luma.oled.device import ssd1306
from PIL import ImageFont

# =========================
# OLED 基础配置
# =========================

# 树莓派默认 I2C 总线通常为 1
I2C_PORT = 1

# SSD1306 OLED 常见 I2C 地址为 0x3C
I2C_ADDRESS = 0x3C

# 屏幕刷新间隔,单位为秒
REFRESH_INTERVAL = 1.0

# 屏幕旋转方向
# 0 表示不旋转
# 1 表示顺时针旋转 90°
# 2 表示旋转 180°
# 3 表示顺时针旋转 270°
SCREEN_ROTATE = 0

# 屏幕对比度,范围 0-255
# 数值越大越亮,越小越暗
# OLED 没有传统 LCD 背光,这里调节的是 SSD1306 对比度
SCREEN_CONTRAST = 160

# 需要检查的网络接口,优先 wlan0,再检查 eth0
NETWORK_INTERFACES = ("wlan0", "eth0")

# =========================
# 刷新策略配置
# =========================

# 低频信息刷新间隔,单位为主循环次数
# 如果 REFRESH_INTERVAL = 1.0,那么 10 次就是约 10 秒
IP_REFRESH_TICKS = 600
MEMORY_REFRESH_TICKS = 5
DISK_REFRESH_TICKS = 10

# 时间冒号闪烁间隔,单位为秒
TIME_COLON_BLINK_INTERVAL = 1.0

# CPU 温度告警阈值
CPU_WARN_TEMP = 50.0

# CPU 告警符号
# 如果 OLED 显示为方框,可以改成 " ▲" 或 " !"
CPU_ALERT_SYMBOL = "   ⚠"

# CPU 告警符号闪烁间隔,单位为秒
CPU_BLINK_INTERVAL = 1.0

# =========================
# OLED 初始化
# =========================

# 初始化 I2C 通信接口
serial = i2c(port=I2C_PORT, address=I2C_ADDRESS)

# 初始化 OLED 设备
device = ssd1306(
    serial,
    width=128,
    height=64,
    rotate=SCREEN_ROTATE
)

# 设置屏幕对比度
device.contrast(SCREEN_CONTRAST)

# =========================
# 字体配置
# =========================

# 主界面字体,支持中文、箭头和温度符号
FONT_MAIN = ImageFont.truetype("/home/sxf/.fonts/chinese.ttf", 12)

# 启动页标题字体
FONT_TITLE = ImageFont.truetype("/home/sxf/.fonts/chinese.ttf", 12)

# 默认字体,后续绘制函数默认使用这个字体
FONT = FONT_MAIN

# 双色屏分界线大约在第 15-16 行
# 0-15 行为黄色区域
# 16-63 行为蓝色区域

# =========================
# 全局运行状态
# =========================

_last_cpu = None
_last_net = None


def create_status():
    """
    创建屏幕显示状态。

    高频数据每次循环更新。
    低频数据按 tick 间隔更新。
    """
    return {
        "temp": 0.0,
        "cpu_pct": 0.0,
        "mem_pct": 0.0,
        "disk_pct": 0.0,
        "ip": "Loading",
        "rx_speed": 0.0,
        "tx_speed": 0.0,
    }


def update_status(status, tick):
    """
    更新屏幕显示状态。

    tick 从 0 开始。
    高频数据每次更新。
    低频数据按配置的 tick 间隔更新。
    """
    status["temp"] = get_cpu_temp()
    status["cpu_pct"] = get_cpu_usage()
    status["rx_speed"], status["tx_speed"] = get_network_speed()

    if tick % MEMORY_REFRESH_TICKS == 0:
        _, _, status["mem_pct"] = get_memory_info()

    if tick % DISK_REFRESH_TICKS == 0:
        status["disk_pct"] = get_disk_usage()

    if tick % IP_REFRESH_TICKS == 0:
        status["ip"] = get_ip_address()


def set_screen_contrast(level):
    """
    设置 OLED 屏幕对比度。

    参数:
    level 范围为 0-255。
    数值越大,显示越亮。
    数值越小,显示越暗。
    """
    level = max(0, min(255, int(level)))
    device.contrast(level)


def screen_off():
    """
    关闭 OLED 显示。

    适合夜间或暂时不需要显示时使用。
    """
    device.hide()


def screen_on():
    """
    打开 OLED 显示。

    与 screen_off 配合使用。
    """
    device.show()


def get_cpu_temp():
    """
    获取 CPU 温度。

    树莓派 CPU 温度通常存放在:
    /sys/class/thermal/thermal_zone0/temp

    文件中的数值单位是毫摄氏度,因此需要除以 1000。
    返回值单位为摄氏度。
    """
    try:
        with open("/sys/class/thermal/thermal_zone0/temp", "r") as f:
            return round(int(f.read().strip()) / 1000, 1)

    except (OSError, ValueError):
        return 0.0


def get_cpu_alert_symbol(temp):
    """
    根据 CPU 温度返回闪烁告警符号。

    小于等于 CPU_WARN_TEMP 不显示。
    大于 CPU_WARN_TEMP 时闪烁显示。
    """
    if temp <= CPU_WARN_TEMP:
        return ""

    is_visible = int(time.monotonic() / CPU_BLINK_INTERVAL) % 2 == 0

    return CPU_ALERT_SYMBOL if is_visible else ""


def get_cpu_usage():
    """
    获取 CPU 使用率百分比。

    计算方式:
    1. 从 /proc/stat 读取 CPU 累计时间。
    2. 记录上一次的 idle 和 total。
    3. 当前值减去上一次的值,得到间隔时间内的 CPU 使用情况。
    4. 使用率 = 1 - idle_delta / total_delta。

    首次调用时没有历史数据,因此返回 0.0。
    """
    global _last_cpu

    try:
        with open("/proc/stat", "r") as f:
            parts = f.readline().split()

        values = list(map(int, parts[1:]))

        # idle 是空闲时间,iowait 也计入等待时间
        idle = values[3] + values[4]

        # total 是所有 CPU 状态时间的总和
        total = sum(values)

        if _last_cpu is None:
            _last_cpu = (idle, total)
            return 0.0

        last_idle, last_total = _last_cpu
        idle_delta = idle - last_idle
        total_delta = total - last_total

        _last_cpu = (idle, total)

        if total_delta <= 0:
            return 0.0

        usage = (1.0 - idle_delta / total_delta) * 100

        return round(usage, 1)

    except (OSError, ValueError, IndexError):
        return 0.0


def get_memory_info():
    """
    获取内存信息。

    返回值:
    total    总内存,单位 KB
    used     已用内存,单位 KB
    mem_pct  已用内存百分比
    """
    try:
        mem_info = {}

        with open("/proc/meminfo", "r") as f:
            for line in f:
                key, value = line.split(":", 1)
                mem_info[key] = int(value.strip().split()[0])

        total = mem_info.get("MemTotal", 1)
        available = mem_info.get("MemAvailable", 0)
        used = total - available

        if total <= 0:
            return 1, 0, 0.0

        return total, used, round(used / total * 100, 1)

    except (OSError, ValueError, IndexError):
        return 1, 0, 0.0


def get_disk_usage():
    """
    获取根目录磁盘使用率。

    os.statvfs("/") 返回文件系统统计信息。
    f_blocks 表示总块数。
    f_bavail 表示普通用户可用块数。
    f_frsize 表示块大小。
    """
    try:
        stat = os.statvfs("/")

        total = stat.f_blocks * stat.f_frsize
        free = stat.f_bavail * stat.f_frsize

        if total <= 0:
            return 0.0

        return round((total - free) / total * 100, 1)

    except OSError:
        return 0.0


def get_ip_address():
    """
    获取当前设备的 IPv4 地址。

    优先检查 wlan0。
    如果 wlan0 没有 IP,再检查 eth0。
    """
    for iface in NETWORK_INTERFACES:
        try:
            result = subprocess.run(
                ["ip", "-4", "addr", "show", iface],
                capture_output=True,
                text=True,
                timeout=1
            )

        except (OSError, subprocess.SubprocessError):
            continue

        if result.returncode != 0:
            continue

        for line in result.stdout.splitlines():
            if "inet " in line:
                return line.strip().split()[1].split("/")[0]

    return "No IP"


def get_time_text():
    """
    获取当前时间文本。

    冒号每隔一段时间显示或隐藏一次。
    例如:
    12:34:56
    12 34 56
    """
    current_time = time.strftime("%H:%M:%S")
    colon_visible = int(time.monotonic() / TIME_COLON_BLINK_INTERVAL) % 2 == 0

    if colon_visible:
        return current_time

    return current_time.replace(":", " ")


def get_network_speed():
    """
    获取实时网络上传和下载速度。

    数据来源:
    /proc/net/dev

    计算方式:
    1. 读取 wlan0 或 eth0 的累计接收字节数和发送字节数。
    2. 与上一次读取的字节数做差。
    3. 除以时间间隔,得到每秒字节数。
    4. 再除以 1024 * 1024,换算为 MB/s。

    返回值:
    rx_speed 下载速度,单位 MB/s
    tx_speed 上传速度,单位 MB/s
    """
    global _last_net

    try:
        rx_bytes = None
        tx_bytes = None

        with open("/proc/net/dev", "r") as f:
            for line in f:
                if ":" not in line:
                    continue

                iface, data = line.split(":", 1)
                iface = iface.strip()

                if iface not in NETWORK_INTERFACES:
                    continue

                fields = data.split()

                if len(fields) < 16:
                    continue

                rx_bytes = int(fields[0])
                tx_bytes = int(fields[8])
                break

        if rx_bytes is None or tx_bytes is None:
            return 0.0, 0.0

    except (OSError, ValueError, IndexError):
        return 0.0, 0.0

    now = time.monotonic()

    if _last_net is None:
        _last_net = (now, rx_bytes, tx_bytes)
        return 0.0, 0.0

    last_time, last_rx, last_tx = _last_net
    elapsed = now - last_time

    _last_net = (now, rx_bytes, tx_bytes)

    if elapsed <= 0:
        return 0.0, 0.0

    rx_speed = round((rx_bytes - last_rx) / elapsed / 1024 / 1024, 1)
    tx_speed = round((tx_bytes - last_tx) / elapsed / 1024 / 1024, 1)

    return rx_speed, tx_speed


def get_text_size(draw, text, font=FONT):
    """
    获取指定文字的宽度和高度。

    新版本 PIL 支持 textbbox。
    老版本 PIL 可能只支持 textsize。
    """
    try:
        bbox = draw.textbbox((0, 0), text, font=font)
        return bbox[2] - bbox[0], bbox[3] - bbox[1]

    except AttributeError:
        return draw.textsize(text, font=font)


def draw_center_text(draw, y, text, font=FONT):
    """
    在指定 y 坐标绘制水平居中的文字。
    """
    text_w, _ = get_text_size(draw, text, font)
    x = max(0, (device.width - text_w) // 2)
    draw.text((x, y), text, font=font, fill="white")


def draw_right_text(draw, y, text, font=FONT, right=127):
    """
    在指定 y 坐标绘制右对齐文字。

    right 默认为 127,对应 128 像素宽屏幕的最右侧。
    """
    text_w, _ = get_text_size(draw, text, font)
    x = max(0, right - text_w)
    draw.text((x, y), text, font=font, fill="white")


def draw_screen(draw, status):
    """
    绘制主监控界面。

    draw_screen 只负责显示,不负责采集数据。

    顶部黄色区域:
    左侧显示当前时间。
    右侧显示下载和上传速度。

    下方蓝色区域:
    第 17 行显示 IP 地址。
    第 31 行显示 CPU 温度和 CPU 使用率。
    第 45 行显示 RAM 和 DSK 使用率。
    """
    temp = status["temp"]
    cpu_pct = status["cpu_pct"]
    mem_pct = status["mem_pct"]
    disk_pct = status["disk_pct"]
    ip = status["ip"]
    rx_speed = status["rx_speed"]
    tx_speed = status["tx_speed"]

    now = get_time_text()

    # ↓ 表示下载速度,↑ 表示上传速度
    # 这里省略单位 MB/s,节省屏幕空间
    net_text = f"↓{rx_speed:.1f} ↑{tx_speed:.1f}"

    # 黄色区域,0-15 行
    draw.text((0, 0), now, font=FONT, fill="white")
    draw_right_text(draw, 0, net_text, font=FONT)

    # 顶部区域下方画一条横线,作为视觉分隔
    draw.line((0, 15, 127, 15), fill="white")

    # 蓝色区域,16-63 行
    draw.text((0, 17), f"IP: {ip}", font=FONT, fill="white")

    cpu_alert = get_cpu_alert_symbol(temp)
    cpu_text = f"CPU: {temp:.0f}°C ({int(cpu_pct)}%){cpu_alert}"
    draw.text((0, 31), cpu_text, font=FONT, fill="white")

    draw.text(
        (0, 45),
        f"RAM: {int(mem_pct)}%  DSK: {int(disk_pct)}%",
        font=FONT,
        fill="white"
    )


def main():
    """
    程序入口。

    启动流程:
    1. 打印启动提示。
    2. 应用屏幕对比度设置。
    3. 显示启动页。
    4. 初始化状态。
    5. 进入循环,每隔 REFRESH_INTERVAL 秒刷新一次 OLED。
    6. 按 Ctrl+C 退出时清空屏幕。
    """
    print("OLED 监控已启动(双色屏适配版),按 Ctrl+C 退出")

    # 启动时应用一次对比度设置
    set_screen_contrast(SCREEN_CONTRAST)

    # 启动页显示一次
    with canvas(device) as draw:
        draw_center_text(draw, 15, "System Monitor", font=FONT_TITLE)
        draw_center_text(draw, 49, "小锋学长生活大爆炸", font=FONT)

    time.sleep(1.5)

    status = create_status()
    tick = 0

    try:
        while True:
            update_status(status, tick)

            with canvas(device) as draw:
                draw_screen(draw, status)

            tick += 1
            time.sleep(REFRESH_INTERVAL)

    except KeyboardInterrupt:
        print("\n已退出")

        # 清空 OLED 屏幕
        with canvas(device) as draw:
            pass


if __name__ == "__main__":
    main()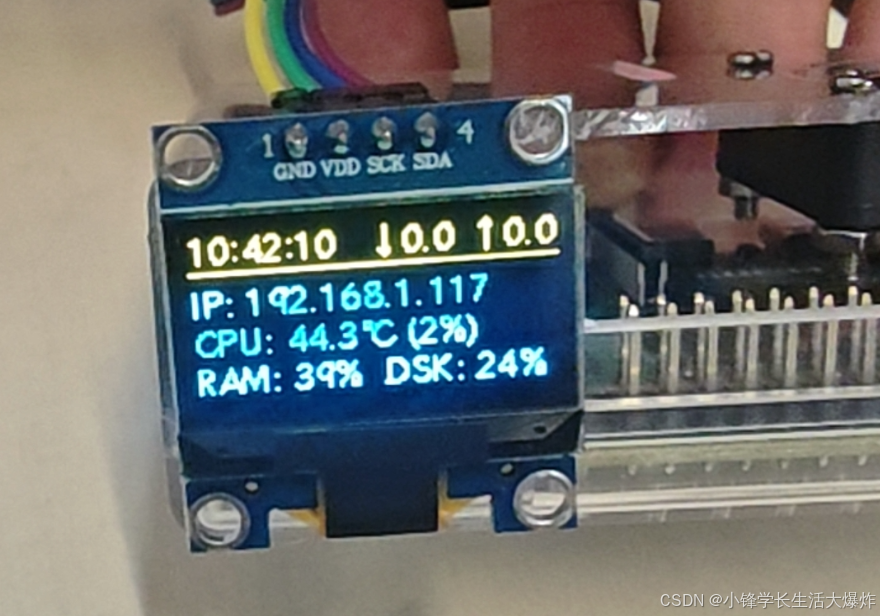
设置开机自启动
如果你希望树莓派开机后自动运行这个监控:
sudo nano /etc/systemd/system/oled-monitor.service粘贴以下内容:
[Unit]
Description=OLED System Monitor
After=network.target

[Service]
Type=simple
User=pi
WorkingDirectory=/home/pi
ExecStart=/usr/bin/python3 /home/pi/system_monitor.py
Restart=always

[Install]
WantedBy=multi-user.target
启用并启动:
sudo systemctl daemon-reload
sudo systemctl enable oled-monitor
sudo systemctl start oled-monitor

# 查看状态
sudo systemctl status oled-monitor
这样每次开机,OLED 就会自动显示系统状态了。
十、常见问题排查
| 现象 | 可能原因 | 解决方案 |
|---|---|---|
| 屏幕完全不亮 | VCC 供电不足或接错 | 尝试换到 5V 引脚;检查接线 |
i2cdetect 无地址 |
SDA/SCL 接反;I2C 未开启 | 检查接线;重新运行 raspi-config 开启 I2C |
| 显示花屏/偏移 | 驱动芯片兼容性问题 | SSD1315 基本兼容 SSD1306,若异常可尝试 sh1106 驱动 |
| 中文显示为方块 | 未加载中文字体 | 安装 fonts-wqy-zenhei 并在代码中指定字体路径 |
| 屏幕有残影 | OLED 特性导致 | 属于正常现象,可通过定期清屏或显示反色缓解 |
结语
SSD1315 与 SSD1306 的高度兼容性,使得我们可以直接使用成熟的 luma.oled 库来驱动这块屏幕。通过本文的步骤,你应该已经成功点亮了屏幕。在此基础上,你可以进一步开发:
-
温湿度传感器数据显示
-
网络状态监控面板
-
小型游戏或动画效果
-
与 MQTT、Home Assistant 联动的智能家居信息屏
希望这篇教程对你有所帮助,欢迎在评论区交流遇到的问题!

智能硬件社区聚焦AI智能硬件技术生态,汇聚嵌入式AI、物联网硬件开发者,打造交流分享平台,同步全国赛事资讯、开展 OPC 核心人才招募,助力技术落地与开发者成长。
更多推荐
 7
7 0
0- 0


 已为社区贡献2条内容

所有评论(0)