骁龙座舱平台核心解析(6): 车载摄像头驱动开发与360°全景环视(AVM)系统实战
·
💡 前言
本文以第四代骁龙座舱平台(SA8295P)的环境为例,进行车载摄像头驱动开发与360°全景环视(AVM)系统实战。360°全景环视(Around View Monitor, AVM)是智能座舱的标配功能,也是 SA8295P 的核心应用场景之一。我们将从摄像头硬件接入、驱动开发、图像拼接算法到完整 AVM 系统实现,完整呈现工程实践全流程。
一、SA8295P 摄像头子系统架构
1.1 硬件数据流架构
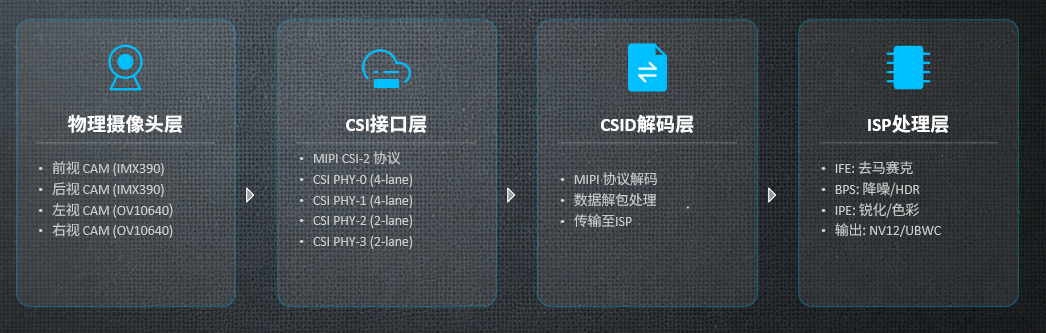
Camera Sensor (IMX390/OV10640)
    ↓ MIPI CSI-2
SerDes (MAX96717 串化器) → 同轴电缆 → SerDes (MAX96724 解串器)
    ↓ MIPI CSI-2
SA8295P CSI-2 PHY (4x 4-lane)
    ↓
Spectra 395 ISP (Image Signal Processor)
    ├── BPS (Bayer Processing Segment) - 原始RAW处理
    ├── IPE (Image Processing Engine) - YUV处理
    └── IFE (Image Front End) - 统计信息
    ↓ NV12/UBWC 格式输出
CamX Framework (Qualcomm Camera Middleware - Pipeline管理)
    ├── Pipeline 0: Preview + AVM
    ├── Pipeline 1: Video Record
    └── Pipeline 2: Snapshot
    ↓
AVM 处理管线 (GPU/DSP拼接) → Camera HAL 3 → DPU输出到屏幕 / App
1.2 SerDes 远距离传输方案
车载摄像头通常距离 SoC 较远(线束 2-5m),需要通过 SerDes 进行长距离传输:
Camera Sensor (IMX390) → MIPI CSI → MAX96717 (串化器) → 同轴电缆(>5m) → MAX96724 (解串器) → MIPI CSI → SA8295P
典型配置:
- GMSL2 (Maxim): MAX96717(Ser) + MAX96724(Des), 6Gbps
- FPD-Link III (TI): DS90UB953(Ser) + DS90UB954(Des), 4.16Gbps
二、摄像头驱动开发
2.1 Sensor 驱动 (以 IMX390 为例)
imx390_sensor.c 关键代码片段:
/*
 * IMX390 传感器驱动 (I2C 寄存器配置)
 */

#include <linux/module.h>
#include <linux/i2c.h>
#include <media/v4l2-subdev.h>
#include "cam_sensor_dev.h"

#define IMX390_I2C_ADDR       0x1A
#define IMX390_CHIP_ID_REG    0x3000
#define IMX390_CHIP_ID_VALUE  0x0390

/* 初始化寄存器序列 */
static const struct cam_sensor_i2c_reg_array imx390_init_regs[] = {
    {0x3000, 0x00, 0x00, 0}, /* 进入待机模式 */
    {0x3002, 0x01, 0x00, 0}, /* 重置 */
    {0x3018, 0x04, 0x00, 0}, /* 全幅模式 */
    {0x3020, 0x00, 0x00, 0}, /* HADD */
    {0x3021, 0x00, 0x00, 0}, /* VADD */
    {0x3022, 0x00, 0x00, 0}, /* ADBIT: 12bit */
    /* 曝光控制 */
    {0x3060, 0x11, 0x00, 0}, /* SHS1 */
    {0x3061, 0x00, 0x00, 0},
    {0x3062, 0x00, 0x00, 0},
    /* 增益控制 */
    {0x3070, 0x00, 0x00, 0}, /* GAIN */
    {0x3071, 0x00, 0x00, 0},
    /* MIPI 输出配置 */
    {0x3480, 0x49, 0x00, 0}, /* INCSEL1 */
    {0x3481, 0x00, 0x00, 0}, /* INCSEL2 */
    /* 帧率: VMAX=1125, HMAX=2200 - 30fps@24MHz */
    {0x300A, 0x65, 0x00, 0}, /* VMAX_L */
    {0x300B, 0x04, 0x00, 0}, /* VMAX_H */
    {0x300C, 0x98, 0x00, 0}, /* HMAX_L */
    {0x300D, 0x08, 0x00, 0}, /* HMAX_H */
};

/* Sensor 1920x1080@30fps 流配置 */
static const struct cam_sensor_i2c_reg_array imx390_1080p30_regs[] = {
    {0x3018, 0x04, 0x00, 0}, /* 全幅模式 */
    {0x300A, 0x65, 0x00, 0}, /* VMAX = 1125 */
    {0x300B, 0x04, 0x00, 0},
    {0x300C, 0x98, 0x00, 0}, /* HMAX = 2200 */
    {0x300D, 0x08, 0x00, 0},
    {0x3000, 0x00, 0x00, 0}, /* 退出 STANDBY */
};

/* Sensor 探测 - 读取 Chip ID 验证 */
static int imx390_sensor_probe(struct cam_sensor_ctrl_t *s_ctrl) {
    uint32_t chip_id = 0;
    int rc = cam_sensor_i2c_read(s_ctrl, IMX390_CHIP_ID_REG, &chip_id,
                                  CAMERA_SENSOR_I2C_TYPE_WORD, CAMERA_SENSOR_I2C_TYPE_WORD);
    if (rc < 0) { pr_err("[IMX390] I2C 读取失败\n"); return rc; }
    if (chip_id != IMX390_CHIP_ID_VALUE) {
        pr_err("[IMX390] Chip ID 不匹配: 期望=0x%04x, 实际=0x%04x\n", IMX390_CHIP_ID_VALUE, chip_id);
        return -ENODEV;
    }
    pr_info("[IMX390] Sensor 探测成功, Chip ID=0x%04x\n", chip_id);
    return 0;
}

/* Sensor 初始化 */
static int imx390_sensor_init(struct cam_sensor_ctrl_t *s_ctrl) {
    int rc = cam_sensor_i2c_write_table(s_ctrl, imx390_init_regs,
                ARRAY_SIZE(imx390_init_regs),
                CAMERA_SENSOR_I2C_TYPE_WORD, CAMERA_SENSOR_I2C_TYPE_BYTE);
    if (rc < 0) { pr_err("[IMX390] 初始化失败\n"); return rc; }
    pr_info("[IMX390] 初始化完成\n");
    return 0;
}

/* 设置曝光和增益 */
static int imx390_set_exposure(struct cam_sensor_ctrl_t *s_ctrl,
                               uint32_t exposure_lines, uint32_t gain) {
    struct cam_sensor_i2c_reg_array ae_regs[] = {
        {0x3060, (1125 - exposure_lines - 1) & 0xFF, 0x00, 0},
        {0x3061, ((1125 - exposure_lines - 1) >> 8) & 0xFF, 0x00, 0},
        {0x3070, gain & 0xFF, 0x00, 0},
        {0x3071, (gain >> 8) & 0xFF, 0x00, 0},
    };
    return cam_sensor_i2c_write_table(s_ctrl, ae_regs, ARRAY_SIZE(ae_regs),
                CAMERA_SENSOR_I2C_TYPE_WORD, CAMERA_SENSOR_I2C_TYPE_BYTE);
}

static struct cam_sensor_ops imx390_ops = {
    .probe = imx390_sensor_probe,
    .init = imx390_sensor_init,
    .set_exposure = imx390_set_exposure,
};
2.2 CSI PHY 配置
csi_phy_config.c 示例:
/*
 * SA8295P CSI PHY 配置
 */
#include "cam_csiphy_dev.h"

/* 配置 CSI PHY-0 (前视摄像头, 4-lane D-PHY, 891Mbps/lane) */
static struct cam_csiphy_param csi_phy0_config = {
    .lane_cnt = 4,
    .lane_mask = 0x1F,          /* 4 data + 1 clock lane */
    .settle_cnt = 0x14,          /* T_HS-SETTLE = 85ns + 6*UI */
    .phy_type = CSIPHY_DPHY,
    .data_rate = 891000000,      /* 891 Mbps per lane */
    .mipi_flags = CSIPHY_CONTINUOUS_CLOCK,
    .vc_cfg = {
        [0] = {.vc = 0, .dt = 0x2C, .decode_fmt = DECODE_RAW12 }
    }
};

/* 初始化所有 CSI PHY */
int sa8295p_csiphy_init_all(void) {
    int rc;
    rc = cam_csiphy_configue(0, &csi_phy0_config);
    if (rc) { pr_err("CSI PHY-0 配置失败\n"); return rc; }
    // 类似配置 PHY-1, PHY-2, PHY-3...
    pr_info("SA8295P 全部 CSI PHY 初始化完成(4路摄像头)\n");
    return 0;
}
三、360° AVM 全景环视系统实现
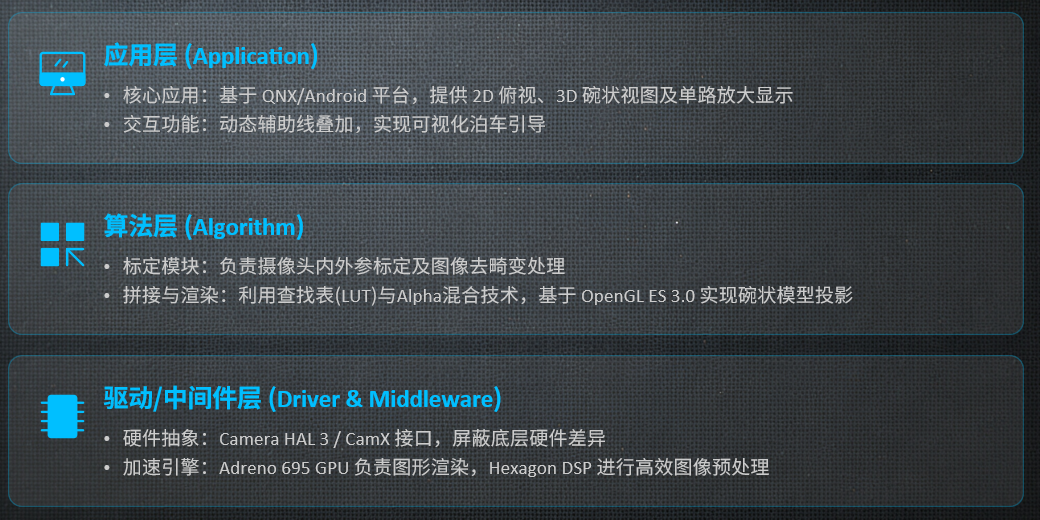
3.1 AVM 系统架构
四路鱼眼摄像头 (前/后/左/右)
    ↓ 采集
Camera HAL 3 (YUV/NV12 帧)
    ↓
AVM Service
    ├── 去畸变 (LUT映射)
    ├── 俯视图变换 (单应性矩阵)
    ├── 图像拼接 (Alpha Blending)
    └── 动态辅助线 (基于车辆CAN数据)
    ↓ GPU/OpenGL ES 渲染
SurfaceFlinger
    ↓
DPU 显示输出
3.2 摄像头标定
AVM的基础是精确的摄像头标定,获取每个摄像头的内参和外参。avm_calibration.py 示例:
import numpy as np
import cv2
import json
import os

class AVMCalibrator:
    """车载 AVM 四路摄像头标定"""
    CAMERA_NAMES = ["front", "rear", "left", "right"]
    BOARD_SIZE = (9, 6)          # 棋盘格内角点
    SQUARE_SIZE = 30.0            # 每格 30mm

    def __init__(self, image_dir: str):
        self.image_dir = image_dir
        self.camera_params = {}
        self.objp = np.zeros((self.BOARD_SIZE[0] * self.BOARD_SIZE[1], 3), np.float32)
        self.objp[:, :2] = np.mgrid[0:self.BOARD_SIZE[0], 0:self.BOARD_SIZE[1]].T.reshape(-1, 2) * self.SQUARE_SIZE

    def calibrate_single_camera(self, camera_name: str) -> dict:
        img_path = os.path.join(self.image_dir, camera_name)
        images = [f for f in os.listdir(img_path) if f.endswith(('.jpg','.png'))]
        obj_points, img_points = [], []
        img_size = None

        for img_file in sorted(images):
            img = cv2.imread(os.path.join(img_path, img_file))
            gray = cv2.cvtColor(img, cv2.COLOR_BGR2GRAY)
            img_size = gray.shape[::-1]
            ret, corners = cv2.findChessboardCorners(gray, self.BOARD_SIZE, None)
            if ret:
                criteria = (cv2.TERM_CRITERIA_EPS + cv2.TERM_CRITERIA_MAX_ITER, 30, 0.001)
                corners = cv2.cornerSubPix(gray, corners, (11,11), (-1,-1), criteria)
                obj_points.append(self.objp)
                img_points.append(corners)

        if len(obj_points) < 10:
            raise ValueError(f"{camera_name}: 有效标定图片不足 ({len(obj_points)}/10)")

        # 鱼眼镜头标定
        K = np.zeros((3,3))
        D = np.zeros((4,1))
        rvecs = [np.zeros((1,1,3), dtype=np.float64) for _ in range(len(obj_points))]
        tvecs = [np.zeros((1,1,3), dtype=np.float64) for _ in range(len(obj_points))]

        obj_points_arr = [p.reshape(1,-1,3).astype(np.float64) for p in obj_points]
        img_points_arr = [p.reshape(1,-1,2).astype(np.float64) for p in img_points]

        rms, K, D, _, _ = cv2.fisheye.calibrate(
            obj_points_arr, img_points_arr, img_size, K, D, rvecs, tvecs,
            cv2.fisheye.CALIB_RECOMPUTE_EXTRINSIC + cv2.fisheye.CALIB_CHECK_COND,
            (cv2.TERM_CRITERIA_EPS+cv2.TERM_CRITERIA_MAX_ITER, 100, 1e-6)
        )
        print(f"[{camera_name}] 标定完成, RMS: {rms:.4f} pixel")
        return {
            "camera_name": camera_name,
            "image_size": img_size,
            "intrinsic_matrix": K.tolist(),
            "distortion_coeffs": D.flatten().tolist(),
            "rms_error": rms,
        }

    def calibrate_all(self):
        for name in self.CAMERA_NAMES:
            self.camera_params[name] = self.calibrate_single_camera(name)
        with open(os.path.join(self.image_dir, "calibration_result.json"), 'w') as f:
            json.dump(self.camera_params, f, indent=2)
        return self.camera_params

if __name__ == "__main__":
    calibrator = AVMCalibrator("/data/avm_calibration_images/")
    calibrator.calibrate_all()
3.3 GPU 图像拼接 (OpenGL ES)
avm_renderer.c 核心代码:
/*
 * SA8295P AVM GPU 图像拼接渲染器 (OpenGL ES 3.0)
 */

#include <EGL/egl.h>
#include <GLES3/gl3.h>

#define AVM_OUTPUT_WIDTH  1280
#define AVM_OUTPUT_HEIGHT 1280
#define NUM_CAMERAS       4

// 顶点着色器
static const char *vertex_shader_src =
    "#version 300 es\n"
    "layout(location = 0) in vec2 a_position;\n"
    "layout(location = 1) in vec2 a_textcoord;\n"
    "layout(location = 2) in float a_alpha;\n"
    "out vec2 v_textcoord;\n"
    "out float v_alpha;\n"
    "void main() {\n"
    "    gl_Position = vec4(a_position, 0.0, 1.0);\n"
    "    v_textcoord = a_textcoord;\n"
    "    v_alpha = a_alpha;\n"
    "}\n";

// 片段着色器
static const char *fragment_shader_src =
    "#version 300 es\n"
    "in vec2 v_textcoord;\n"
    "in float v_alpha;\n"
    "uniform sampler2D u_camera_tex;\n"
    "uniform float u_brightness;\n"
    "out vec4 fragColor;\n"
    "void main() {\n"
    "    vec4 color = texture(u_camera_tex, v_textcoord);\n"
    "    color.rgb *= u_brightness;\n"
    "    color.a = v_alpha;\n"
    "    fragColor = color;\n"
    "}\n";

typedef struct {
    GLuint program;
    GLuint camera_textures[NUM_CAMERAS];
    GLuint mesh_vbo[NUM_CAMERAS];
    GLuint mesh_vao[NUM_CAMERAS];
    int mesh_vertex_count[NUM_CAMERAS];
    GLint loc_camera_tex;
    GLint loc_brightness;
} avm_renderer_t;

// 生成俯视图投影网格
static void generate_bev_mesh(avm_renderer_t *renderer, int camera_idx,
                              const float *homography_matrix, const float *blend_mask) {
    const int GRID_W = 64, GRID_H = 64;
    const int num_vertices = GRID_W * GRID_H * 6; // 三角形顶点
    float *vertices = malloc(num_vertices * 5 * sizeof(float)); // pos(2) + tex(2) + alpha(1)
    int idx = 0;

    for (int y = 0; y < GRID_H; y++) {
        for (int x = 0; x < GRID_W; x++) {
            float x0 = (float)x / GRID_W * 2.0f - 1.0f;
            float y0 = (float)y / GRID_H * 2.0f - 1.0f;
            float x1 = (float)(x+1) / GRID_W * 2.0f - 1.0f;
            float y1 = (float)(y+1) / GRID_H * 2.0f - 1.0f;
            // 两个三角形构成一个网格单元
            // 此处省略具体顶点计算,实际应用时通过单应性矩阵将俯视图坐标映射到摄像头图像坐标
        }
    }
    // 创建 VBO/VAO...
}

// 渲染 AVM 俯视图
void avm_render_frame(avm_renderer_t *renderer) {
    glViewport(0, 0, AVM_OUTPUT_WIDTH, AVM_OUTPUT_HEIGHT);
    glClearColor(0.2f, 0.2f, 0.2f, 1.0f);
    glClear(GL_COLOR_BUFFER_BIT);
    glUseProgram(renderer->program);
    glEnable(GL_BLEND);
    glBlendFunc(GL_SRC_ALPHA, GL_ONE_MINUS_SRC_ALPHA);

    float brightness[NUM_CAMERAS] = {1.0f, 0.95f, 1.05f, 0.98f};
    int render_order[] = {0, 2, 3, 1}; // front, left, right, rear

    for (int i = 0; i < NUM_CAMERAS; i++) {
        int cam = render_order[i];
        glActiveTexture(GL_TEXTURE0);
        glBindTexture(GL_TEXTURE_2D, renderer->camera_textures[cam]);
        glUniform1i(renderer->loc_camera_tex, 0);
        glUniform1f(renderer->loc_brightness, brightness[cam]);
        glBindVertexArray(renderer->mesh_vao[cam]);
        glDrawArrays(GL_TRIANGLES, 0, renderer->mesh_vertex_count[cam]);
    }

    // 绘制车辆模型
    render_car_model(renderer);
    glDisable(GL_BLEND);
}

// 更新摄像头纹理(每帧从Camera HAL获取新帧)
void avm_update_camera_frame(avm_renderer_t *renderer, int camera_idx,
                             void *frame_data, int width, int height) {
    glBindTexture(GL_TEXTURE_2D, renderer->camera_textures[camera_idx]);
    glTexSubImage2D(GL_TEXTURE_2D, 0, 0, 0, width, height,
                    GL_RGBA, GL_UNSIGNED_BYTE, frame_data);
}
3.4 AVM 动态辅助线
根据方向盘转角实时计算预测轨迹:
typedef struct {
    float steering_angle;  // 方向盘转角(度)
    float wheelbase;       // 轴距(mm)
    float rear_overhang;   // 后悬(mm)
    float car_width;       // 车宽(mm)
} vehicle_params_t;

// 计算倒车轨迹线(基于阿克曼转向模型)
void calculate_reverse_trajectory(const vehicle_params_t *vp,
                                  float *trajectory_points, int *num_points) {
    float steering_rad = vp->steering_angle * M_PI / 180.0f;
    int idx = 0;
    if (fabsf(steering_rad) < 0.01f) {
        // 直行:生成直线轨迹
        for (float d = 0; d < 6000; d += 100) {
            trajectory_points[idx++] = -vp->car_width / 2.0f;
            trajectory_points[idx++] = -(vp->rear_overhang + d);
            trajectory_points[idx++] =  vp->car_width / 2.0f;
            trajectory_points[idx++] = -(vp->rear_overhang + d);
        }
    } else {
        // 转弯:生成圆弧轨迹
        // 具体计算略...
    }
    *num_points = idx / 2; // 每两个点一组(左右轮迹)
}
四、Camera HAL 3 集成
4.1 Android Camera HAL 配置
camera_config.json 示例:
{
    "camera_module_name": "sa8295p_avm_camera",
    "camera_count": 4,
    "cameras": [
        {
            "id": 0,
            "name": "front_camera",
            "sensor": "imx390",
            "csi_phy": 0,
            "i2c_bus": 2,
            "i2c_addr": "0x1A",
            "position": "front",
            "orientation": 0,
            "resolution": {"width": 1920, "height": 1080},
            "fps": 30,
            "lens_type": "fisheye",
            "fov": 190,
            "use_case": ["avm", "parking", "adas"]
        },
        {
            "id": 1,
            "name": "rear_camera",
            "sensor": "imx390",
            "csi_phy": 1,
            "i2c_bus": 2,
            "i2c_addr": "0x1B",
            "position": "rear",
            "orientation": 180,
            "resolution": {"width": 1920, "height": 1080},
            "fps": 30,
            "lens_type": "fisheye",
            "fov": 190,
            "use_case": ["avm", "parking", "rvc"]
        },
        {
            "id": 2,
            "name": "left_camera",
            "sensor": "ov10640",
            "csi_phy": 2,
            "i2c_bus": 3,
            "i2c_addr": "0x30",
            "position": "left",
            "orientation": 270,
            "resolution": {"width": 1280, "height": 960},
            "fps": 30,
            "lens_type": "fisheye",
            "fov": 190,
            "use_case": ["avm", "bsd"]
        },
        {
            "id": 3,
            "name": "right_camera",
            "sensor": "ov10640",
            "csi_phy": 3,
            "i2c_bus": 3,
            "i2c_addr": "0x31",
            "position": "right",
            "orientation": 90,
            "resolution": {"width": 1280, "height": 960},
            "fps": 30,
            "lens_type": "fisheye",
            "fov": 190,
            "use_case": ["avm", "bsd"]
        }
    ],
    "serdes": {
        "type": "gmsl2",
        "serializer": "max96717",
        "deserializer": "max96724",
        "link_speed": "6gbps"
    }
}
五、AVM系统调试与性能优化
5.1 调试工具
# 1. 检查摄像头是否正常出流
adb shell cat /sys/class/video4linux/video*/name
adb shell v4l2-ctl --device=/dev/video0 --all

# 2. 抓取原始帧数据
adb shell "cat /dev/video0 > /data/local/tmp/front_raw.yuv"

# 3. 查看ISP状态
adb shell cat /sys/kernel/debug/camera/isp_status

# 4. 查看CSI PHY链路状态
adb shell cat /sys/kernel/debug/camera/csiphy0_status
# 关注:lane_count, data_rate, error_count

# 5. 帧率统计
adb shell cat /sys/kernel/debug/camera/fps_info

# 6. AVM渲染性能(GPU)
adb shell dumpsys gfxinfo com.vehicle.avm

# 7. 端到端延迟测量(使用LED闪烁+高速相机)
5.2 性能优化建议
| 优化方向 | 方法 | 效果 |
|---|---|---|
| 零拷贝 | 使用ION/DMA-BUF共享摄像头和GPU缓冲区 | 减少30%内存拷贝开销 |
| ISP直通 | BPS/IPE输出直连GPU纹理,跳过CPU | 降低1帧延迟 |
| LUT预计算 | 标定完成后离线生成LUT,运行时只查表 | 消除实时去畸变计算 |
| 网格简化 | 非重叠区域使用粗网格,重叠区域细网格 | GPU绘制调用减少50% |
| UBWC格式 | 使用高通UBWC压缩纹理格式 | 带宽节省30-50% |
六、总结
- 硬件层:4路MIPI CSI-2 + SerDes远距离传输 + Spectra395 ISP图像处理。
- 驱动层:Sensor驱动(I2C寄存器配置)+ CSI PHY初始化 + CamX Pipeline。
- 算法层:鱼眼标定 → 去畸变LUT → 单应性变换 → GPU俯视图拼接 → Alpha混合。
- 应用层:2D/3D视图切换 + 动态辅助线 + 多摄像头帧同步。

智能硬件社区聚焦AI智能硬件技术生态,汇聚嵌入式AI、物联网硬件开发者,打造交流分享平台,同步全国赛事资讯、开展 OPC 核心人才招募,助力技术落地与开发者成长。
更多推荐
 8
8 0
0- 0


 已为社区贡献6条内容

所有评论(0)