语音备忘速记 - ArkTS录音与语音识别引擎接入详解
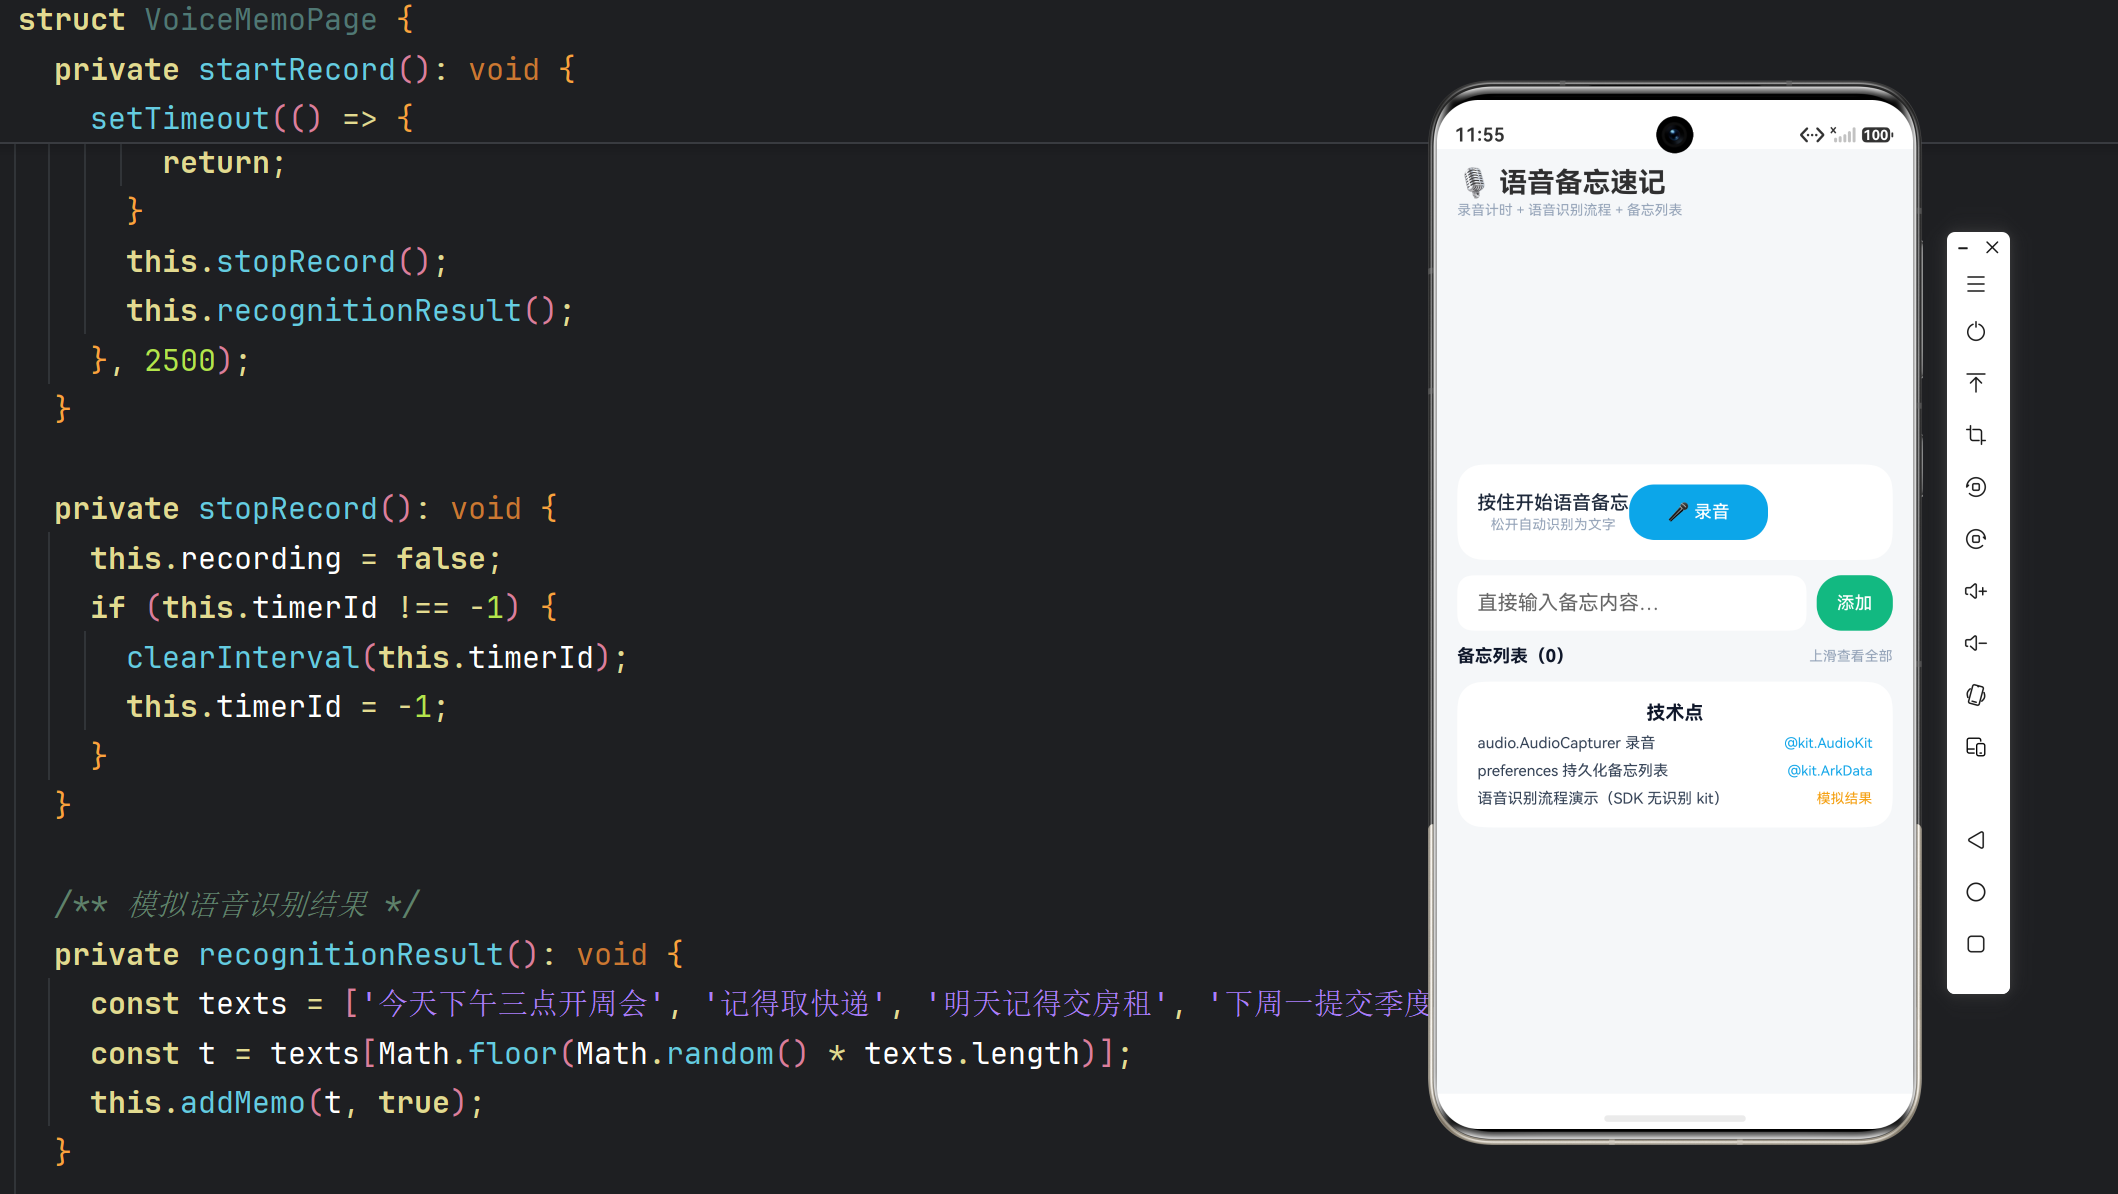
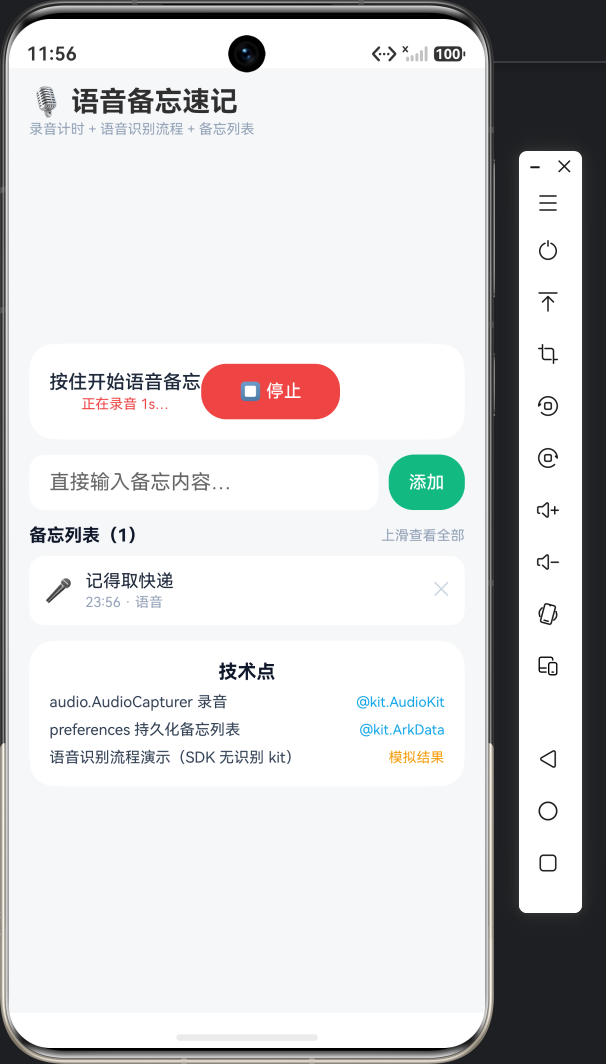
实例:语音备忘速记|技术:@kit.CoreSpeechKit(SpeechRecognizer)、@kit.AudioKit(AudioCapturer/AudioRenderer)、@ohos.file.fs、@kit.ArkData(preferences)、权限
一、本篇范围
语音备忘速记是「音频采集 + 语音识别 + 文件存储」的综合性应用:用户长按录音按钮说话,系统通过麦克风采集 PCM 音频,同时语音识别引擎(SpeechRecognizer)把语音流实时转成文字;松开按钮后,录音文件落盘(m4a 封装)、识别文本落库,形成一条「有声音、有文字」的备忘记录。
本篇拆「采集与识别服务层」,核心问题:
- 录音怎么采?
AudioCapturer的参数(采样率、声道、位深)怎么配才兼容语音识别; - 识别怎么接?
SpeechRecognizer.createEngine的启动、监听、销毁生命周期; - 识别模式选哪个?
longForm(长语音)与shortForm(短句)的区别,实时转写走哪条路径; - 文件怎么存?
@ohos.file.fs的应用沙箱路径,音频文件 + 识别文本怎么关联。
二、权限与能力准备
2.1 权限声明
语音备忘需要麦克风权限,属于 user_grant,必须运行时弹窗申请。同时语音识别引擎是系统服务,部分场景还需要声明 ohos.permission.USE_AI_SERVICES(AI 服务权限,normal 级,用于访问系统 AI 能力,如语音识别、翻译等)。
{
  "module": {
    "requestPermissions": [
      {
        "name": "ohos.permission.MICROPHONE",
        "reason": "$string:microphone_reason",
        "usedScene": { "abilities": ["EntryAbility"], "when": "inuse" }
      },
      {
        "name": "ohos.permission.USE_AI_SERVICES",
        "reason": "$string:ai_services_reason",
        "usedScene": { "abilities": ["EntryAbility"], "when": "inuse" }
      }
    ]
  }
}
USE_AI_SERVICES 这个权限是 API 11 之后新增的:任何调用系统 AI 能力(语音识别、文本翻译、图像理解等)的应用都必须声明,否则 createEngine 会失败。很多开发者只申请了麦克风权限却忽略它,导致识别引擎创建直接报错——这是语音类应用最常见的「静默失败」坑。
2.2 运行时申请
复用第一篇的 PermissionHelper 模式,这里给出语音场景的专用版本:
import { abilityAccessCtrl, common, Permissions } from '@kit.AbilityKit';
import { BusinessError } from '@kit.BasicServicesKit';

export class VoicePermission {
  static async ensureMicrophone(context: common.UIAbilityContext): Promise<boolean> {
    const atManager = abilityAccessCtrl.createAtManager();
    const perms: Permissions[] = ['ohos.permission.MICROPHONE', 'ohos.permission.USE_AI_SERVICES'];
    try {
      for (const p of perms) {
        const status = await atManager.checkAccessToken(context.applicationInfo.accessTokenId, p);
        if (status !== abilityAccessCtrl.GrantStatus.PERMISSION_GRANTED) {
          const result = await atManager.requestPermissionsFromUser(context, perms);
          return result.authResults.every((r: number) =>
            r === abilityAccessCtrl.GrantStatus.PERMISSION_GRANTED);
        }
      }
      return true;
    } catch (err) {
      console.error(`麦克风权限申请失败: ${(err as BusinessError).message}`);
      return false;
    }
  }
}
三、录音采集:AudioCapturer 参数详解
3.1 为什么用 AudioCapturer 而不是 startAudioRecording
API 9+ 提供了两种录音路径:@ohos.multimedia.media 的 AVRecorder(高级封装,直接出 mp4/m4a 文件)和 @ohos.multimedia.audio 的 AudioCapturer(低层 PCM 流)。
| 方案 | 输出 | 适用 |
|---|---|---|
| AVRecorder | 直接写文件(aac/mp4) | 只要录音文件,不需要流式处理 |
| AudioCapturer | PCM 原始流 | 需要边采边识别、边采边做音量可视化 |
语音备忘需要「边录音边识别」,识别引擎要吃 PCM 流,所以必须用 AudioCapturer。它把采集到的裸数据通过 read 循环吐出来,我们一分为二:一份喂给识别引擎,一份编码后落盘。
3.2 采集器参数配置
import { audio } from '@kit.AudioKit';

export interface AudioChunk {
  buffer: ArrayBuffer;   // PCM 数据
  bytesRead: number;     // 有效字节数
  time: number;          // 时间戳
}

export class AudioCaptureService {
  private capturer: audio.AudioCapturer | null = null;
  private onData: ((chunk: AudioChunk) => void) | null = null;
  private reading: boolean = false;

  /** 配置参数:16kHz 单声道 16bit,与语音识别引擎对齐 */
  private buildOptions(): audio.AudioCapturerOptions {
    return {
      streamInfo: {
        samplingRate: audio.AudioSamplingRate.SAMPLE_RATE_16000,
        channels: audio.AudioChannel.CHANNEL_1,
        sampleFormat: audio.AudioSampleFormat.SAMPLE_FORMAT_S16LE,
        encodingType: audio.AudioEncodingType.ENCODING_TYPE_RAW
      },
      capturerInfo: {
        source: audio.SourceType.SOURCE_TYPE_MIC,
        capturerFlags: 0
      }
    };
  }

  async start(onData: (chunk: AudioChunk) => void): Promise<void> {
    this.onData = onData;
    this.capturer = await audio.createAudioCapturer(this.buildOptions());
    await this.capturer.start();
    this.reading = true;
    this.readLoop();
  }

  /** 循环读取 PCM 数据(每块 1280 字节 ≈ 40ms @16kHz) */
  private async readLoop(): Promise<void> {
    if (!this.capturer) return;
    const bufferSize = 1280;
    const buffer = new ArrayBuffer(bufferSize);
    while (this.reading) {
      const bytesRead = await this.capturer.read(buffer, bufferSize);
      if (bytesRead > 0) {
        this.onData?.({
          buffer: buffer.slice(0, bytesRead),
          bytesRead,
          time: Date.now()
        });
      }
      // 轻微让步,避免独占主线程
      await new Promise<void>((resolve) => setTimeout(resolve, 0));
    }
  }

  async stop(): Promise<void> {
    this.reading = false;
    await this.capturer?.stop();
    await this.capturer?.release();
    this.capturer = null;
  }
}
3.3 采样率对齐:识别的隐藏契约
SAMPLE_RATE_16000(16kHz)、单声道、S16LE 是语音识别引擎的「标准输入格式」。为什么?语音识别模型在训练时用的就是 16kHz 采样率,16kHz 覆盖了人声的主要频率范围(约 300Hz–3.4kHz),再高(如 48kHz)只会增加数据量不提升识别率,再低则损失清晰度。采集端采样率必须与识别引擎对齐,否则引擎要么拒绝输入,要么识别率骤降。
read 返回的是实际读到的字节数(可能小于缓冲区),所以每次回调里用 buffer.slice(0, bytesRead) 截断有效部分——尾部的脏数据会干扰识别。40ms 一块(1280 字节 = 16000 × 2 字节 × 0.04s)是识别引擎友好的分块粒度。
四、语音识别引擎:SpeechRecognizer 生命周期
4.1 引擎创建与模式选择
import { speechRecognizer } from '@kit.CoreSpeechKit';
import { BusinessError } from '@kit.BasicServicesKit';

export class SpeechService {
  private engine: speechRecognizer.SpeechRecognizer | null = null;
  private readonly sessionId: string = 'voice_memo_session';
  private onResult: ((text: string, isFinal: boolean) => void) | null = null;
  private onState: ((state: string) => void) | null = null;

  /** 启动识别引擎并进入监听状态 */
  async start(onResult: (text: string, isFinal: boolean) => void,
              onState: (state: string) => void): Promise<boolean> {
    this.onResult = onResult;
    this.onState = onState;

    // 1. 创建引擎:longForm 长语音模式,适合连续说话转写
    this.engine = await speechRecognizer.createEngine({
      language: 'zh-CN',
      online: 1,           // 1 在线 / 0 离线,在线识别率更高
      accent: 'Mandarin',
      recognizeMode: speechRecognizer.RecognizeMode.LONG_FORM
    });

    // 2. 注册事件监听:识别结果、状态、错误
    this.engine.on('result', (data: speechRecognizer.SpeechRecognitionResult) => {
      const isFinal = data.resultId === speechRecognizer.SessionEventId.FINAL_RESULT;
      this.onResult?.(data.result ?? '', isFinal);
    });
    this.engine.on('stateChange', (state: speechRecognizer.State) => {
      this.onState?.(state);
    });
    this.engine.on('error', (code: number, reason: string) => {
      console.error(`识别错误: code=${code}, reason=${reason}`);
    });

    // 3. 启动会话
    await this.engine.startListening(this.sessionId);
    return true;
  }

  /** 写入一段 PCM 音频 */
  async writeAudio(buffer: ArrayBuffer): Promise<void> {
    await this.engine?.writeAudio(this.sessionId, buffer);
  }

  /** 结束写入并获取最终结果 */
  async finish(): Promise<void> {
    await this.engine?.finish(this.sessionId);
  }

  /** 销毁引擎(必须调用,否则占资源) */
  async destroy(): Promise<void> {
    await this.engine?.destroy();
    this.engine = null;
  }
}
4.2 事件体系详解
SpeechRecognizer 的事件是识别引擎的核心,四个事件各司其职:
| 事件 | 回调参数 | 触发时机 |
|---|---|---|
| result | SpeechRecognitionResult | 每次识别出文本(中间结果或最终结果) |
| stateChange | State | 引擎状态流转(监听中/识别中/空闲等) |
| error | code + reason | 引擎出错(网络断开、音频格式不符等) |
| start | — | 引擎开始监听 |
result 的 isFinal 判断:data.resultId === SessionEventId.FINAL_RESULT 表示这是整段话的最终结果,否则是中间草稿。实时转写 UI 的经典做法是「中间结果实时替换,最终结果落地」——用户说话时看到文字在增长,停顿后文字定稿。如果忽略 isFinal 直接覆盖,会造成文字乱跳。
4.3 recognizeMode 的选择
SHORT_FORM(短句模式):适合一句话以内的语音指令,返回快、资源省;LONG_FORM(长语音模式):适合连续朗读、会议记录,支持长时间输入,延迟略高。
备忘场景是「说一段话」,必须 LONG_FORM。注意 LONG_FORM 的引擎首次调用可能耗时较长(模型加载),UI 层要用「引擎准备中」状态过渡,不能假装立即可用。
五、流式编排:AudioCapturer 与 SpeechRecognizer 的桥接
录音和识别是两个独立的异步系统,桥接层把它们串成一条流水线:
export class VoiceMemoSession {
  private capturer: AudioCaptureService = new AudioCaptureService();
  private speech: SpeechService = new SpeechService();
  private audioChunks: ArrayBuffer[] = []; // 录音数据暂存,停止后统一编码
  private startedAt: number = 0;

  /** 开始录音 + 识别 */
  async start(context: common.UIAbilityContext): Promise<boolean> {
    const granted = await VoicePermission.ensureMicrophone(context);
    if (!granted) return false;

    this.audioChunks = [];
    this.startedAt = Date.now();

    // 1. 先启识别引擎(模型加载慢,提前启动)
    await this.speech.start(
      (text, isFinal) => {
        // 识别结果回调:实时转发给 UI
        this.onTranscript?.(text, isFinal);
      },
      (state) => this.onState?.(state)
    );

    // 2. 再启录音(引擎就绪后开始喂数据)
    await this.capturer.start((chunk) => {
      this.audioChunks.push(chunk.buffer);
      // 边采边识别
      this.speech.writeAudio(chunk.buffer).catch((e) =>
        console.error(`写入音频失败: ${e.message}`));
    });
    return true;
  }

  /** 停止:结束识别、取最终文本、生成文件 */
  async stop(): Promise<VoiceMemoResult> {
    await this.capturer.stop();
    const text = await this.speech.finish();
    await this.speech.destroy();
    // 组装音频文件(PCM → m4a 由媒体编码器处理,简化示例直接拼 WAV 头)
    const wavPath = await this.saveWav();
    return {
      text: text ?? '',
      audioPath: wavPath,
      durationMs: Date.now() - this.startedAt
    };
  }

  private async saveWav(): Promise<string> {
    // 拼接所有 PCM 块 + WAV 文件头
    const totalBytes = this.audioChunks.reduce((s, c) => s + c.byteLength, 0);
    const header = buildWavHeader(16000, 1, 16, totalBytes);
    const full = new Uint8Array(header.byteLength + totalBytes);
    full.set(new Uint8Array(header), 0);
    let offset = header.byteLength;
    for (const chunk of this.audioChunks) {
      full.set(new Uint8Array(chunk), offset);
      offset += chunk.byteLength;
    }
    const path = `${this.audioDir}/memo_${Date.now()}.wav`;
    const file = await fs.open(path, fs.OpenMode.READ_WRITE | fs.OpenMode.CREATE);
    await fs.write(file.fd, full.buffer);
    await fs.close(file.fd);
    return path;
  }
}
5.1 启动顺序:引擎先、录音后
为什么先启识别引擎再启录音?因为 createEngine 涉及模型加载,可能耗时几百毫秒到一秒;录音是即时的。如果先录音,前几百毫秒的音频会丢失(引擎还没就绪)。把引擎启动放在前面,录音开始后数据立即能被消费,不丢字。
5.2 WAV 文件头:40 行代码解决音频落盘
真机上完整方案是用 AVCodec 把 PCM 编码成 m4a/aac(体积小、兼容好)。为了聚焦本篇主题(识别链路),这里用「PCM + WAV 头」方案——WAV 是一种无压缩封装,加 44 字节文件头即可直接播放。buildWavHeader 的核心是填充 RIFF 块:
function buildWavHeader(sampleRate: number, channels: number, bits: number, dataLen: number): ArrayBuffer {
  const buf = new ArrayBuffer(44);
  const dv = new DataView(buf);
  const byteRate = sampleRate * channels * bits / 8;
  const blockAlign = channels * bits / 8;
  // RIFF 头
  dv.setUint8(0, 0x52); dv.setUint8(1, 0x49); dv.setUint8(2, 0x46); dv.setUint8(3, 0x46); // 'RIFF'
  dv.setUint32(4, 36 + dataLen, true);
  dv.setUint8(8, 0x57); dv.setUint8(9, 0x41); dv.setUint8(10, 0x56); dv.setUint8(11, 0x45); // 'WAVE'
  // fmt 块
  dv.setUint8(12, 0x66); dv.setUint8(13, 0x6D); dv.setUint8(14, 0x74); dv.setUint8(15, 0x20); // 'fmt '
  dv.setUint32(16, 16, true);          // fmt 块长度
  dv.setUint16(20, 1, true);           // PCM 格式
  dv.setUint16(22, channels, true);    // 声道数
  dv.setUint32(24, sampleRate, true);  // 采样率
  dv.setUint32(28, byteRate, true);    // 字节率
  dv.setUint16(32, blockAlign, true);  // 块对齐
  dv.setUint16(34, bits, true);        // 位深
  // data 块
  dv.setUint8(36, 0x64); dv.setUint8(37, 0x61); dv.setUint8(38, 0x74); dv.setUint8(39, 0x61); // 'data'
  dv.setUint32(40, dataLen, true);     // 数据长度
  return buf;
}
setUint32(..., true) 的第二个参数 littleEndian=true 必须显式传:WAV 是小端序,而 DataView 默认大端。这个头 44 字节写错任何一字节,播放器都打不开文件——是最考验基本功的细节。
六、备忘数据的持久化:preferences 存索引
音频文件在沙箱里,识别文本需要随文件一起管理。用 preferences 存「文本索引」,音频路径作 key:
export interface VoiceMemo {
  id: string;
  text: string;
  audioPath: string;
  createdAt: number;
  durationMs: number;
}

export class VoiceMemoStore {
  private static readonly KEY_LIST: string = 'memo_list';

  static async save(context: common.UIAbilityContext, memo: VoiceMemo): Promise<void> {
    const store = await preferences.getPreferences(context, 'voice_memo');
    const raw = await store.get(VoiceMemoStore.KEY_LIST, '[]');
    const list: VoiceMemo[] = typeof raw === 'string' ? JSON.parse(raw) : [];
    list.unshift(memo); // 新的在前
    await store.put(VoiceMemoStore.KEY_LIST, JSON.stringify(list.slice(0, 50))); // 最多 50 条
    await store.flush();
  }

  static async queryAll(context: common.UIAbilityContext): Promise<VoiceMemo[]> {
    const store = await preferences.getPreferences(context, 'voice_memo');
    const raw = await store.get(VoiceMemoStore.KEY_LIST, '[]');
    try {
      return typeof raw === 'string' ? JSON.parse(raw) as VoiceMemo[] : [];
    } catch {
      return [];
    }
  }

  static async remove(context: common.UIAbilityContext, id: string): Promise<void> {
    const store = await preferences.getPreferences(context, 'voice_memo');
    const list = await VoiceMemoStore.queryAll(context);
    const next = list.filter((m) => m.id !== id);
    await store.put(VoiceMemoStore.KEY_LIST, JSON.stringify(next));
    await store.flush();
  }
}
文本量小(一条备忘几百字),preferences 完全够用;如果要做全文搜索(搜「买菜」找出相关备忘),就该上 SQLite + LIKE,那是数据库系列的专长。这里用 JSON 数组存储,注意 list.slice(0, 50) 限制条数,防止无限增长把 preferences 塞爆。
七、音频目录获取:沙箱路径
import { fileIo as fs } from '@kit.CoreFileKit';
import { common } from '@kit.AbilityKit';

export class AudioFileManager {
  private static dir: string = '';

  static init(context: common.UIAbilityContext): void {
    // filesDir 是应用沙箱私有目录,无需存储权限
    AudioFileManager.dir = `${context.filesDir}/voice_memos`;
    fs.mkdirSync(AudioFileManager.dir); // 已存在会报错?用 try 包裹
    try {
      fs.accessSync(AudioFileManager.dir);
    } catch {
      fs.mkdirSync(AudioFileManager.dir);
    }
  }

  static getDir(): string {
    return AudioFileManager.dir;
  }
}
context.filesDir 是应用私有目录,存音频不需要任何存储权限(沙箱内自由读写)。fs.mkdirSync 在目录已存在时会抛错,所以用 accessSync 先查后建,这是文件系统代码的标准防御。删除备忘时同步删音频文件,避免孤儿文件堆积:
static async deleteAudio(path: string): Promise<void> {
  try {
    await fs.unlink(path);
  } catch (e) {
    console.warn(`删除音频失败(可能已不存在): ${e.message}`);
  }
}
八、代码定位表
| 代码块 | 关注点 | 改动入口 |
|---|---|---|
| module.json5 权限 | MICROPHONE + USE_AI_SERVICES | 增删 AI 权限时改这里 |
| VoicePermission | user_grant 动态申请 | 调整权限组合时改 perms |
| AudioCaptureService | 采集参数与 read 循环 | 换识别引擎时先对齐采样率 |
| SpeechService | 引擎生命周期与事件 | 换识别模式时改 RecognizeMode |
| VoiceMemoSession | 双系统桥接与启动顺序 | 调整流水线顺序时改 start/stop |
| VoiceMemoStore | 文本索引持久化 | 增加字段时改 VoiceMemo 接口 |
九、本篇小结
语音备忘的服务层是一条「麦克风 PCM 流 → 识别引擎 → 文本 + 音频文件」的流水线,三个关键决策决定了成败:采样率必须与识别引擎对齐(16kHz/单声道/S16LE)、引擎必须先于录音启动(避免丢头字)、USE_AI_SERVICES 权限不可漏(否则 createEngine 失败)。
关键记忆点:AudioCapturer 出 PCM、AVRecorder 出文件;SHORT_FORM 短句、LONG_FORM 长语音;resultId 判 isFinal;WAV 头必须小端序;沙箱文件免权限。
下一篇进入页面层:录音按钮的按下/抬起交互、实时转写文字流、备忘列表卡片、以及 AudioRenderer 播放音频的实现。

智能硬件社区聚焦AI智能硬件技术生态,汇聚嵌入式AI、物联网硬件开发者,打造交流分享平台,同步全国赛事资讯、开展 OPC 核心人才招募,助力技术落地与开发者成长。
更多推荐


 6
6 0
0- 0


 已为社区贡献2条内容

所有评论(0)