kubernetes中Pod的优化及管理
一、kubernetes中的资源
1.1资源管理介绍
-
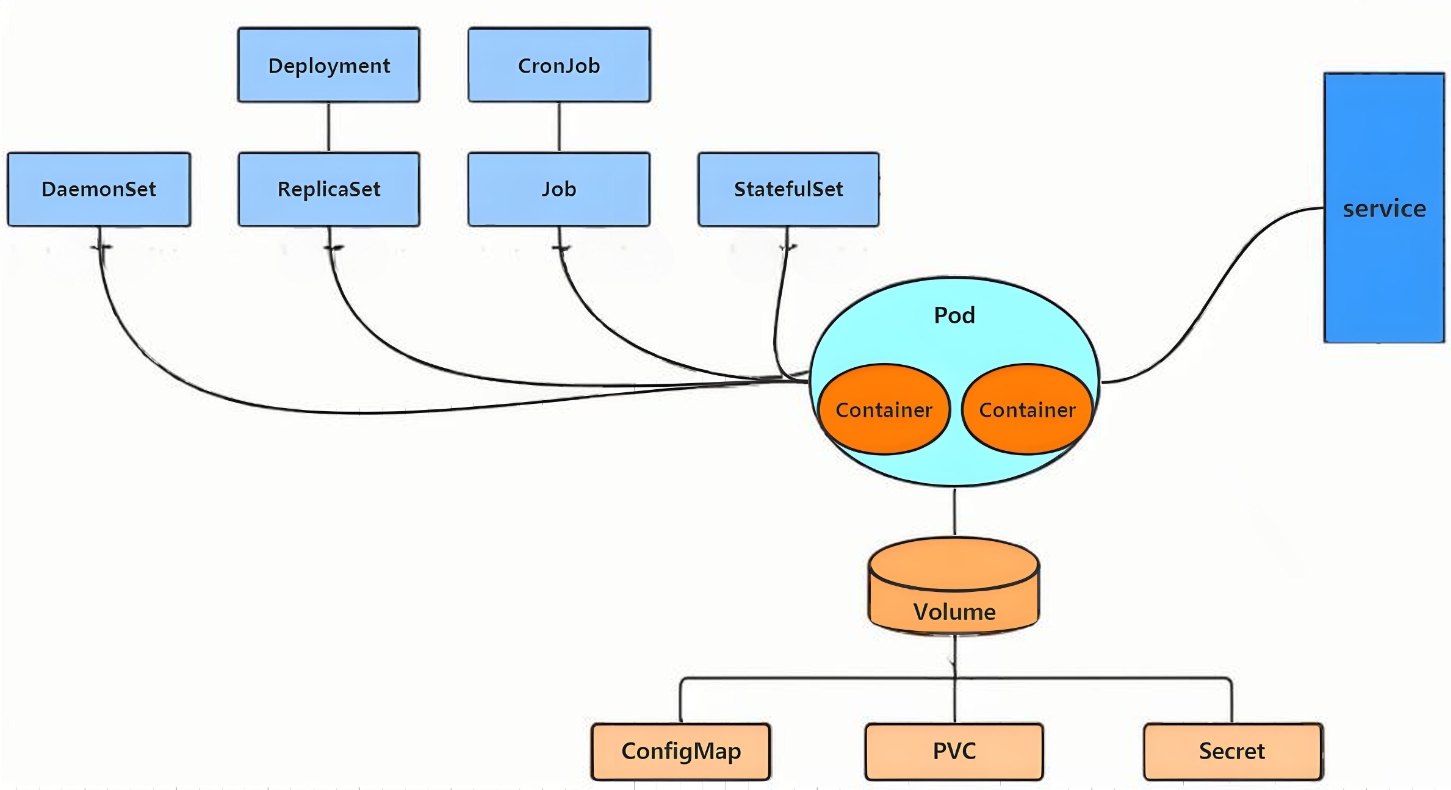
在kubernetes中,所有的内容都抽象为资源,用户需要通过操作资源来管理kubernetes。
-
kubernetes的本质上就是一个集群系统,用户可以在集群中部署各种服务
-
所谓的部署服务,其实就是在kubernetes集群中运行一个个的容器,并将指定的程序跑在容器中。
-
kubernetes的最小管理单元是pod而不是容器,只能将容器放在Pod中,
-
kubernetes一般也不会直接管理Pod,而是通过Pod控制器来管理Pod的。
-
Pod中服务服务的访问是由kubernetes提供的Service资源来实现。
1.2资源管理方式
-
命令式对象管理:直接使用命令去操作kubernetes资源
kubectl run nginx-pod --image=nginx:latest --port=80 -
命令式对象配置:通过命令配置和配置文件去操作kubernetes资源
kubectl create/patch -f nginx-pod.yaml -
声明式对象配置:通过apply命令和配置文件去操作kubernetes资源
kubect1 apply -f nginx-pod.yaml
| 类型 | 适用环境 | 优点 | 缺点 |
|---|---|---|---|
| 命令式对象管理 | 测试 | 简单 | 只能操作活动对象,无法审计、跟踪 |
| 命令式对象配置 | 开发 | 可以审计、跟踪 | 项目大时,配置文件多,操作麻烦 |
| 声明式对象配置 | 开发 | 支持目录操作 | 意外情况下难以调试 |
1.2.1命令式对象管理
kubectl是kubernetes集群的命令行工具,通过它能够对集群本身进行管理,并能够在集群上进行容器化应用的安装部署
kubectl命令的语法如下:
kubectl [command] [type] [name] [flags]
comand:指定要对资源执行的操作,例如create、get、delete
type:指定资源类型,比如deployment、pod、service
name:指定资源的名称,名称大小写敏感flags:指定额外的可选参数
#查看所有pod
kubectl get pod
#查看某个pod
kubectl get pod pod_name
#查看某个pod,以yaml格式展示结果
kubectl get pod pod_name -o yaml
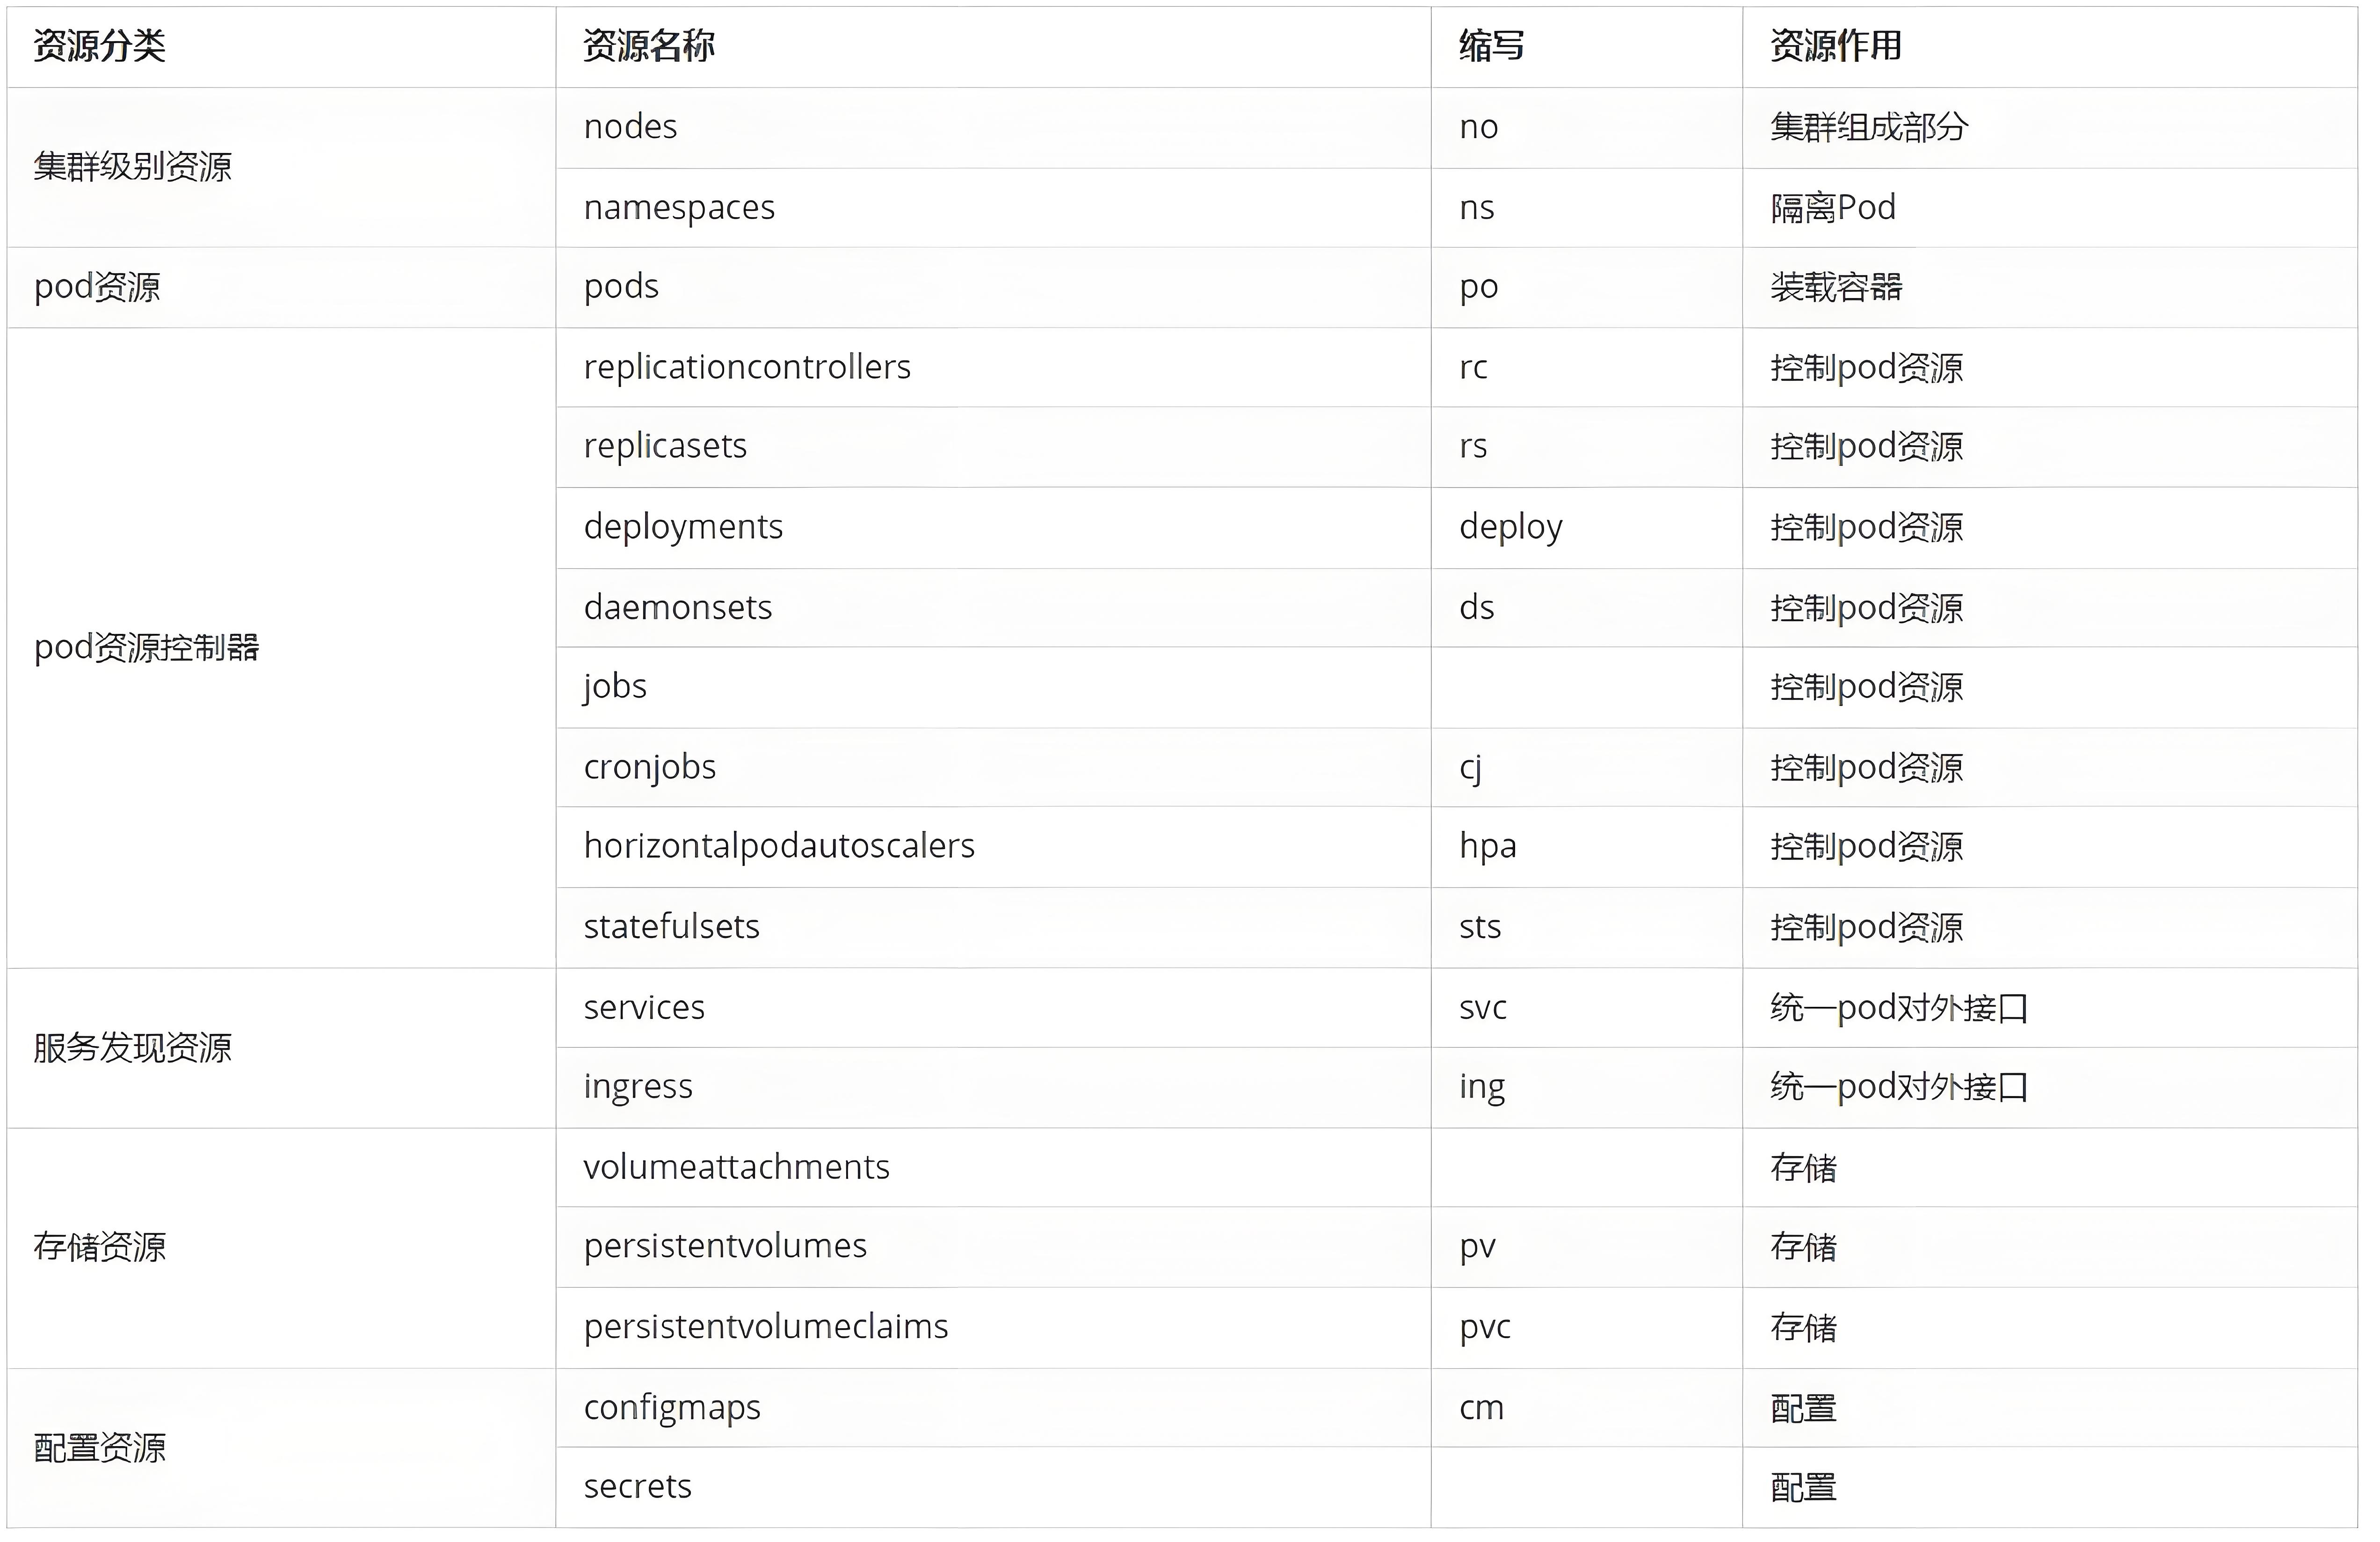
1.2.2资源类型
kubernetes中所有的内容都抽象为资源
kubectl api-resources
1.2.3 基本命令示例
#显示集群版本
[root@master ~]# kubectl version
Client Version: v1.35.3
Kustomize Version: v5.7.1
Server Version: v1.35.3

#显示集群信息
[root@master ~]# kubectl cluster-info
Kubernetes control plane is running at https://172.25.254.100:6443
CoreDNS is running at https://172.25.254.100:6443/api/v1/namespaces/kube-system/services/kube-dns:dns/proxy

To further debug and diagnose cluster problems, use 'kubectl cluster-info dump'.
二、资源使用的方法
1.命令式
#前提是镜像仓库有这个镜像
[root@master ~]# kubectl run webpod --image nginx:latest --port 80
pod/webpod created
[root@master ~]# kubectl get pods
NAME     READY   STATUS    RESTARTS   AGE
webpod   1/1     Running   0          10s
[root@master ~]# kubectl describe pods webpod
Name:             webpod
Namespace:        default
Priority:         0
Service Account:  default
Node:             node2/172.25.254.20
Start Time:       Sat, 18 Apr 2026 17:46:58 +0800
Labels:           run=webpod
Annotations:      <none>
Status:           Running
IP:               10.244.2.4
IPs:
  IP:  10.244.2.4
Containers:
  webpod:
    Container ID:   docker://5b8b56eca62ba0c0499be288a4e677db98b686ae037b2962855859f4e2aa38cd
    Image:          nginx:latest
    Image ID:       docker-pullable://nginx@sha256:ee228419e4bec2a78632d216e137e49dfd8f6f65b2f20e666ee4cab14eda781a
    Port:           80/TCP
    Host Port:      0/TCP
    State:          Running
      Started:      Sat, 18 Apr 2026 17:46:58 +0800
    Ready:          True
    Restart Count:  0
    Environment:    <none>
    Mounts:
      /var/run/secrets/kubernetes.io/serviceaccount from kube-api-access-758jg (ro)
Conditions:
  Type                        Status
  PodReadyToStartContainers   True
  Initialized                 True
  Ready                       True
  ContainersReady             True
  PodScheduled                True
Volumes:
  kube-api-access-758jg:
    Type:                    Projected (a volume that contains injected data from multiple sources)
    TokenExpirationSeconds:  3607
    ConfigMapName:           kube-root-ca.crt
    Optional:                false
    DownwardAPI:             true
QoS Class:                   BestEffort
Node-Selectors:              <none>
Tolerations:                 node.kubernetes.io/not-ready:NoExecute op=Exists for 300s
                             node.kubernetes.io/unreachable:NoExecute op=Exists for 300s
Events:
  Type    Reason     Age   From               Message
  ----    ------     ----  ----               -------
  Normal  Scheduled  33s   default-scheduler  Successfully assigned default/webpod to node2
  Normal  Pulling    33s   kubelet            spec.containers{webpod}: Pulling image "nginx:latest"
  Normal  Pulled     33s   kubelet            spec.containers{webpod}: Successfully pulled image "nginx:latest" in 112ms (112ms including waiting). Image size: 191974935 bytes.
  Normal  Created    33s   kubelet            spec.containers{webpod}: Container created
  Normal  Started    32s   kubelet            spec.containers{webpod}: Container started

#查看pod的运行情况和在哪里运行
[root@master ~]# kubectl get pods -o wide
NAME     READY   STATUS    RESTARTS   AGE    IP           NODE    NOMINATED NODE   READINESS GATES
webpod   1/1     Running   0          107s   10.244.2.4   node2   <none>           <none>

#删除webpod这个pod
[root@master ~]# kubectl delete pods webpod
pod "webpod" deleted from default namespace
2.命令式对象配置
[root@master ~]# kubectl create deployment test --image nginx --replicas 1  --dry-run=client -o yaml  > test.yml

[root@master ~]# vim test.yml
apiVersion: apps/v1
kind: Deployment
metadata:
  labels:
    app: test
  name: test
spec:
  replicas: 1
  selector:
    matchLabels:
      app: test
  template:
    metadata:
      labels:
        app: test
    spec:
      containers:
      - image: nginx
        name: nginx

#建立式
[root@master ~]# kubectl create  -f test.yml
deployment.apps/test created
[root@master ~]# kubectl get pods
NAME                    READY   STATUS    RESTARTS   AGE
test-56848fd9dc-h2sct   1/1     Running   0          8s

[root@master ~]# kubectl delete -f test.yml
deployment.apps "test" deleted from default namespace
[root@master ~]# kubectl get pods
No resources found in default namespace.


#声明式
[root@master ~]# kubectl apply -f test.yml
deployment.apps/test created
[root@master ~]# kubectl get pods
NAME                    READY   STATUS    RESTARTS   AGE
test-56848fd9dc-cxtnp   1/1     Running   0          1s


#注意建立只能建立不能更新,声明可以
[root@master ~]# vim test.yml
apiVersion: apps/v1
kind: Deployment
metadata:
  labels:
    app: test
  name: test
spec:
  replicas: 2			#只修改pod数量
。。。。。。。。。。。。。。。。。。

[root@master ~]# kubectl create  -f test.yml
Error from server (AlreadyExists): error when creating "test.yml": deployments.apps "test" already exists

[root@master ~]# kubectl apply  -f test.yml
deployment.apps/test configured
[root@master ~]# kubectl get pods
NAME                    READY   STATUS    RESTARTS   AGE
test-56848fd9dc-9sw95   1/1     Running   0          8s
test-56848fd9dc-cxtnp   1/1     Running   0          2m42s
三、资源类型
1.node
[root@k8s-master ~]# kubectl get nodes
NAME         STATUS   ROLES           AGE     VERSION
k8s-master   Ready    control-plane   5d10h   v1.35.7
k8s-node1    Ready    <none>          5d10h   v1.35.7
k8s-node2    Ready    <none>          5d10h   v1.35.7


[root@master ~]# kubeadm token create --print-join-command
kubeadm join 172.25.254.100:6443 --token 517uel.vxmfjqltr9vdk6b5 --discovery-token-ca-cert-hash sha256:6f0c71dc88033ba7c06a575bb094c4502c82d3df8205f7d926b6e6f9c3472d82
2.namespace
#查看所有的命名空间
[root@master ~]# kubectl get namespaces
NAME              STATUS   AGE
default           Active   3d23h
kube-flannel      Active   3d23h
kube-node-lease   Active   3d23h
kube-public       Active   3d23h
kube-system       Active   3d23h

# 查看default默认命名空间下的pod(不加‑n指定namespaces,默认就是default)
[root@master ~]# kubectl get pods
NAME                    READY   STATUS    RESTARTS   AGE
test-56848fd9dc-728nr   1/1     Running   0          126m
test-56848fd9dc-rjqpd   1/1     Running   0          126m

#指定查看kube-flannel命名空间下的pod
[root@master ~]# kubectl -n kube-flannel get pods
NAME                    READY   STATUS    RESTARTS        AGE
kube-flannel-ds-75c6s   1/1     Running   0               3d23h
kube-flannel-ds-7z6lz   1/1     Running   0               3d23h
kube-flannel-ds-tc9j6   1/1     Running   0               3d23h
kube-flannel-ds-wmltb   1/1     Running   1 (5h41m ago)   3d23h

#创建新的命名空间
[root@master ~]# kubectl create namespace timinglee
namespace/timinglee created

[root@master ~]# kubectl get namespaces
NAME              STATUS   AGE
default           Active   3d23h
kube-flannel      Active   3d23h
kube-node-lease   Active   3d23h
kube-public       Active   3d23h
kube-system       Active   3d23h
timinglee         Active   13s

#在指定的命名空间timinglee下创建pod,命名为testpod,指定镜像为nginx:latest
[root@master ~]# kubectl -n timinglee run testpod --image nginx:latest
pod/testpod created

[root@master ~]# kubectl get pods
NAME                    READY   STATUS    RESTARTS   AGE
test-56848fd9dc-728nr   1/1     Running   0          129m
test-56848fd9dc-rjqpd   1/1     Running   0          129m

[root@master ~]# kubectl -n timinglee get pods
NAME      READY   STATUS    RESTARTS   AGE
testpod   1/1     Running   0          26s

#同一个命名空间不能建立相同的Pod(资源隔离)
[root@master ~]# kubectl -n timinglee run testpod --image nginx:latest
Error from server (AlreadyExists): pods "testpod" already exists

#在default空间建立
[root@master ~]# kubectl run testpod --image nginx:latest
pod/testpod created

#不用了的资源要回收
[root@master ~]# kubectl -n timinglee delete pods testpod
pod "testpod" deleted from timinglee namespace
[root@master ~]# kubectl delete pods testpod
pod "testpod" deleted from default namespace
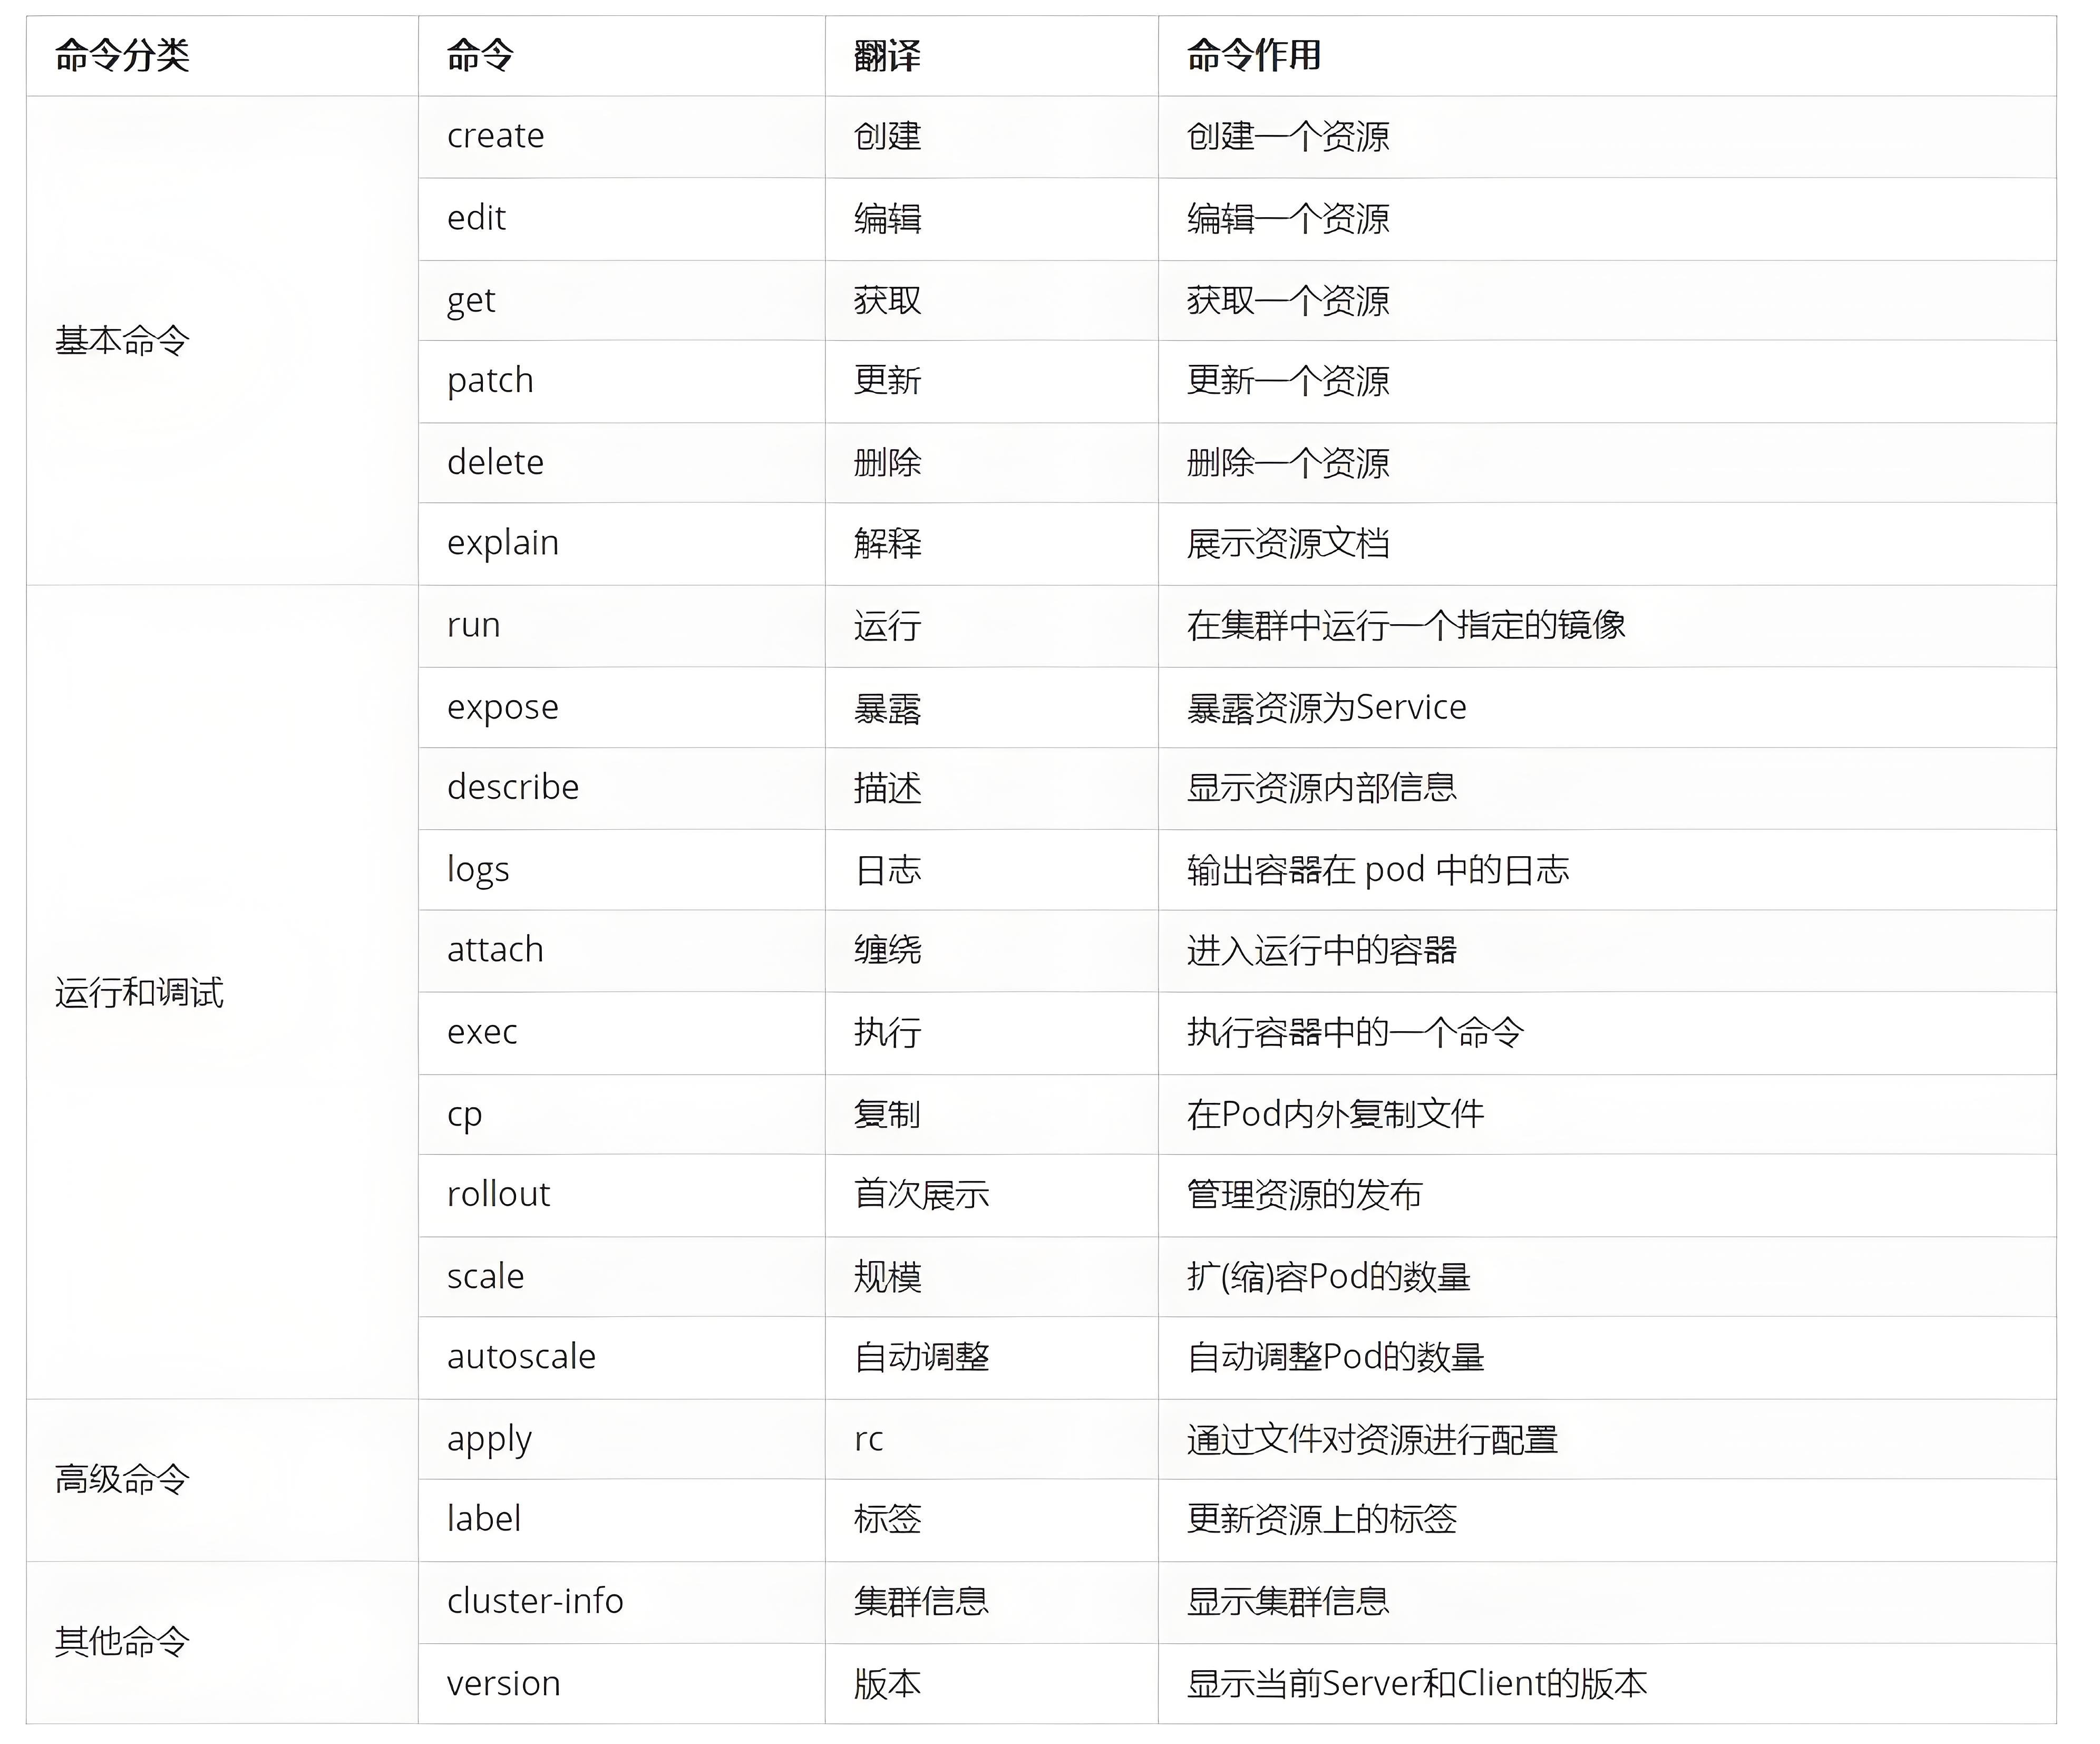
四、kubectl命令
#查看控制器
[root@master ~]# kubectl get deployments.apps
NAME   READY   UP-TO-DATE   AVAILABLE   AGE
test   2/2     2            2           172m

[root@master ~]# kubectl get pods
NAME                    READY   STATUS    RESTARTS   AGE
test-56848fd9dc-728nr   1/1     Running   0          173m
test-56848fd9dc-rjqpd   1/1     Running   0          173m

[root@master ~]# kubectl edit deployments.apps test
deployment.apps/test edited

.....
replicas: 4     #将这个参数改为4
.....

[root@master ~]# kubectl get pods
NAME                    READY   STATUS    RESTARTS   AGE
test-56848fd9dc-728nr   1/1     Running   0          176m
test-56848fd9dc-h4mjj   1/1     Running   0          7s
test-56848fd9dc-rjqpd   1/1     Running   0          176m
test-56848fd9dc-wpf42   1/1     Running   0          7s

#还可以这样改(非交互式更改)
[root@master ~]# kubectl patch deployments.apps test -p '{"spec":{"replicas":1}}'
deployment.apps/test patched
[root@master ~]# kubectl get pods
NAME                    READY   STATUS    RESTARTS   AGE
test-56848fd9dc-728nr   1/1     Running   0          178m

#端口暴露
#回到4个
[root@master ~]# kubectl patch deployments.apps test -p '{"spec":{"replicas":4}}'
deployment.apps/test patched
[root@master ~]# kubectl expose deployment test --port 80 --target-port 80
service/test exposed
[root@master ~]# kubectl describe service test                             Name:                     test
Namespace:                default
Labels:                   app=test
Annotations:              <none>
Selector:                 app=test
Type:                     ClusterIP
IP Family Policy:         SingleStack
IP Families:              IPv4
IP:                       10.99.133.122
IPs:                      10.99.133.122
Port:                     <unset>  80/TCP
TargetPort:               80/TCP
Endpoints:                10.244.1.5:80,10.244.1.8:80,10.244.2.12:80 + 1 more...
Session Affinity:         None
Internal Traffic Policy:  Cluster
Events:                   <none>

[root@master ~]# curl 10.99.133.122
<!DOCTYPE html>
<html>
<head>
<title>Welcome to nginx!</title>
<style>
html { color-scheme: light dark; }
body { width: 35em; margin: 0 auto;
font-family: Tahoma, Verdana, Arial, sans-serif; }
</style>
</head>
<body>
<h1>Welcome to nginx!</h1>
<p>If you see this page, the nginx web server is successfully installed and
working. Further configuration is required.</p>

<p>For online documentation and support please refer to
<a href="http://nginx.org/">nginx.org</a>.<br/>
Commercial support is available at
<a href="http://nginx.com/">nginx.com</a>.</p>

<p><em>Thank you for using nginx.</em></p>
</body>
</html>

#查看日志
[root@master ~]# kubectl logs pods/test-56848fd9dc-m52r2
/docker-entrypoint.sh: /docker-entrypoint.d/ is not empty, will attempt to perform configuration
/docker-entrypoint.sh: Looking for shell scripts in /docker-entrypoint.d/
/docker-entrypoint.sh: Launching /docker-entrypoint.d/10-listen-on-ipv6-by-default.sh
10-listen-on-ipv6-by-default.sh: info: Getting the checksum of /etc/nginx/conf.d/default.conf
10-listen-on-ipv6-by-default.sh: info: Enabled listen on IPv6 in /etc/nginx/conf.d/default.conf
/docker-entrypoint.sh: Sourcing /docker-entrypoint.d/15-local-resolvers.envsh
/docker-entrypoint.sh: Launching /docker-entrypoint.d/20-envsubst-on-templates.sh
/docker-entrypoint.sh: Launching /docker-entrypoint.d/30-tune-worker-processes.sh
/docker-entrypoint.sh: Configuration complete; ready for start up
2026/04/18 13:31:57 [notice] 1#1: using the "epoll" event method
2026/04/18 13:31:57 [notice] 1#1: nginx/1.26.3
2026/04/18 13:31:57 [notice] 1#1: built by gcc 12.2.0 (Debian 12.2.0-14)
2026/04/18 13:31:57 [notice] 1#1: OS: Linux 5.14.0-570.12.1.el9_6.x86_64
2026/04/18 13:31:57 [notice] 1#1: getrlimit(RLIMIT_NOFILE): 1024:524288
2026/04/18 13:31:57 [notice] 1#1: start worker processes
2026/04/18 13:31:57 [notice] 1#1: start worker process 30
2026/04/18 13:31:57 [notice] 1#1: start worker process 31
2026/04/18 13:31:57 [notice] 1#1: start worker process 32
2026/04/18 13:31:57 [notice] 1#1: start worker process 33

#attach
[root@master ~]# kubectl run testpod -it --image busybox
All commands and output from this session will be recorded in container logs, including credentials and sensitive information passed through the command prompt.
If you don't see a command prompt, try pressing enter.
/ # ctrl+pq退出
/ #Session ended, resume using 'kubectl attach testpod -c testpod -i -t' command when the pod is running

[root@master ~]# kubectl attach pods/testpod -it
All commands and output from this session will be recorded in container logs, including credentials and sensitive information passed through the command prompt.
If you don't see a command prompt, try pressing enter.
/ #
/ #
/ #
/ #
/ # exit
Session ended, resume using 'kubectl attach testpod -c testpod -i -t' command when the pod is running

#执行
[root@master ~]# kubectl exec -it pods/testpod -c testpod -- /bin/sh
/ #
/ #
/ #

[root@master ~]# kubectl cp test.yml testpod:/ -c testpod
[root@master ~]# kubectl exec -it pods/testpod -c testpod -- /bin/sh
/ # ls
bin       etc       lib       proc      sys       tmp       var
dev       home      lib64     root      test.yml  usr

#扩容
[root@master ~]# kubectl get pods
NAME                    READY   STATUS    RESTARTS   AGE
test-56848fd9dc-2qkdm   1/1     Running   0          81m
test-56848fd9dc-2w5nm   1/1     Running   0          81m
test-56848fd9dc-f76rl   1/1     Running   0          81m
test-56848fd9dc-m52r2   1/1     Running   0          81m
testpod                 1/1     Running   1 (2m9s ago)   2m26s

[root@master ~]# kubectl scale deployment test --replicas 6
deployment.apps/test scaled
[root@master ~]# kubectl get pods
NAME                    READY   STATUS    RESTARTS   AGE
test-56848fd9dc-2qkdm   1/1     Running   0          82m
test-56848fd9dc-2w5nm   1/1     Running   0          82m
test-56848fd9dc-c9w9b   1/1     Running   0          12s
test-56848fd9dc-f76rl   1/1     Running   0          82m
test-56848fd9dc-l8tdp   1/1     Running   0          12s
test-56848fd9dc-m52r2   1/1     Running   0          82m

[root@master ~]# kubectl scale deployment test --replicas 1
deployment.apps/test scaled
[root@master ~]# kubectl get pods
NAME                    READY   STATUS    RESTARTS   AGE
test-56848fd9dc-f76rl   1/1     Running   0          83m

[root@master ~]# kubectl get pods --show-labels
NAME                    READY   STATUS    RESTARTS   AGE   LABELS
test-56848fd9dc-f76rl   1/1     Running   0          84m   app=test,pod-template-hash=56848fd9dc
testpod                 1/1     Running   0          9s    run=testpod

[root@master ~]# kubectl get pods testpod name=lee
NAME      READY   STATUS    RESTARTS   AGE
testpod   1/1     Running   0          119s
Error from server (NotFound): pods "name=lee" not found
[root@master ~]# kubectl label pods testpod name=lee
pod/testpod labeled

[root@master ~]# kubectl get pods --show-labels
NAME                    READY   STATUS    RESTARTS   AGE     LABELS
test-56848fd9dc-f76rl   1/1     Running   0          87m     app=test,pod-template-hash=56848fd9dc
testpod                 1/1     Running   0          2m47s   name=lee,run=testpod
[root@master ~]#
五、Pod应用
1.什么是Pod
- Pod是可以创建和管理Kubernetes计算的最小可部署单元
- 一个Pod代表着集群中运行的一个进程,每个pod都有一个唯一的ip。
- 一个pod类似一个豌豆荚,包含一个或多个容器(通常是docker)
- 多个容器间共享IPC、Network和UTC namespace。
2.创建自助式pod(生产不推荐)
优点:
灵活性高:
●可以精确控制Pod的各种配置参数,包括容器的镜像、资源限制、环境变量、命令和参数等,满足特定的应用需求。
学习和调试方便:
●对于学习Kubernetes的原理和机制非常有帮助,通过手动创建Pod可以深入了解Pod的结构和配置方式。在调试问题时,可以更直接地观察和调整Pod的设置。
适用于特殊场景:
●在一些特殊情况下,如进行一次性任务、快速验证概念或在资源受限的环境中进行特定配置时,手动创建Pod可能是一种有效的方式。
缺点:
管理复杂:
●如果需要管理大量的Pod,手动创建和维护会变得非常繁琐和耗时。难以实现自动化的扩缩容、故障恢复等操作。
缺乏高级功能:
●无法自动享受Kubernetes提供的高级功能,如自动部署、滚动更新、服务发现等。这可能导致应用的部署和管理效率低下。
可维护性差
- 手动创建的Pod在更新应用版本或修改配置时需要手动干预,容易出现错误,并且难以保证一致性。相比之下,通过声明式配置或使用Kubernetes的部署工具可以更方便地进行应用的维护和更新。
#先删除多余的pod
[root@master ~]# kubectl delete -f test.yml
[root@master ~]# kubectl get pods
No resources found in default namespace.

[root@master ~]# kubectl run myappv2 --image myapp:v2 --port 80
pod/myappv2 created
#如果没有myapp:v2的镜像就会出现下面几种情况
[root@master ~]# kubectl get pods
NAME      READY   STATUS              RESTARTS   AGE
myappv2   0/1     ContainerCreating   0          8s				#创建中
[root@master ~]# kubectl get pods
NAME      READY   STATUS         RESTARTS   AGE
myappv2   0/1     ErrImagePull   0          20s					#镜像拉取失败

[root@master ~]# kubectl get pods
NAME      READY   STATUS             RESTARTS   AGE
myappv2   0/1     ImagePullBackOff   0          3m48s			#尝试从新拉去镜像
#上传镜像后就可以了
[root@master ~]# kubectl get pods
NAME      READY   STATUS    RESTARTS   AGE
myappv2   1/1     Running   0          4m20s
[root@master ~]# kubectl delete pods myappv2
pod "myappv2" deleted from default namespace
[root@master ~]# kubectl get pods
No resources found in default namespace.
3.利用控制器管理pod(推荐)
高可用性和可靠性:
●自动故障恢复:如果一个Pod失败或被删除,控制器会自动创建新的Pod来维持期望的副本数量。确保应用始终处于可用状态,减少因单个Pod故障导致的服务中断。
●健康检查和自愈:可以配置控制器对Pod进行健康检查(如存活探针和就绪探针)。如果Pod不
健康,控制器会采取适当的行动,如重启Pod或删除并重新创建它,以保证应用的正常运行。
可扩展性:
●轻松扩缩容:可以通过简单的命令或配置更改来增加或减少Pod的数量,以满足不同的工作负载需求。例如,在高流量期间可以快速扩展以处理更多请求,在低流量期间可以缩容以节省资源。
●水平自动扩缩容(HPA):可以基于自定义指标(如CPU利用率、内存使用情况或应用特定的指标)自动调整Pod的数量,实现动态的资源分配和成本优化。
版本管理和更新:
●滚动更新:对于Deployment等控制器,可以执行滚动更新来逐步替换旧版本的Pod为新版本,确保应用在更新过程中始终保持可用。可以控制更新的速率和策略,以减少对用户的影响。
●回滚:如果更新出现问题,可以轻松回滚到上一个稳定版本,保证应用的稳定性和可靠性。
声明式配置:
●简洁的配置方式:使用YAML或JSON格式的声明式配置文件来定义应用的部署需求。这种方式使得配置易于理解、维护和版本控制,同时也方便团队协作。
●期望状态管理:只需要定义应用的期望状态(如副本数量、容器镜像等),控制器会自动调整实际状态与期望状态保持一致。无需手动管理每个Pod的创建和删除,提高了管理效率。
服务发现和负载均衡:
●自动注册和发现:Kubernetes中的服务(Service)可以自动发现由控制器管理的Pod,并将流量路由到它们。这使得应用的服务发现和负载均衡变得简单和可靠,无需手动配置负载均衡器。
●流量分发:可以根据不同的策略(如轮询、随机等)将请求分发到不同的Pod,提高应用的性能和可用性。
多环境一致性:
●一致的部署方式:在不同的环境(如开发、测试、生产)中,可以使用相同的控制器和配置来部署应用,确保应用在不同环境中的行为一致。这有助于减少部署差异和错误,提高开发和运维效率。
[root@master ~]# kubectl create deployment webcluster --image myapp:v2 --replicas 1
deployment.apps/webcluster created
[root@master ~]# kubectl get deployments.apps -o wide
NAME         READY   UP-TO-DATE   AVAILABLE   AGE   CONTAINERS   IMAGES     SELECTOR
webcluster   1/1     1            1           19s   myapp        myapp:v2   app=webcluster
[root@master ~]# kubectl scale deployment webcluster --replicas 2
deployment.apps/webcluster scaled
[root@master ~]# kubectl scale deployment webcluster --replicas 1
deployment.apps/webcluster scaled
[root@master ~]# kubectl get pods
NAME                          READY   STATUS    RESTARTS   AGE
webcluster-6c8b4bb9d7-ttdth   1/1     Running   0          18m

[root@master ~]# kubectl label pods webcluster-6c8b4bb9d7-ttdth app-
pod/webcluster-6c8b4bb9d7-ttdth unlabeled
[root@master ~]# kubectl label pods webcluster-6c8b4bb9d7-ttdth app=webcluster
pod/webcluster-6c8b4bb9d7-ttdth labeled

#暴漏控制器(设定访问pod的vip)
[root@master ~]# kubectl expose deployment webcluster --port 80 --target-port 80
[root@master ~]# kubectl describe svc webcluster | tail -n 10
IP Family Policy:         SingleStack
IP Families:              IPv4
IP:                       10.98.36.168
IPs:                      10.98.36.168
Port:                     <unset>  80/TCP
TargetPort:               80/TCP
Endpoints:                10.244.1.12:80
Session Affinity:         None
Internal Traffic Policy:  Cluster
Events:                   <none>


[root@master ~]# curl  10.98.36.168
Hello MyApp | Version: v2 | <a href="hostname.html">Pod Name</a>


#更新版本
[root@master ~]# kubectl set image deployments webcluster myapp=myapp:v1
deployment.apps/webcluster image updated

[root@master ~]# curl 10.98.36.168
Hello MyApp | Version: v1 | <a href="hostname.html">Pod Name</a>

[root@master ~]# kubectl rollout history deployment webcluster
deployment.apps/webcluster
REVISION  CHANGE-CAUSE
1         <none>
2         <none>

[root@master ~]# kubectl rollout undo deployment webcluster --to-revision 1
deployment.apps/webcluster rolled back
[root@master ~]# curl 10.98.36.168
Hello MyApp | Version: v2 | <a href="hostname.html">Pod Name</a>
4.利用yaml文件部署应用
用yaml文件部署应用有以下优点
声明式配置:
●清晰表达期望状态:以声明式的方式描述应用的部署需求,包括副本数量、容器配置、网络设置等。这使得配置易于理解和维护,并且可以方便地查看应用的预期状态。
●可重复性和版本控制:配置文件可以被版本控制,确保在不同环境中的部署一致性。可以轻松回滚到以前的版本或在不同环境中重复使用相同的配置。
●团队协作:便于团队成员之间共享和协作,大家可以对配置文件进行审查和修改,提高部署的可靠性和稳定性。
灵活性和可扩展性:
●丰富的配置选项:可以通过YAML文件详细地配置各种Kubernetes资源,如Deployment、Service、ConfigMap、Secret等。可以根据应用的特定需求进行高度定制化。
●组合和扩展:可以将多个资源的配置组合在一个或多个YAML文件中,实现复杂的应用部署架构。同时,可以轻松地添加新的资源或修改现有资源以满足不断变化的需求。
与工具集成:
●与CI/CD流程集成:可以将YAML配置文件与持续集成和持续部署(CI/CD)工具集成,实现自动化的应用部署。例如,可以在代码提交后自动触发部署流程,使用配置文件来部署应用到不同的环境。
●命令行工具支持:Kubernetes的命令行工具kubect1对YAML配置文件有很好的支持,可以方便地应用、更新和删除配置。同时,还可以使用其他工具来验证和分析YAML配置文件,确保其正确性和安全性。
运行单个容器
[root@master ~]# kubectl delete deployment webcluster
deployment.apps "webcluster" deleted from default namespace

[root@master ~]# kubectl run  lee1 --image myapp:v1  --dry-run=client -o yaml  > 1test.yml
[root@master ~]# vim 1test.yml
apiVersion: v1
kind: Pod
metadata:
  labels:
    name: lee1
  name: lee1
spec:
  containers:
  - image: myapp:v1
    name: myappv1
[root@master ~]# kubectl apply -f 1test.yml
pod/lee1 created
[root@master ~]# kubectl get pods
NAME                          READY   STATUS    RESTARTS   AGE
lee1                          1/1     Running   0          7s
[root@master ~]# kubectl describe pods
Name:             lee1
Namespace:        default
Priority:         0
Service Account:  default
Node:             node2/172.25.254.20
Start Time:       Sun, 19 Apr 2026 19:52:45 +0800
Labels:           run=lee1
Annotations:      <none>
Status:           Running
IP:               10.244.2.26
IPs:
  IP:  10.244.2.26
Containers:
  lee1:
    Container ID:   docker://1f403c36c6d38e8eac92e6231488556e4cef9c09bd717bed7ee24a6a7e91cea9
    Image:          myapp:v1
    Image ID:       docker-pullable://myapp@sha256:9eeca44ba2d410e54fccc54cbe9c021802aa8b9836a0bcf3d3229354e4c8870e
    Port:           <none>
    Host Port:      <none>
    State:          Running
      Started:      Sun, 19 Apr 2026 19:52:46 +0800
    Ready:          True
    Restart Count:  0
    Environment:    <none>
    Mounts:
      /var/run/secrets/kubernetes.io/serviceaccount from kube-api-access-z6jgw (ro)
Conditions:
  Type                        Status
  PodReadyToStartContainers   True
  Initialized                 True
  Ready                       True
  ContainersReady             True
  PodScheduled                True
Volumes:
  kube-api-access-z6jgw:
    Type:                    Projected (a volume that contains injected data from multiple sources)
    TokenExpirationSeconds:  3607
    ConfigMapName:           kube-root-ca.crt
    Optional:                false
    DownwardAPI:             true
QoS Class:                   BestEffort
Node-Selectors:              <none>
Tolerations:                 node.kubernetes.io/not-ready:NoExecute op=Exists for 300s
                             node.kubernetes.io/unreachable:NoExecute op=Exists for 300s
Events:
  Type    Reason     Age    From               Message
  ----    ------     ----   ----               -------
  Normal  Scheduled  2m55s  default-scheduler  Successfully assigned default/lee1 to node2
  Normal  Pulled     2m54s  kubelet            spec.containers{lee1}: Container image "myapp:v1" already present on machine and can be accessed by the pod
  Normal  Created    2m54s  kubelet            spec.containers{lee1}: Container created
  Normal  Started    2m54s  kubelet            spec.containers{lee1}: Container started


[root@master ~]# kubectl get pods
NAME   READY   STATUS    RESTARTS   AGE
lee1   1/1     Running   0          4m12s
[root@master ~]# kubectl get pods -o wide
NAME   READY   STATUS    RESTARTS   AGE     IP            NODE    NOMINATED NODE   READINESS GATES
lee1   1/1     Running   0          4m28s   10.244.2.26   node2   <none>           <none>
[root@master ~]# kubectl delete -f 1test.yml
pod "lee1" deleted from default namespace
运行多个容器
[root@master ~]# cp 1test.yml 2test.yml
[root@master ~]# vim 2test.yml
apiVersion: v1
kind: Pod
metadata:
  labels:
    run: lee1
  name: lee1
spec:
  containers:
  - image: myapp:v1
    name: myappv1
  - image: busybox:latest
    name: busybox
    command:
      - /bin/sh
      - -c
      - sleep 20000
[root@master ~]# kubectl apply -f 2test.yml
pod/lee1 created
[root@master ~]# kubectl get pods
NAME   READY   STATUS    RESTARTS   AGE
lee1   2/2     Running   0          7s
[root@master ~]# kubectl delete -f 2test.yml --force
理解pod间的网络整合
[root@master ~]# cp 2test.yml 3test.yml
[root@master ~]# vim 3test.yml
apiVersion: v1
kind: Pod
metadata:
  labels:
    run: lee1
  name: lee1
spec:
  containers:
  - image: myapp:v1
    name: myappv1
  - image: busyboxplus:latest
    name: busybox
    command:
      - /bin/sh
      - -c
      - sleep 20000
#如果镜像不存在则需要先上传镜像
[root@master ~]# docker load -i busyboxplus.tar
Loaded image: rickiechina/busyboxplus:latest
[root@master ~]# docker tag rickiechina/busyboxplus:latest reg.timinglee.org/library/busyboxplus:latest
[root@master ~]# docker push reg.timinglee.org/library/busyboxplus
Using default tag: latest
The push refers to repository [reg.timinglee.org/library/busyboxplus]
5f70bf18a086: Mounted from library/busyboxyplus
430380561a4f: Mounted from library/busyboxyplus
165264a81ac2: Mounted from library/busyboxyplus
latest: digest: sha256:ef538eae80f40015736f1ee308d74b4f38f74e978c65522ce64abdf8c8c5e0d6 size: 1765

[root@master ~]# kubectl apply -f 3test.yml
pod/lee1 created
[root@master ~]# kubectl get pods
NAME   READY   STATUS    RESTARTS   AGE
lee1   2/2     Running   0          7s

[root@master ~]# kubectl exec -it pods/lee1 -c busybox -- /bin/sh
/bin/sh: shopt: not found
[ root@lee1:/ ]$ curl localhost
Hello MyApp | Version: v1 | <a href="hostname.html">Pod Name</a>
[ root@lee1:/ ]$
端口映射
#先删除lee1这个pod
[root@master ~]# kubectl delete pod lee1
pod "lee1" deleted from default namespace

[root@master ~]# cp 1test.yml  4test.yml
[root@master ~]# vim 4test.yml
apiVersion: v1
kind: Pod
metadata:
  labels:
    run: lee1
  name: lee1
spec:
  containers:
  - image: myapp:v1
    name: myappv1
    ports:
    - name: webport
      containerPort: 80
      hostPort: 80
      protocol: TCP
[root@master ~]# kubectl apply -f 4test.yml
pod/lee1 created
[root@master ~]# kubectl get pods -o wide
NAME   READY   STATUS    RESTARTS   AGE   IP            NODE    NOMINATED NODE   READINESS GA                          TES
lee1   1/1     Running   0          70s   10.244.1.28   node1   <none>           <none>
[root@master ~]# curl 172.25.254.10
Hello MyApp | Version: v1 | <a href="hostname.html">Pod Name</a>
选择运行节点
[root@master ~]# cp 4test.yml 5test.yml
[root@master ~]# vim 5test.yml
apiVersion: v1
kind: Pod
metadata:
  labels:
    run: lee1
  name: lee1
spec:
  nodeSelector:
    kubernetes.io/hostname: node1
  containers:
  - image: myapp:v1
    name: myappv1
    ports:
    - name: webport
      containerPort: 80
      hostPort: 80
      protocol: TCP

[root@master ~]# kubectl delete pod lee1
pod "lee1" deleted from default namespace
[root@master ~]# kubectl apply -f 5test.yml
pod/lee1 created
[root@master ~]# kubectl get pods -o wide
NAME   READY   STATUS    RESTARTS   AGE   IP            NODE    NOMINATED NODE   READINESS GATES
lee1   1/1     Running   0          15s   10.244.2.28   node2   <none>           <none>
共享宿主机网络
[root@master ~]# cp  5test.yml  6test.yml
[root@master ~]# vim 6test.yml
[root@master ~]# kubectl delete pod lee1
pod "lee1" deleted from default namespace
[root@master ~]# kubectl apply -f 6test.yml
pod/lee1 created
apiVersion: v1
kind: Pod
metadata:
  labels:
    run: lee1
  name: lee1
spec:
  hostNetwork: true
  nodeSelector:
    kubernetes.io/hostname: node1
  containers:
  - image: busybox:latest
    name:  busybox
    command:
      - /bin/sh
      - -c
      - sleep 1000

[root@master ~]# kubectl exec -it pods/lee1 -c busybox -- /bin/sh
/ # ip a
1: lo: <LOOPBACK,UP,LOWER_UP> mtu 65536 qdisc noqueue qlen 1000
    link/loopback 00:00:00:00:00:00 brd 00:00:00:00:00:00
    inet 127.0.0.1/8 scope host lo
       valid_lft forever preferred_lft forever
    inet6 ::1/128 scope host
       valid_lft forever preferred_lft forever
2: eth0: <BROADCAST,MULTICAST,UP,LOWER_UP> mtu 1500 qdisc mq qlen 1000
    link/ether 00:0c:29:d8:2d:db brd ff:ff:ff:ff:ff:ff
    inet 172.25.254.20/24 brd 172.25.254.255 scope global noprefixroute eth0
       valid_lft forever preferred_lft forever
    inet6 fe80::20c:29ff:fed8:2ddb/64 scope link noprefixroute
       valid_lft forever preferred_lft forever
3: docker0: <NO-CARRIER,BROADCAST,MULTICAST,UP> mtu 1500 qdisc noqueue
    link/ether 66:fd:22:83:ca:d3 brd ff:ff:ff:ff:ff:ff
    inet 172.17.0.1/16 brd 172.17.255.255 scope global docker0
       valid_lft forever preferred_lft forever
4: flannel.1: <BROADCAST,MULTICAST,UP,LOWER_UP> mtu 1450 qdisc noqueue
    link/ether 12:58:cb:73:eb:d3 brd ff:ff:ff:ff:ff:ff
    inet 10.244.2.0/32 scope global flannel.1
       valid_lft forever preferred_lft forever
    inet6 fe80::1058:cbff:fe73:ebd3/64 scope link
       valid_lft forever preferred_lft forever
5: cni0: <BROADCAST,MULTICAST,UP,LOWER_UP> mtu 1450 qdisc noqueue qlen 1000
    link/ether 46:c7:d0:04:cc:7e brd ff:ff:ff:ff:ff:ff
    inet 10.244.2.1/24 brd 10.244.2.255 scope global cni0
       valid_lft forever preferred_lft forever
    inet6 fe80::44c7:d0ff:fe04:cc7e/64 scope link
       valid_lft forever preferred_lft forever
6: vetha1044cb6@eth0: <BROADCAST,MULTICAST,UP,LOWER_UP> mtu 1450 qdisc noqueue master cni0
    link/ether 26:dd:7c:4e:3d:06 brd ff:ff:ff:ff:ff:ff
    inet6 fe80::24dd:7cff:fe4e:3d06/64 scope link
       valid_lft forever preferred_lft forever
/ #
5.资源优先级
BestEffort没有做任何资源限制,资源使用优先级最低
[root@k8s-master pod]# vim testpod.yaml
apiVersion: v1
kind: Pod
metadata:
  labels:
    run: testpod
  name: testpod
spec:
  hostNetwork: true
  containers:
  - image: busybox:latest
    name: busybox
    command:
    - /bin/sh
    - -c
    - sleep 10000


[root@k8s-master pod]# kubectl describe pods  testpod  | grep "QoS Class:"
QoS Class:                   BestEffort
Burstable 设定了资源限制,但是期望值和限制值不同,资源使用优先级次之
[root@k8s-master pod]# vim testpod.yaml

apiVersion: v1
kind: Pod
metadata:
  labels:
    run: testpod
  name: testpod
spec:
  hostNetwork: true
  containers:
  - image: busybox:latest
    name: busybox
    command:
    - /bin/sh
    - -c
    - sleep 10000
	resources:
      limits:
        cpu: 700m
        memory: 200M
      requests:
        cpu: 500m
        memory: 100M

[root@k8s-master pod]# kubectl apply -f testpod.yaml
pod/testpod unchanged

[root@k8s-master pod]# kubectl describe pods  testpod  | grep "QoS Class:"
QoS Class:                   Burstable
Guaranteed期望值和最大使用限制相同,优先级最高
[root@k8s-master pod]# vim testpod.yaml

apiVersion: v1
kind: Pod
metadata:
  labels:
    run: testpod
  name: testpod
spec:
  hostNetwork: true
  containers:
  - image: busybox:latest
    name: busybox
    command:
    - /bin/sh
    - -c
    - sleep 10000
	resources:
      limits:
        cpu: 500m
        memory: 100M
      requests:
        cpu: 500m
        memory: 100M

[root@k8s-master pod]# kubectl apply -f testpod.yaml
pod/testpod created
[root@k8s-master pod]# kubectl describe pods  testpod  | grep "QoS Class:"
QoS Class:                   Guaranteed
7.容器重启规则
Always 无论什么原因都会从新运行pod
apiVersion: v1
kind: Pod
metadata:
  labels:
    run: testpod
  name: testpod
spec:
  hostNetwork: true
  restartPolicy: Always
  containers:
  - image: busybox:latest
    name: busybox
    command:
    - /bin/sh
    - -c
    - sleep 60


[root@k8s-master pod]# kubectl get pods -o wide  -w

NAME      READY   STATUS    RESTARTS   AGE   IP              NODE        NOMINATED NODE   READINESS GATES
mysql     2/2     Running   0          42h   10.244.1.15     k8s-node1   <none>           <none>
testpod   1/1     Running   2          35m   172.25.254.20   k8s-node2   <none>           <none>
testpod   0/1     ContainerCreating   3          35m   172.25.254.20   k8s-node2   <none>           <none>
testpod   1/1     Running             3          35m   172.25.254.20   k8s-node2   <none>           <none>


#到node2节点删除第一个容器,就可以看到上面的现象
[root@k8s-node2 ~]# docker rm -f 3051d9de4c36
OnFailure 非正常管关闭会从其pod
apiVersion: v1
kind: Pod
metadata:
  labels:
    run: testpod
  name: testpod
spec:
  hostNetwork: true
  restartPolicy: OnFailure
  containers:
  - image: busybox:latest
    name: busybox
    command:
    - /bin/sh
    - -c
    - sleep 30

[root@k8s-master pod]# kubectl get pods -o wide  -w
[root@k8s-node2 ~]# docker rm -f 3051d9de4c36
Never pod关闭后不重启
apiVersion: v1
kind: Pod
metadata:
  labels:
    run: testpod
  name: testpod
spec:
  hostNetwork: true
  restartPolicy: Nerver
  containers:
  - image: busybox:latest
    name: busybox
    command:
    - /bin/sh
    - -c
    - sleep 30

[root@k8s-master pod]# kubectl get pods -o wide  -w
[root@k8s-node2 ~]# docker rm -f 3051d9de4c36

#等30秒后让容器中的命令运行完成后再次观察
六、pod的生命周期
6.1 INIT容器
-
Pod可以包含多个容器,应用运行在这些容器里面,同时Pod也可以有一个或多个先于应用容器启动的Init容器。
-
Init容器与普通的容器非常像,除了如下两点:
它们总是运行到完成
oinit容器不支持Readiness,因为它们必须在Pod就绪之前运行完成,每个Init容器必须运行成功,下一个才能够运行。
-
如果Pod的Init容器失败,Kubernetes会不断地重启该Pod,直到Init容器成功为止。但是,如果Pod对应的restartPolicy值为Never,它不会重新启动。
6.1.1 INIT容器的功能
-
Init容器可以包含一些安装过程中应用容器中不存在的实用工具或个性化代码。
-
Init容器可以安全地运行这些工具,避免这些工具导致应用镜像的安全性降低。
-
应用镜像的创建者和部署者可以各自独立工作,而没有必要联合构建一个单独的应用镜像。
-
Init容器能以不同于Pod内应用容器的文件系统视图运行。因此,Init容器可具有访问Secrets的权限,而应用容器不能够访问。
-
由于Init容器必须在应用容器启动之前运行完成,因此Init容器提供了一种机制来阻塞或延迟应用容器的启动,直到满足了一组先决条件。一旦前置条件满足,Pod内的所有的应用容器会并行启动。
[root@master ~]# cp 1test.yml init.yml
[root@master ~]# vim init.yml
[root@master ~]# kubectl delete pods lee1
pod "lee1" deleted from default namespace
[root@master ~]# kubectl apply -f init.yml
pod/lee1 created

#新开一个master界面用于监控
[root@master ~]# watch -n 1 kubectl get pods		#监控命令
NAME   READY   STATUS     RESTARTS   AGE
lee1   0/1     Init:0/1   0          3s

#回到原来的界面
[root@master ~]# kubectl exec -it pods/lee1 -c init-myservice -- /bin/sh
/ # touch /testfile
/ # commacommand terminated with exit code 137
[root@master ~]# kubectl get pods
NAME   READY   STATUS    RESTARTS   AGE
lee1   1/1     Running   0          3m28s
6.2 探针
探针是由kubelet对容器执行的定期诊断:
● ExecAction:在容器内执行指定命令。如果命令退出时返回码为0则认为诊断成功。
● TCPSocketAction:对指定端口上的容器的IP地址进行TCP检查。如果端口打开,则诊断被认为是成功的。
● HTTPGetAction:对指定的端口和路径上的容器的IP地址执行HTTP Get请求。如果响应的状态码大于等于200且小于400,则诊断被认为是成功的。
每次探测都将获得以下三种结果之一:
●成功:容器通过了诊断。
●失败:容器未通过诊断。
●未知:诊断失败,因此不会采取任何行动。
Kubelet可以选择是否执行在容器上运行的三种探针执行和做出反应:
● livenessProbe:指示容器是否正在运行。如果存活探测失败,则kubelet会杀死容器,并且容器将受到其重启策略的影响。如果容器不提供存活探针,则默认状态为Success。
● readinessProbe:指示容器是否准备好服务请求。如果就绪探测失败,端点控制器将从与Pod匹配的所有Service的端点中删除该Pod的IP地址。初始延迟之前的就绪状态默认为Failure。如果容器不提供就绪探针,则默认状态为Success。
● startupProbe:指示容器中的应用是否已经启动。如果提供了启动探测(startup probe),则禁用所有其他探测,直到它成功为止。如果启动探测失败,kubelet将杀死容器,容器服从其重启策略进行重启。如果容器没有提供启动探测,则默认状态为成功Success。
ReadinessProbe与LivenessProbe的区别
- ReadinessProbe当检测失败后,将Pod的IP:Port从对应的EndPoint列表中删除。
- LivenessProbe当检测失败后,将杀死容器并根据Pod的重启策略来决定作出对应的措施
StartupProbe与ReadinessProbe、LivenessProbe的区别
- 如果三个探针同时存在,先执行StartupProbe探针,其他两个探针将会被暂时禁用,直到pod满足StartupProbe探针配置的条件,其他2个探针启动,如果不满足按照规则重启容器。
- 另外两种探针在容器启动后,会按照配置,直到容器消亡才停止探测,而StartupProbe探针只是在容器启动后按照配置满足一次后,不在进行后续的探测。
[root@master ~]# kubectl create deployment webcluster --image myapp:v1 --replicas 1 --
deployment.apps/webcluster created
[root@master ~]# kubectl create deployment webcluster --image myapp:v1 --replicas 1 --dry-run=client -o yaml > liveness.yml
[root@master ~]# kubectl expose deployment webcluster --port 80 --target-port 80  --dry-run=client -o yaml >> liveness.yml
[root@master ~]# kubectl delete -f liveness.yml
service "webcluster" deleted from default namespace
[root@master ~]# kubectl apply -f liveness.yml
service/webcluster created
[root@master ~]# watch -n 1 "kubectl get pods  ;kubectl describe svc webcluster | tail -n 10"

NAME                          READY   STATUS    RESTARTS   AGE
lee1                          1/1     Running   0          14m
webcluster-77c87d9946-rj974   1/1     Running   0          88s
IP Family Policy:         SingleStack
IP Families:              IPv4
IP:                       10.105.85.147
IPs:                      10.105.85.147
Port:                     <unset>  80/TCP
TargetPort:               80/TCP
Endpoints:                10.244.2.29:80
Session Affinity:         None
Internal Traffic Policy:  Cluster
Events:                   <none>


[root@master ~]# kubectl exec -it pods/webcluster-77c87d9946-rj974  -c myapp -- /bin/sh
/ # nginx -s stop
2026/04/19 13:22:48 [notice] 16#16: signal process started
/ # command terminated with exit code 137
6.3 ReadinessProbe
[root@master ~]# cp liveness.yml ReadinessProbe.yml
[root@master ~]# vim ReadinessProbe.yml
apiVersion: apps/v1
kind: Deployment
metadata:
  labels:
    app: webcluster
  name: webcluster
spec:
  replicas: 1
  selector:
    matchLabels:
      app: webcluster
  template:
    metadata:
      labels:
        app: webcluster
    spec:
      containers:
      - image: myapp:v1
        name: myapp
        readinessProbe:
          httpGet:
            path: /test.html
            port: 80
          initialDelaySeconds: 1
          periodSeconds: 3
          timeoutSeconds: 1

---
apiVersion: v1
kind: Service
metadata:
  labels:
    app: webcluster
  name: webcluster
spec:
  ports:
  - port: 80
    protocol: TCP
    targetPort: 80
  selector:
    app: webcluster
[root@master ~]# kubectl apply -f ReadinessProbe.yml

#监控
[root@master ~]# watch -n 1 "kubectl get pods  ;kubectl describe svc webcluster | tail -n 10"
6
NAME                          READY   STATUS    RESTARTS        AGE
lee1                          1/1     Running   0               20m
webcluster-6bc85dfc84-4t4xz   0/1     Running   0               2m6s
webcluster-77c87d9946-rj974   1/1     Running   1 (4m13s ago)   7m27s
IP Family Policy:         SingleStack
IP Families:              IPv4
IP:                       10.105.85.147
IPs:                      10.105.85.147
Port:                     <unset>  80/TCP
TargetPort:               80/TCP
Endpoints:                10.244.2.29:80
Session Affinity:         None
Internal Traffic Policy:  Cluster
Events:                   <none>

[root@master ~]# kubectl exec -it pods/webcluster-6bc85dfc84-4t4xz   -c myapp -- /bin/sh
/ # echo timinglee > /usr/share/nginx/html/test.html
/ # rm -fr /usr/share/nginx/html/test.html
/ # echo timinglee > /usr/share/nginx/html/test.html

智能硬件社区聚焦AI智能硬件技术生态,汇聚嵌入式AI、物联网硬件开发者,打造交流分享平台,同步全国赛事资讯、开展 OPC 核心人才招募,助力技术落地与开发者成长。
更多推荐
 8
8 0
0- 0


 已为社区贡献1条内容

所有评论(0)