使用wsl基于esp32h2搭建matter开发环境
在Windows主机上使用WSL开发matter。
1.安装wsl2
(1) 现在,您可以使用一个命令安装运行WSL所需的所有内容。以管理员模式打开PowerShell,右键单击并选择“以管理员身份运行”,输入wsl --install命令,然后重新启动计算机。
wsl --install
该命令将启用运行WSL和安装Linux的Ubuntu发行版所需的特性。(此默认发行版可 以更改)。
(2) 更改已安装的默认Linux发行版,默认情况下,安装的Linux发行版是Ubuntu。这可以使用-d标志进行更改。
要更改已安装的发行版,输入:
wsl.exe --install [Distro]
将[Distro]替换为您想要安装的发行版的名称。
要查看可通过在线商店下载的可用Linux发行版列表,请输入:
wsl.exe --list --online
(3) 检查您正在运行的是哪个版本的wsl
您可以列出已安装的Linux发行版,并通过输入以下命令检查WSL的版本设置:
wsl.exe --list --verbose
(4) 要在PowerShell中运行一个特定的wsl发行版,而不改变你的默认发行版,使用下面的命令:
wsl.exe --distribution <DistroName>
将 <DistroName> 替换为您想使用的发行版的名称。
2.安装usbipd-win WSL Support
用于在本地连接的 USB 设备与其他计算机(包括 Hyper-V 客户机和 WSL 2)之间进行共享的 Windows 软件。Windows不支持向WSL发行版公开COM端口。
(1) 下载链接
https://github.com/dorssel/usbipd-win
(2) 分享设备
命令usbipd list列出所有连接到Windows的USB设备。在Windows的管理员命令提示符中运行此命令。
> usbipd list
BUSID  DEVICE                                      STATE
1-7    USB Input Device                            Not shared
4-4    STMicroelectronics STLink dongle, STMic...  		 Not shared
5-2    Surface Ethernet Adapter                     Not shared
命令usbipd bind共享一个设备,允许它连接到WSL。这需要管理员权限。选择您希望在WSL中使用的设备的总线ID并运行此命令。下命令:
> usbipd bind --busid 4-4
验证设备是否为共享设备。
> usbipd list
BUSID  DEVICE                                      STATE
1-7    USB Input Device                            Not shared
4-4    STMicroelectronics STLink dongle, STMic...       Shared
5-2    Surface Ethernet Adapter                     Not shared
请注意,共享设备是持久的;它能在重启后存活。你只需要在每个设备上做一次。关闭管理员命令提示符;进一步的命令不需要特殊权限。
(3) 连接设备
命令 usbipd attach --wsl可将 USB 设备连接到 WSL。只要设备已连接到 WSL,Windows 就无法使用它。一旦连接到 WSL,您就可以在任何 WSL 2 发行版中使用该设备。请在 Windows 命令提示符下运行此命令。
> usbipd attach --wsl --busid 4-4
(4) 确认设备已连接
> usbipd list
BUSID  DEVICE                                      STATE
1-7    USB Input Device                            Not shared
4-4    STMicroelectronics STLink dongle, STMic...       Attached
5-2    Surface Ethernet Adapter                     Not shared
(5) 在WSL中,运行lsusb以列出连接的USB设备。您应该看到刚刚连接的设备,并且能够使用普通的Linux工具与它进行交互
$ lsusb
Bus 002 Device 001: ID 1d6b:0003 Linux Foundation 3.0 root hub
Bus 001 Device 002: ID 0483:374b STMicroelectronics ST-LINK/V2.1
Bus 001 Device 001: ID 1d6b:0002 Linux Foundation 2.0 root hub
(6) 命令usbipd detach从WSL中分离设备。一旦分离,Windows就可以再次使用该设备。当拔出设备或重新启动WSL时,设备也将被分离。
> usbipd detach --busid 4-4

> usbipd list
BUSID  DEVICE                                      STATE
1-7    USB Input Device                            Not shared
4-4    STMicroelectronics STLink dongle, STMic...       Shared
5-2    Surface Ethernet Adapter                     Not shared
3.matter构建前提准备
在构建之前,您必须安装一些特定于操作系统的依赖项。
(1) 在 Linux 上安装必备组件
在基于 Debian 的 Linux 发行版(如 Ubuntu)上,可以通过以下命令来满足这些依赖项:
sudo apt-get update
sudo apt-get install git gcc g++ pkg-config cmake curl libssl-dev libdbus-1-dev \
     libglib2.0-dev libavahi-client-dev ninja-build python3-venv python3-dev \
     python3-pip unzip libgirepository1.0-dev libcairo2-dev libreadline-dev \
     libevent-dev default-jre
(2) 在 Ubuntu 22.04 系统上升级 Python
Ubuntu 22.04 默认安装的是 Python 3.10,但 Matter SDK 要求使用 Python 3.11 或更高版本。要升级 Python,请运行以下命令:
sudo apt-get install python3.11 python3.11-dev python3.11-venv
# Register python3.10 so that it can be switched back if needed
sudo update-alternatives --install /usr/bin/python3 python3 /usr/bin/python3.10 1
# Register python3.11 with higher priority (will be automatically selected)
sudo update-alternatives --install /usr/bin/python3 python3 /usr/bin/python3.11 2
# Verify that python3 points to python3.11
python3 --version
升级成python3.11之后,Ubuntu运行sudo apt update有可能报错:ModuleNotFoundError: No module named ‘apt_pkg’
执行以下命令即可解决:
sudo apt remove python3-apt
sudo apt autoclean
sudo apt install python3-apt
(3) 配置蓝牙
由于使用的是WSL下的Ubuntu系统,宿主机自带的蓝牙无法直接穿透给Ubuntu使用,所以需要USB蓝牙5.0适配器(免驱,Linux通用)。将适配器插入电脑后,在PowerShell中,将USB设备连接到WSL下。
命令usbipd list列出所有连接到Windows的USB设备
> usbipd list
命令usbipd bind共享一个设备,允许它连接到WSL
> usbipd bind --busid x-x
命令 usbipd attach --wsl可将 USB 设备连接到 WSL
> usbipd attach --wsl --busid x-x
在Ubuntu中,我们需要确保蓝牙服务正常运行,并且 chip-tool 有权限访问蓝牙。
1)安装bluez
sudo apt-get install bluez
2)检查蓝牙控制器状态
sudo systemctl status bluetooth
3)如果服务未运行,使用 sudo systemctl start bluetooth 启动它。然后,使用 bluetoothctl 工具进行简单测试:
bluetoothctl
# 进入交互式命令行后,输入
power on
list
scan on
输入 scan off 和 exit 退出。这一步是为了确认蓝牙硬件和驱动在Ubuntu内工作正常。
4.安装ESP-IDF
(1) 官方推荐方法安装esp-idf
git clone --recursive https://github.com/espressif/esp-idf.git
cd esp-idf; git checkout v5.4.1; git submodule update --init --recursive;
./install.sh
cd ..
使用此方法安装esp-idf报错:
Submodule path 'components/spiffs/spiffs':checked out
'0dbb3f71c5f6fae3747a9d935372773762baf852' fatal: Unable to checkout
'005c5cefc22aaf0396e4327ee7f2e0ad32a7733b' in submodule path
'components/openthread/openthread'。
导致基于esp32h2编译matter例程light,编译报错:
/home/will/esp-idf/components/openthread/src/port/esp_openthread_udp.c:9:10: fatal error: common/code_utils.hpp: No such file or directory
    9 | #include "common/code_utils.hpp"
(2) 使用esp-idf安装方式2
git clone -b release/v5.4 --recursive https://github.com/espressif/esp-idf.git
cd esp-idf
./install.sh esp32h2
(3) 每次打开新终端时都应执行此操作。
cd esp-idf; source ./export.sh; cd ..
5.安装ESP Matter
由于上游connectedhomeip中有很多子模块,克隆esp-matter存储库需要一段时间,所以如果你想做一个浅克隆,使用以下命令:
(1) Linux环境下:
cd esp-idf
source ./export.sh
cd ..

git clone --depth 1 https://github.com/espressif/esp-matter.git
cd esp-matter
git submodule update --init --depth 1
cd ./connectedhomeip/connectedhomeip
./scripts/checkout_submodules.py --platform esp32 linux --shallow
cd ../..
./install.sh
cd ..
(2) 配置环境
每次打开新终端时都应执行此操作。
cd esp-idf; source ./export.sh; cd ..
cd esp-matter; source ./export.sh; cd ..
(3) 启用 Ccache 以加快 IDF 的构建速度。
Ccache是一个编译器缓存。Matter构建非常缓慢,需要花费很多时间。Ccache缓存以前的编译并加速后续构建中的重新编译。
export IDF_CCACHE_ENABLE=1
(4) 您还可以将上述内容添加到您的 shell 的配置文件(如 .profile、.bashrc、.zprofile 等)中,以便每次打开新终端时都能启用 ccache 功能。
(5) 添加至.bashrc中
nano ~/.bashrc
在末尾添加
cd /home/will/esp-idf; source ./export.sh; cd ..
cd /home/will/esp-matter; source ./export.sh; cd ..
export IDF_CCACHE_ENABLE=1
CTRL+X保存退出
6.测试light例程
官方提供了很多例程,在esp-matter/examples文件夹下,本次使用light例程。
(1) 选择IDF目标
idf.py set-target esp32h2
如果未显式设置IDF目标,则将esp32视为默认值
(2) 擦除FLASH
当第一次烧录SDK时,建议执行idf.py erase-flash来擦除整个flash并重新开始。
(3) 烧录FLASH&&监控
idf.py flash monitor
启动之后,设备会自动进入蓝牙配网状态,维持一段时间后蓝牙会自动关闭,如果关闭重新执行idf.py monitor即可。
(4) 调试&&控制
基于wsl的linux使用主机的蓝牙比较麻烦,因此需要外置一个蓝牙适配器挂载到wsl,在交互模式下使用chip-tool进行设备配网:
chip-tool interactive start
输入:
pairing ble-thread 0x7283 hex:<operationalDataset> 20202021 3840
在以上命令中:
0x7283 is the randomly chosen node_id
20202021 is the setup_passcode
3840 is the discriminator
hex:<operationalDataset>可以随意填个值
例如:
pairing ble-thread 0x7283 0x31 20202021 3840
执行此指令后会进入配网状态,最后一句提示Run command failure,但不影响chip-tool 指令调试,不过运行一段时间后会自动断连,需再次执行配网指令。
chip-tool调试设备:
# 开关灯:
onoff toggle 0x7283 0x1
# 开灯:
onoff on 0x7283 0x1
# 调节亮度10%
levelcontrol move-to-level 10 0 0 0 0x7283 0x1
# 调节亮度100%
levelcontrol move-to-level 100 0 0 0 0x7283 0x1
(5) APP连接
1)基于苹果手机,连上wifi,连接音响Apple home。
2)使用官方默认的QR码,扫描配网,如果连接失败就多尝试几次:
https://project-chip.github.io/connectedhomeip/qrcode.html?data=MT:Y.K9042C00KA0648G00

7.使用vscode开发
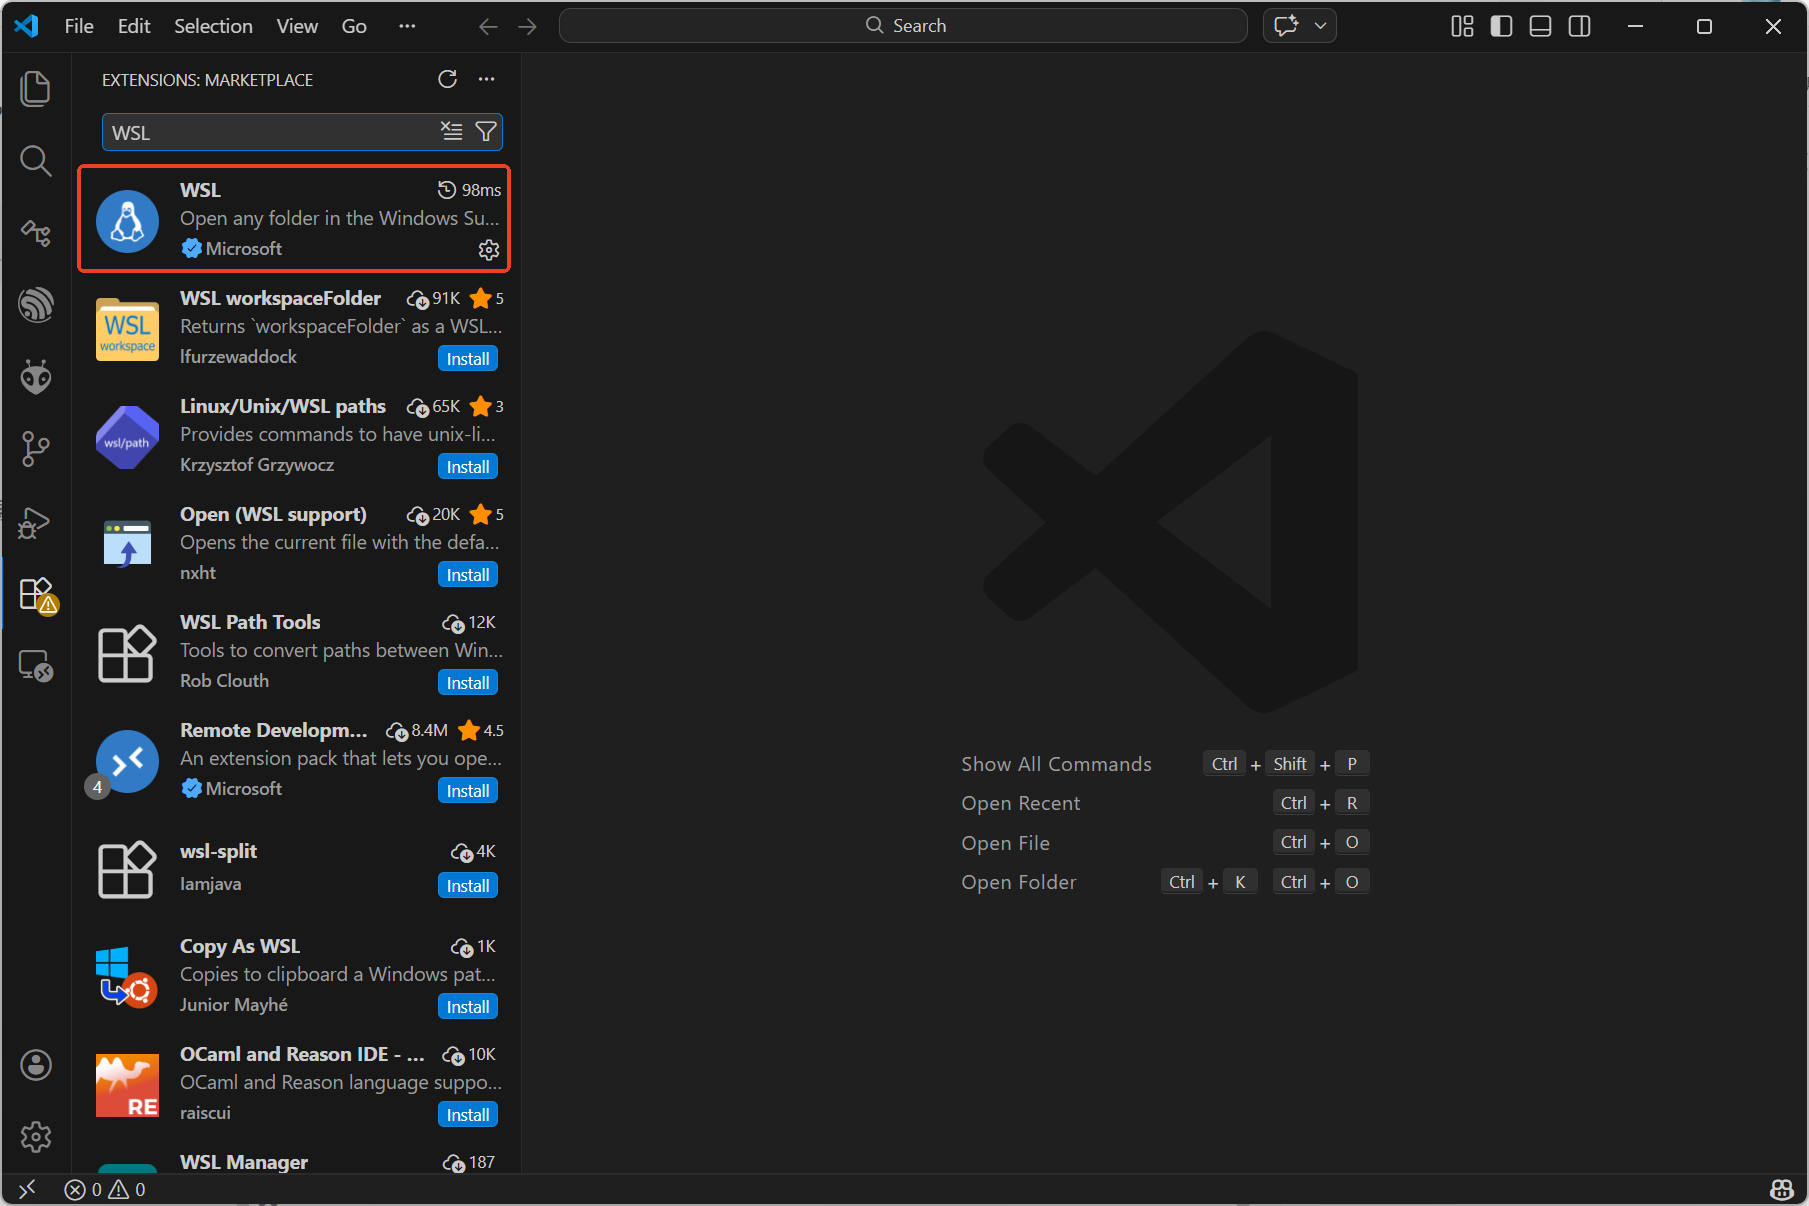
- 安装组件
打开vscode,点击Extensions,或者使用快捷键Ctrl+Shift+X,搜索WSL,点击安装。
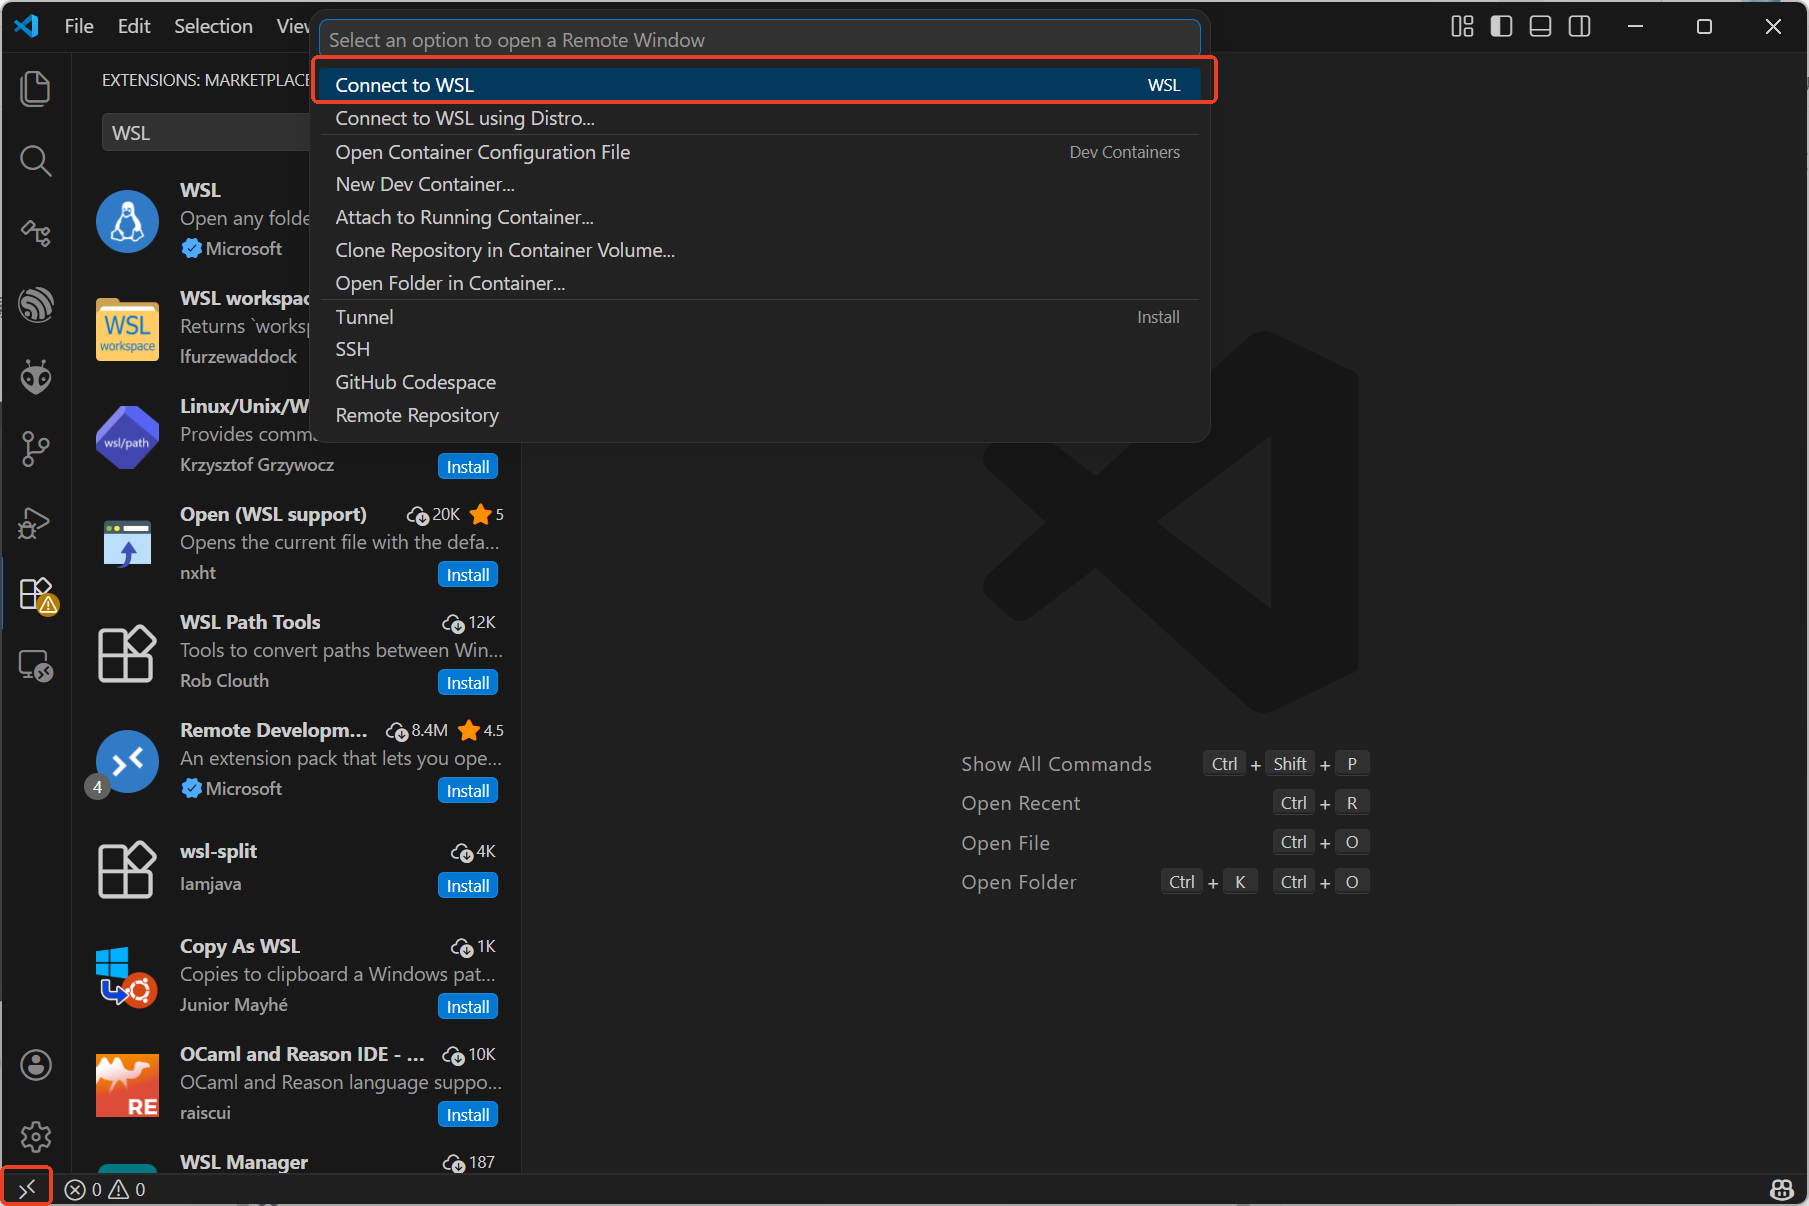
- 连接WSL
点击左下角的图标,选择Connec to WSL,等待连接即可。
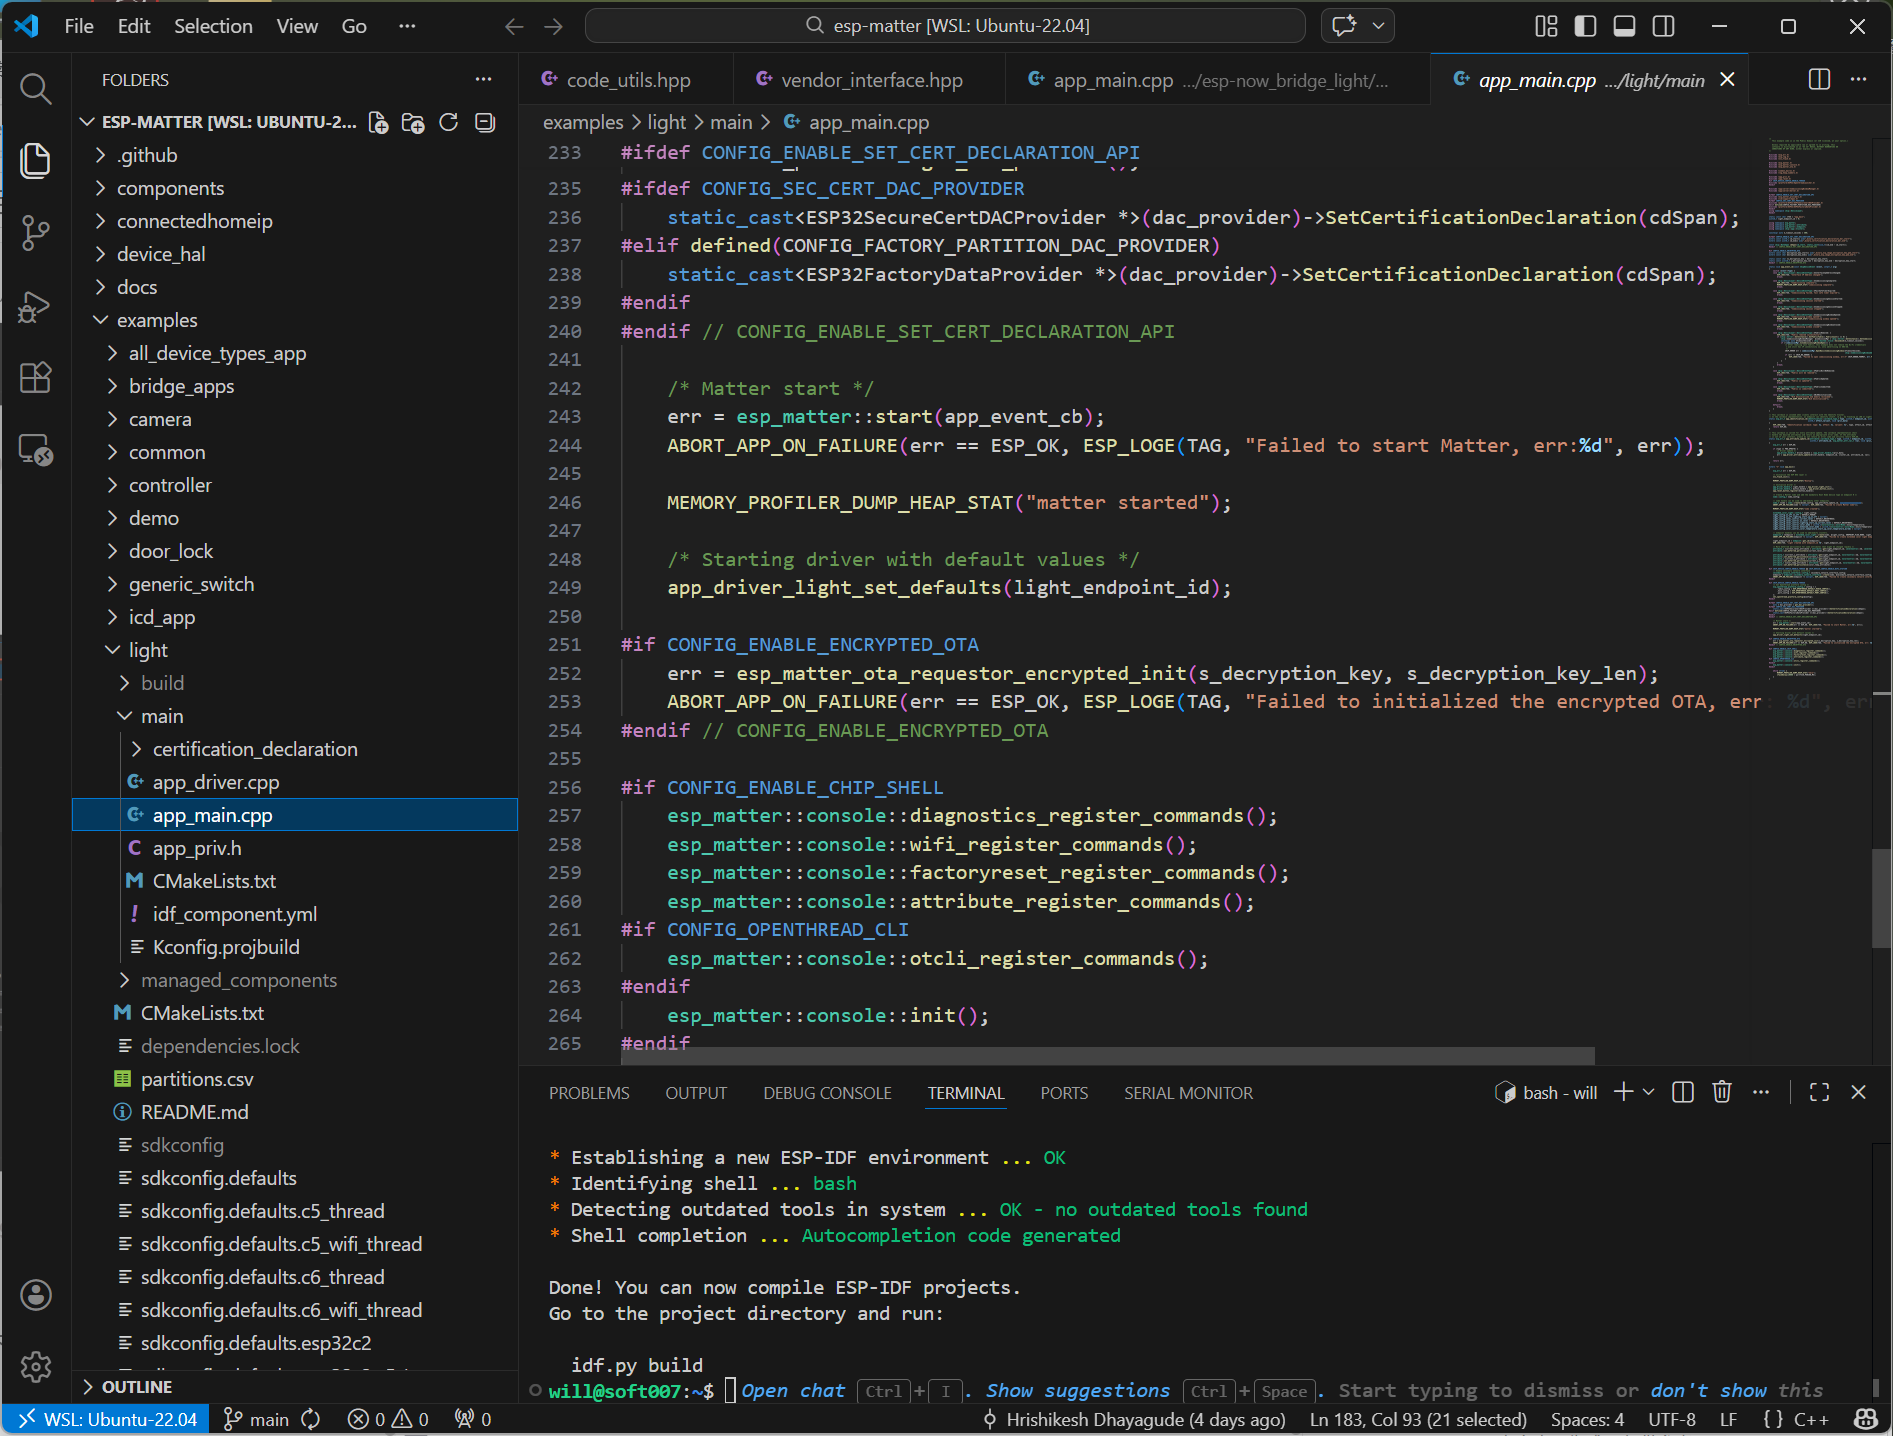
 3. 打开工程
选择工程所在的文件夹,打开即可,编译下载可在terminal窗口输入指令即可。

智能硬件社区聚焦AI智能硬件技术生态,汇聚嵌入式AI、物联网硬件开发者,打造交流分享平台,同步全国赛事资讯、开展 OPC 核心人才招募,助力技术落地与开发者成长。
更多推荐
 22
22 0
0- 0


 已为社区贡献1条内容

所有评论(0)