HAL_新建工程(手动移植)
一、创建工程目录
1、创建工程目录
确定一个存储位置,存放工程文件。(HAL_Template)
2、创建子目录
在工程目录中添加Doc、 User、Libraries、 CMSIS、Project文件夹:
Doc:
User:
main.c
Libraries:
Include
Source
CMSIS :
Include
Source
Project:
Output
Listing
3、目录文件说明
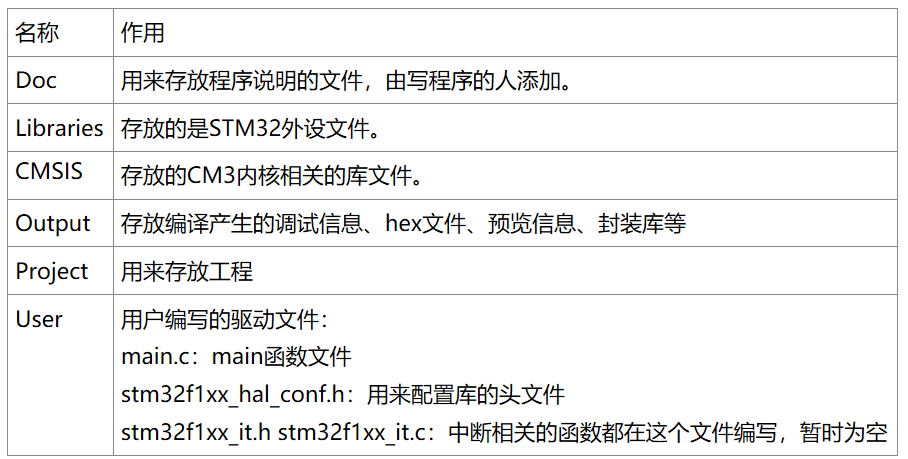
二、拷贝HAL库相关文件
1、拷贝HAL库(Libraries)
进入\STM32Cube_FW_F1_V1.8.0\Drivers\STM32F1xx_HAL_Driver 把头文件夹 Inc 和源文件夹 Src 移动到自己的Libraries的对应的文件中。
2、拷贝启动文件(CMSIS\Include)
1)、先进入内核文件\STM32Cube_FW_F1_V1.8.0\Drivers\CMSIS
2)、进入头文件\CMSIS\Include 把所有文件拷贝到自己的CMSIS/Include文件中。
3)、再进入\CMSIS\Device\ST\STM32F1xx\Include 把所有文件拷贝到自己的CMSIS/Include文件中
3、拷贝源文件(CMSYS\Source)
1)、进入\STM32Cube_FW_F1_V1.8.0\Drivers\CMSIS\Device\ST\STM32F1xx\Source\Templates
2)、把\Templates 文件的的system_stm32f1xx.c拷贝到自己的CMSIS/Source文件中
3)、再进入/arm文件下,把所有文件拷贝到自己的CMSIS/Source文件中
4、添加中断文件
在User文件夹创建stm32f1xx_it.c 和stm32f1xx_it.h文件。
stm32f1xx_it.c
			/*-------------------------------------------------*/
			/*                                                 */
			/*          实现各种中断服务函数的源文件           */
			/*                                                 */
			/*-------------------------------------------------*/

			#include "stm32f1xx_hal.h"
			#include "stm32f1xx_it.h"

			/*-------------------------------------------------*/
			/*函数名:不可屏蔽中断处理函数                     */
			/*参  数:无                                       */
			/*返回值:无                                       */
			/*-------------------------------------------------*/
			void NMI_Handler(void)
			{

			}

			/*-------------------------------------------------*/
			/*函数名:硬件出错后进入的中断处理函数             */
			/*参  数:无                                       */
			/*返回值:无                                       */
			/*-------------------------------------------------*/
			void HardFault_Handler(void)
			{

			}
			/*-------------------------------------------------*/
			/*函数名:软中断,SWI 指令调用的处理函数           */
			/*参  数:无                                       */
			/*返回值:无                                       */
			/*-------------------------------------------------*/
			void SVC_Handler(void)
			{

			}
			/*-------------------------------------------------*/
			/*函数名:可挂起的系统服务处理函数                 */
			/*参  数:无                                       */
			/*返回值:无                                       */
			/*-------------------------------------------------*/
			void PendSV_Handler(void)
			{

			}
			/*-------------------------------------------------*/
			/*函数名:SysTic系统嘀嗒定时器处理函数             */
			/*参  数:无                                       */
			/*返回值:无                                       */
			/*-------------------------------------------------*/
			void SysTick_Handler(void)
			{
			        HAL_IncTick();
			}
stm32f1xx_it.h
/**
******************************************************************************
* @file GPIO/GPIO_IOToggle/Inc/stm32f1xx_it.h
* @author MCD Application Team
* @brief This file contains the headers of the interrupt handlers.
******************************************************************************
* @attention
*
* <h2><center>© Copyright (c) 2016 STMicroelectronics.
* All rights reserved.</center></h2>
*
* This software component is licensed by ST under BSD 3-Clause license,
* the "License"; You may not use this file except in compliance with the
* License. You may obtain a copy of the License at:
* opensource.org/licenses/BSD-3-Clause
*
******************************************************************************
*/
/* Define to prevent recursive inclusion -------------------------------------*/
#ifndef __STM32F1xx_IT_H
#define __STM32F1xx_IT_H
#ifdef __cplusplus
extern "C" {
#endif
/* Includes ------------------------------------------------------------------*/
/* Exported types ------------------------------------------------------------*/
/* Exported constants --------------------------------------------------------*/
/* Exported macro ------------------------------------------------------------*/
/* Exported functions ------------------------------------------------------- */
void NMI_Handler(void);
void HardFault_Handler(void);
void MemManage_Handler(void);
void BusFault_Handler(void);
void UsageFault_Handler(void);
void SVC_Handler(void);
void DebugMon_Handler(void);
void PendSV_Handler(void);
void SysTick_Handler(void);
#ifdef __cplusplus
}
#endif
#endif /* __STM32F1xx_IT_H */
/************************ (C) COPYRIGHT STMicroelectronics *****END OF FILE****/
5、更改hal配置文件
把自己的Libraries文件中的Include 文件中的stm32f1xx_hal_conf_template.h 更名为 stm32f1xx_hal_conf.h 。
否则编译会找不到这个头文件。
三、Keil创建工程
1、创建工程
选择Project为工程目录。
2、添加组文件夹
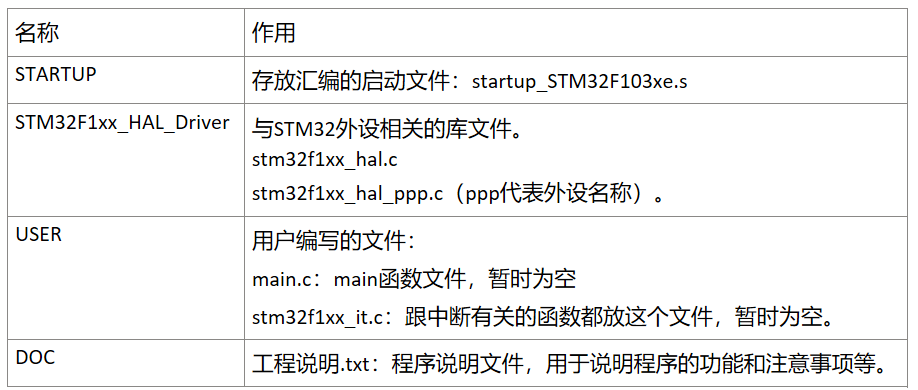
3、导入文件
STM32F1xx_HAL_Driver :
stm32f1xx_hal.c
stm32f1xx_hal_cortex.c
stm32f1xx_hal_gpio.c
stm32f1xx_hal_gpio_ex.c
stm32f1xx_hal_rcc.c
stm32f1xx_hal_rcc_ex.c
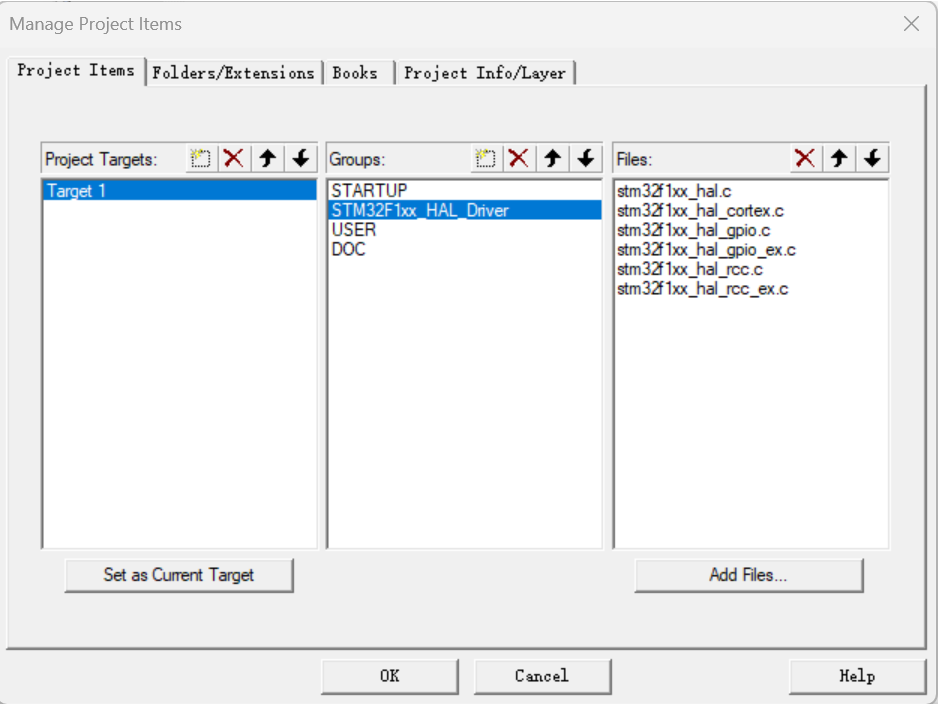
STARTUP:
system_stm32f1xx.c
startup_stm32f103xe.s
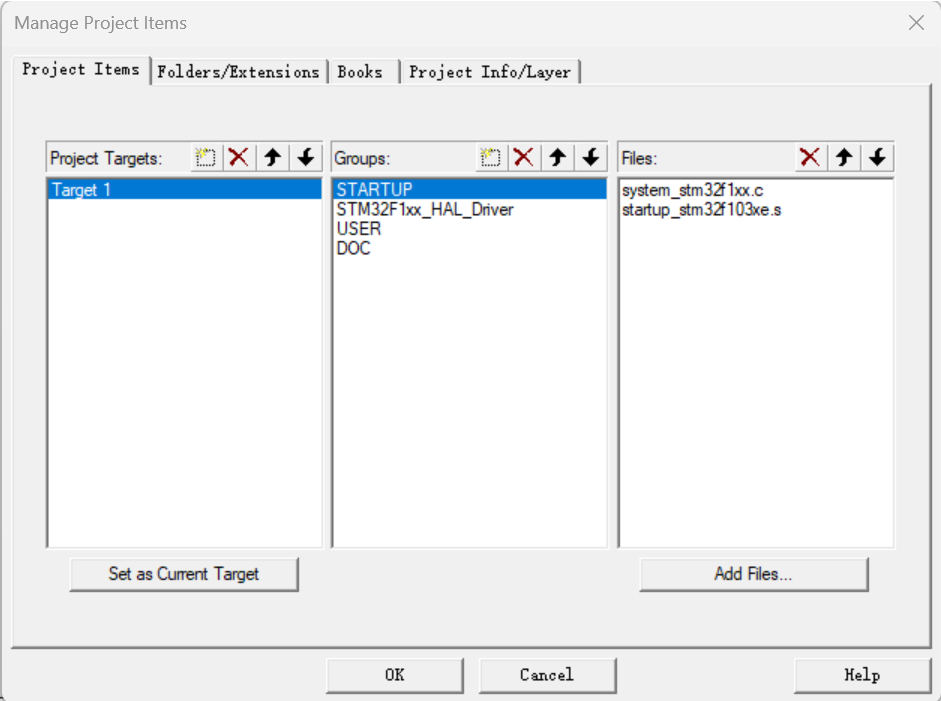
User:
main.c
stm32f1xx_it.c
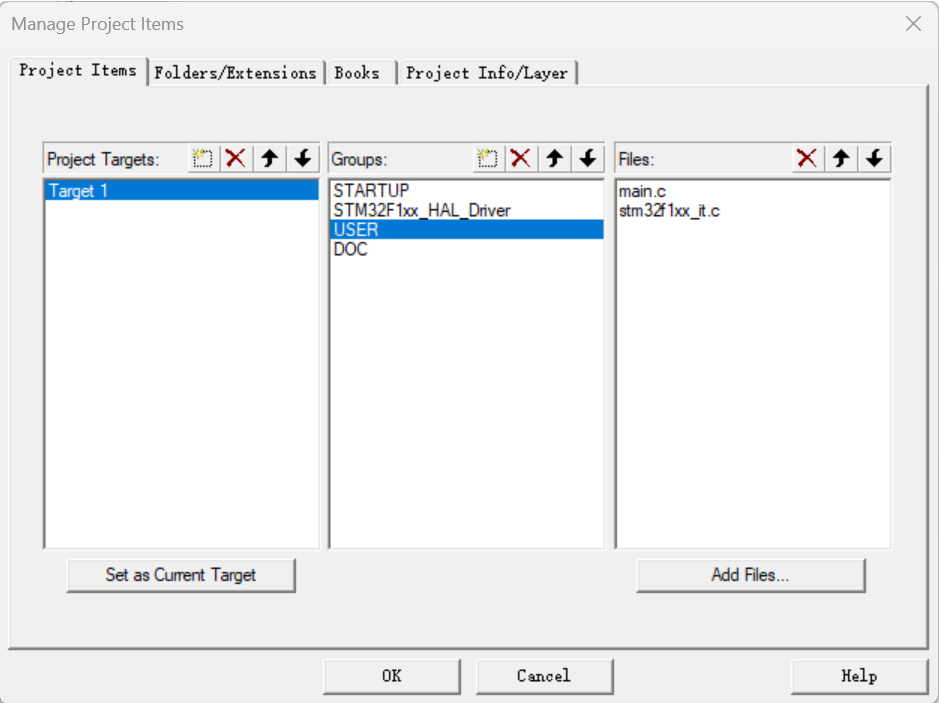
四、配置工程
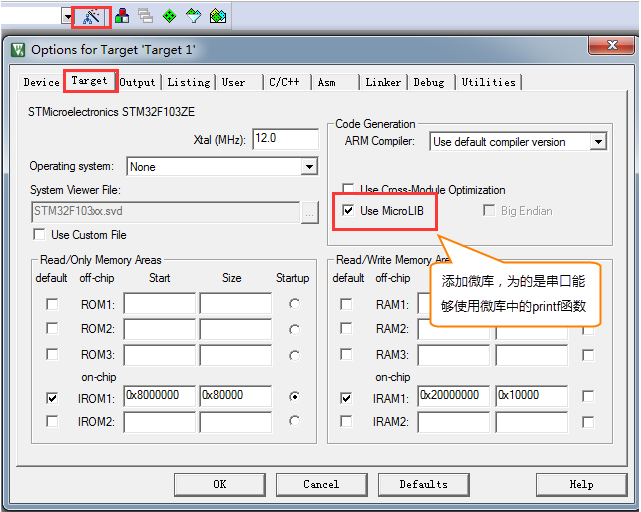
1、Target中选中微库“ Use MicroLib”,为的是在日后编写串口驱动的时候可以使用printf函数。
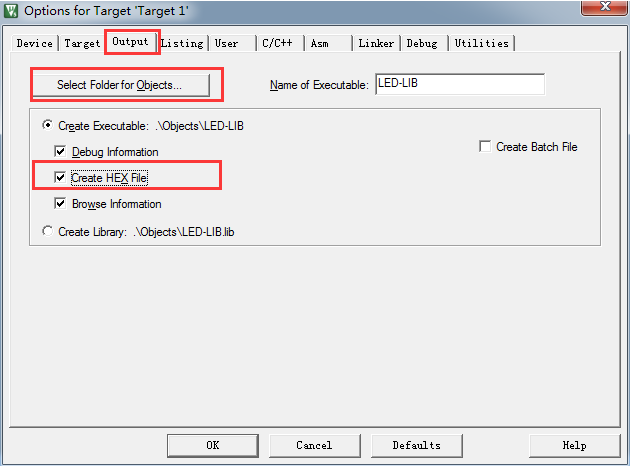
2、在Output选项卡中把输出文件夹定位到我们工程目录下的“output”文件夹,如果想在编译的过程中生成hex文件,那么那Create HEX File选项勾上。
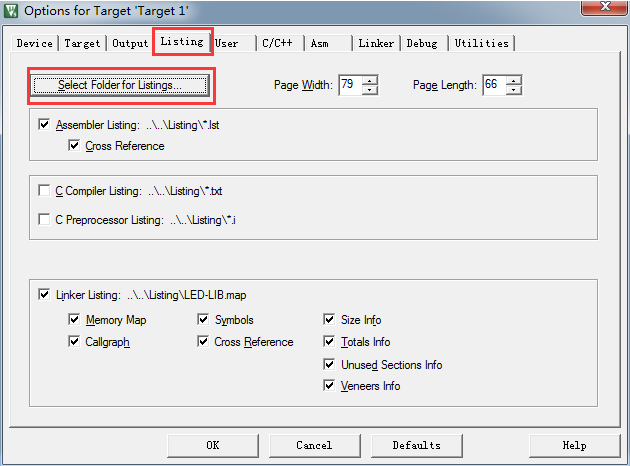
3、在Listing选项卡中把输出文件夹定位到我们工程目录下的“Listing”文件夹。
4、在C/C++选项卡中添加处理宏及编译器编译的时候查找的头文件路径。
如果头文件路径添加有误,则编译的时候会报错找不到头文件。
选中C99 Mode。
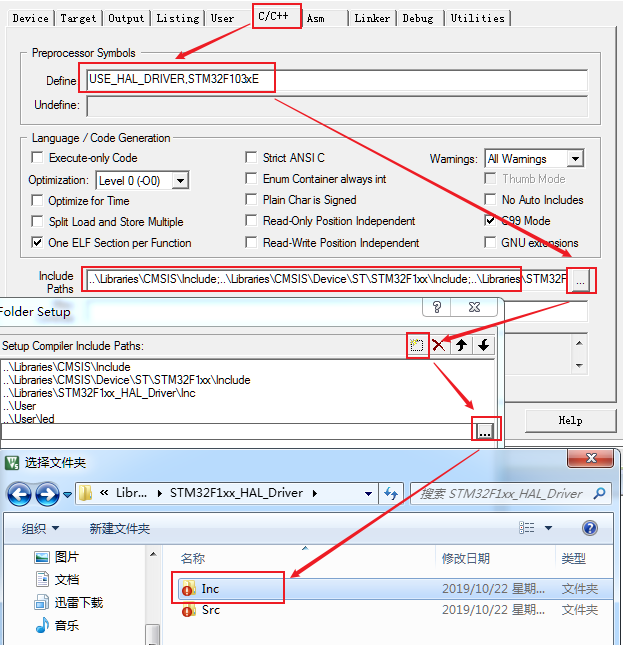
在编译器中添加宏的好处就是,只要用了这个模版,就不用源文件中修改代码。
STM32F103xE 宏:为了告诉STM32HAL库,我们使用的芯片类型是STM32型号是大容量的,使STM32HAL库根据我们选定的芯片型号来配置。
USE_HAL_DRIVER 宏:为了让stm32f1xx.h包含stm32f1xx_hal_conf.h这个头文件。
四、编译测试
1、测试源代码
		#include "stm32f1xx_hal.h"
		#define LED_PIN GPIO_PIN_8
		#define LED_PORT GPIOA
		void SystemClock_Config(void);
		int main(void)
		{
		    /* 1. HAL库核心初始化(移植最关键的第一步) */
		    HAL_Init();
		    /* 2. 系统时钟配置(必须和你的硬件匹配!) */
		    SystemClock_Config();
		    /* 3. 极简GPIO初始化(仅配置LED引脚) */
		    // 使能GPIO时钟
		    __HAL_RCC_GPIOA_CLK_ENABLE();
		    // 配置LED引脚为推挽输出
		    GPIO_InitTypeDef gpio_conf = {0};
		    gpio_conf.Pin = LED_PIN;
		    gpio_conf.Mode = GPIO_MODE_OUTPUT_PP;  // 推挽输出
		    gpio_conf.Pull = GPIO_NOPULL;          // 无上下拉
		    gpio_conf.Speed = GPIO_SPEED_FREQ_LOW; // 低速
		    HAL_GPIO_Init(LED_PORT, &gpio_conf);
		    /* 4. 测试主循环:LED闪烁(验证移植成功) */
		    while (1)
		    {
		        HAL_GPIO_TogglePin(LED_PORT, LED_PIN); // 翻转LED电平
		        HAL_Delay(500);                        // 延时500ms
		    }
		}
		/**
		 * @brief 系统时钟配置(根据你的芯片修改!)
		 * 示例:STM32F103 72MHz / STM32F407 168MHz / 无晶振则用HSI
		 */
		void SystemClock_Config(void)
		{
		    // 极简版:用内部HSI时钟(无需外部晶振,适配所有板子)
		    RCC_OscInitTypeDef osc_init = {0};
		    RCC_ClkInitTypeDef clk_init = {0};
		    // 启用HSI(内部高速时钟,8MHz)
		    osc_init.OscillatorType = RCC_OSCILLATORTYPE_HSI;
		    osc_init.HSIState = RCC_HSI_ON;
		    osc_init.HSICalibrationValue = RCC_HSICALIBRATION_DEFAULT;
		    if (HAL_RCC_OscConfig(&osc_init) != HAL_OK)
		    {
		        while (1)
		            ; // 时钟配置失败,卡死
		    }
		    // 配置系统时钟 = HSI(8MHz)
		    clk_init.ClockType = RCC_CLOCKTYPE_SYSCLK | RCC_CLOCKTYPE_HCLK |
		                         RCC_CLOCKTYPE_PCLK1 | RCC_CLOCKTYPE_PCLK2;
		    clk_init.SYSCLKSource = RCC_SYSCLKSOURCE_HSI;
		    clk_init.AHBCLKDivider = RCC_SYSCLK_DIV1;
		    clk_init.APB1CLKDivider = RCC_HCLK_DIV1;
		    clk_init.APB2CLKDivider = RCC_HCLK_DIV1;
		    if (HAL_RCC_ClockConfig(&clk_init, FLASH_LATENCY_0) != HAL_OK)
		    {
		        while (1)
		            ; // 时钟配置失败,卡死
		    }
		}
		/**
		 * @brief 错误处理函数(移植失败时触发)
		 */
		void Error_Handler(void)
		{
		    while (1)
		    {
		        // 若移植失败,LED快速闪烁(100ms一次)
		        HAL_GPIO_TogglePin(LED_PORT, LED_PIN);
		        HAL_Delay(100);
		    }
		}
		// 以下是CubeMX自动生成的弱函数,按需保留
		#ifdef USE_FULL_ASSERT
		void assert_failed(uint8_t *file, uint32_t line)
		{
		}
		#endif
2、下载测试
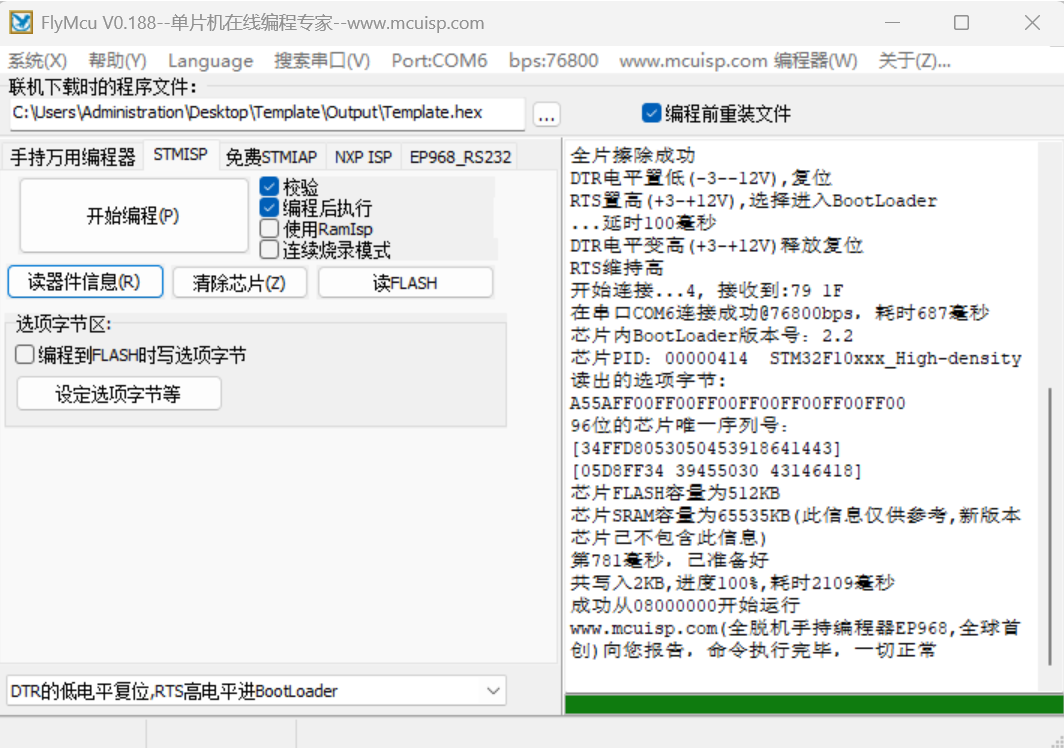
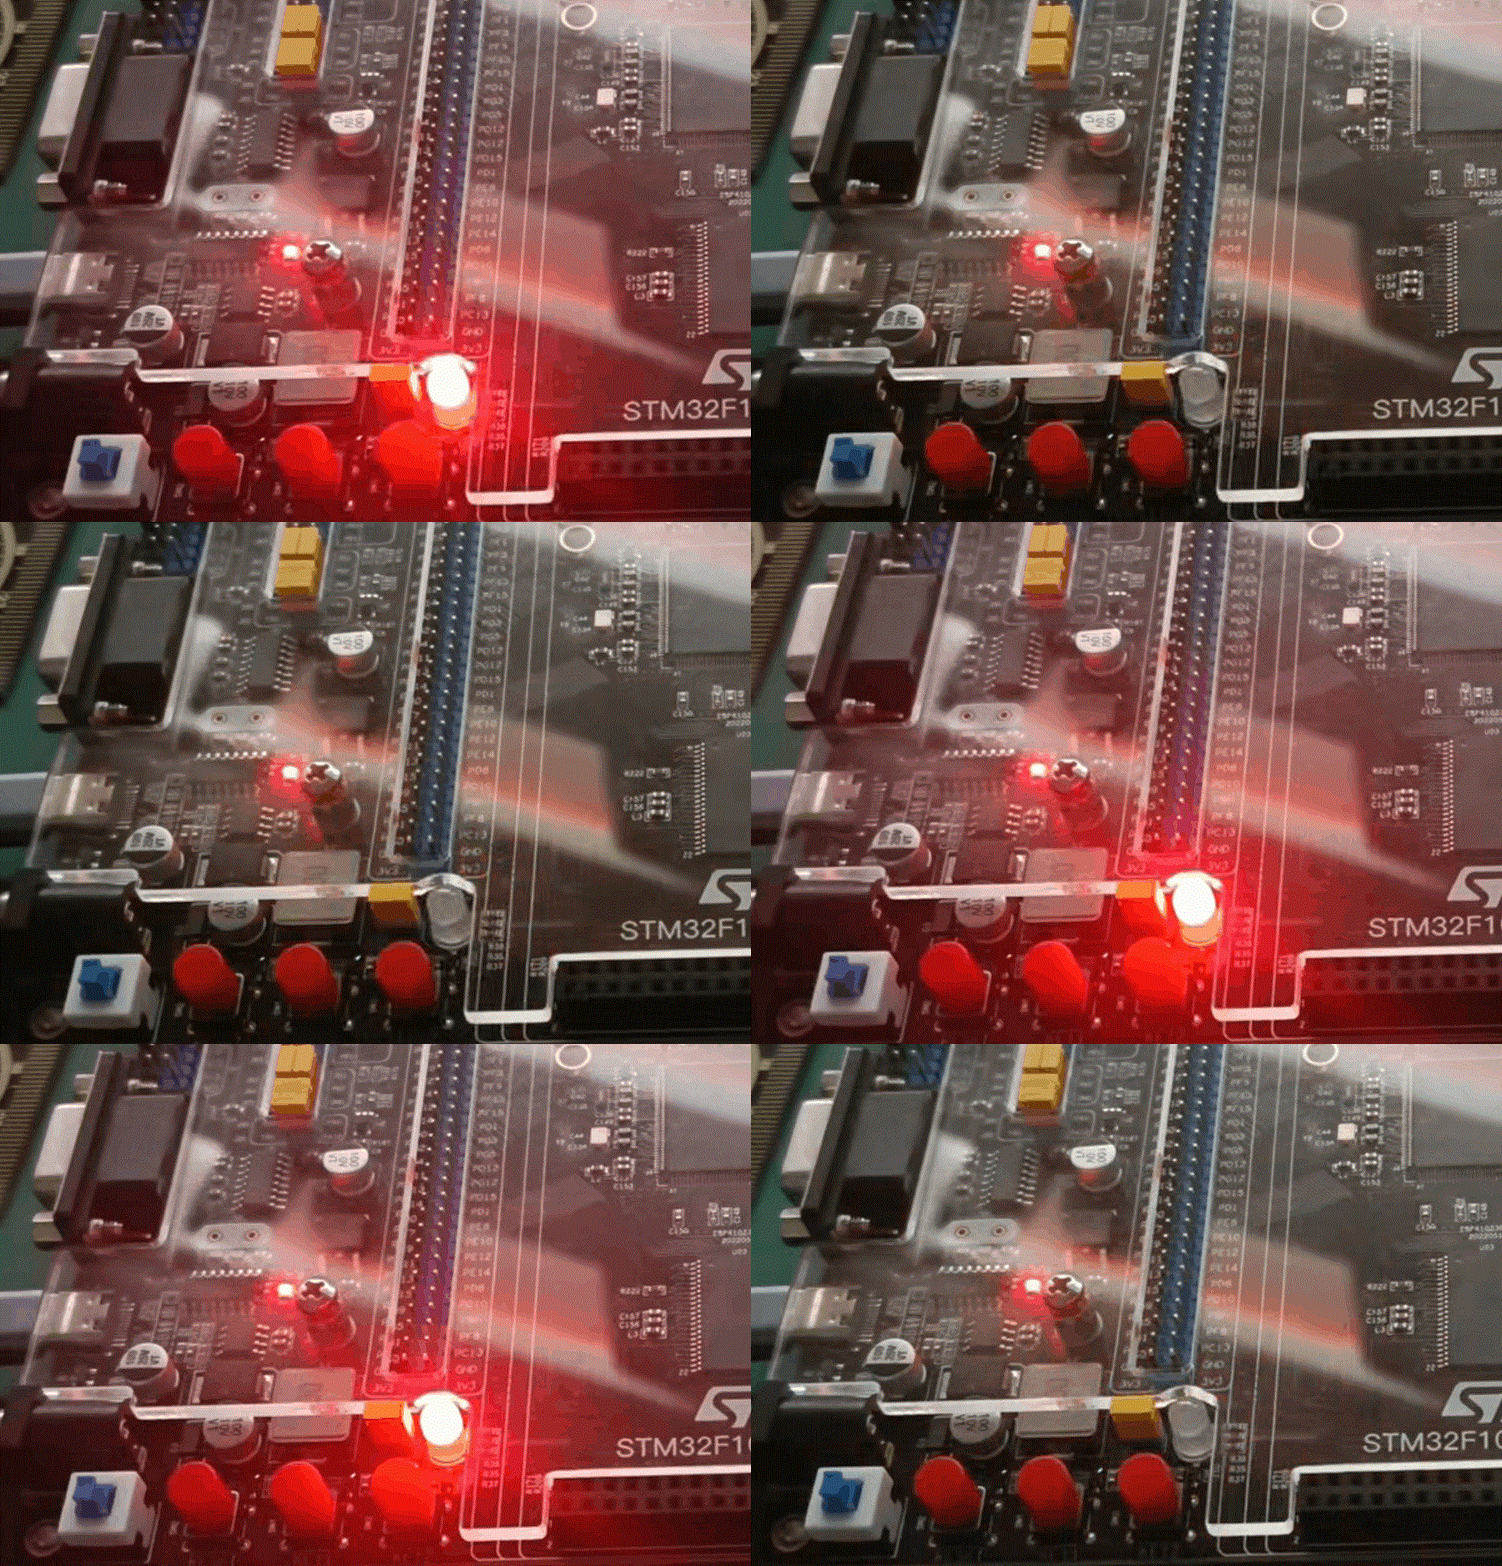

智能硬件社区聚焦AI智能硬件技术生态,汇聚嵌入式AI、物联网硬件开发者,打造交流分享平台,同步全国赛事资讯、开展 OPC 核心人才招募,助力技术落地与开发者成长。
更多推荐

 6
6 0
0- 0


 已为社区贡献29条内容

所有评论(0)