ESP32安装软件arduino然后安装CHC343搭建环境连接屏幕蜂鸣器舵机按钮支持python通信
软件+完整代码+所有资料链接:https://pan.quark.cn/s/788ba52d5281
我的项目的最终的目标是这样的:
电脑上python识别数字,发送到ESP32-屏幕显示-按下按钮-蜂鸣器响-舵机旋转
1.安装CHC343
在这里下载 https://www.wch.cn/downloads/ch343ser_exe.html
2.安装软件arduino
https://www.arduino.cc/en/software/
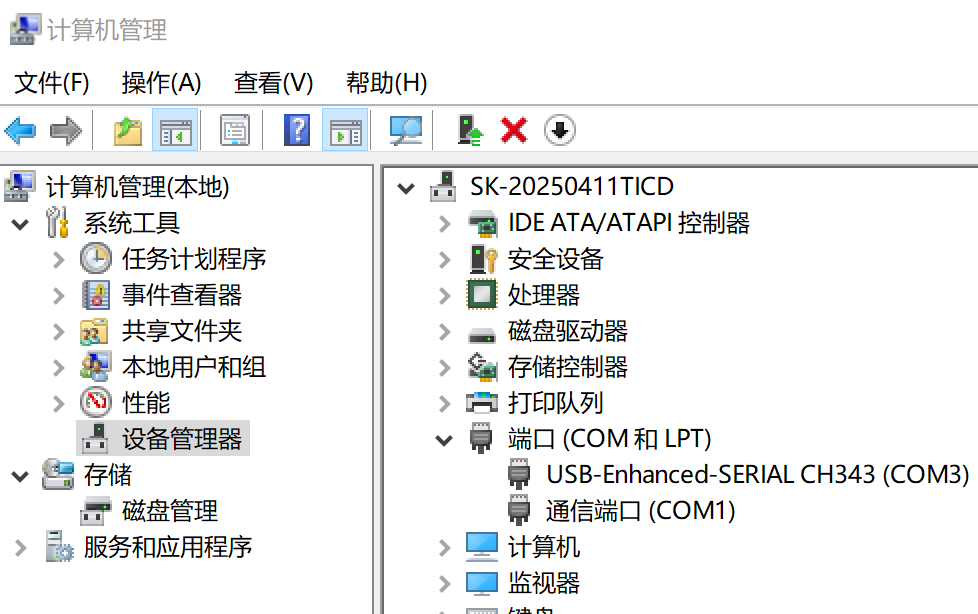
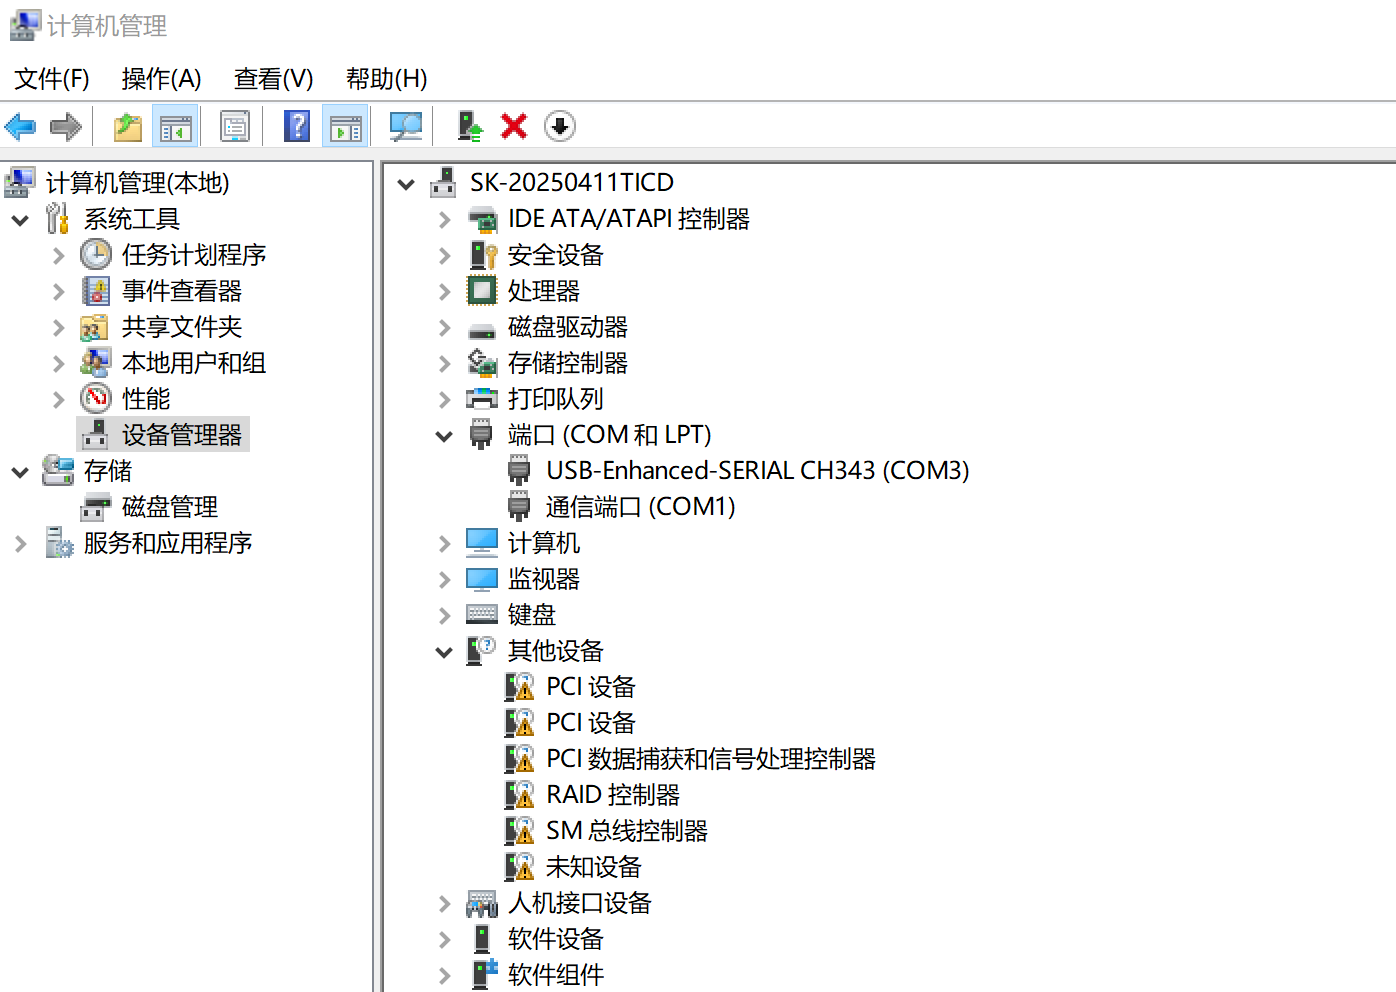
安装上CHC343后接入esp32的com端,在windows电脑上端口显示多了一个(COM3)
意思就是端口3就是这个esp32,如果没有或者显示问号,等下再管,先安装arduino软件。
之前插上没反应,换了一根有数据传输功能的数据线可以了
如果识别不出来就换数据线
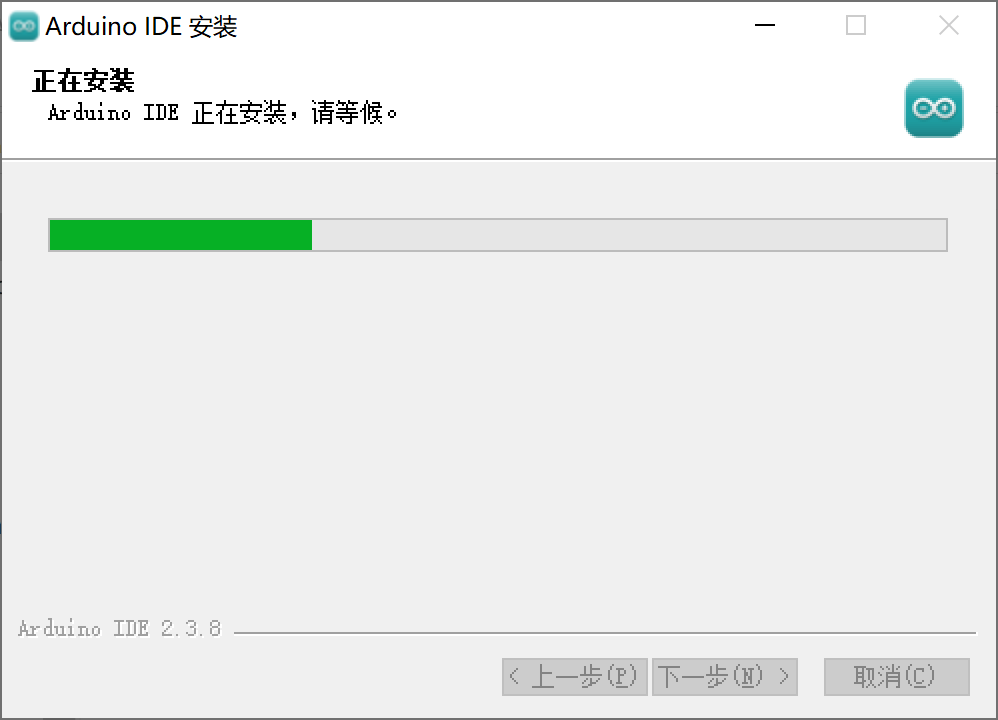
安装软件
arduino-ide_2.3.8_Windows_64bit
打开 Arduino IDE,点击左上角的 File -> Preferences(首选项)。

在 Additional Boards Manager URLs(附加开发板管理器地址)这一行,粘贴这个链接:
https://espressif.github.io/arduino-esp32/package_esp32_index.json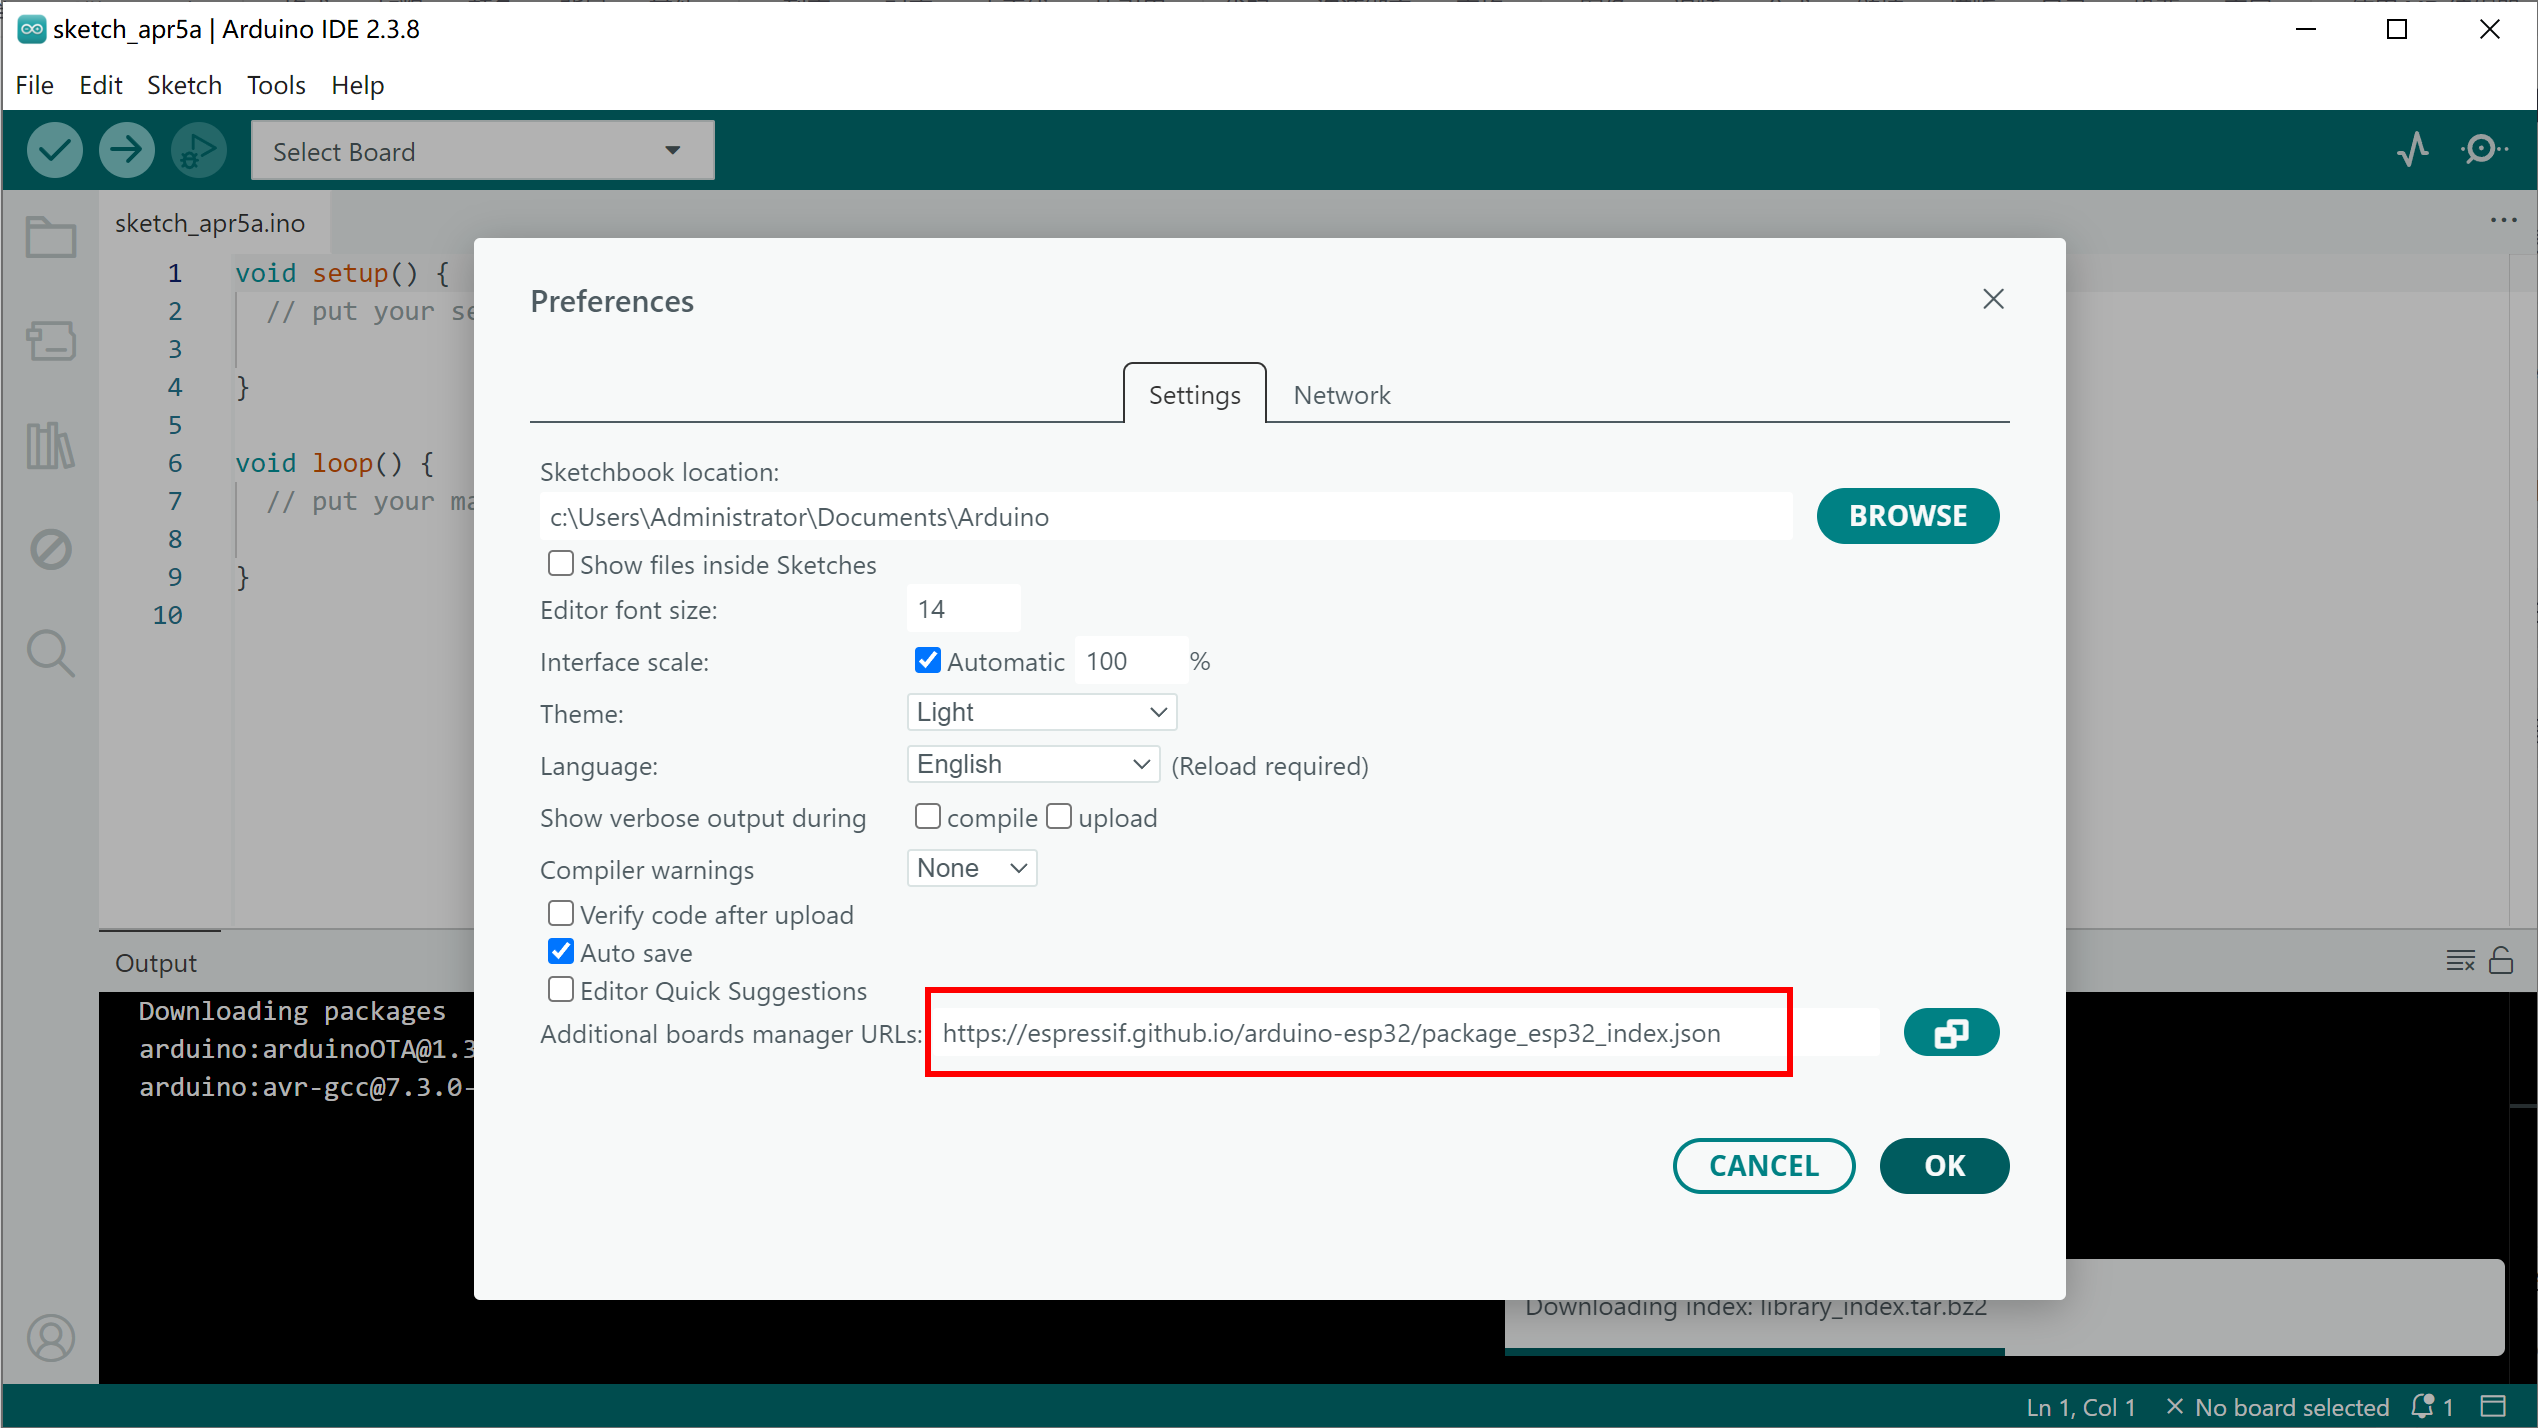
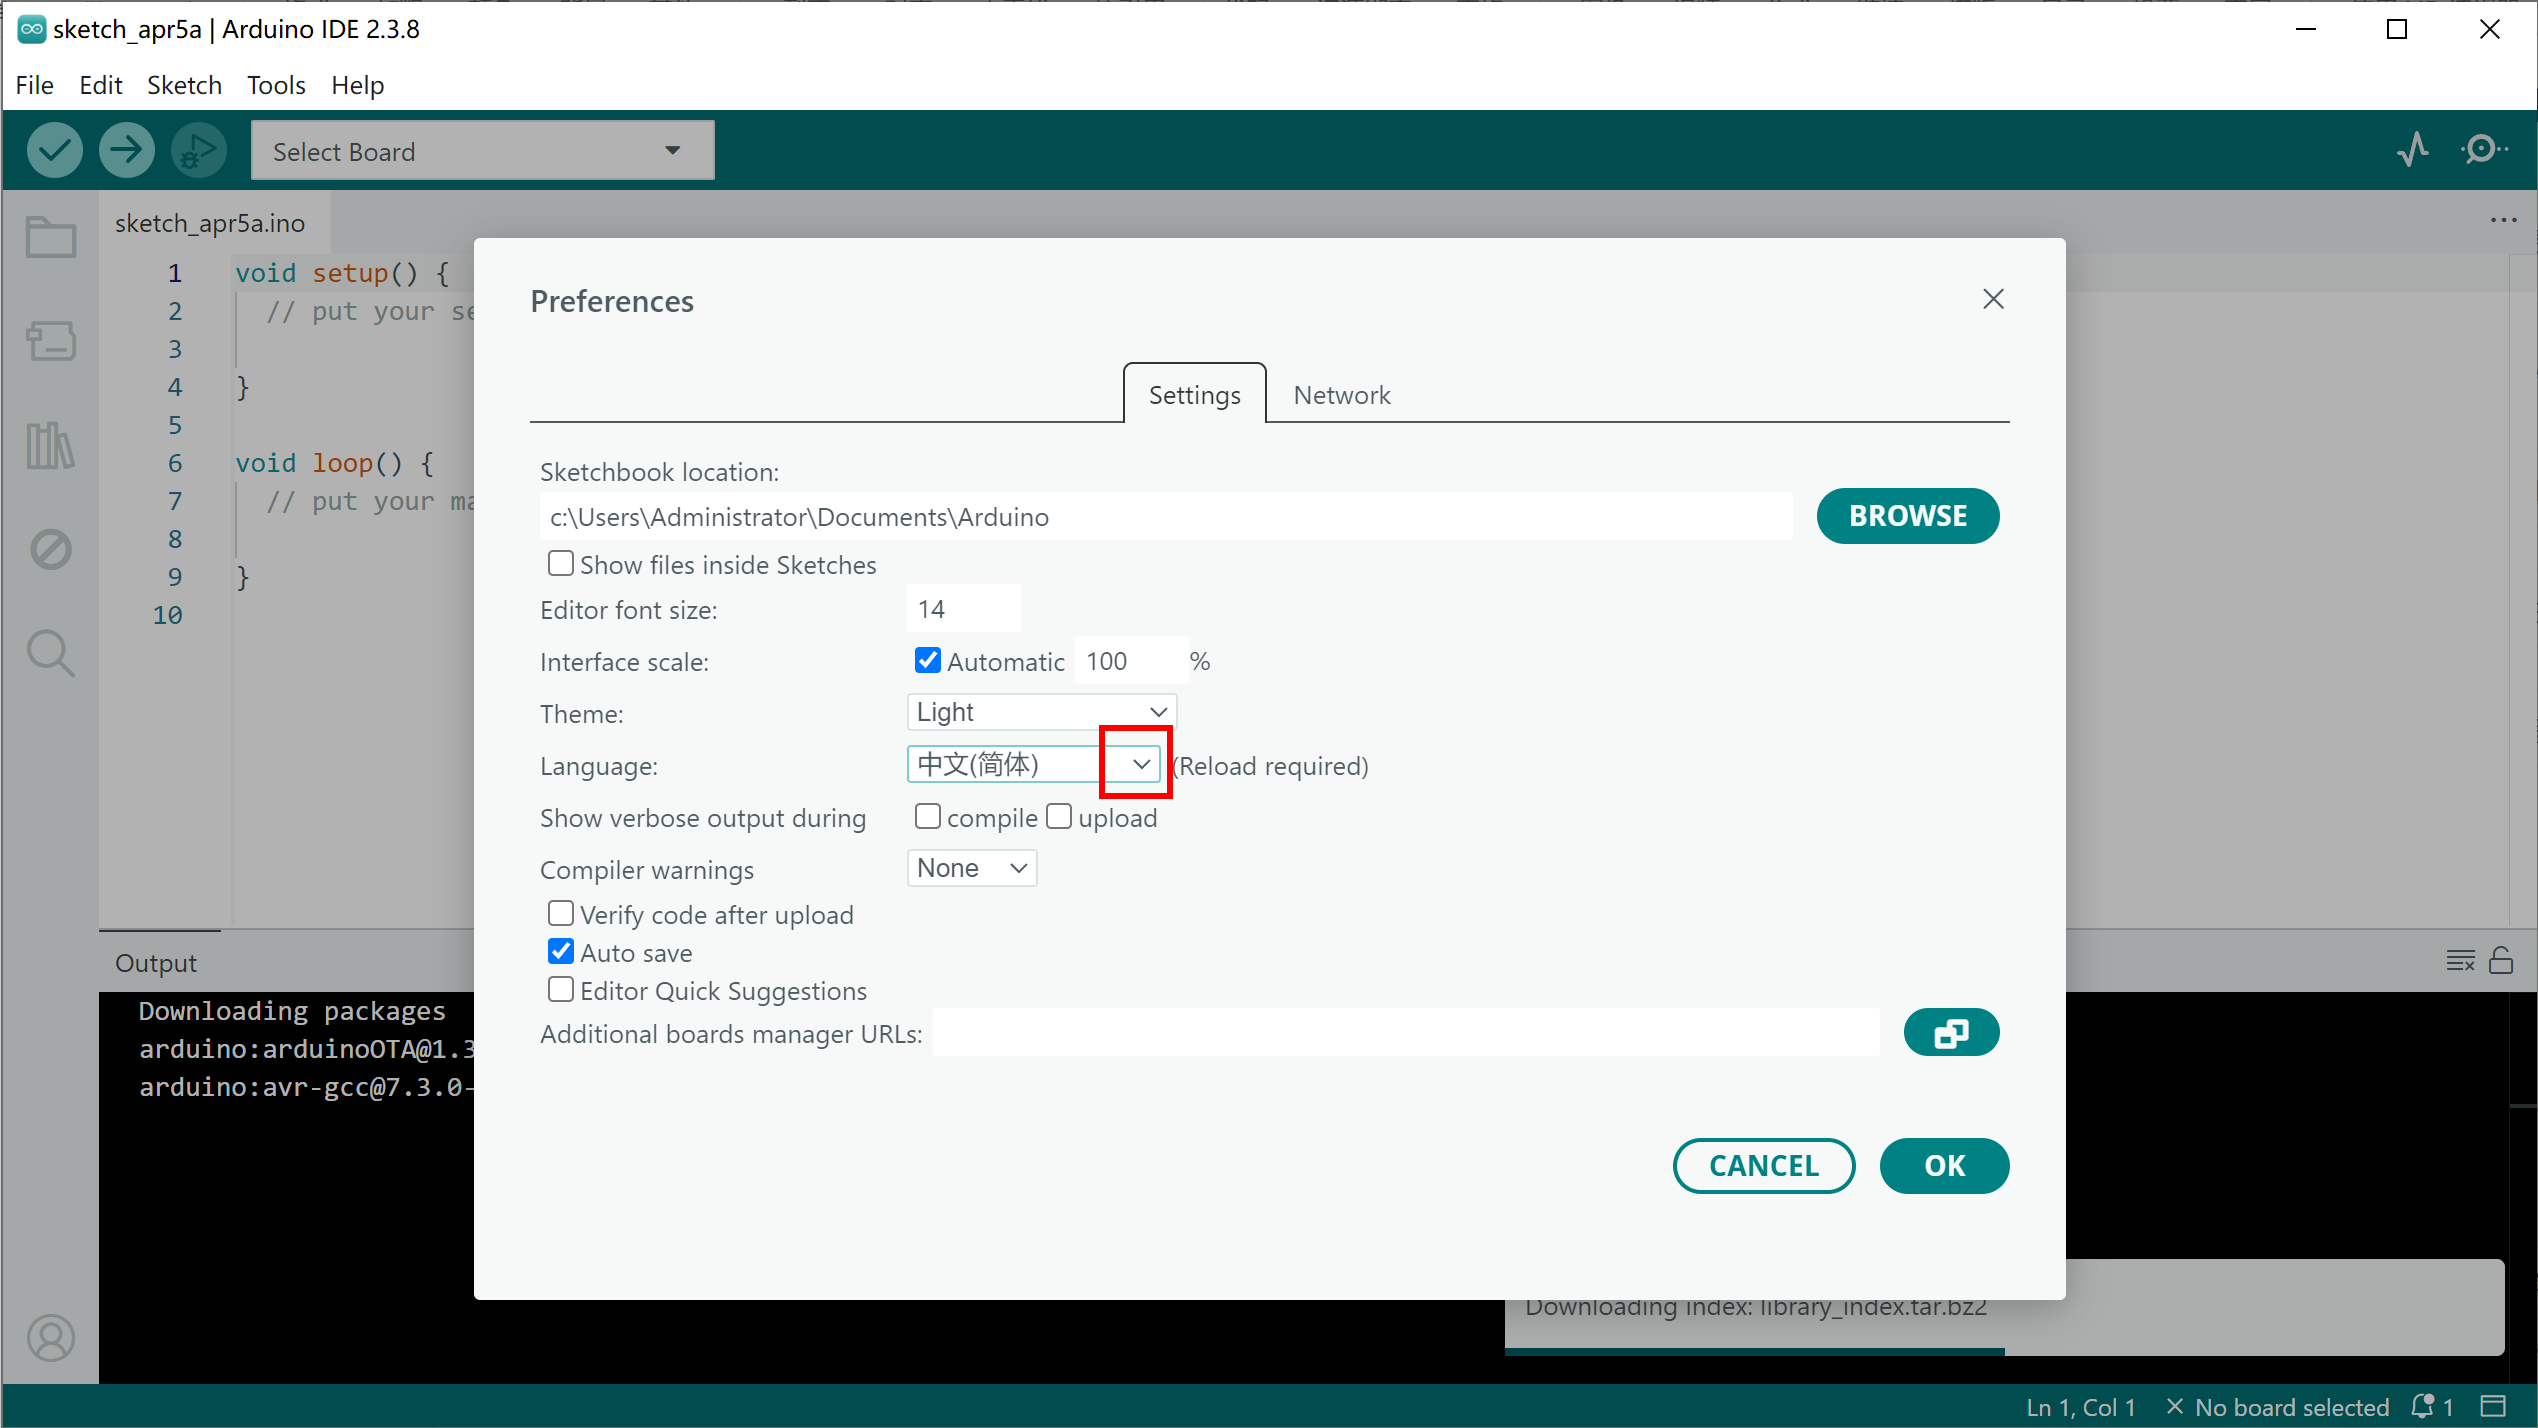
在这里汉化一下方便使用
安装插件,点击左侧的这个""小接口""的形状的标志,在搜索框搜索
安装ESP32插件
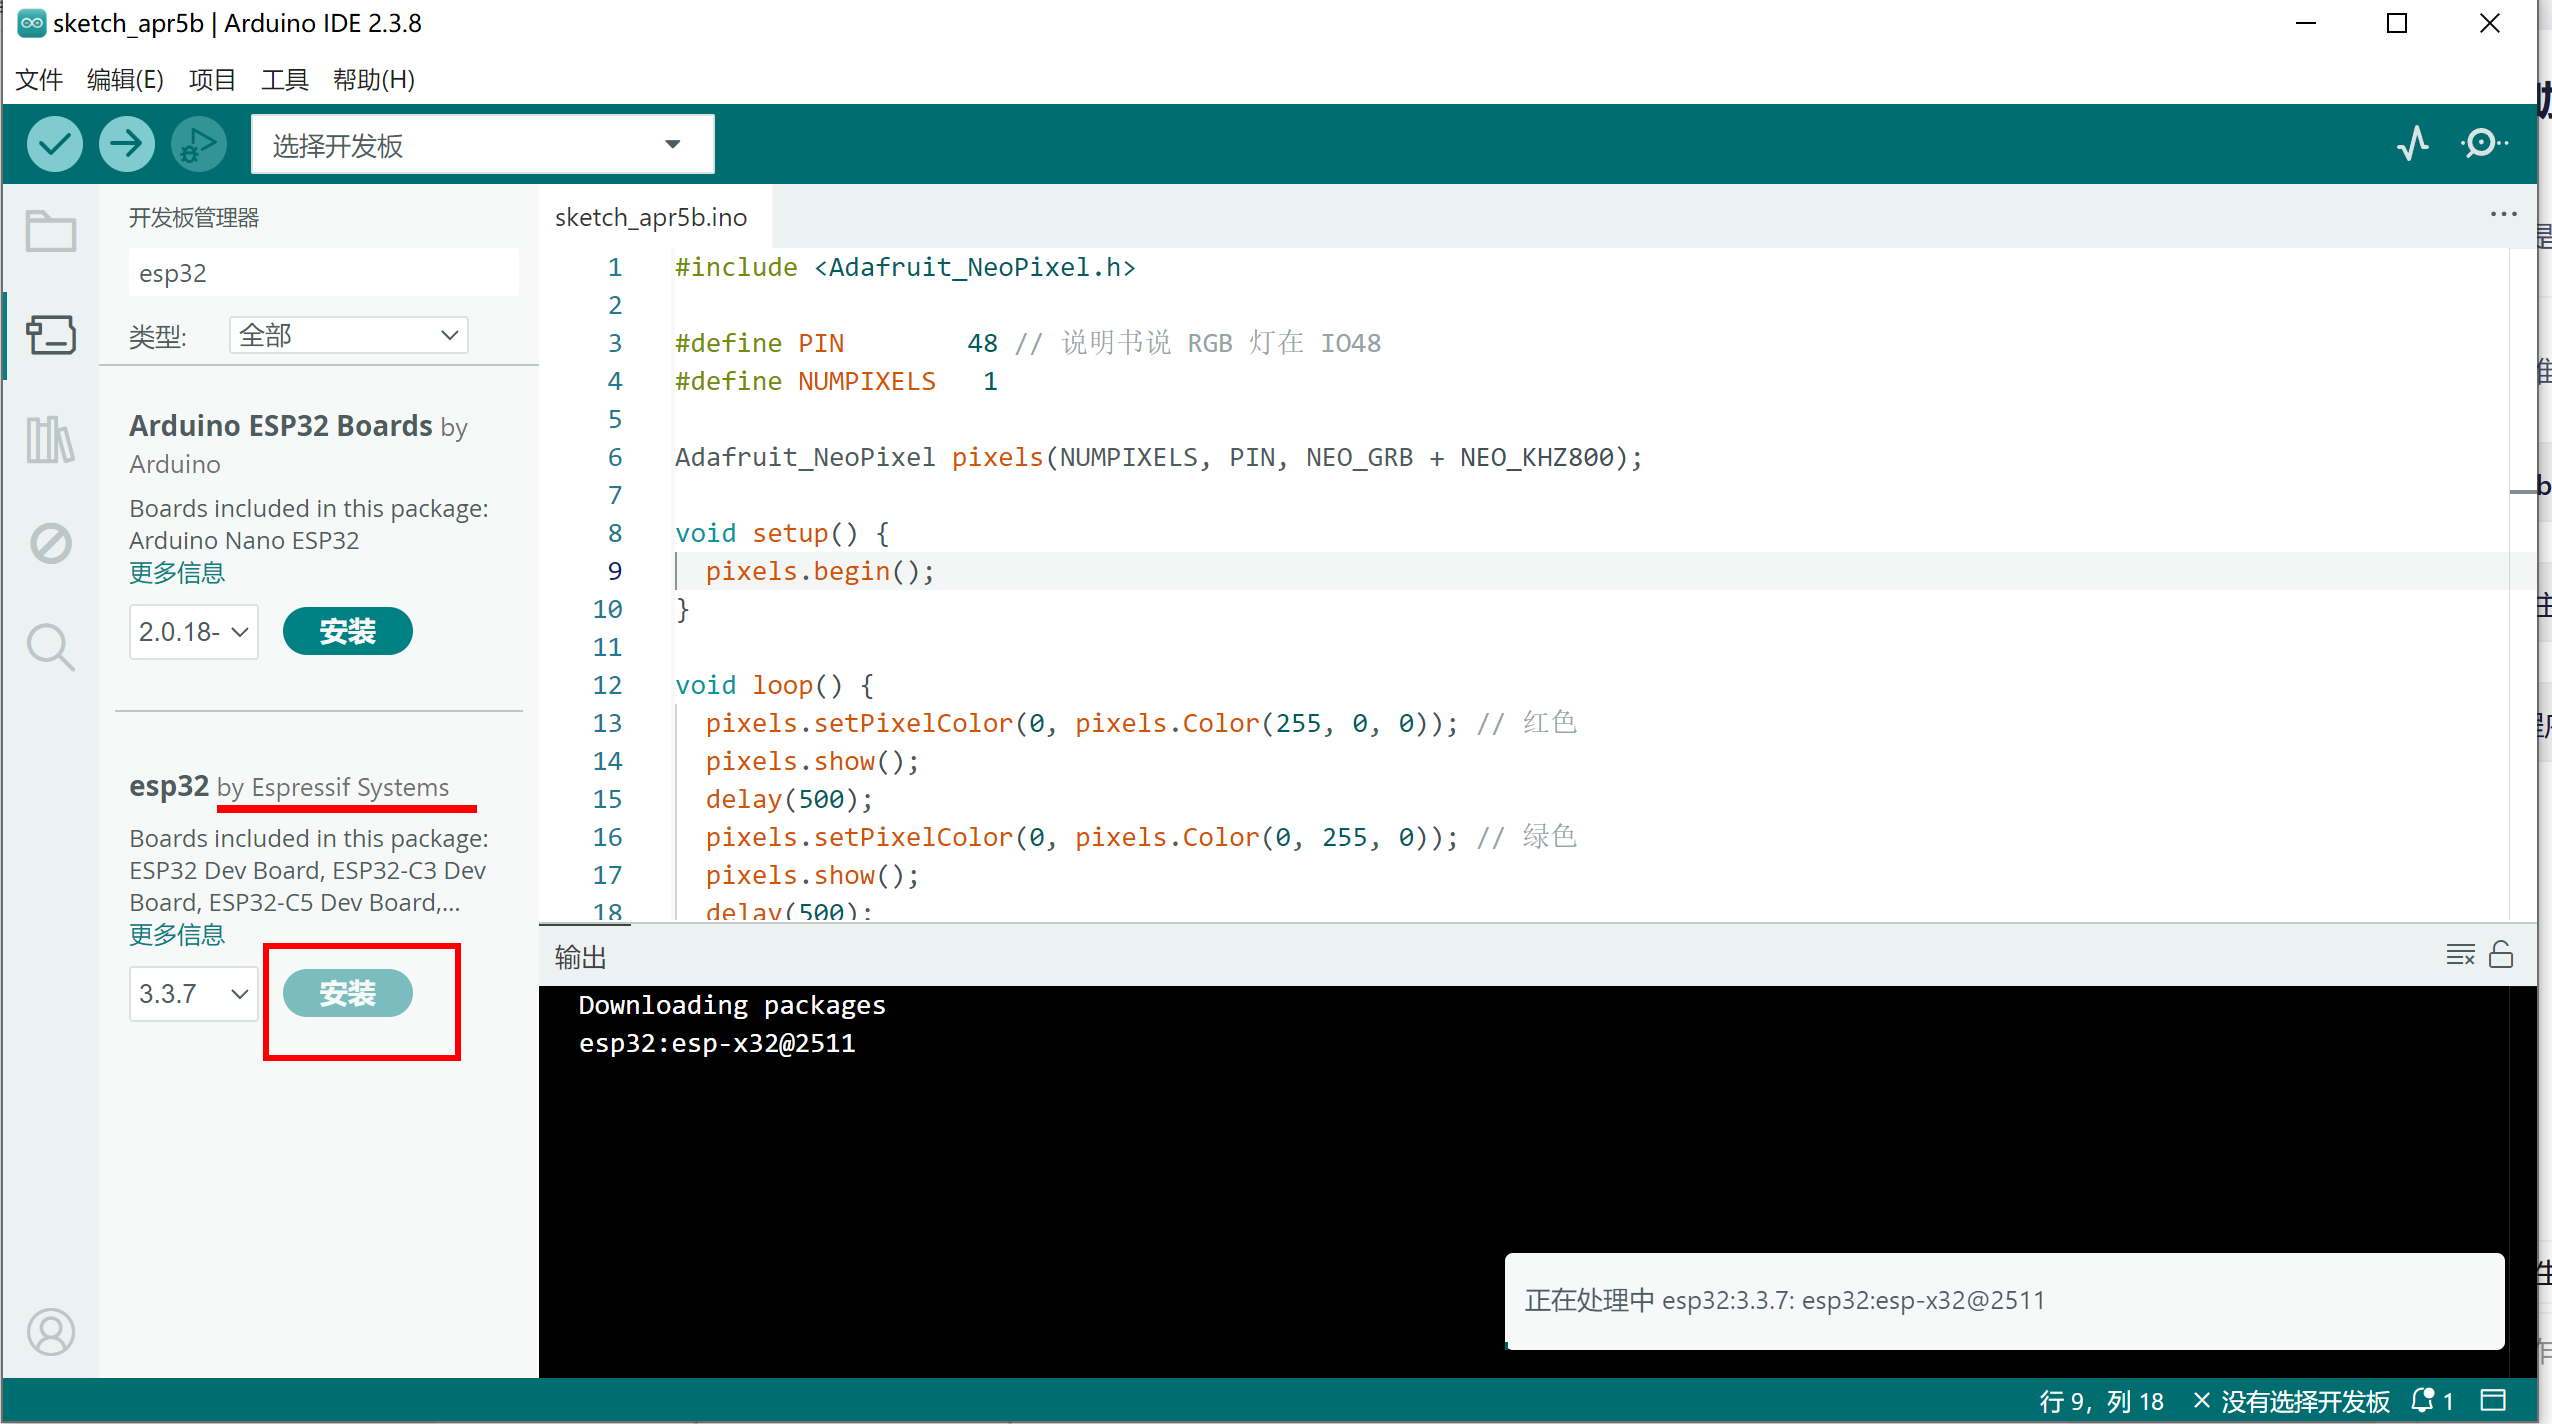
安装过程有点缓慢,安装上后,
https://arduino.me/packages/esp32.json
把那个json文件换成这个,是从国内下载有点慢,然后我切换到了最开始的json
还是很慢,设置一下代理,在首选项里面,找到网络
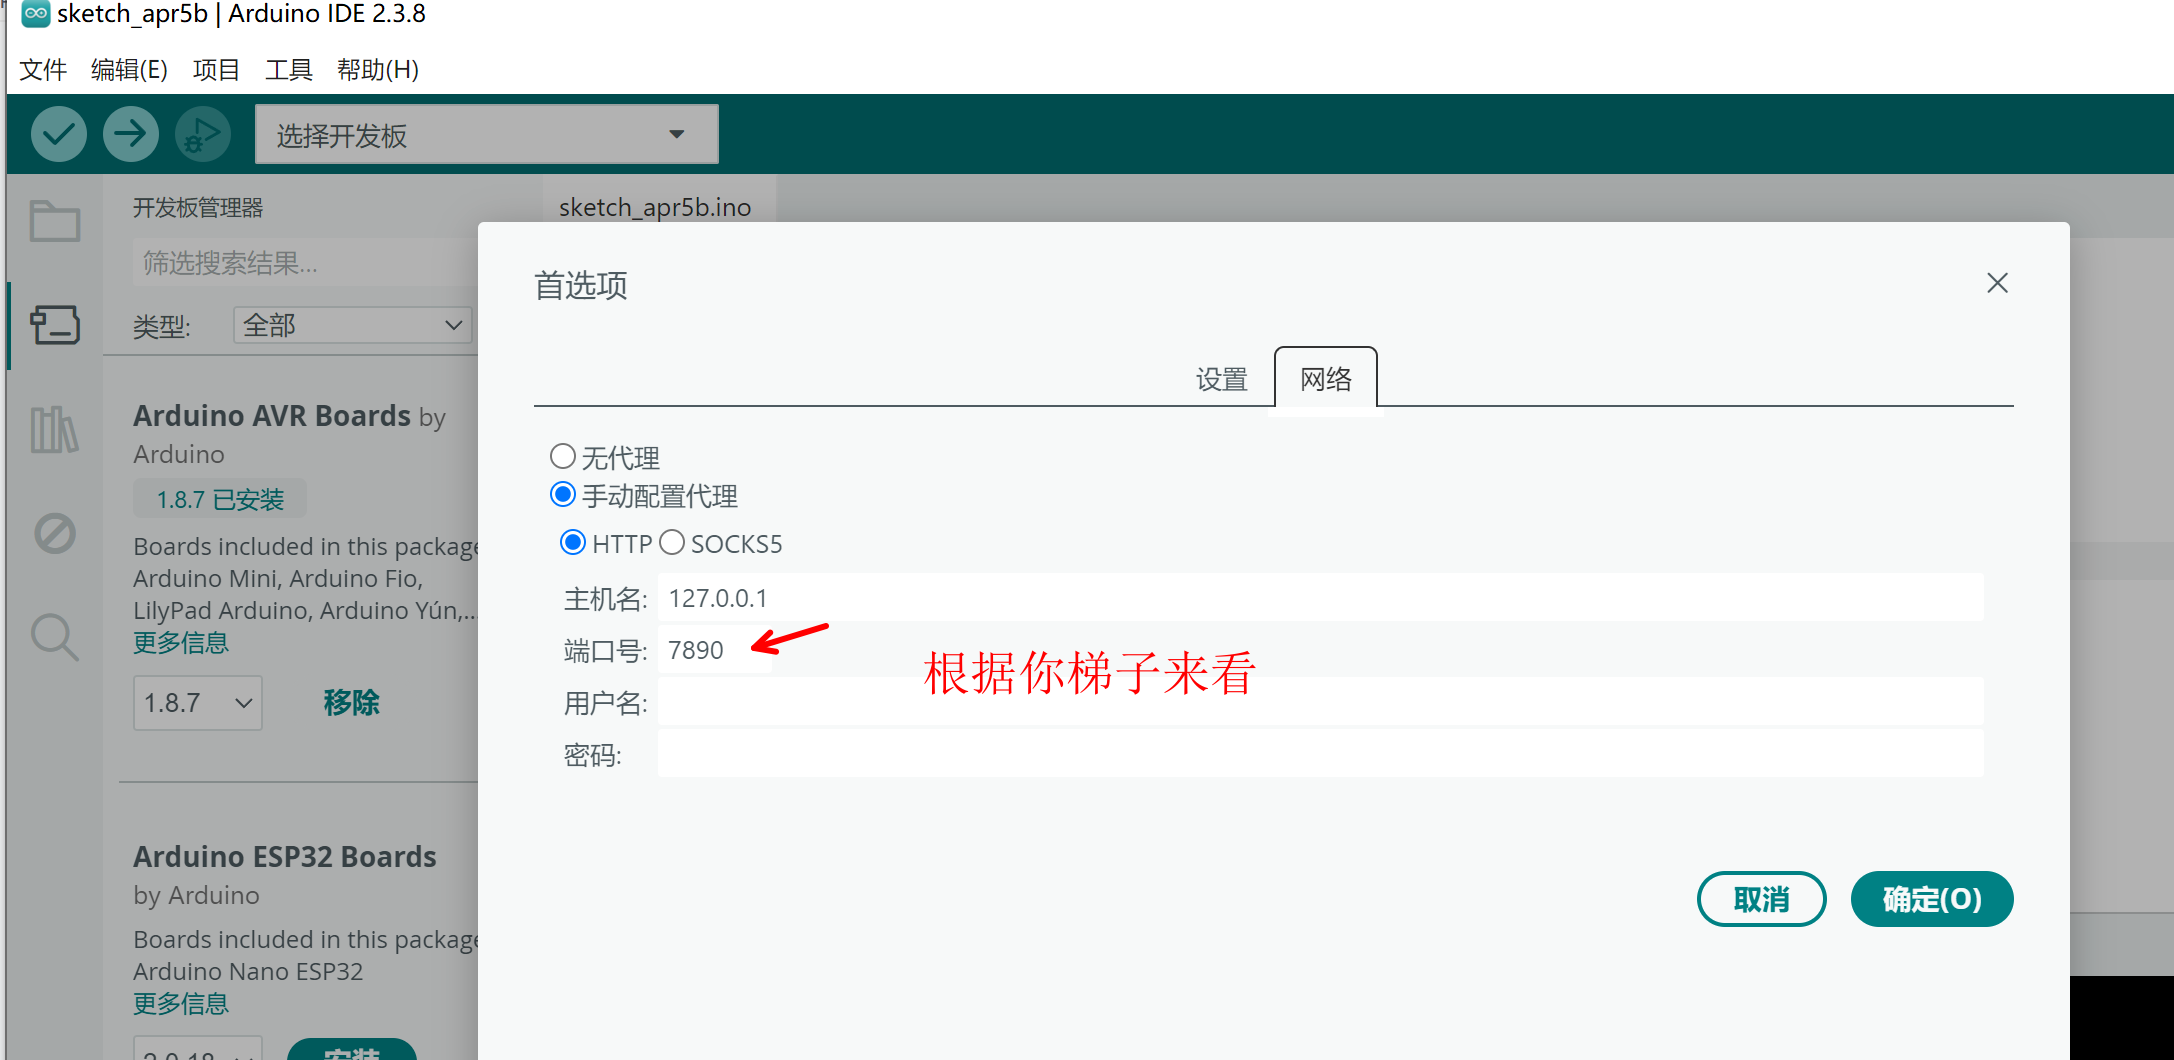
大概200MB还得是梯子快一些,我的梯子端口是这个,你根据你自己的梯子端口设置,好像改不动不知道是不是小bug,我把梯子端口改成7890就可以了
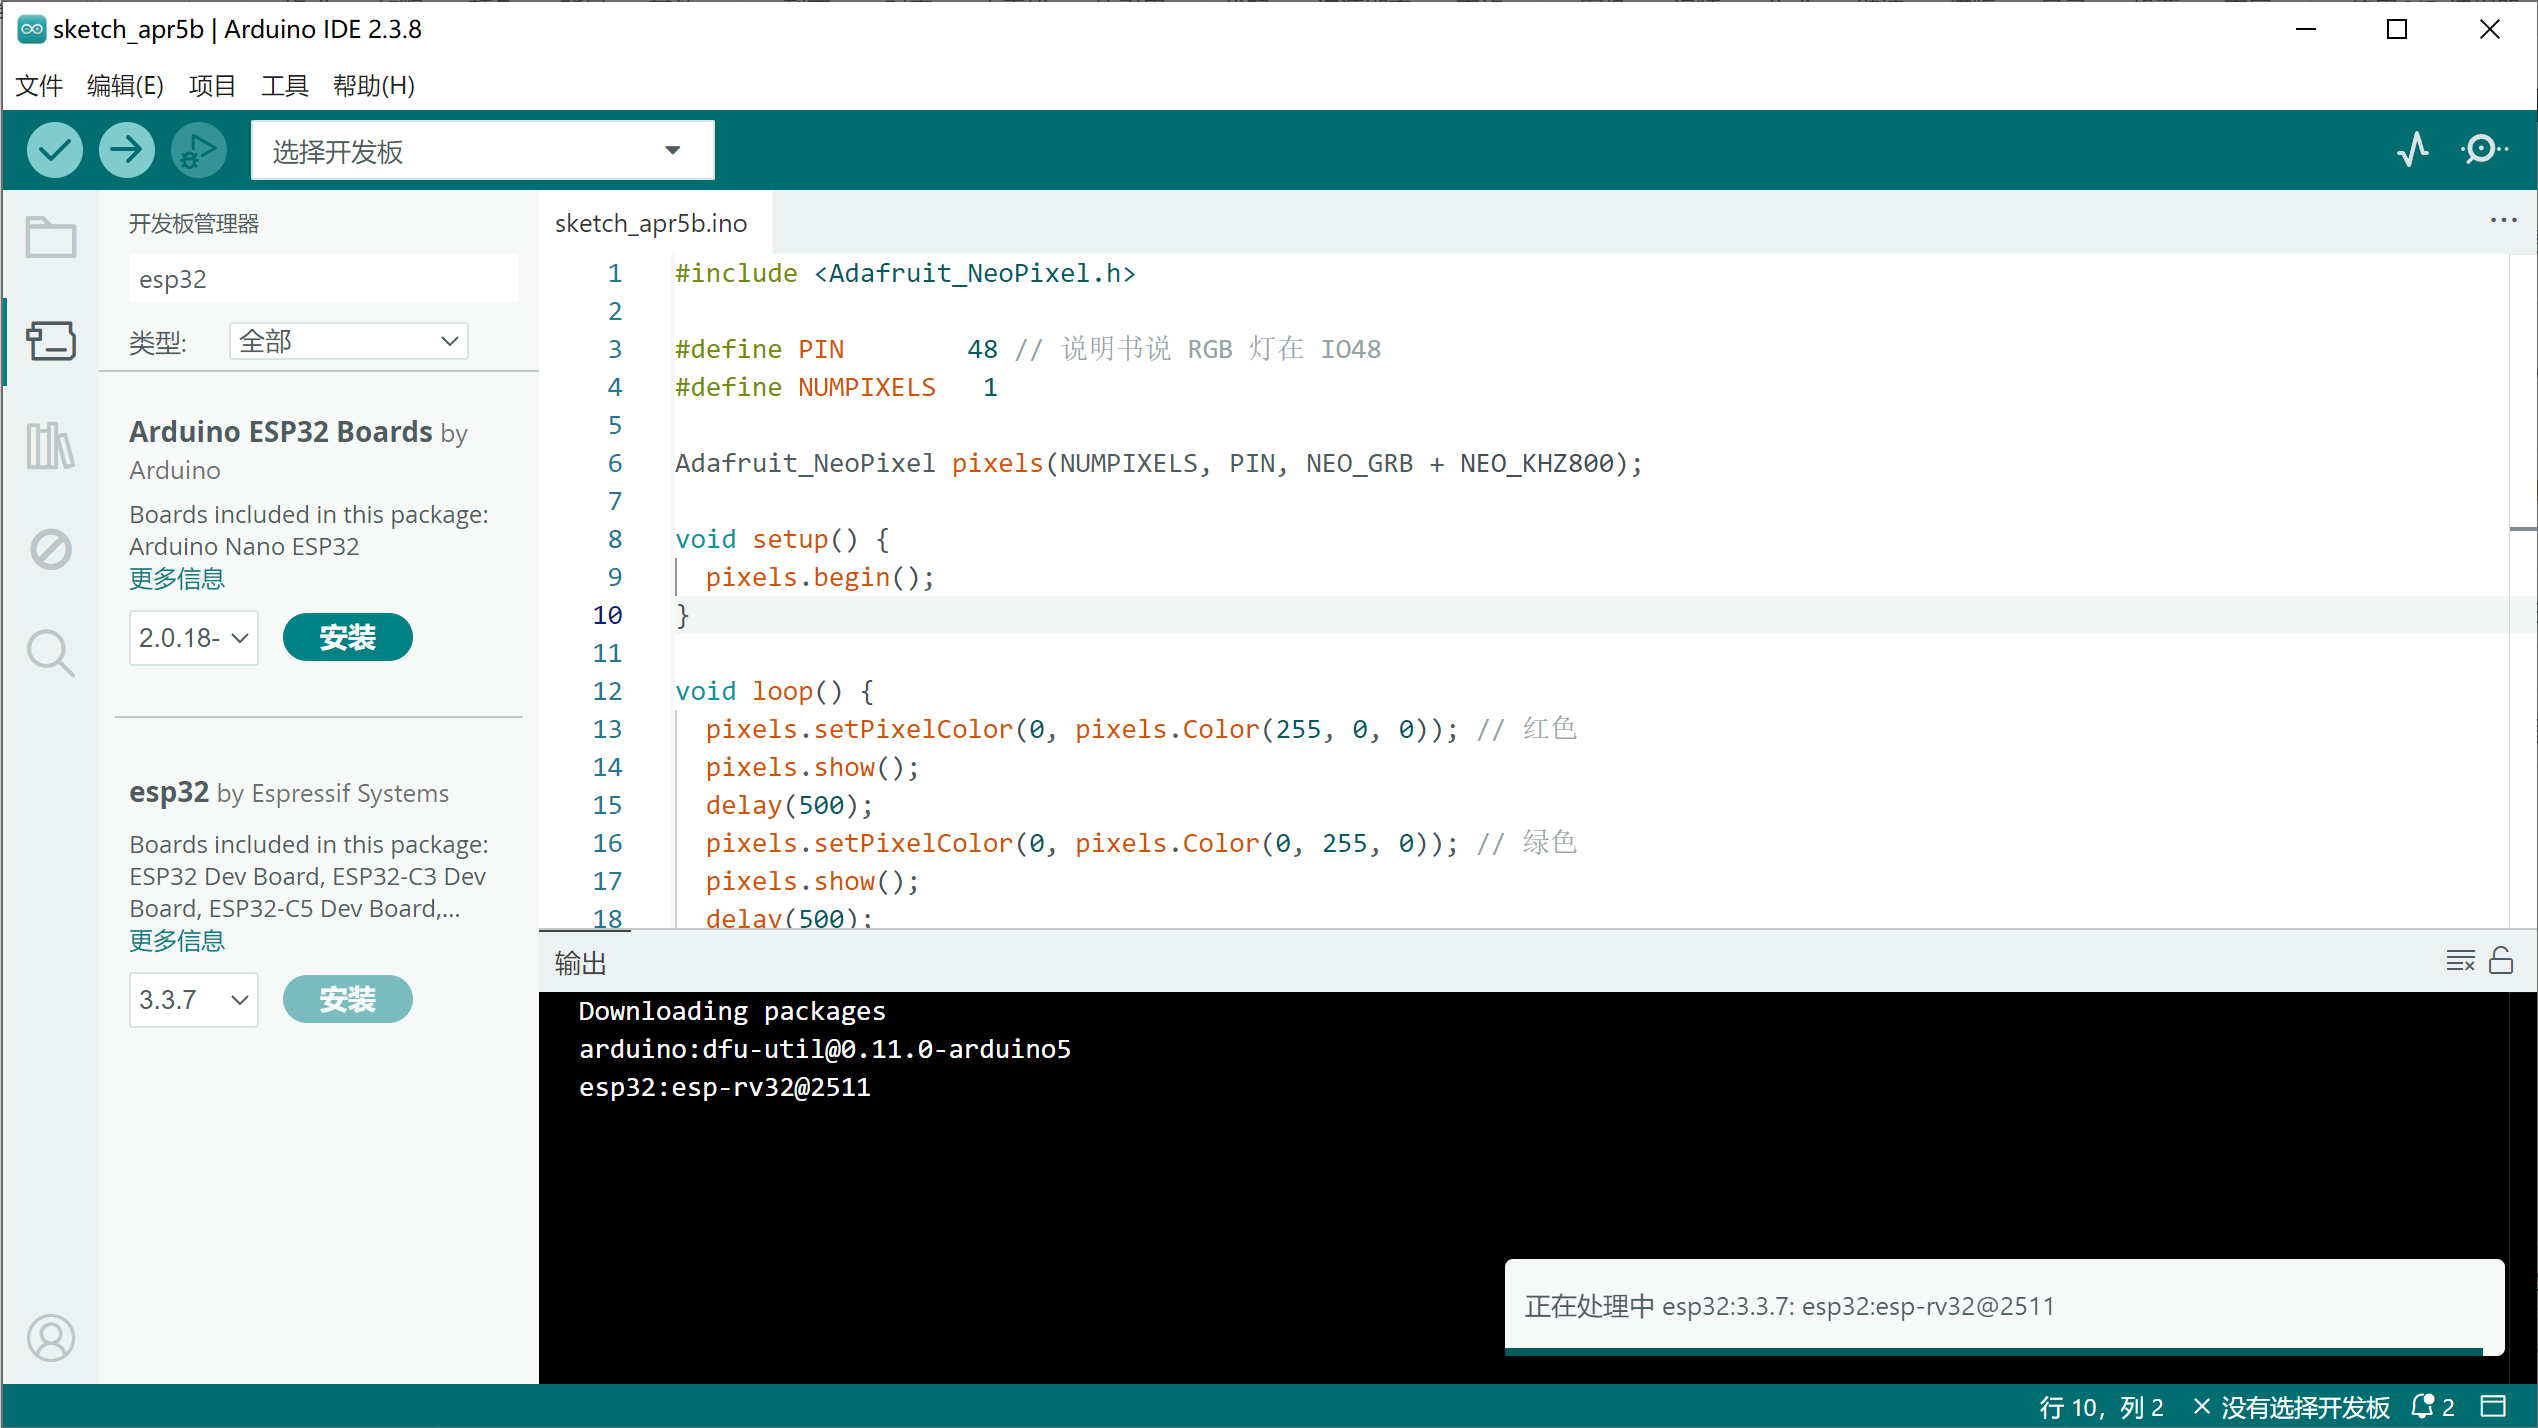
终于安装上了这个插件
下面测试一下,先用一个小灯的程序试试
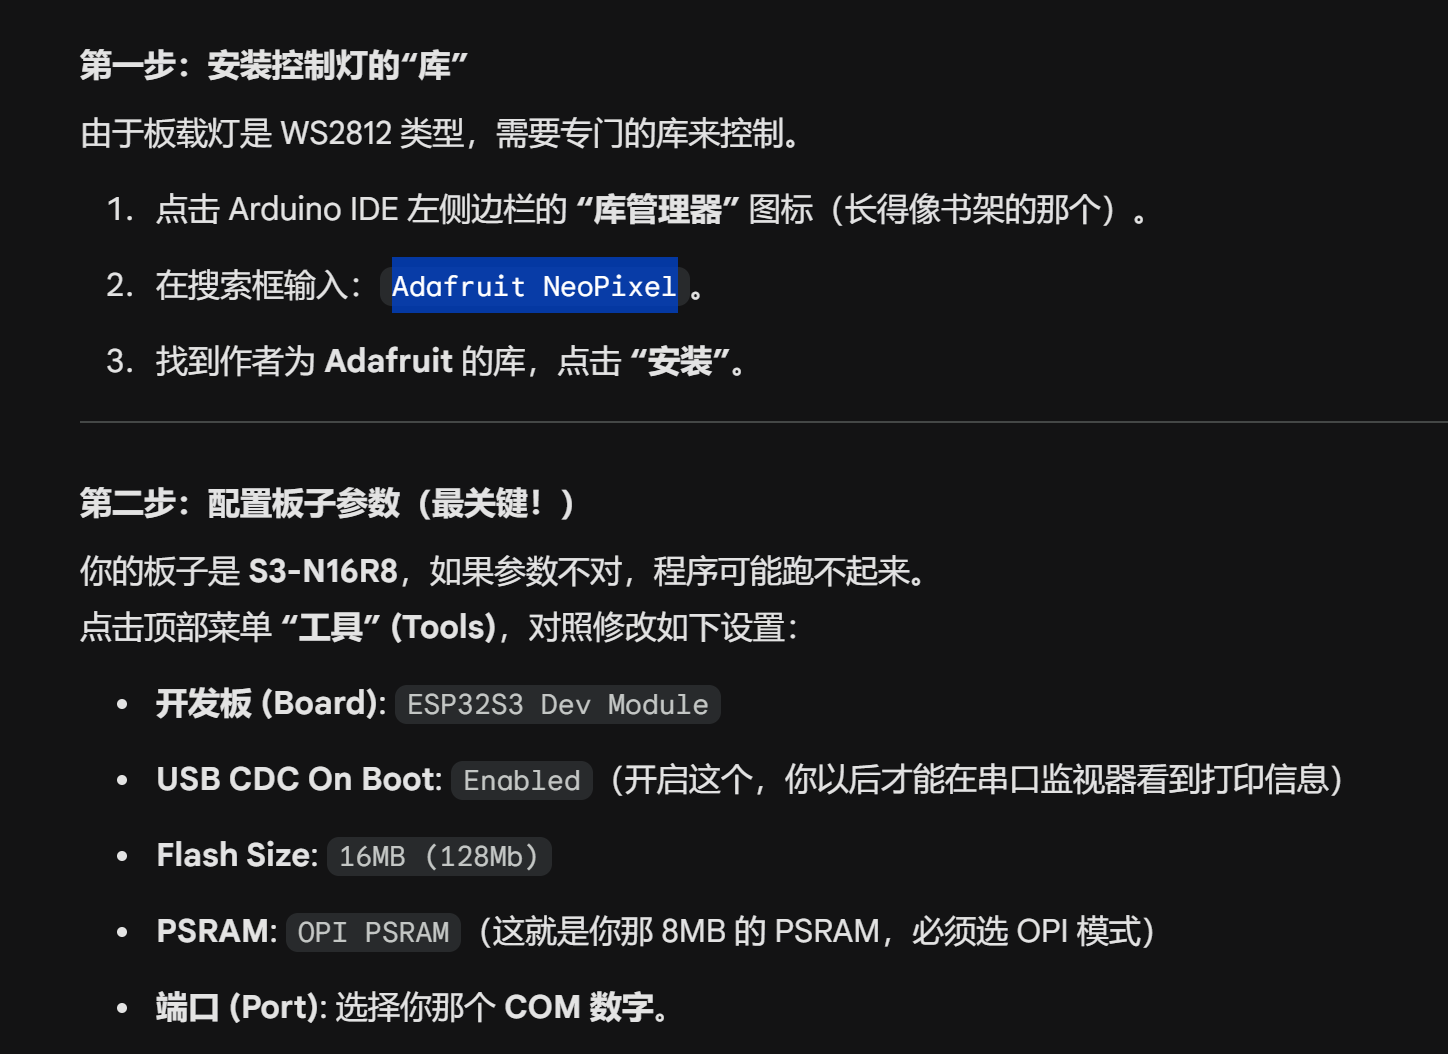
根据你自己的板子型号设置
然后确认已经连接上了板子
都设置上后就连接上了板子了
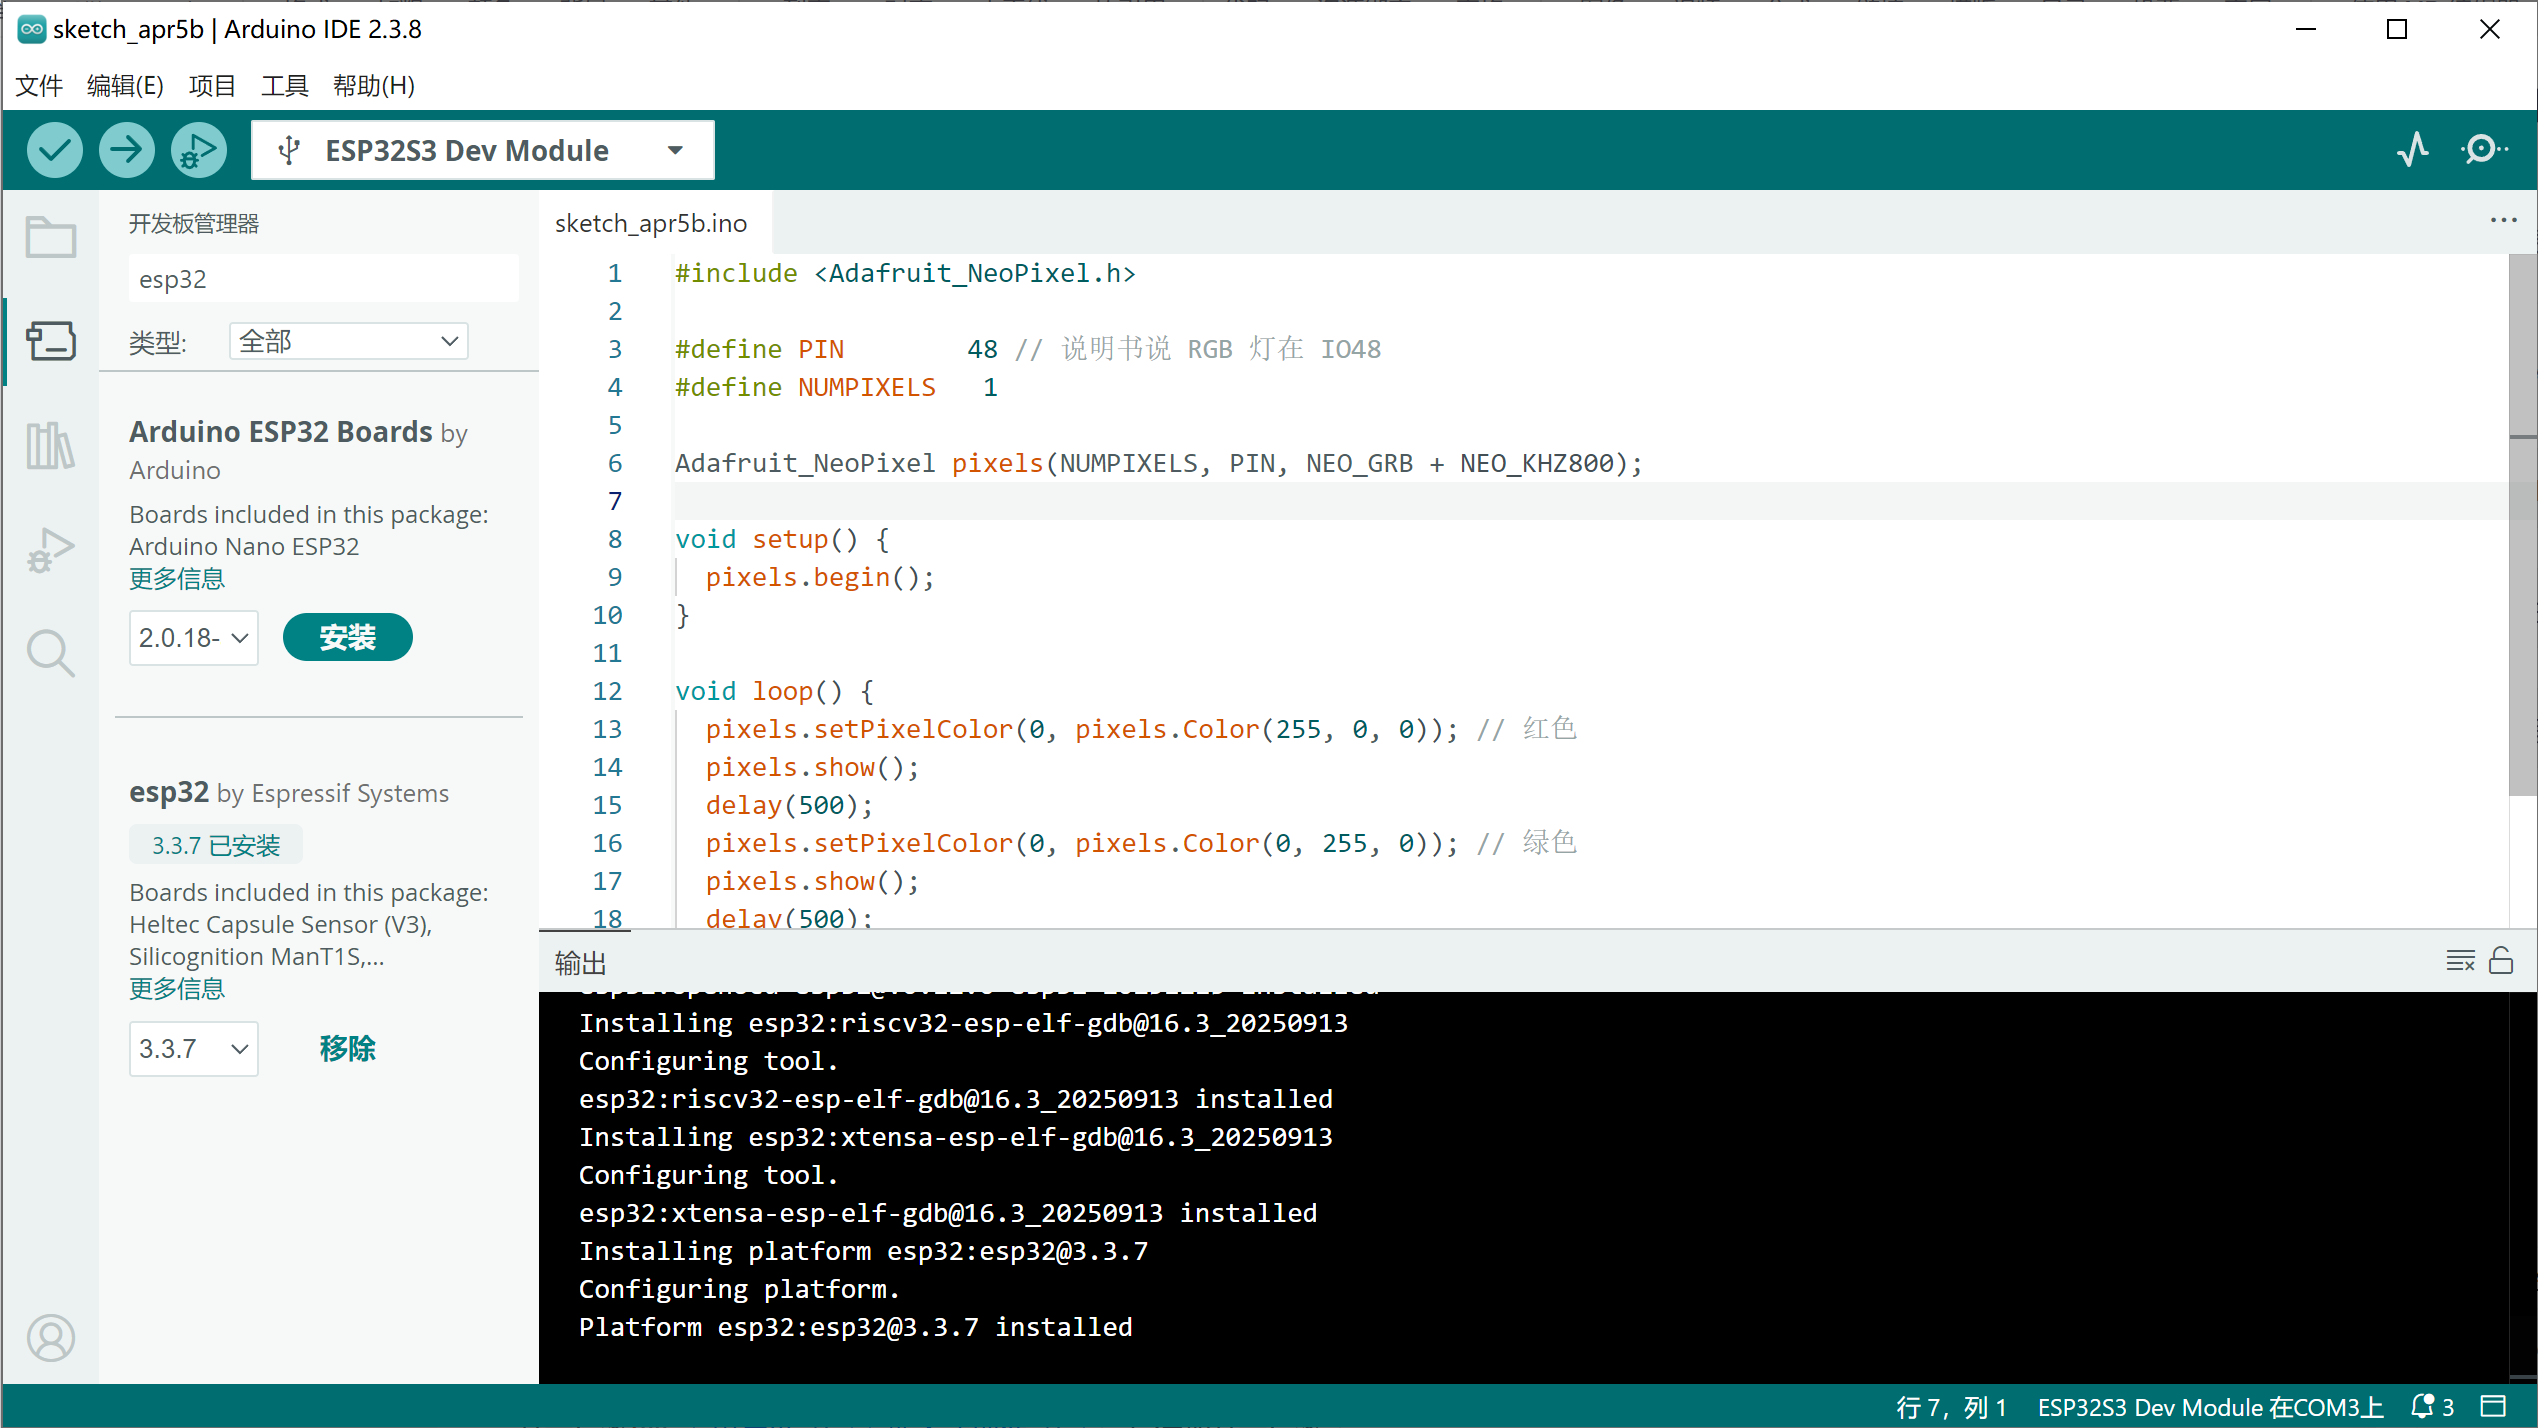
右下角显示ESP32在COM3上表示连接成功
先用一个测试代码测试是否正确
在arduino里面粘贴这段代码,然后点击 →按钮烧录代码
#include <Adafruit_NeoPixel.h>

// 根据说明书,RGB 灯连接在引脚 48
#define PIN        48
#define NUMPIXELS   1

// 初始化灯珠对象
Adafruit_NeoPixel pixels(NUMPIXELS, PIN, NEO_GRB + NEO_KHZ800);

void setup() {
  Serial.begin(115200);
  Serial.println("RGB 测试开始...");
  pixels.begin(); // 初始化灯珠
}

void loop() {
  // 红色
  Serial.println("显示:红色");
  pixels.setPixelColor(0, pixels.Color(255, 0, 0));
  pixels.show();
  delay(1000);

  // 绿色
  Serial.println("显示:绿色");
  pixels.setPixelColor(0, pixels.Color(0, 255, 0));
  pixels.show();
  delay(1000);

  // 蓝色
  Serial.println("显示:蓝色");
  pixels.setPixelColor(0, pixels.Color(0, 0, 255));
  pixels.show();
  delay(1000);

  // 关闭灯(呼吸效果)
  Serial.println("关闭灯光");
  pixels.setPixelColor(0, pixels.Color(0, 0, 0));
  pixels.show();
  delay(1000);
}
下一步
删除本身的代码,把这个代码拷贝到这个里面,然后点左上角的➡ 按钮烧录代码
现在我要给它接一个屏幕,先用杜邦线别焊死,错了会很麻烦
-
屏幕不亮:检查 VCC 和 GND 是不是接反了(接反必烧,请三思后通电)。
-
显示乱码或黑屏:确认 SCL 和 SDA 没接反。
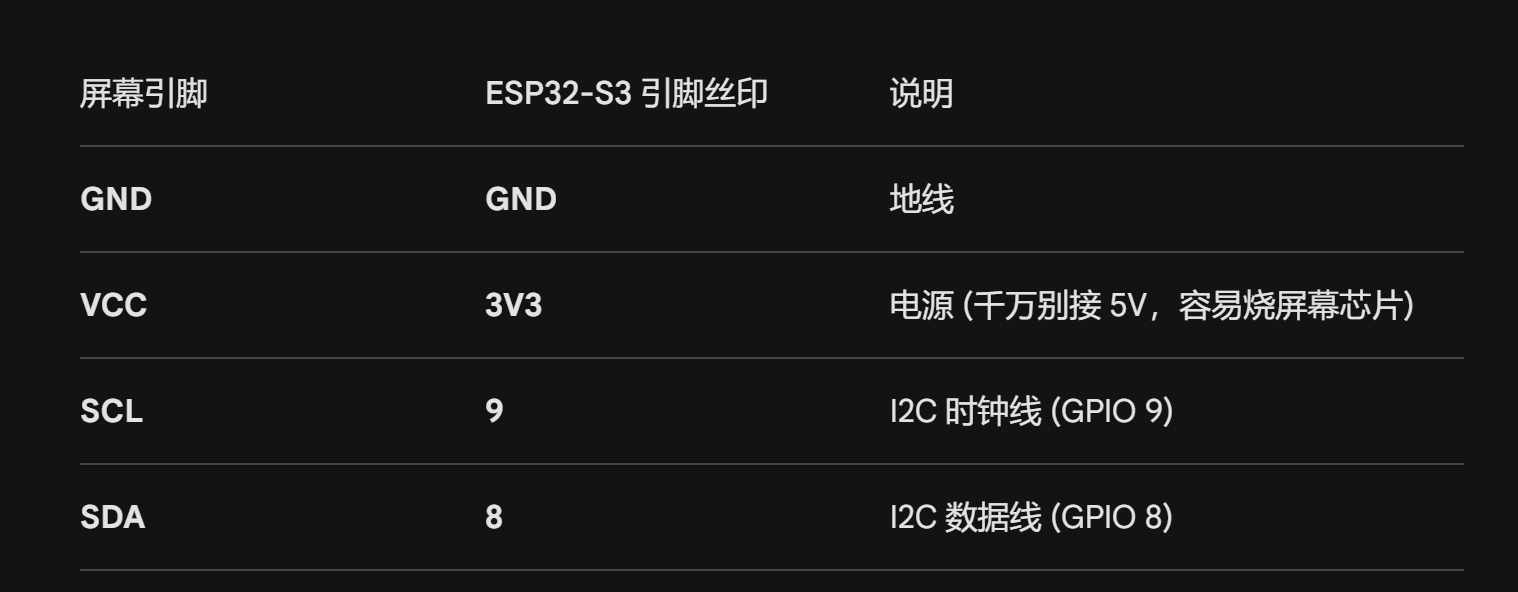
先用杜邦线接上试试
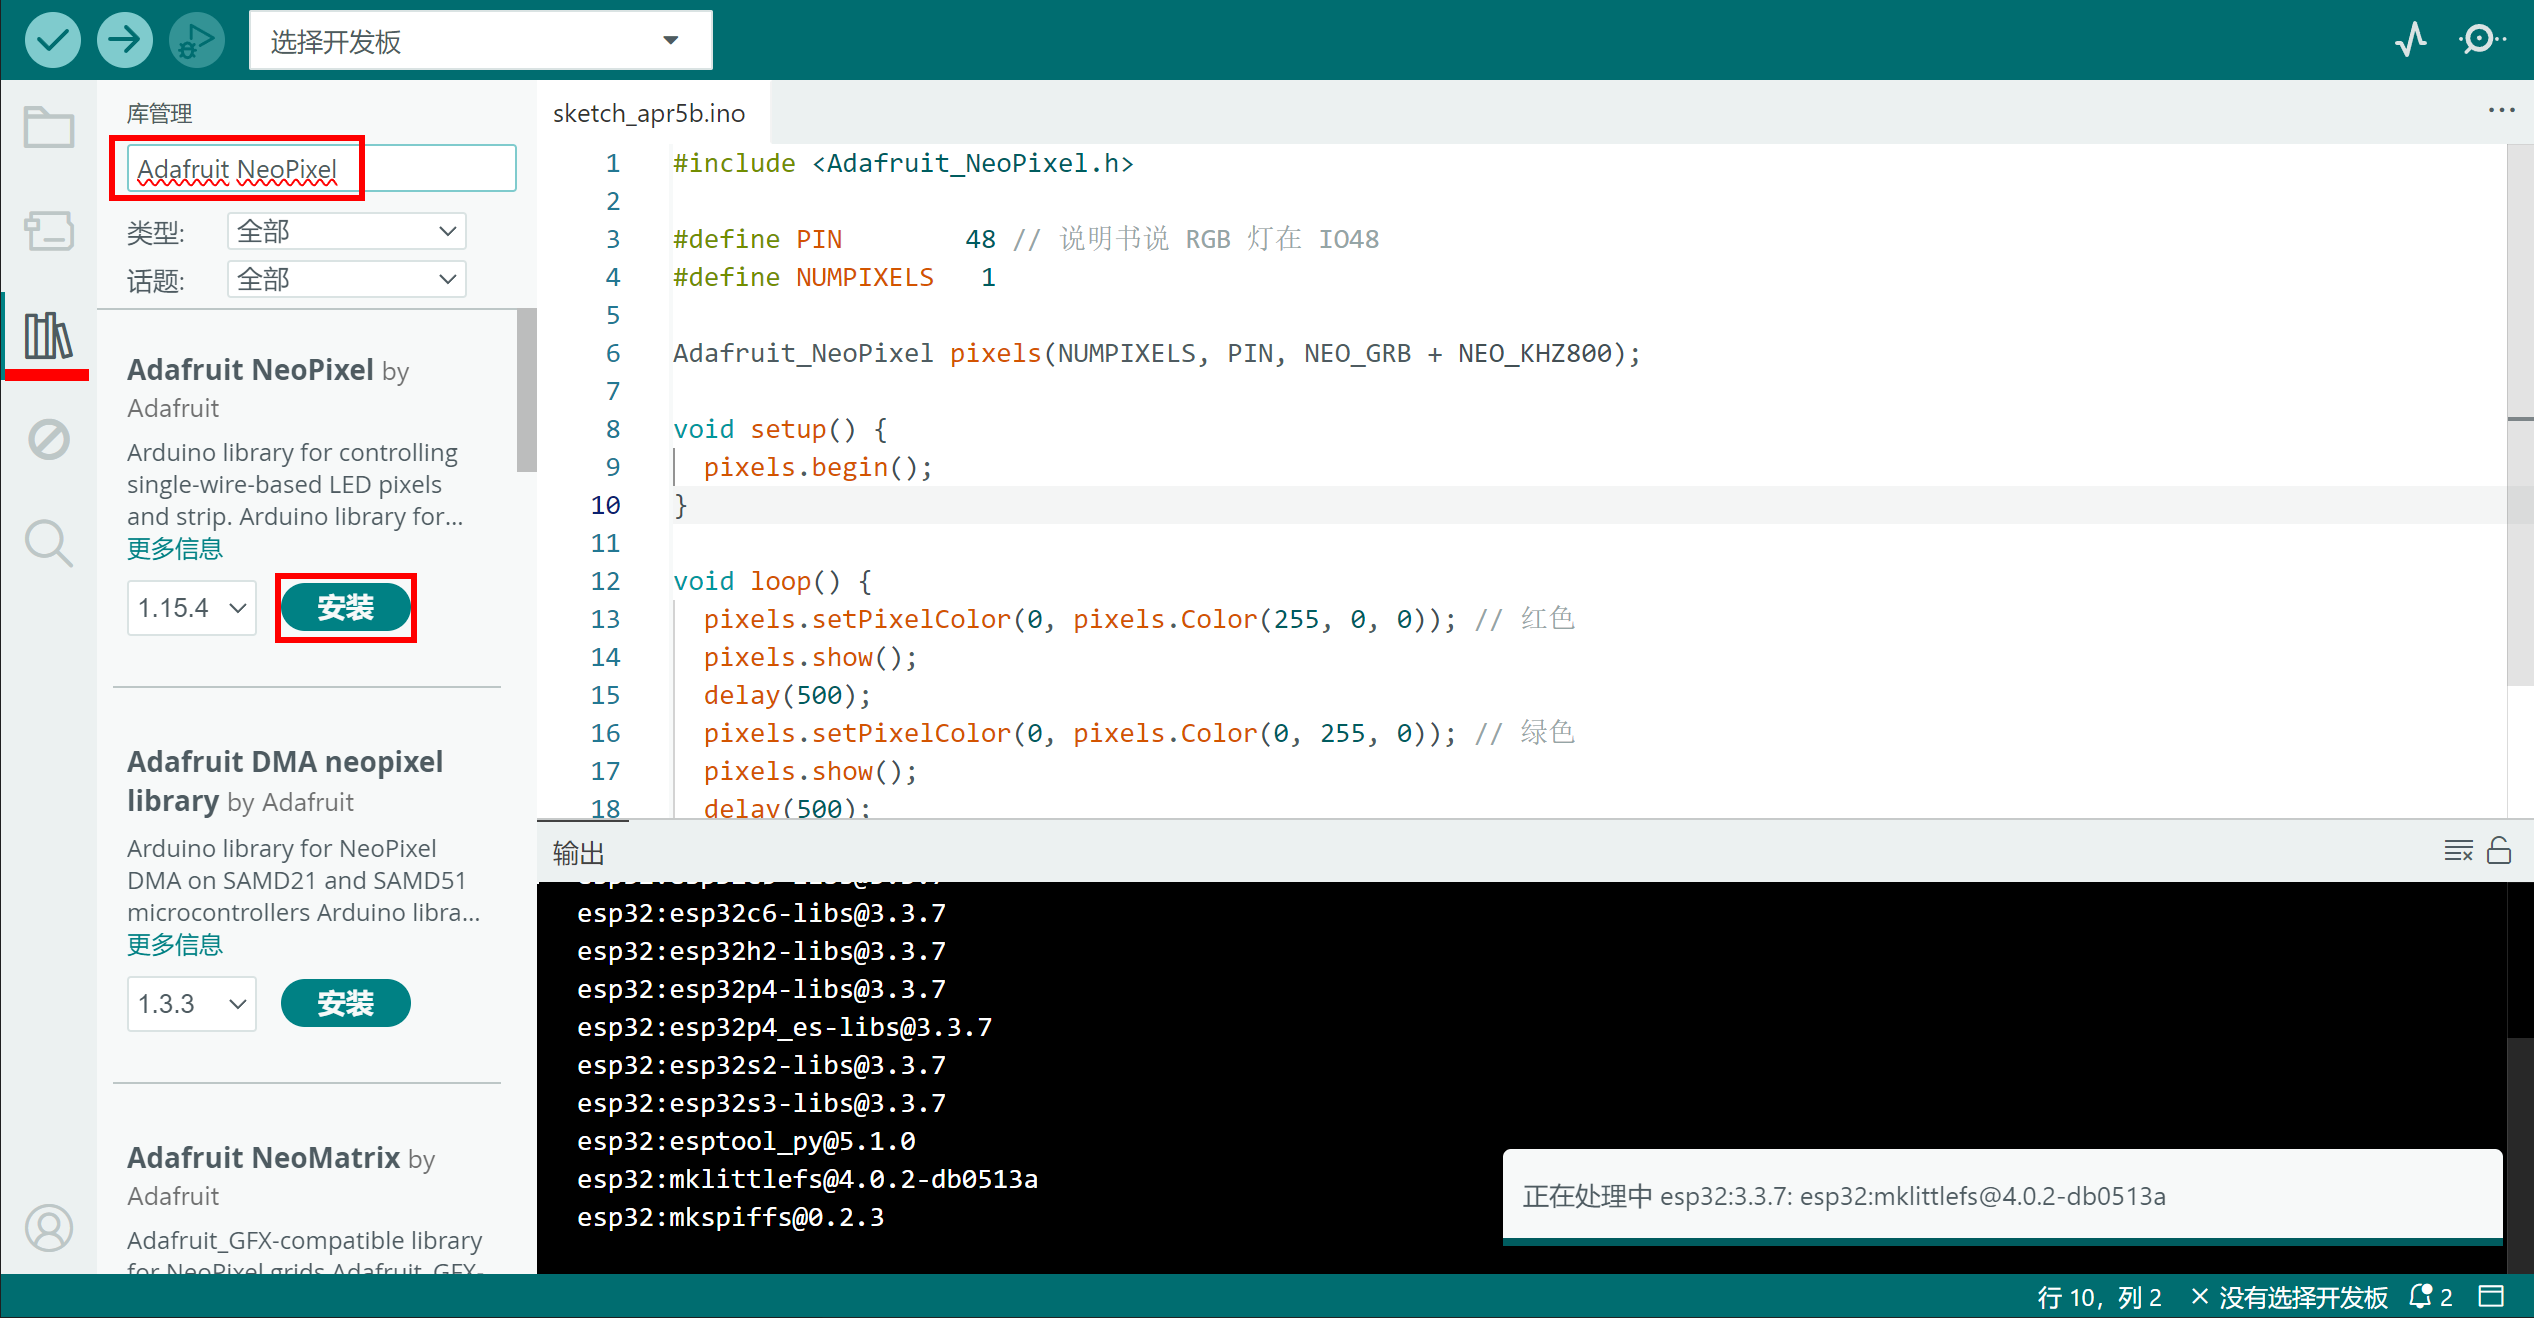
3. 安装屏幕驱动库
在 Arduino IDE 里:

点击左侧 “库管理器”(书架图标)。

搜索 U8g2。

找到 u8g2 by oliver,点击 “安装”。这是目前公认最好用、支持字体最全的屏幕库。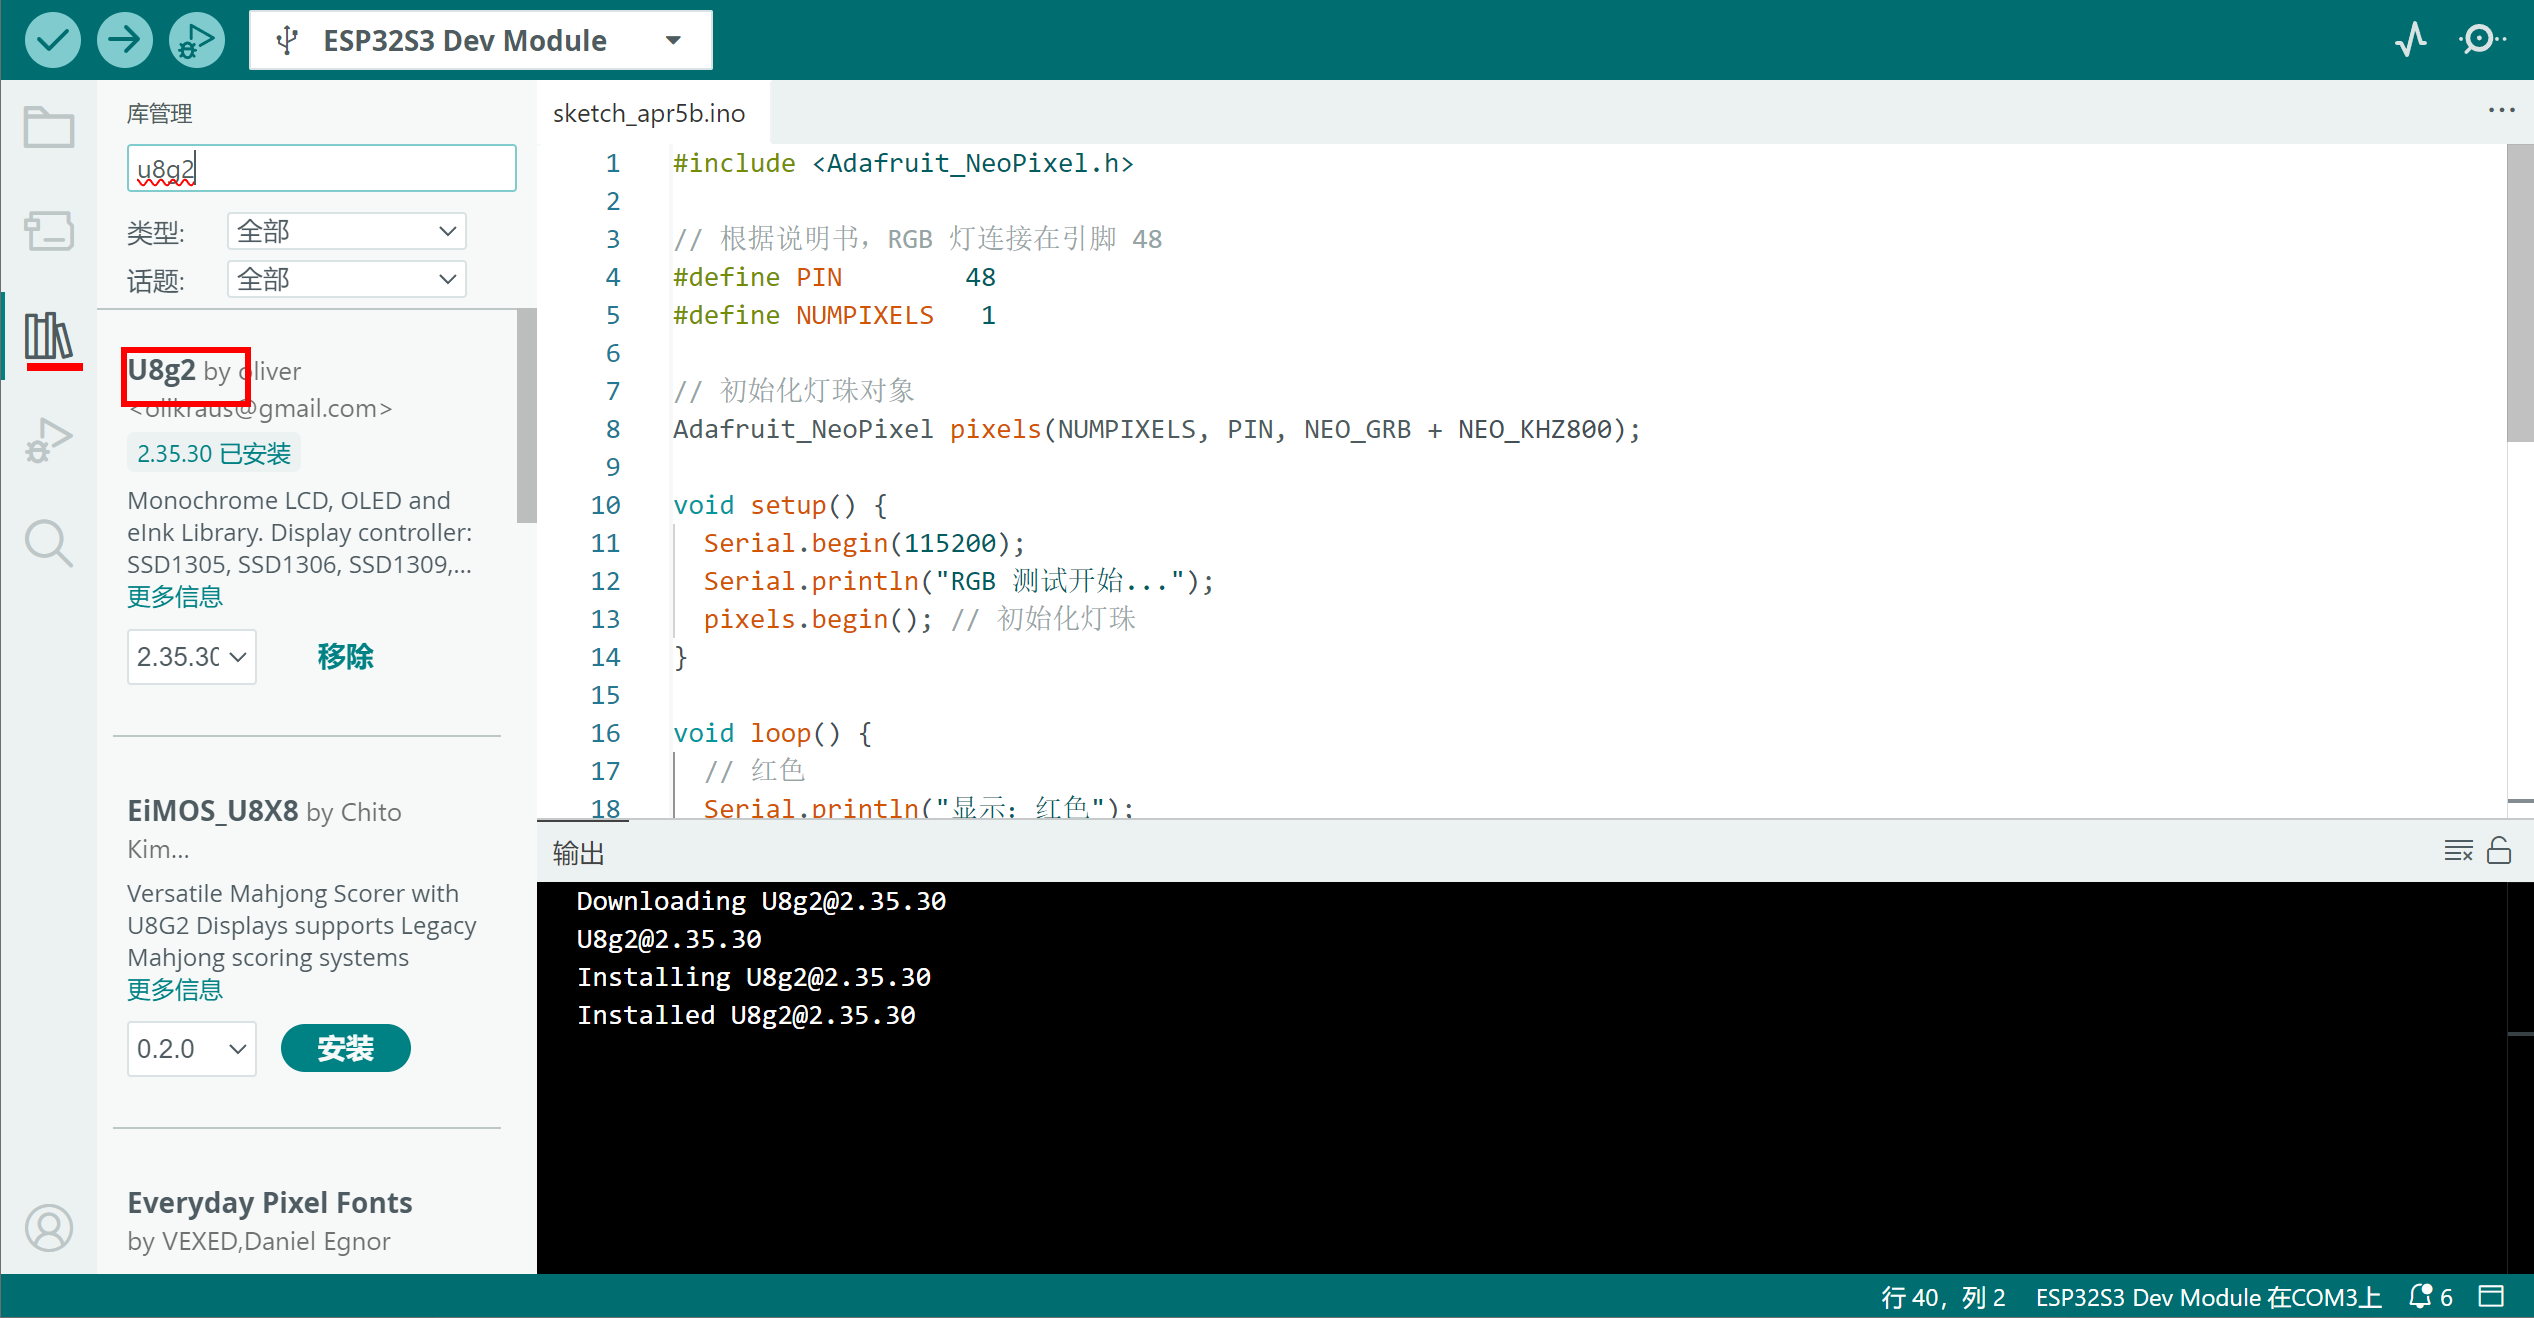
安装上了,接上屏幕后测试这个代码
#include <Arduino.h>
#include <U8g2lib.h>
#include <Wire.h>

// 初始化屏幕:SSD1306, 128x64分辨率, 使用硬件I2C
// SCL接9,SDA接8
U8G2_SSD1306_128X64_NONAME_F_HW_I2C u8g2(U8G2_R0, /* reset=*/ U8X8_PIN_NONE, /* clock=*/ 9, /* data=*/ 8);

void setup() {
  u8g2.begin();
  u8g2.enableUTF8Print(); // 支持中文字符(需对应字体)
}

void loop() {
  u8g2.clearBuffer();					// 清除内部缓冲区
  u8g2.setFont(u8g2_font_ncenB08_tr);	// 选择一个字体
  u8g2.drawStr(0,10,"ESP32-S3 Ready!");	// 写字
  u8g2.drawStr(0,30,"Handwriting Demo");
  u8g2.drawStr(0,50,"Waiting for PC...");
  u8g2.sendBuffer();					// 将缓冲区内容发送到显示器
  delay(1000);
}-
屏幕不亮:检查 VCC 和 GND 是不是接反了(接反必烧,请三思后通电)。
-
显示乱码或黑屏:确认 SCL 和 SDA 没接反。
遇到的问题:屏幕正常显示,打开串口监视器,发送8消息,什么都不显示,现在
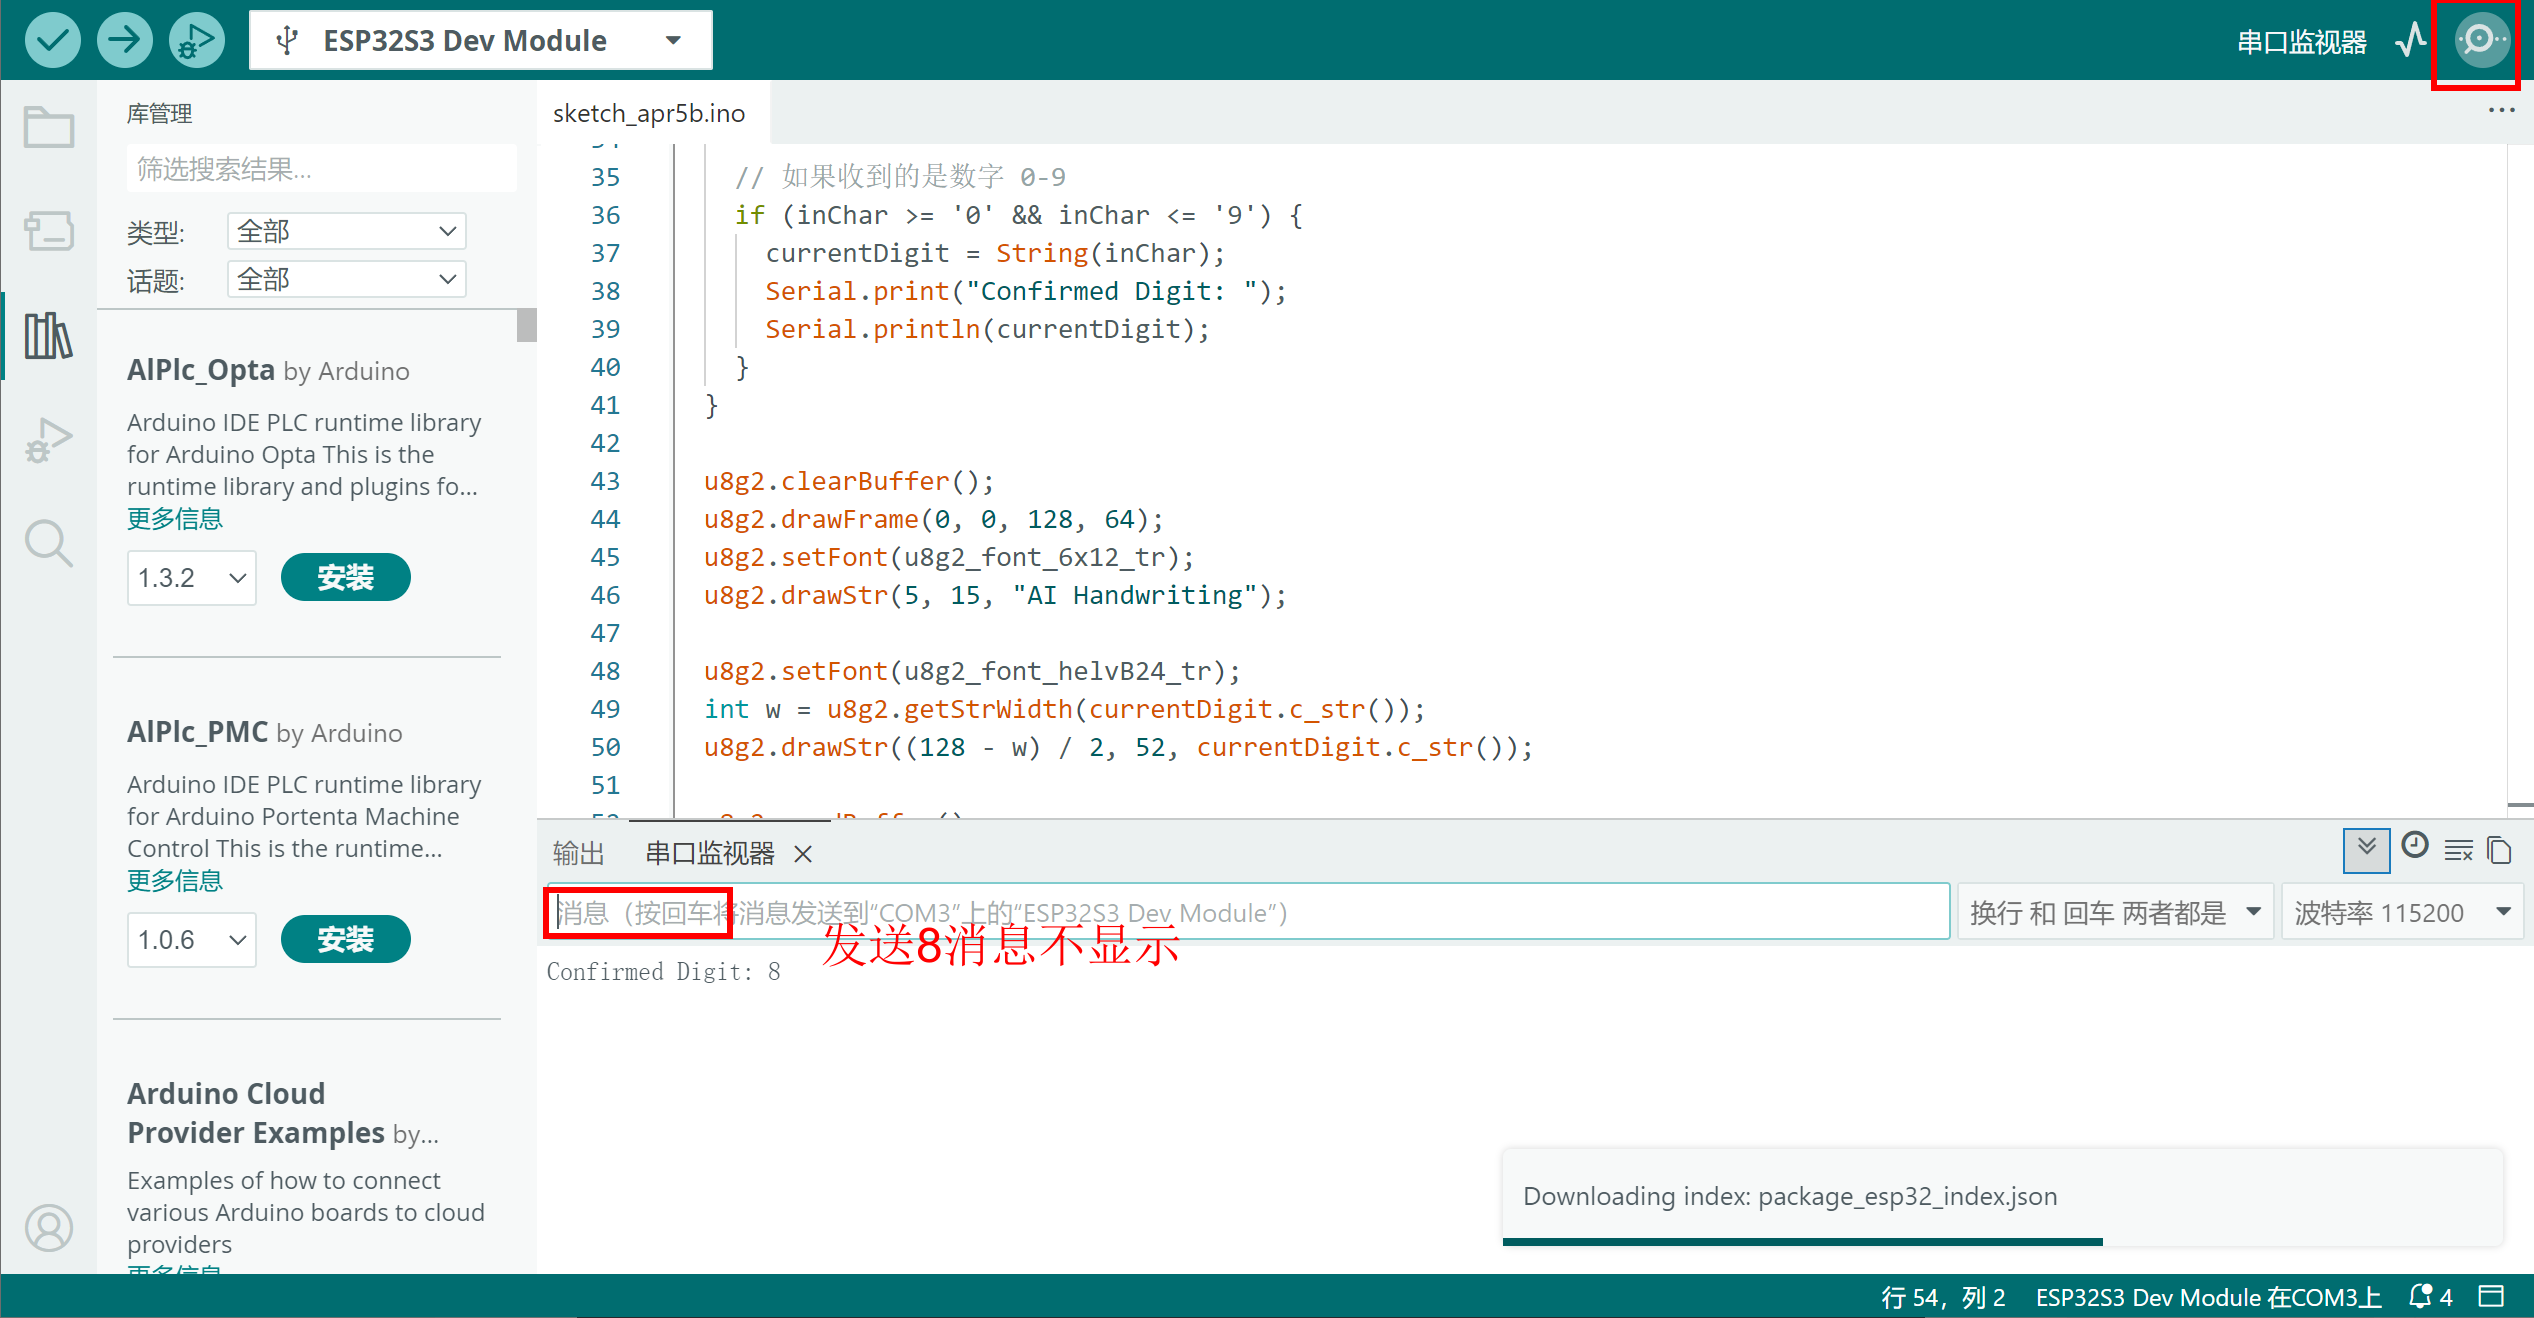
现在重新弄了一下,使用这个代码,SCL(42) SDA接线换到了41
在 Arduino IDE 菜单栏 工具 (Tools) 中:
-
USB CDC On Boot: 务必改为 Disabled(禁用)。
然后编译后按下RST
能够显示GO了,然后在串口监控器发送消息能收到了
#include <Arduino.h>
#include <U8g2lib.h>

// 保持 41, 42 接线不变
U8G2_SSD1306_128X64_NONAME_F_SW_I2C u8g2(U8G2_R0, 42, 41, U8X8_PIN_NONE);

String currentDigit = "GO!";

void setup() {
  // 强制初始化串口 0(硬件串口),并手动指定 S3 常用的 43/44 引脚
  Serial.begin(115200);

  u8g2.begin();
  u8g2.enableUTF8Print();

  u8g2.clearBuffer();
  u8g2.setFont(u8g2_font_6x12_tr);
  u8g2.drawStr(10, 35, "WAITING SERIAL...");
  u8g2.sendBuffer();

  // 此时你在监视器应该能看到这行字了
  Serial.println("\n[SYSTEM OK]");
  Serial.println("Protocol: UART Bridge");
}

void loop() {
  // 使用最原始的字节检查
  while (Serial.available() > 0) {
    char inChar = (char)Serial.read();
    if (inChar == '\n' || inChar == '\r') {
      // 收到换行符才处理(对应你串口监视器的设置)
      continue;
    }

    // 如果收到的是数字 0-9
    if (inChar >= '0' && inChar <= '9') {
      currentDigit = String(inChar);
      Serial.print("Confirmed Digit: ");
      Serial.println(currentDigit);
    }
  }

  u8g2.clearBuffer();
  u8g2.drawFrame(0, 0, 128, 64);
  u8g2.setFont(u8g2_font_6x12_tr);
  u8g2.drawStr(5, 15, "AI Handwriting");

  u8g2.setFont(u8g2_font_helvB24_tr);
  int w = u8g2.getStrWidth(currentDigit.c_str());
  u8g2.drawStr((128 - w) / 2, 52, currentDigit.c_str());

  u8g2.sendBuffer();
  delay(50);
}
然后修改我的手写数字识别的代码
能够成功了,这个代码名字叫
手写数字识别CNN增强版
import tkinter as tk
from PIL import Image, ImageDraw, ImageOps
import torch
import torch.nn as nn
import torch.nn.functional as F
import torchvision.transforms as transforms
import serial  # 导入串口库
import time

# --- 1. 必须保留和训练时一致的模型类 ---
class UltimateCNN(nn.Module):
    def __init__(self):
        super(UltimateCNN, self).__init__()
        self.conv1 = nn.Conv2d(1, 32, kernel_size=3, padding=1)
        self.bn1 = nn.BatchNorm2d(32)
        self.conv2 = nn.Conv2d(32, 32, kernel_size=3, padding=1)
        self.bn2 = nn.BatchNorm2d(32)
        self.conv3 = nn.Conv2d(32, 64, kernel_size=3, padding=1)
        self.bn3 = nn.BatchNorm2d(64)
        self.pool = nn.MaxPool2d(2, 2)
        self.dropout = nn.Dropout(0.3)
        self.fc1 = nn.Linear(64 * 7 * 7, 256)
        self.fc2 = nn.Linear(256, 10)

    def forward(self, x):
        x = F.relu(self.bn1(self.conv1(x)))
        x = self.pool(F.relu(self.bn2(self.conv2(x))))
        x = self.dropout(x)
        x = self.pool(F.relu(self.bn3(self.conv3(x))))
        x = self.dropout(x)
        x = x.view(-1, 64 * 7 * 7)
        x = F.relu(self.fc1(x))
        x = self.dropout(x)
        x = self.fc2(x)
        return x

# 加载模型
device = torch.device("cuda" if torch.cuda.is_available() else "cpu")
model = UltimateCNN().to(device)
try:
    model.load_state_dict(torch.load("mnist_model.pth", map_location=device))
    model.eval()
except:
    print("错误:未找到模型文件 mnist_model.pth")

class DigitApp:
    def __init__(self, root):
        self.root = root
        self.root.title("AI 手写识别 - ESP32 同步版")

        # --- 【核心修改】初始化串口 ---
        # 请将 'COM3' 改为你设备管理器中看到的端口号
        try:
            self.ser = serial.Serial('COM3', 115200, timeout=1)
            time.sleep(2) # 等待串口稳定
            print("连接 ESP32 成功!")
        except Exception as e:
            self.ser = None
            print(f"串口连接失败: {e}。请检查端口号并在代码中修改。")

        self.canvas = tk.Canvas(root, width=280, height=280, bg="white", cursor="pencil")
        self.canvas.pack(pady=10)

        self.label = tk.Label(root, text="请在白色区域书写", font=("微软雅黑", 16))
        self.label.pack()

        self.image = Image.new("L", (280, 280), 255)
        self.draw = ImageDraw.Draw(self.image)
        self.canvas.bind("<B1-Motion>", self.paint)

        btn_frame = tk.Frame(root)
        btn_frame.pack(pady=10)
        tk.Button(btn_frame, text="重置", command=self.clear, width=10).pack(side=tk.LEFT, padx=5)
        tk.Button(btn_frame, text="AI识别", command=self.predict, width=12, bg="#FF6700", fg="white").pack(side=tk.LEFT, padx=5)

    def paint(self, event):
        r = 10  # 笔触稍微加粗,识别更准
        x1, y1 = (event.x - r), (event.y - r)
        x2, y2 = (event.x + r), (event.y + r)
        self.canvas.create_oval(x1, y1, x2, y2, fill="black", outline="black")
        self.draw.ellipse([x1, y1, x2, y2], fill=0)

    def clear(self):
        self.canvas.delete("all")
        self.image = Image.new("L", (280, 280), 255)
        self.draw = ImageDraw.Draw(self.image)
        self.label.config(text="请在白色区域书写")
        # 清除时给 ESP32 发送一个信号,显示问号或空白
        if self.ser:
            self.ser.write("?\n".encode())

    def predict(self):
        bbox = self.image.getbbox()
        if bbox and (bbox[2] - bbox[0] > 5):
            digit_crop = self.image.crop(bbox)
            w, h = digit_crop.size
            size = max(w, h) + 60
            new_img = Image.new("L", (size, size), 255)
            new_img.paste(digit_crop, ((size - w) // 2, (size - h) // 2))
            img = new_img.resize((28, 28), resample=Image.LANCZOS)
        else:
            img = self.image.resize((28, 28), resample=Image.LANCZOS)

        img = ImageOps.invert(img)
        transform = transforms.Compose([
            transforms.ToTensor(),
            transforms.Normalize((0.1307,), (0.3081,))
        ])
        img_tensor = transform(img).unsqueeze(0).to(device)

        with torch.no_grad():
            output = model(img_tensor)
            prediction = torch.argmax(output, dim=1).item()
            prob = F.softmax(output, dim=1)
            conf = torch.max(prob).item() * 100

        result_text = f"AI识别结果: {prediction} ({conf:.1f}%)"
        self.label.config(text=result_text)

        # --- 【核心修改】将结果通过串口发给 ESP32 ---
        if self.ser:
            # 发送字符串格式,例如 "5\n"
            send_data = f"{prediction}\n"
            self.ser.write(send_data.encode())
            print(f"已传送到屏幕: {prediction}")

if __name__ == "__main__":
    root = tk.Tk()
    app = DigitApp(root)
    # 窗口关闭时关闭串口
    def on_closing():
        if app.ser:
            app.ser.close()
        root.destroy()
    root.protocol("WM_DELETE_WINDOW", on_closing)
    root.mainloop()
可以了,在手写识别出来数字后,可以发送到板子的屏幕上了。
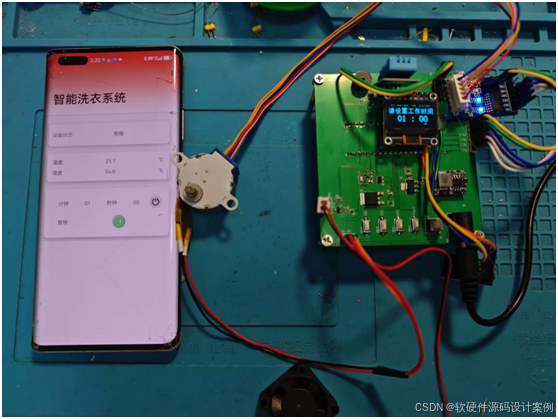
经过多次调试
最终的目标是这样的,电脑上识别数字,发送到ESP32-屏幕显示-按下按钮-蜂鸣器响-舵机旋转
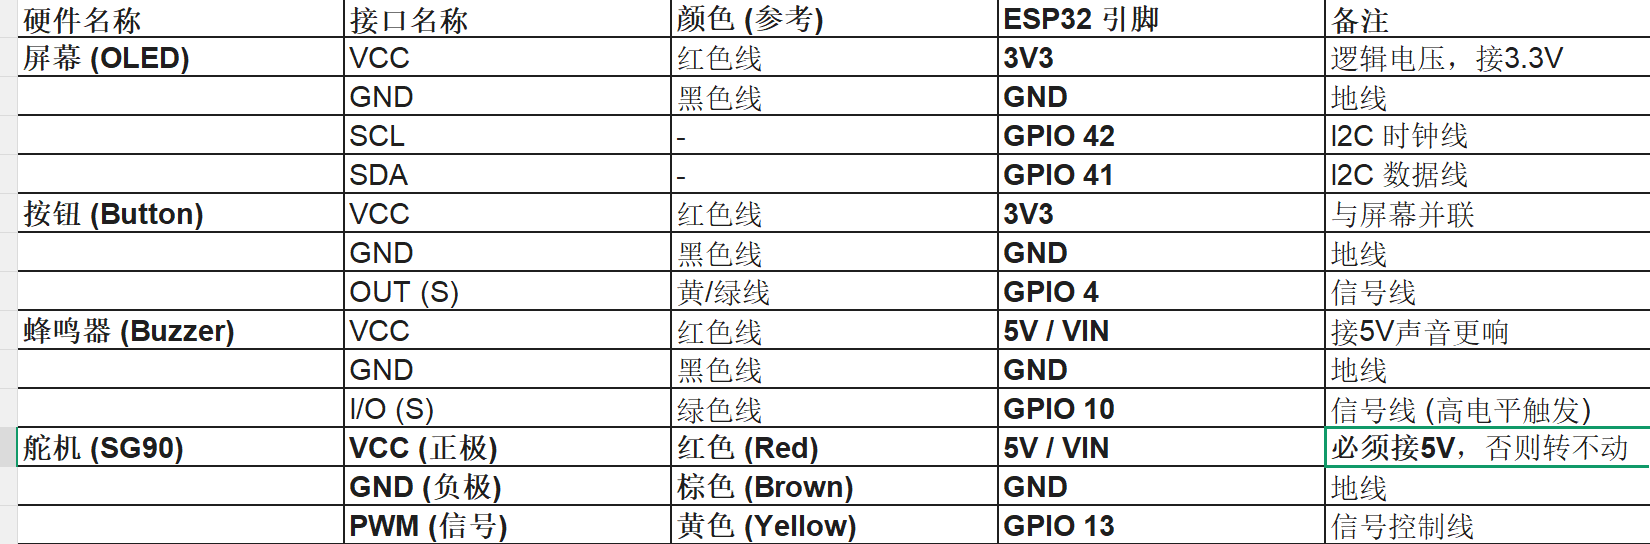
ESP32最终连线
最终接线
ESP32最终源码
#include <Arduino.h>
#include <U8g2lib.h>
#include <ESP32Servo.h>

// --- 1. 硬件引脚定义 ---
// 屏幕:SCL接42, SDA接41 (针对 ESP32-S3)
U8G2_SSD1306_128X64_NONAME_F_SW_I2C u8g2(U8G2_R0, 42, 41, U8X8_PIN_NONE);

#define BTN_PIN 4    // 按钮信号线
#define BUZ_PIN 10   // 蜂鸣器信号线 (高电平触发)
#define SRV_PIN 14   // 舵机信号线 (14号口)

// --- 2. 全局对象与变量 ---
Servo myServo;
String currentDigit = "GO!";
int digitInt = -1; // 存储当前识别到的整数数字 (-1 表示待机)

// --- 3. 辅助函数:执行归位并断开信号 ---
void servoHome() {
  Serial.println("舵机正在归位到安全位置 (5度)...");
  myServo.attach(SRV_PIN, 500, 2400); // 挂载信号

  // 修改点:回到 5 度,避开物理限位死角,消除噪音
  myServo.write(5);

  delay(800);                         // 给足时间物理到位
  myServo.detach();                   // 彻底切断 PWM 信号,进入绝对静音
  Serial.println("归位静默完成。");
}

void setup() {
  // 【优先级最高】立刻关闭高电平触发的蜂鸣器,防止开机乱响
  pinMode(BUZ_PIN, OUTPUT);
  digitalWrite(BUZ_PIN, LOW);

  // 初始化串口 (用于接收 Python 数据)
  Serial.begin(115200);

  // --- 初始化屏幕 ---
  u8g2.begin();
  u8g2.enableUTF8Print();
  u8g2.clearBuffer();
  u8g2.setFont(u8g2_font_6x12_tr);
  u8g2.drawStr(10, 35, "INIT SYSTEM...");
  u8g2.sendBuffer();

  // --- 初始化按钮 ---
  pinMode(BTN_PIN, INPUT_PULLUP);

  // --- 初始化舵机资源并执行【开机安全回位】 ---
  ESP32PWM::allocateTimer(0);
  ESP32PWM::allocateTimer(1);
  ESP32PWM::allocateTimer(2);
  ESP32PWM::allocateTimer(3);

  myServo.setPeriodHertz(50);
  servoHome(); // 系统启动时自动归位到 5 度

  u8g2.clearBuffer();
  u8g2.drawStr(10, 35, "READY!");
  u8g2.sendBuffer();

  Serial.println("\n[SYSTEM OK - SAFE HOME 5 DEG]");
}

void loop() {
  // --- 第一部分:读取电脑端识别结果 ---
  while (Serial.available() > 0) {
    char inChar = (char)Serial.read();
    if (inChar == '\n' || inChar == '\r') continue;

    if (inChar >= '0' && inChar <= '9') {
      currentDigit = String(inChar);
      digitInt = inChar - '0';
      Serial.print("Confirmed Digit: ");
      Serial.println(digitInt);
    } else if (inChar == '?') {
      currentDigit = "?";
      digitInt = -1;
    }
  }

  // --- 第二部分:按钮动作逻辑 ---
  if (digitalRead(BTN_PIN) == LOW) {
    if (digitInt != -1) {
      Serial.println("Action Triggered!");

      // 1. 蜂鸣器反馈 (数字是几响几声)
      int beepTimes = (digitInt == 0) ? 1 : digitInt;
      for (int i = 0; i < beepTimes; i++) {
        digitalWrite(BUZ_PIN, HIGH);
        delay(150);
        digitalWrite(BUZ_PIN, LOW);
        delay(150);
      }

      // 2. 舵机精准控制:【挂载 -> 旋转 -> 回到5度 -> 断开】
      myServo.attach(SRV_PIN, 500, 2400);

      int targetAngle = digitInt * 18;
      // 确保角度不会超过舵机物理极限
      if (targetAngle < 5) targetAngle = 5;

      Serial.print("Moving to: ");
      Serial.println(targetAngle);

      myServo.write(targetAngle); // 旋转到目标角度
      delay(1200);

      myServo.write(5);           // 统一回到安全位 5 度
      delay(1000);

      myServo.detach();           // 动作结束,切断信号,消除所有噪音
      Serial.println("Action Finished & Detached.");

      // 等待按钮松开
      while (digitalRead(BTN_PIN) == LOW) { delay(10); }
    } else {
      // 未识别到数字时的错误提示
      digitalWrite(BUZ_PIN, HIGH);
      delay(50);
      digitalWrite(BUZ_PIN, LOW);
    }
  }

  // --- 第三部分:屏幕显示刷新 ---
  u8g2.clearBuffer();
  u8g2.drawFrame(0, 0, 128, 64); // 画个外边框
  u8g2.setFont(u8g2_font_6x12_tr);
  u8g2.drawStr(5, 15, "AI Digit Recognizer");

  u8g2.setFont(u8g2_font_helvB24_tr);
  int w = u8g2.getStrWidth(currentDigit.c_str());
  u8g2.drawStr((128 - w) / 2, 52, currentDigit.c_str()); // 居中显示数字

  u8g2.sendBuffer();

  delay(20);
}
python最终源码
import tkinter as tk
from PIL import Image, ImageDraw, ImageOps
import torch
import torch.nn as nn
import torch.nn.functional as F
import torchvision.transforms as transforms
import serial  # 导入串口库
import time

# --- 1. 必须保留和训练时一致的模型类 ---
class UltimateCNN(nn.Module):
    def __init__(self):
        super(UltimateCNN, self).__init__()
        self.conv1 = nn.Conv2d(1, 32, kernel_size=3, padding=1)
        self.bn1 = nn.BatchNorm2d(32)
        self.conv2 = nn.Conv2d(32, 32, kernel_size=3, padding=1)
        self.bn2 = nn.BatchNorm2d(32)
        self.conv3 = nn.Conv2d(32, 64, kernel_size=3, padding=1)
        self.bn3 = nn.BatchNorm2d(64)
        self.pool = nn.MaxPool2d(2, 2)
        self.dropout = nn.Dropout(0.3)
        self.fc1 = nn.Linear(64 * 7 * 7, 256)
        self.fc2 = nn.Linear(256, 10)

    def forward(self, x):
        x = F.relu(self.bn1(self.conv1(x)))
        x = self.pool(F.relu(self.bn2(self.conv2(x))))
        x = self.dropout(x)
        x = self.pool(F.relu(self.bn3(self.conv3(x))))
        x = self.dropout(x)
        x = x.view(-1, 64 * 7 * 7)
        x = F.relu(self.fc1(x))
        x = self.dropout(x)
        x = self.fc2(x)
        return x

# 加载模型
device = torch.device("cuda" if torch.cuda.is_available() else "cpu")
model = UltimateCNN().to(device)
try:
    model.load_state_dict(torch.load("mnist_model.pth", map_location=device))
    model.eval()
except:
    print("错误:未找到模型文件 mnist_model.pth")

class DigitApp:
    def __init__(self, root):
        self.root = root
        self.root.title("AI 手写识别 - ESP32 同步版")

        # --- 【核心修改】初始化串口 ---
        # 请将 'COM3' 改为你设备管理器中看到的端口号
        try:
            self.ser = serial.Serial('COM3', 115200, timeout=1)
            time.sleep(2) # 等待串口稳定
            print("连接 ESP32 成功!")
        except Exception as e:
            self.ser = None
            print(f"串口连接失败: {e}。请检查端口号并在代码中修改。")

        self.canvas = tk.Canvas(root, width=280, height=280, bg="white", cursor="pencil")
        self.canvas.pack(pady=10)

        self.label = tk.Label(root, text="请在白色区域书写", font=("微软雅黑", 16))
        self.label.pack()

        self.image = Image.new("L", (280, 280), 255)
        self.draw = ImageDraw.Draw(self.image)
        self.canvas.bind("<B1-Motion>", self.paint)

        btn_frame = tk.Frame(root)
        btn_frame.pack(pady=10)
        tk.Button(btn_frame, text="重置", command=self.clear, width=10).pack(side=tk.LEFT, padx=5)
        tk.Button(btn_frame, text="AI识别", command=self.predict, width=12, bg="#FF6700", fg="white").pack(side=tk.LEFT, padx=5)

    def paint(self, event):
        r = 10  # 笔触稍微加粗,识别更准
        x1, y1 = (event.x - r), (event.y - r)
        x2, y2 = (event.x + r), (event.y + r)
        self.canvas.create_oval(x1, y1, x2, y2, fill="black", outline="black")
        self.draw.ellipse([x1, y1, x2, y2], fill=0)

    def clear(self):
        self.canvas.delete("all")
        self.image = Image.new("L", (280, 280), 255)
        self.draw = ImageDraw.Draw(self.image)
        self.label.config(text="请在白色区域书写")
        # 清除时给 ESP32 发送一个信号,显示问号或空白
        if self.ser:
            self.ser.write("?\n".encode())

    def predict(self):
        bbox = self.image.getbbox()
        if bbox and (bbox[2] - bbox[0] > 5):
            digit_crop = self.image.crop(bbox)
            w, h = digit_crop.size
            size = max(w, h) + 60
            new_img = Image.new("L", (size, size), 255)
            new_img.paste(digit_crop, ((size - w) // 2, (size - h) // 2))
            img = new_img.resize((28, 28), resample=Image.LANCZOS)
        else:
            img = self.image.resize((28, 28), resample=Image.LANCZOS)

        img = ImageOps.invert(img)
        transform = transforms.Compose([
            transforms.ToTensor(),
            transforms.Normalize((0.1307,), (0.3081,))
        ])
        img_tensor = transform(img).unsqueeze(0).to(device)

        with torch.no_grad():
            output = model(img_tensor)
            prediction = torch.argmax(output, dim=1).item()
            prob = F.softmax(output, dim=1)
            conf = torch.max(prob).item() * 100

        result_text = f"AI识别结果: {prediction} ({conf:.1f}%)"
        self.label.config(text=result_text)

        # --- 【核心修改】将结果通过串口发给 ESP32 ---
        if self.ser:
            # 发送字符串格式,例如 "5\n"
            send_data = f"{prediction}\n"
            self.ser.write(send_data.encode())
            print(f"已传送到屏幕: {prediction}")

if __name__ == "__main__":
    root = tk.Tk()
    app = DigitApp(root)
    # 窗口关闭时关闭串口
    def on_closing():
        if app.ser:
            app.ser.close()
        root.destroy()
    root.protocol("WM_DELETE_WINDOW", on_closing)
    root.mainloop()
搞定了
这个项目完成

智能硬件社区聚焦AI智能硬件技术生态,汇聚嵌入式AI、物联网硬件开发者,打造交流分享平台,同步全国赛事资讯、开展 OPC 核心人才招募,助力技术落地与开发者成长。
更多推荐
 14
14 0
0- 0


 已为社区贡献1条内容

所有评论(0)